Renkforce RF-ET17 Plus Handleiding
Renkforce Document camera RF-ET17 Plus
Bekijk gratis de handleiding van Renkforce RF-ET17 Plus (4 pagina’s), behorend tot de categorie Document camera. Deze gids werd als nuttig beoordeeld door 72 mensen en kreeg gemiddeld 4.8 sterren uit 7 reviews. Heb je een vraag over Renkforce RF-ET17 Plus of wil je andere gebruikers van dit product iets vragen? Stel een vraag
Pagina 1/4
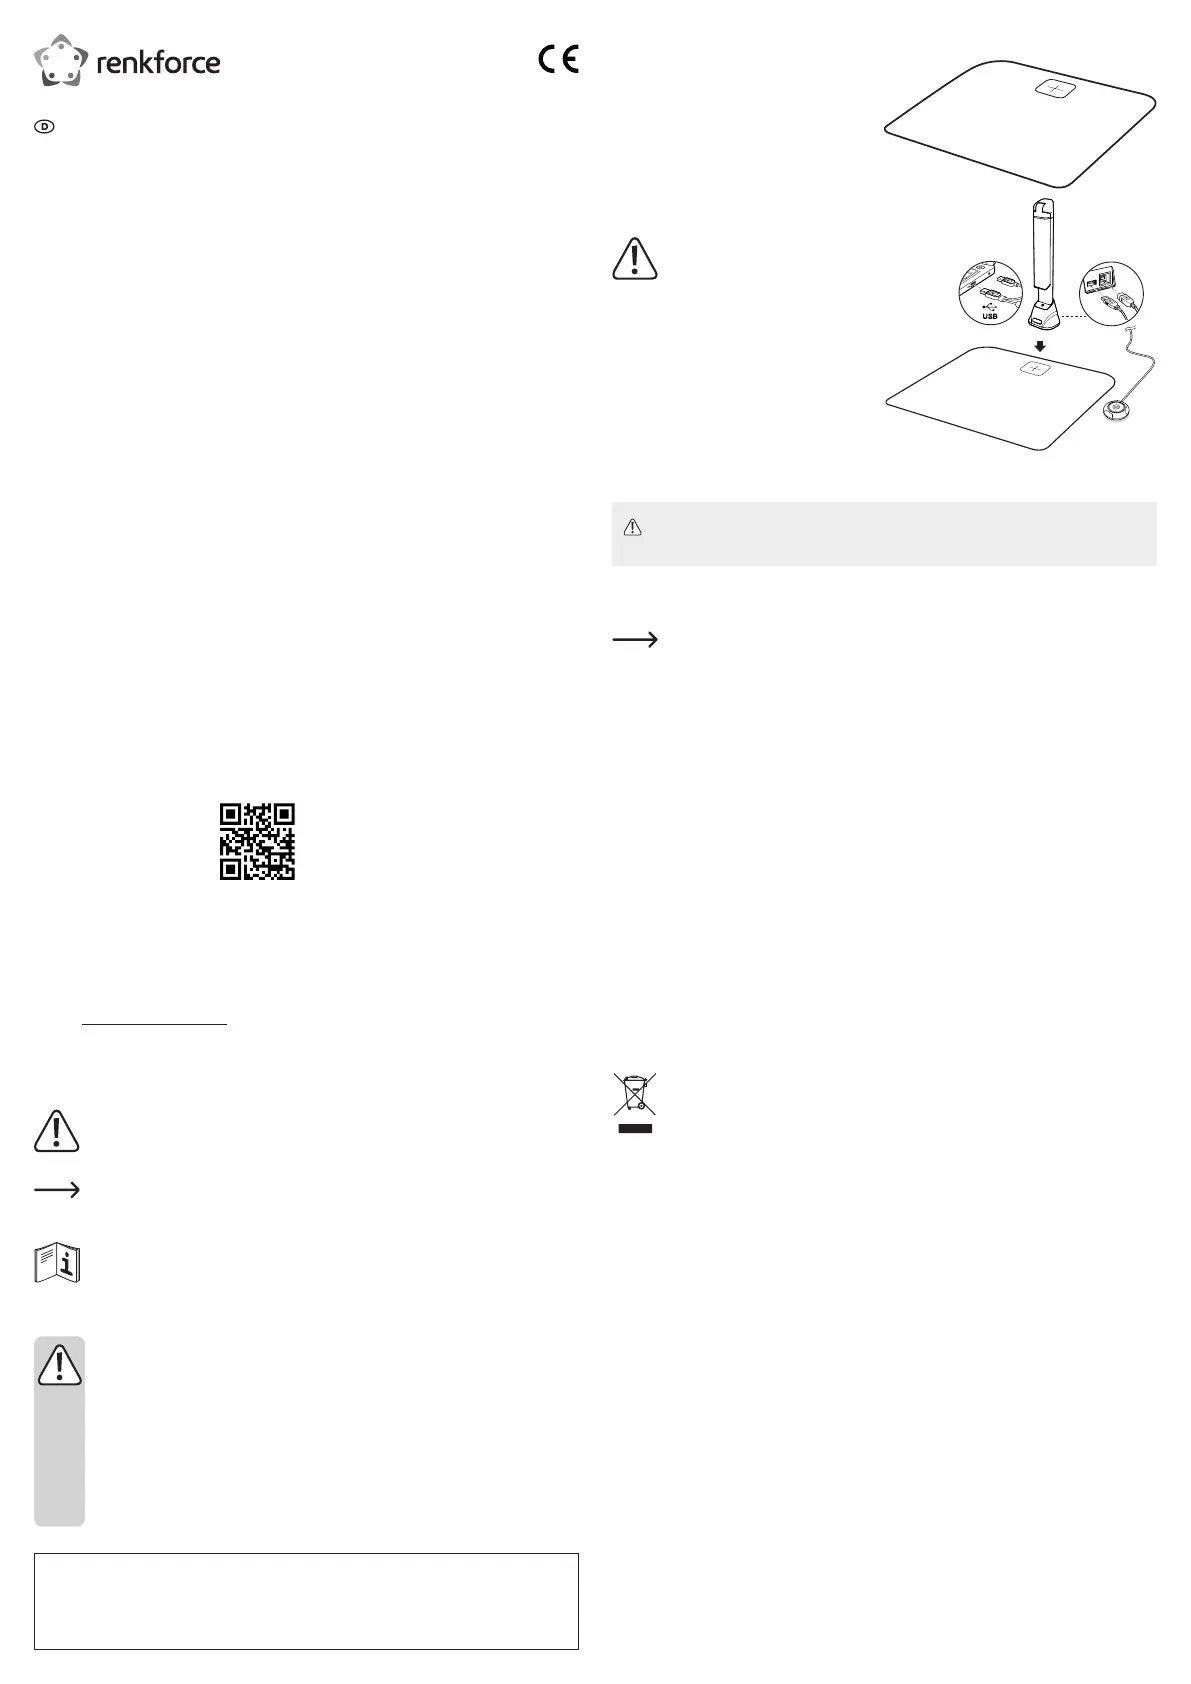
Aufstellen
• Platzieren Sie die Tischmatte auf eine stabile,
ebene, ausreichend große Fläche. Stellen Sie
den Scanner auf den Rand der Matte wie durch
das Kreuz in der Abbildung bestimmt.
• Schützen Sie wertvolle oder kratzempndliche
Möbeloberächen um die Matte herum mit einer
geeigneten Unterlage vor Beschädigungen durch
Kabel oder Stecker.
Anschluss
Stecken Sie den Fernauslöser hinten
am Scanner an. Der Auslöser verfügt
über einen USB-Stecker. Dieser ist
jedoch nicht zum Anschluss an einen
herkömmlichen USB-Port vorgesehen.
Schließen Sie den Auslöser niemals
an einen herkömmlichen USB-Port an,
dabei kann der USB-Port oder das USB-
Gerät beschädigt werden. Schließen
Sie den Auslöser ausschließlich am
Scanner an!
• Schließen Sie die USB-Kabel wie in der Abbildung
dargestellt an.
• Schließen Sie den Scanner über die USB-B-Buchse und das mitgelieferte USB-Kabel mit Y-Anschluss an
zwei USB-Ports Ihres Computers an. Jeder der zwei Ports muss 500 mA Strom liefern können.
Weitere Informationen zu den Scanmöglichkeiten und -vorgängen, entnehmen Sie der
Herstelleranleitung auf der CD.
Inbetriebnahme am PC
• Installieren Sie die mitgelieferte Software am PC.
Warten Sie bis Windows das Gerät erkennt.
• Klappen Sie den Faltarm bis zu Anschlag nach oben in die Horizontale.
• Schalten Sie die Beleuchtung am Scanner ein. Lesen Sie Näheres dazu im Abschnittt „Beleuchtung ein-/
ausschalten“.
• Starten Sie die Scanner-Software am PC.
Software installieren und bedienen
Beachten Sie die beiliegende Herstelleranleitung auf der CD sowie ggf. vorhandene Informationen in der
Software.
Beleuchtung ein-/ausschalten
• Drücken Sie kurz die Taste am Horizontalarm, die mit einem Leuchtensymbol gekennzeichnet ist. Hiermit
kann die LED-Beleuchtung des Scanners eingeschaltet werden. Weiteres Drücken stellt verschiedene
Helligkeitsstufen ein. Beim vierten Drücken wird die Beleuchtung des Scanners wieder ausgeschaltet.
Pege und Reinigung
• Trennen Sie das Produkt vor jeder Reinigung von der Stromversorgung.
• Verwenden Sie auf keinen Fall aggressive Reinigungsmittel, Reinigungsalkohol oder andere chemische
Lösungen, da dadurch das Gehäuse angegriffen oder gar die Funktion beeinträchtigt werden kann.
• Verwenden Sie ein trockenes, faserfreies Tuch zur Reinigung des Produkts.
• Drücken Sie nicht zu fest auf das Display oder die Kameralinse, da es hierbei zu Kratzspuren kommen
kann
Entsorgung
Elektronische Geräte sind Wertstoffe und gehören nicht in den Hausmüll. Entsorgen Sie das
Produkt am Ende seiner Lebensdauer gemäß den geltenden gesetzlichen Bestimmungen.
Sie erfüllen damit die gesetzlichen Verpichtungen und leisten Ihren Beitrag zum Umweltschutz.
Technische Daten
Betriebsspannung/-strom .....................5 V/DC, 1 A
Bildsensor .............................................16 Megapixel, CMOS
Aufnahmebereich .................................max. 420 x 297 mm (A3)
Optische Auösung ...............................4608 x 3456 Pixel
Ausgabeformate ................................... Abbildung: JPG, TIFF, BMP, PNG
Dokument: PDF (Bild), PDF (durchsuchbar), PDF (Text), MSExcel,
MSWord, Text (*.txt)
E-Book: EPUB
Farbe Bit-Tiefe ......................................24 Bit
Integrierte LED .....................................4 Stück (3-stuge Steuerung)
Fokus ....................................................fest eingestellt
Video-Streaming ................................... Standard: 1920 x 1080 bei 30 Bilder/s
Vorschau: 2048 x 1536 bei 15 Bilder/s
Erforderliches Betriebssystem .............. Windows
®
XP (Home, Pro, mit SP1, SP2, SP3,
nur 32 Bit), Vista™ (32/64 Bit), 7 (32/64 Bit),
8 und 8.1 (32/64 Bit), 10 (32/64 Bit),
Betriebsbedingungen ............................ 0 bis +45 °C, 20 - 85 %
relative Feuchtigkeit (nicht kondensierend)
Lagerbedingungen ................................ -20 bis +60 ºC, 65 ± 5 %
relative Feuchtigkeit (nicht kondensierend)
Abmessungen (B x H x T) .................... 93 x 82 x 357 mm (zusammengeklappt)
Gewicht .................................................800 g
Kurzanleitung
16 Megapixel Dokument-
Kamerascanner
Best.-Nr. 2300623
Bestimmungsgemäße Verwendung
Das Produkt kann über seine eingebaute Kamera
Bilder von Dokumenten, Büchern und auch von
Gegenständen machen, die sich auf einem PC
speichern und bearbeiten lassen. Die Auslösung der
Kamera ist über einen Fernauslöser möglich (ist im
Lieferumfang enthalten). Eine auf CD mitgelieferte
Software ermöglicht das Scannen und Bearbeiten
der gescannten Daten, z. B. eine Texterkennung.
Eine Verwendung ist nur in geschlossenen Räumen,
also nicht im Freien erlaubt. Der Kontakt mit
Feuchtigkeit, z.B. im Badezimmer u.ä. ist unbedingt
zu vermeiden.
Aus Sicherheits- und Zulassungsgründen
dürfen Sie das Produkt nicht umbauen und/
oder verändern. Falls Sie das Produkt für andere
Zwecke verwenden, als zuvor beschrieben, kann
das Produkt beschädigt werden. Außerdem kann
eine unsachgemäße Verwendung Gefahren wie
z.B. Kurzschluss, Brand, etc. hervorrufen. Lesen
Sie sich die Bedienungsanleitung genau durch und
bewahren Sie diese auf. Reichen Sie das Produkt
nur zusammen mit der Bedienungsanleitung an dritte
Personen weiter.
Das Produkt entspricht den gesetzlichen, nationalen
und europäischen Anforderungen. Alle enthaltenen
Firmennamen und Produktbezeichnungen sind
Warenzeichen der jeweiligen Inhaber. Alle Rechte
vorbehalten.
Lieferumfang
• Scanner
• Fernauslöser
(mit 0,9 m USB-Kabel)
• USB-Kabel (200 cm)
• Software-CD (12 cm)
• Tischmatte
• Kurzanleitung
• Bedienungsanleitung des Herstellers auf CD
Aktuelle Bedienungsanleitungen
Laden Sie aktuelle Bedienungsanleitungen über
den Link www.conrad.com/downloads herunter oder
scannen Sie den abgebildeten QR-Code. Befolgen
Sie die Anweisungen auf der Webseite.
Symbol-Erklärung
Das Symbol mit dem Ausrufezeichen
im Dreieck weist auf wichtige Hinweise
in dieser Bedienungsanleitung hin, die
unbedingt zu beachten sind.
Das Pfeil-Symbol ist zu nden, wenn
Ihnen besondere Tipps und Hinweise
zur Bedienung gegeben werden sollen.
Dieses Symbol erinnert Sie daran,
die zum Produkt gehörende
Bedienungsanleitung zu lesen.
Sicherheitshinweise
Lesen Sie sich die
Bedienungsanleitung aufmerksam
durch und beachten Sie insbesondere
die Sicherheitshinweise. Falls Sie die
Sicherheitshinweise und die Angaben
zur sachgemäßen Handhabung in
dieser Bedienungsanleitung nicht
befolgen, übernehmen wir für
dadurch resultierende Personen-/
Sachschäden keine Haftung.
Außerdem erlischt in solchen Fällen
die Gewährleistung/Garantie.
a) Allgemein
• Das Produkt ist kein Spielzeug. Halten Sie es von
Kindern und Haustieren fern.
• Lassen Sie das Verpackungsmaterial nicht
achtlos liegen. Dieses könnte für Kinder zu einem
gefährlichen Spielzeug werden.
• Schützen Sie das Produkt vor extremen
Temperaturen, direktem Sonnenlicht, starken
Erschütterungen, hoher Feuchtigkeit, Nässe,
brennbaren Gasen, Dämpfen und Lösungsmitteln.
• Setzen Sie das Produkt keiner mechanischen
Beanspruchung aus.
• Wenn kein sicherer Betrieb mehr möglich ist,
nehmen Sie das Produkt außer Betrieb und
schützen Sie es vor unbeabsichtigter Verwendung.
Der sichere Betrieb ist nicht mehr gewährleistet,
wenn das Produkt:
-sichtbare Schäden aufweist,
-nicht mehr ordnungsgemäß funktioniert,
-über einen längeren Zeitraum unter ungünstigen
Umgebungsbedingungen gelagert wurde oder
-erheblichen Transportbelastungen ausgesetzt
wurde.
• Gehen Sie vorsichtig mit dem Produkt um. Durch
Stöße, Schläge oder dem Fall aus bereits geringer
Höhe wird es beschädigt.
• Beachten Sie auch die Sicherheitshinweise und
Bedienungsanleitungen der übrigen Geräte, an
die das Produkt angeschlossen wird.
• In gewerblichen Einrichtungen sind die
Unfallverhütungsvorschriften des Verbandes
der gewerblichen Berufsgenossenschaft für
elektrische Anlagen und Betriebsmittel zu
beachten.
• In Schulen, Ausbildungseinrichtungen, Hobby-
und Selbsthilfewerkstätten ist das Betreiben des
Produkts durch geschultes Personal verantwortlich
zu überwachen.
• Wenden Sie sich an eine Fachkraft, wenn Sie
Zweifel über die Arbeitsweise, die Sicherheit oder
den Anschluss des Produkts haben.
• Lassen Sie Wartungs-, Anpassungs- und
Reparaturarbeiten ausschließlich von einem
Fachmann bzw. einer Fachwerkstatt durchführen.
• Sollten Sie noch Fragen haben, die in dieser
Bedienungsanleitung nicht beantwortet werden,
wenden Sie sich an unseren technischen
Kundendienst oder an andere Fachleute.
• Achtung, LED-Licht:
-Nicht in den LED-Lichtstrahl blicken!
-Nicht direkt oder mit optischen Instrumenten
betrachten!
b) Personen und Produkt
• Gießen Sie nie Flüssigkeiten über elektrische
Geräte aus und stellen Sie keine mit Flüssigkeit
gefüllten Gegenstände neben das Gerät. Sollte
dennoch Flüssigkeit oder ein Gegenstand ins
Geräteinnere gelangt sein, ziehen Sie das
zugehörige USB-Kabel. Das Produkt darf danach
nicht mehr betrieben werden, bringen Sie es in
eine Fachwerkstatt.
• Verwenden Sie das Produkt niemals gleich dann,
wenn es von einem kalten in einen warmen
Raum gebracht wird. Das dabei entstehende
Kondenswasser kann unter Umständen das
Produkt zerstören. Lassen Sie das Produkt
zuerst auf Zimmertemperatur kommen, bevor es
angeschlossen und verwendet wird. Dies kann
u.U. mehrere Stunden dauern.
c) Scanner
• Stellen Sie den Scanner nur auf eine stabile, ebene,
ausreichend große Fläche. Schützen Sie wertvolle
oder kratzempndliche Möbeloberächen mit einer
geeigneten Unterlage vor Beschädigungen.
• Verlegen Sie alle Verbindungskabel so, dass
niemand darüber stolpern kann. Treten Sie nicht
auf die Kabel.
Dies ist eine Publikation der Conrad Electronic SE, Klaus-Conrad-Str. 1, D-92240 Hirschau (www.conrad.com).
Alle Rechte einschließlich Übersetzung vorbehalten. Reproduktionen jeder Art, z. B. Fotokopie, Mikroverlmung, oder
die Erfassung in elektronischen Datenverarbeitungsanlagen, bedürfen der schriftlichen Genehmigung des Herausgebers.
Nachdruck, auch auszugsweise, verboten. Die Publikation entspricht dem technischen Stand bei Drucklegung.
Copyright 2021 by Conrad Electronic SE. *2300623_v2_0221_02_dh_qg_de
Product specificaties
| Merk: | Renkforce |
| Categorie: | Document camera |
| Model: | RF-ET17 Plus |
Heb je hulp nodig?
Als je hulp nodig hebt met Renkforce RF-ET17 Plus stel dan hieronder een vraag en andere gebruikers zullen je antwoorden
Handleiding Document camera Renkforce

30 Augustus 2023
Handleiding Document camera
Nieuwste handleidingen voor Document camera
27 December 2025
4 Juli 2025
19 Maart 2025
2 December 2024
19 November 2024
19 November 2024
19 November 2024
17 November 2024
31 Juli 2024
31 Juli 2024