QFX RETRO-100 Handleiding
Bekijk gratis de handleiding van QFX RETRO-100 (2 pagina’s), behorend tot de categorie Radio. Deze gids werd als nuttig beoordeeld door 53 mensen en kreeg gemiddeld 4.6 sterren uit 9 reviews. Heb je een vraag over QFX RETRO-100 of wil je andere gebruikers van dit product iets vragen? Stel een vraag
Pagina 1/2
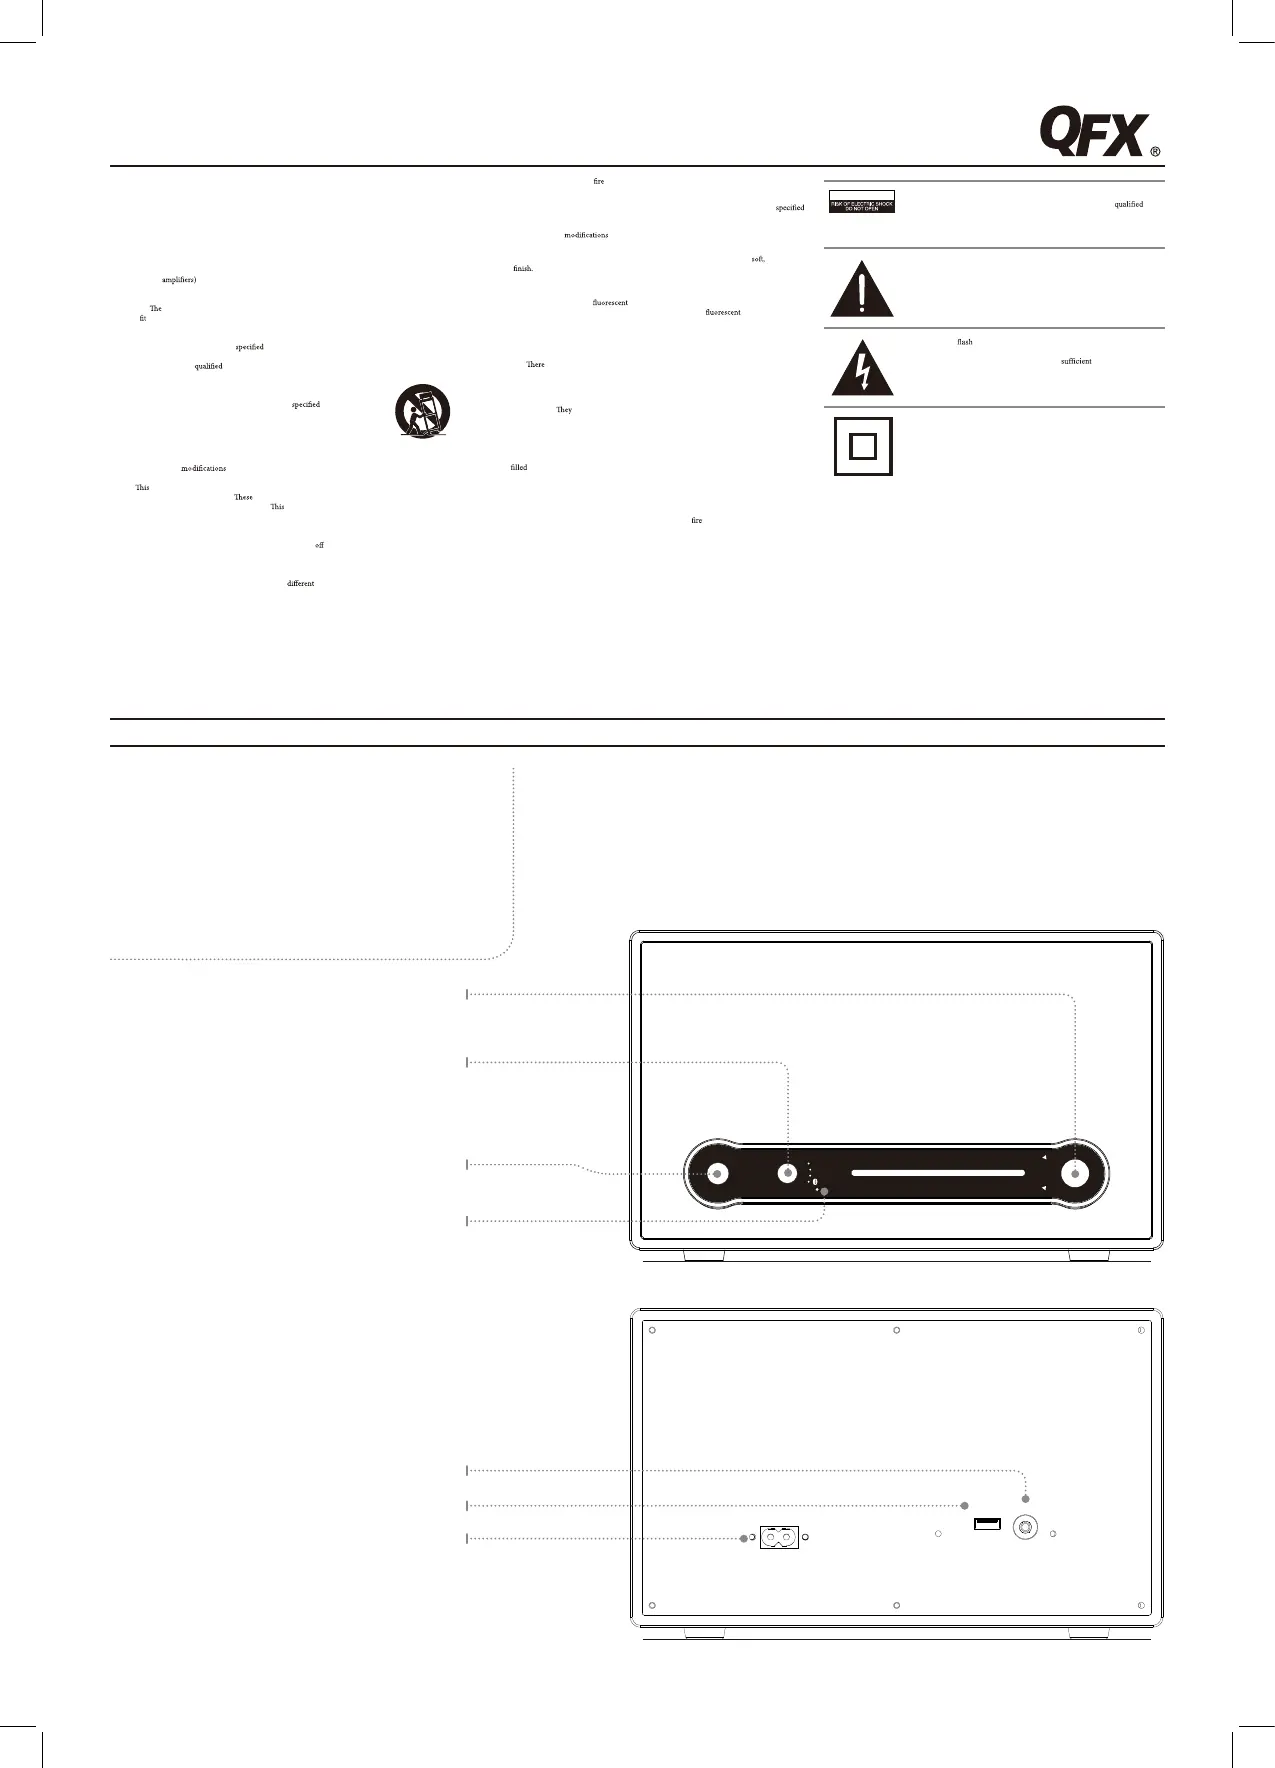
Source/Pair
Adjust the switch to one of
the sources to turn the unit
on. In Bluetooth mode,
press to begin pairing.
USB CHARGERLINE IN
AC IN~
SOURCE/PAIR
OFF
FM
AM
/LINE IN
M
I
N
V
O
L
U
M
E
M
A
X
T
U
N
I
N
G
FM 88 91 94 98 102 106 108 MHz
AM 530 700 900 1100 1300 1500 1700
KHz
• Battery shall not be exposed to excessive heat such as sunshine,orthelike.
• Keep new and used batteries away from children. If the battery compartment does not closesecurely,
stopusingtheproductandkeepitawayfromchildren.
• If you think batteries might have been swallowed or placed inside any partofthebody,seek
immediatemedicalattention.
• Do not mix old andnewbatteries.
• Completely replace all old batteries withnewones.
• Do not mix alkaline, standard (carbon-zinc), or rechargeable (ni-cad, ni-mh,etc)batteries.
• Batteries should be recycled or disposed of as per state andlocalguidelines.
FEATURES AND CONTROLS
Bluetooth Wooden Retro Radio
User’s Guide for Model No. RETRO-100
Important Safety Instructions
• Read these Instructions.
• Keep these Instructions.
• Heed all Warnings.
• Follow all instructions.
• Do not use this apparatusnearwater.
• Clean only with a dry cloth.
• Do not block any ventilationopenings.Installinaccordancewiththemanufacturer’sinstructions.
• Do not install near any heatsourcessuchasradiators,heatregisters,stoves, or otherapparatus
(including
that produce heat.
• Do not defeat the safety purposeofthepolarizedorgrounding-typeplug.Apolarizedplughastwo
bladeswithonewiderthantheother.Agroundingtypeplughastwobladesandathirdgrounding
prong.
wide blade or the third prongare provided foryoursafety.Whentheprovidedplugdoes
not
into your outlet,consultanelectricianforreplacementoftheobsoleteoutlet.
• Protect the power cordfrombeingwalkedonorpinchedparticularlyatplugs,convenience
receptacles,andthepointwheretheyexitfromtheapparatus.
• Only use attachments/accessories
by the manufacturer.
• Unplugthisapparatusduringlightningstormsorwhenunusedforlongperiodsoftime.
• Refer all servicing to
service personnel. Servicing is required when the apparatushasbeen
damagedinanyway,suchaspower-supplycordor plug is damaged, liquidhasbeenspilledorobjects
havefallenintotheapparatus,theapparatushasbeenexposedtorainormoisture,
doesnotoperatenormally,orhasbeendropped.
• Useonlywithacart,stand,tripod,bracket,ortable
by the manufacturer,
orsoldwiththeapparatus.Whenacartisused,usecautionwhenmovingthecart/
apparatuscombinationto avoid injuryfromtip-over.
FCC Warnings
Warning:Changesor tothisunitnotexpresslyapprovedbythepartyresponsiblefor
compliancecouldvoidtheuser’sauthoritytooperatetheequipment.
NOTE:
equipment has been tested and found to comply with the limits for a ClassBdigitaldevice,
pursuanttoPart15oftheFCCRules.
limits are designed to provide reasonableprotectionagainst
harmfulinterferenceinaresidentialinstallation.
equipment generates, uses, andcanradiateradio
frequencyenergyand,ifnotinstalledandusedinaccordancewiththeinstructions,maycauseharmful
interferencetoradiocommunications.However,thereisnoguaranteethatinterferencewillnotoccur
inaparticularinstallation.Ifthisequipmentdoescauseharmfulinterferencetoradioortelevision
reception,whichcanbedeterminedbyturningtheequipmen
t
and on, the user isencouragedtotry
tocorrecttheinterferencebyoneormoreofthefollowingmeasures:
• Reorient or relocatethereceivingantenna.
• Increase the separation between the equipmentandreceiver.
• Connect the equipment intoanoutletonacircuit
from that to which the receiveris
connected.
• Consult the dealer or an experienced radio/TV technician for help.
Additional Warnings and Precautions
• CAUTION:TOPREVENTELECTRICSHOCK,MATCHWIDEBLADEOFPLUGTOWIDE
SLOT,FULLYINSERT.
• WARNING:Toreducetheriskof orelectricshock,donotexposethisapparatustorain,
moisture,dripping,orsplashing.
• CAUTION: Use of controls or adjustments or performance of procedures other thanthose
mayresultinhazardousradiationexposure.
• WARNING:Changes or
to this unit not expresslyapprovedbythepartyresponsible
forcompliancecouldvoidtheuser’sauthoritytooperatetheequipment.
• WARNING:Do not place this unit directly ontofurnituresurfaceswithanytypeof
porous,or
sensitive
As with any rubber compoundmadewithoils,thefeetcouldcausemarksorstaining
wherethefeetreside.Werecommendusingaprotectivebarriersuchasaclothorapieceofglass
betweentheunitandthesurfacetoreducetheriskofdamageand/orstaining.
• WARNING:Useofthisunitnear
lighting may cause interferenceregardinguseofthe
remote.Iftheunitisdisplayingerraticbehaviormoveawayfromany
lighting,asitmay
bethecause.
• CAUTION: Dangerofexplosionifbatteryisincorrectlyreplaced.Replaceonlywiththesameor
equivalenttype.
• WARNING:
is a danger of explosion if youattempttochargestandardAlkalinebatteriesinthe
unit.OnlyuserechargeableNiMHbatteries.
• WARNING:Lithiumbatteries,likeallrechargeablebatteries,arerecyclableandshouldberecycled
ordisposedofinnormalhouseholdwaste.Contact your local government fordisposalorrecycling
practicesinyourarea.
should never be incinerated since they might explode.
• WARNING:Shockhazard-DoNotOpen.
• Caution and marking information is located at the rear or bottom of the apparatus.
• Objects
with liquids, such as vases, shall not be placed on the apparatus.
• Mains plug is used as disconnect device and it should remain readily operableduringintended
use.Inordertodisconnecttheapparatusfromthemainscompletely,themainsplugshouldbe
disconnectedformthemainssocketoutletcompletely.
WARNING:Toreducetheriskofelectricshock,donotremovecover
(orback).Nouser-serviceablepartsinside.Referservicingto
servicepersonnel.
CAUTION
Theexclamationpointwithinanequilateraltriangleisintendedtoalertthe
usertothepresenceofimportantoperatingandmaintenance(servicing)
instructionsintheliteratureaccompanyingtheappliance.
Thissymbolindicatesthatthisproductincorporatesdoubleinsulation
betweenhazardousmainsvoltageanduseraccessibleparts.
Thelightning witharrowheadsymbol,withinanequilateraltriangle,is
intendedtoalerttheusertothepresenceofuninsulated“dangerousvoltage”
withintheproduct’senclosurethatmaybeof
magnitudeto
constituteariskofelectricshocktopersons.
FEATURES
• 3.5mm audio input
• Analog volume control
• USB port for mobile phone charging
• LED pairing indicator
• Built-in AM/FM wire antenna
• Bluetooth Wireless range: 33 feet
• AC power input: requires an AC power cable (included)
Tuning
Turn to adjust the AM or
FM radio station.
Volume
Turn to adjust the volume.
3.5mm Audio Line Input
USB Charging Port
AC Power Input
Pairing Indicator
RETRO-100 111/19/2014 11:35:44 AM
Product specificaties
| Merk: | QFX |
| Categorie: | Radio |
| Model: | RETRO-100 |
| Kleur van het product: | Grijs |
| Ingebouwd display: | Nee |
| Gewicht: | 2046 g |
| Breedte: | - mm |
| Diepte: | - mm |
| Hoogte: | - mm |
| Stroombron: | AC, USB |
| LED-indicatoren: | Ja |
| Bluetooth: | Ja |
| Type aansluitplug: | 3,5 mm |
| Meegeleverde kabels: | AC |
| Afmetingen verpakking (BxDxH): | 304.8 x 185.4 x 177.8 mm |
| Aantal USB 2.0-poorten: | 1 |
| Ingebouwde luidsprekers: | Ja |
| Gemiddeld vermogen: | - W |
| Volumeregeling: | Draaiknop |
| Hoofdtelefoonuitgangen: | 1 |
| Soort tuner: | Analoog |
| Ingangsspanning: | 120 V |
| MP3 afspelen: | Nee |
| Ondersteunde frequentiebanden: | AM, FM |
| Radio: | Persoonlijk |
| Apple docking-compatibiliteit: | Niet ondersteund |
Heb je hulp nodig?
Als je hulp nodig hebt met QFX RETRO-100 stel dan hieronder een vraag en andere gebruikers zullen je antwoorden
Handleiding Radio QFX

3 Juni 2025
27 April 2025
27 April 2025
25 Februari 2024
Handleiding Radio
Nieuwste handleidingen voor Radio
22 Juli 2026
13 Juli 2026
12 Juli 2026
10 Juli 2026
9 Juli 2026
9 Juli 2026
8 Juli 2026
2 Juli 2026
1 Juli 2026
30 Juni 2026