Pioneer PN43-R851-26U Handleiding
Bekijk gratis de handleiding van Pioneer PN43-R851-26U (2 pagina’s), behorend tot de categorie Televisie. Deze gids werd als nuttig beoordeeld door 10 mensen en kreeg gemiddeld 4.4 sterren uit 4 reviews. Heb je een vraag over Pioneer PN43-R851-26U of wil je andere gebruikers van dit product iets vragen? Stel een vraag
Pagina 1/2
QUICK SETUP GUIDE
43"/55"/65" 4K LED Pioneer Roku TV
PN43-R851-26U / PN43-R851-26C
PN55-R851-26U / PN55-R851-26C
PN65-R851-26U
INCLUDED ACCESSORIES
WHAT YOU NEED (not included)
• Phillips screwdriver
• Computer, tablet, or smart phone (to connect with a Roku
account)
• Roku account and Internet connection (for streaming)
*Subscription or other payment may be required to access certain content.
IMPORTANT: Roku never charges for activation. A Roku account and internet
connection are required for activation. A paid subscription or other payments may
be required for some streaming app content. App availability subject to change
and varies by country.
FIND YOUR USER GUIDE ONLINE!
Go to http://www.usca.pioneer-tv.com and search for
PN43-R851-26U / PN43-R851-26C / PN55-R851-26U /
PN55-R851-26C / PN65-R851-26U.
For Roku OS features, the manual can be found at
go.roku.com/tvmanual
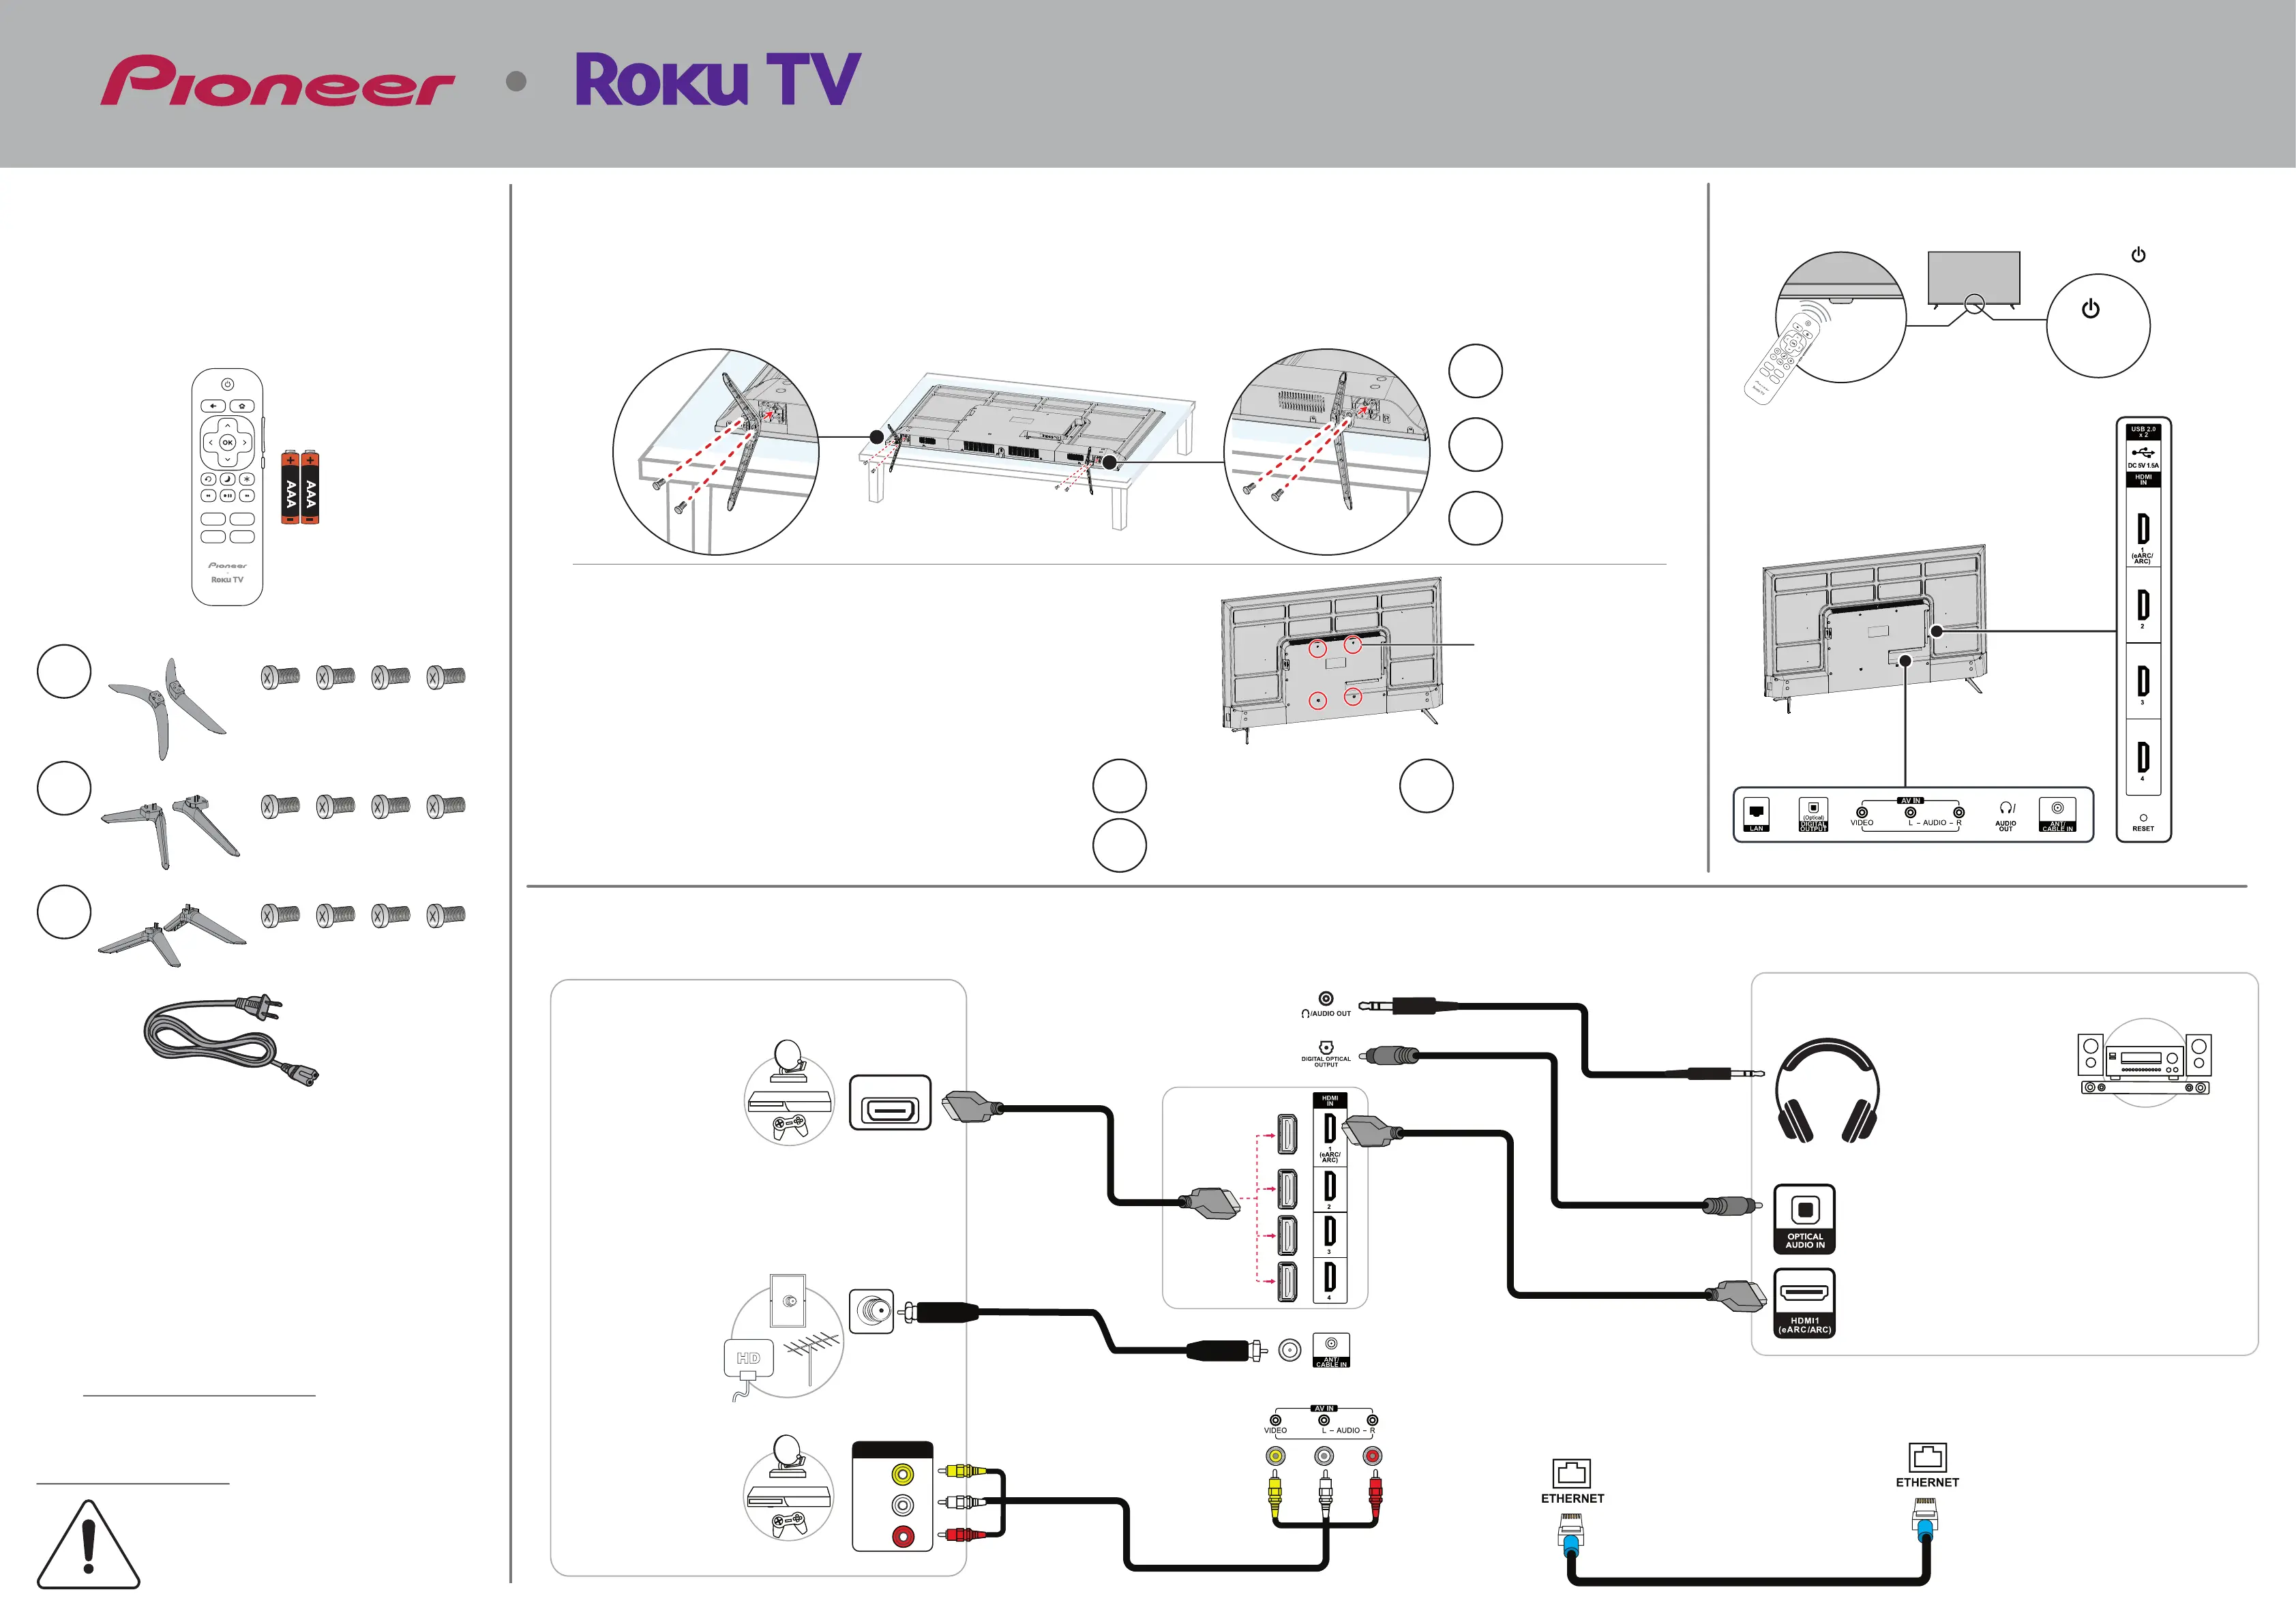
START HERE
How do I attach the stands to my TV? (not for wall mounting)
Carefully place your TV face-down on a cushioned, clean surface. Use a Phillips screwdriver
to secure each TV stand to the bottom of your TV with two of the provided screws.
USING THE STANDS
1
Back
FEATURES
Front
Note: Images do not necessarily represent the exact design of your television.
2
MAKING CONNECTIONS
How do I watch TV (cable, satellite, or antenna) or connect a device such as a DVD or Blu-ray disc player or game console? How do I connect to the internet?
For best audio clarity use HDMI 1
(eARC/ARC) for audio output.
Surround sound signal from the
TV/source can be compressed
when using non-HDMI
connections.
Note: If you need to change the
digital audio format, go to Home,
select Settings, and then select
Audio. Next, select Audio Output,
then select Digital Audio Format,
and change the setting to PCM or
your preferred audio format.
ANT/CABLE IN
(GOOD)
Note: Connect an HD
antenna or clear cable
(via a wall jack).
AV (GOOD)
USING DIGITAL AUDIO
SOUNDBAR
AUDIO OPTIONS
USING HEADPHONES
AUDIO/VIDEOOUT
VIDEO
L
R
*
HDMI options
HDMI OUT
VIDEO OPTIONS
HDMI (BEST)
Note: You can use HDMI to
connect to other HDMI
devices. To use eARC/ARC
functionality the connected
device must also have HDMI
eARC/ARC.
Both devices need to be
plugged into eARC/ARC HDMI
ports.
ETHERNET (optional)
Note: You can use a wired Ethernet connection to
access the internet instead of a Wi-Fi connection.
Plug an Ethernet cable into the ETHERNET jack
on your TV and your Ethernet connection.
WALL MOUNTING
Before you mount your TV, make sure that:
• You remove the stands if you have already installed them.
• The wall-mount bracket supports the weight of your TV.
See the instructions that came with your wall mount for
more information about how to correctly mount your TV.
WARNING: Your TV has four VESA mounting holes on the
back. You must secure a wall-mount bracket to all four
holes. If you do not use all four holes, your TV may fall and
cause property damage or personal injury.
Note: Wall-mount screws are not included.
Before using your new TV, read these
instructions to prevent any damage.
Do not plug your power cord in until all
other devices have been connected.
Bottom
Power
indicator/
Remote
control
sensor
/ INPUT button
Press to turn on
your TV. When
your TV is on,
press to cycle
through the
power and input
selections.
Remote and two AAA batteries
/
INPUT
ST4 screws
(18 mm length) (4 pcs.)
Power cord
55" TV shown
ST4 screws
(18 mm length) (4 pcs.)
M4 screws
(18 mm length) (4 pcs.)
M4 screws
(25 mm length) (4 pcs.)
55"
43"
65"
M4 screws
(18 mm length) (4 pcs.)
M4 screws
(25 mm length) (4 pcs.)
55"
43"
65"
VESA
mounting
holes
55" TV shown
55"
43"65"
VESA Mounting Pattern
200 × 300 mm
Screws: Type M6,
10 mm (4 pcs) length depending
on the wall mount
VESA Mounting Pattern
300 × 300 mm
Screws: Type M6,
20 mm (4 pcs) length depending
on the wall mount
55" TV shown
Product specificaties
| Merk: | Pioneer |
| Categorie: | Televisie |
| Model: | PN43-R851-26U |
Heb je hulp nodig?
Als je hulp nodig hebt met Pioneer PN43-R851-26U stel dan hieronder een vraag en andere gebruikers zullen je antwoorden
Handleiding Televisie Pioneer

6 Maart 2026
5 Maart 2026
28 November 2025
29 September 2025
3 November 2024
1 November 2024
1 November 2024
1 November 2024
1 November 2024
1 November 2024
Handleiding Televisie
Nieuwste handleidingen voor Televisie
27 Mei 2026
26 Mei 2026
26 Mei 2026
26 Mei 2026
26 Mei 2026
25 Mei 2026
23 Mei 2026
22 Mei 2026
22 Mei 2026
20 Mei 2026