Pioneer DVR-117D Handleiding
Pioneer
Niet gecategoriseerd
DVR-117D
Bekijk gratis de handleiding van Pioneer DVR-117D (2 pagina’s), behorend tot de categorie Niet gecategoriseerd. Deze gids werd als nuttig beoordeeld door 61 mensen en kreeg gemiddeld 4.8 sterren uit 31 reviews. Heb je een vraag over Pioneer DVR-117D of wil je andere gebruikers van dit product iets vragen? Stel een vraag
Pagina 1/2

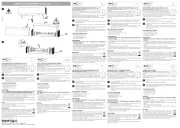
Step 1 – Prepare the Computer
1) Turn OFF the computer and disconnect the power cord.
2) Remove the bezel and the open drive bay cover from the computer’s front panel.
Note: Your computer may be a tower
model as shown on the left or a
desktop model as shown below. This
drive works in either PC model style.
Step 2 – Prepare the Drive
3) Attach slide rails to the drive if required for your drive model.
Slide rails are sold separately through computer retailers.
4) Position the drive close to the open computer bay.
Horizontal Installation Vertical Installation
Step 3 – Connect the Cables
5) Connect the power cable from the computer to the drive.
Pay close attention to the polarity of the cable.
6) Connect the IDE cable to the drive.
C onfirm that Pin 1 on the drive corresponds to Pin 1 on the cable.
7) Connect the drive’s audio output to the sound card if one is present.

Step 4 – Finish the Installation
8) Place the mounting screws in the appropriate holes and tighten by hand.
When mounting screws are loose, vibrations from the spinning disc may cause a ripping sound.
9) Replace the bezel and power ON the computer.
Setting the Jumper For Use in a Master/Slave PC
If you have a Master/Slave type of computer, you probably have two IDE channels, Primary and Secondary. The hard
drive is using the Primary IDE channel and any drives are using the Secondary channel. Install this drive as the Master
device on the Secondary channel and any other devices as Slaves to this new drive. Follow the directions below to
change your older drives or other equipment on the Secondary channel to a Slave device.
1) Disconnect the following drive cables in the order listed below.
Power cable
IDE cable
Audio cable
2) Remove the drive from the drive bay.
3) Use your fingers or a tool to move the jumper to the new setting.
4) Return the drive to the drive bay.
5) Reconnect the cables in the reverse order, Audio, IDE then Power.
Jumper: (jumpered = ON; no jumper = OFF)
Set the jumper to select the drive type for your computer.
Pin Name Function
1 MA on Drive set to Master mode
2 SL on Drive set to Slave mode
3 CS on Drive set to Cable Select mode
4 Reserved
5 Reserved
Master Slave Cable Select
Setting the Jumper For Use in a Cable-Select PC
Some computers support a data exchange method called Cable Select. If your PC uses Cable Select then all devices
need to be set to Cable Select as well. Also, the IDE cable must be designed for Cable Select communication.
Simply position the jumper for Cable Select and install the drive according to the instructions beginning on the opposite
side of this paper. No other changes are required when using Cable Select computers.
Do Not jumper the drive to Cable Select unless your PC uses this method.
Product specificaties
| Merk: | Pioneer |
| Categorie: | Niet gecategoriseerd |
| Model: | DVR-117D |
Heb je hulp nodig?
Als je hulp nodig hebt met Pioneer DVR-117D stel dan hieronder een vraag en andere gebruikers zullen je antwoorden
Handleiding Niet gecategoriseerd Pioneer

2 Juni 2025
28 Januari 2025
28 Januari 2025
4 Januari 2025

4 Januari 2025

4 Januari 2025

4 Januari 2025

31 December 2025

31 December 2025

31 December 2025
Handleiding Niet gecategoriseerd
- Cleanmaxx
- Airman
- Koma Elektronik
- Oster
- Skan Holz
- LAS
- Sideclick
- Mesko
- Peterson
- Nibe
- Nextbase
- Shelly
- Tovsto
- GW Instek
- Klark Teknik
Nieuwste handleidingen voor Niet gecategoriseerd
31 Juli 2025
31 Juli 2025
31 Juli 2025

31 Juli 2025
31 Juli 2025
31 Juli 2025

31 Juli 2025

31 Juli 2025
31 Juli 2025

31 Juli 2025