Pioneer CA-HM-TOY.013 Handleiding
Pioneer
Niet gecategoriseerd
CA-HM-TOY.013
Bekijk gratis de handleiding van Pioneer CA-HM-TOY.013 (5 pagina’s), behorend tot de categorie Niet gecategoriseerd. Deze gids werd als nuttig beoordeeld door 9 mensen en kreeg gemiddeld 4.5 sterren uit 5 reviews. Heb je een vraag over Pioneer CA-HM-TOY.013 of wil je andere gebruikers van dit product iets vragen? Stel een vraag
Pagina 1/5

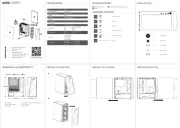
KIT FEATURES
• ISO DIN radio provision
• ISO DDIN radio provision †
• Pioneer modular DDIN radio
provision †
• Painted high gloss black to
match the factory finish
KIT COMPONENTS
• A) ISO DIN radio trim panel • B) ISO DDIN radio trim panel • C) Trim panel housing • D) Trim panel housing clip brackets • E) Radio brackets
• F) Pioneer adapter brackets • G) Panel clips (qty. 2) • H) Phillips screws (qty. 8)
A B C D E F
G
Toyota Corolla 2020-Up, Corolla Hatchback 2019-Up
H
CA-HM-TOY.013
Installation manual
1

|
2
1. Unclip and remove the radio trim panel.
(Figure A)
2. Unclip, unplug, and remove the climate
control panel. (Figure B)
3. Unclip, unplug, and remove the center
a/c vent and hazard switch assembly.
(Figure C)
(Figure B)
(Figure D)
(Figure A) (Figure C)
DASH DISASSEMBLY
4. Remove (4) 10mm screws securing the
bottom of the radio. Two screws will be
clearly visible, but two will be hidden,
facing upward. Unclip and slide the radio
out, then unplug and remove. (Figure D)
Continue to Kit Assembly

3
5. ISO DIN radio trim panel Attach the to
the , then secure trim panel housing
using (4) Phillips screws provided
(Figure C)
6. trim panel housing clip Secure the
brackets to the trim panel/housing
assembly using (4) Phillips screws
provided. (Figure D)
7. Attach (2) provided onto the panel clips
trim panel/housing assembly.
8. Clip the trim panel/housing assembly to
the dash.
9. Reassemble the dash in reverse
order of disassembly to complete the
installation.
KIT ASSEMBLY
(Figure B)
(Figure C)
(Figure D)
(Figure A)
then secure using the factory screws.
Slide the radio assembly into the dash,
4.
complete
antenna connector in the dash and
Locate the factory wiring harness and
3.
(Figures A,B)
radio and the screw slots to be used.
Note the location of the bracket on the
using screws supplied with the radio.
Secure the
radio brackets
to the radio
2.
ring from the aftermarket radio.
Remove the metal DIN sleeve and trim
1.
ISO DIN radio provision
Product specificaties
| Merk: | Pioneer |
| Categorie: | Niet gecategoriseerd |
| Model: | CA-HM-TOY.013 |
Heb je hulp nodig?
Als je hulp nodig hebt met Pioneer CA-HM-TOY.013 stel dan hieronder een vraag en andere gebruikers zullen je antwoorden
Handleiding Niet gecategoriseerd Pioneer

2 Juni 2025
28 Januari 2025
28 Januari 2025
4 Januari 2025

4 Januari 2025
4 Januari 2025
4 Januari 2025

31 December 2025

31 December 2025

31 December 2025
Handleiding Niet gecategoriseerd
- Eden
- Polarlite
- Omron
- Twisted Electrons
- Life On Products
- DV Mark
- Minolta
- Moleskine
- Croozer
- Tech 21
- Bowers And Wilkins
- BioChef
- CommScope
- Learning Resources
- Varaluz
Nieuwste handleidingen voor Niet gecategoriseerd
5 Augustus 2025

5 Augustus 2025
5 Augustus 2025
5 Augustus 2025

5 Augustus 2025
5 Augustus 2025
5 Augustus 2025

5 Augustus 2025

5 Augustus 2025