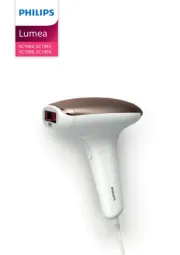
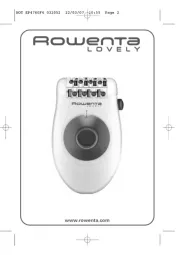
Philips Satinelle Advanced BRE612 Handleiding
Bekijk gratis de handleiding van Philips Satinelle Advanced BRE612 (11 pagina’s), behorend tot de categorie Epilator. Deze gids werd als nuttig beoordeeld door 84 mensen en kreeg gemiddeld 4.5 sterren uit 42.5 reviews. Heb je een vraag over Philips Satinelle Advanced BRE612 of wil je andere gebruikers van dit product iets vragen? Stel een vraag
Pagina 1/11

In US only manufactured for: Philips Personal Health
A division of Philips North America LLC
P.O. Box 10313, Stamford, CT 06904
In Canada only manufactured for:Philips Electronics Ltd.
281 Hillmount Road, Markham, ON L6C 2S3
This symbol on the product’s nameplate means it
is listed by Underwriters’ Laboratories, Inc.
Ce symbole apparaissant sur la plaque nominale
du produit signifie qu’il est enregistré par
Underwriter’s Laboratories, Inc.
Este símbolo en la placa de características del
producto significa que está registrado por
Underwriters Laboratories, Inc.
PHILIPS and Philips shield are registered trademarks of
Koninklijke Philips N.V. ©2017 Philips North America LLC. All rights
reserved.
PHILIPS et le blason Philips sont des marques déposées de
Koninklijke Philips N.V. ©2017 Philips North America LLC. Tout
droits réservés.
PHILIPS y Philips Shield son marcas registradas de Koninklijke
Philips N.V. ©2017 Philips North America LLC. Todos los derechos
reservados. .
©2018
4222.003.0229.3 (11/29/2018)
BC
BRE612
2
3
4
5
6
12
7
8
9
10
11
12
13
14
15
16
17
18
19
20
21
22
23
>75 % recycled paper
>75 % papier recyclé

English
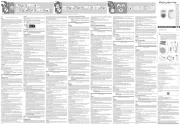
IMPORTANT SAFETY INSTRUCTIONS
When using an electric product, basic precautions should always
be followed, including the following:
Read all instructions before using this product.
DANGER
To reduce the risk of electric shock:
-Do not reach for a corded product that has fallen into water.
Unplug immediately.
-The power plug and accessories connected to it are not for
immersion or for use in the shower.
-Do not use an extension cord with this product.
-Except when charging, always unplug this product from the
power outlet immediately after use.
-Unplug and remove power supply cord from epilator before
cleaning.
-Do not place or store the product where it can fall or be pulled
into a tub or sink. Do not place or drop the product into water
or other liquid.
-The batteries used in this product may present a fire or
chemical burn hazard if mistreated. Do not disassemble, heat
above 100 °C (212 °F) or incinerate.
WARNING
To reduce the risk of burns, fire, electric shock, or injury to
persons:
-This product should never be used by, on, or near children or
invalids. Keep out of reach of children.
-Use this product only for its intended household use as
described in this manual. Do not use attachments not
recommended by Philips North America LLC.
-Never operate this product if it has a damaged cord or
charging plug, if it is not working properly, if it has been
dropped, damaged, or dropped into water. For assistance, call
1-800-243-7884 (in US only) or 1-866-800-9311 (in Canada
only).
-Keep the product, cord, charging plug and any attachments
away from heated surfaces.
-Never drop or insert any object into any opening.
-Do not use the adapter in or near wall sockets that contain or
have contained an electric air freshener to prevent irreparable
damage to the adapter.
-Do not use, charge or plug in product outdoors or operate
where aerosol (spray) products are being used or where
oxygen is being administered.
-Always check rotating disks, foil and attachments before using
the product. Do not use the product if rotating disks, foil and
attachments are damaged or show signs of wear, as injury may
occur.
-Always attach power cord to product first, then to power
outlet. To disconnect, set all controls to 'off' position. Then
remove power cord from power outlet.
-To prevent possible damage to the cord, do not wrap cord
around the product.
-Never put the product in direct sunlight or store at a
temperature above 140°F (60°C). Never clean the product with
water above 104°F (40°C).
-A device should never be left unattended when plugged in.
-This product is for use on human hair only. Do not use this
product for any other purpose.
Always store your product and power plug in a moisture-free
area. Make sure the cord is disconnected from the product.
-Never point the built-in light directly at your or somebody
else's eyes.
-Never insert any type of material into the socket of the product
plug.
-Only use the power plug and other accessories supplied with
the epilator.
-For hygienic reasons, the appliance should only be used by
one person.
-Do not use the appliance on irritated skin or skin with varicose
veins, rashes, spots, moles (with hairs), sores or wounds
without consulting your doctor first. People with a reduced
immune response or people who suffer from diabetes mellitus,
haemophilia or immunodeficiency should also consult their
doctor first.
Do not use the callus removal disk on:
-Any area of the feet that is swollen, burned or inflamed or
when skin eruptions or ulcerated sores are present.
-Any area of the feet that is anesthetized or lacks the ability to
sense pressure or pain unless approved by your doctor.
Note: Should pain or discomfort result, discontinue use and
consult your doctor.
Note: Do not use this appliance on areas of the skin with severe
acne, a rash or other skin ailments.
-Stop using the appliance if your skin becomes sore or
inflamed.
SAVE THESE INSTRUCTIONS
IMPORTANT: The power plug contains a transformer. Do not cut
off the power plug to replace it with another plug as this will
cause a hazardous condition.
Introduction
Congratulations on your purchase and welcome to Philips! To
fully benefit from the support that Philips offers, register your
product at . www.philips.com/welcome
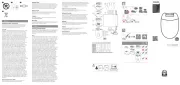
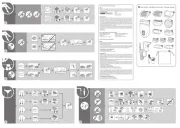
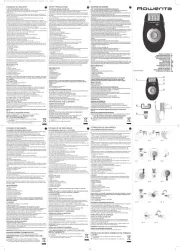
General description (Fig. 1)
1 Callus removal disk
2 Outer rim
3 Callus removal attachment
6
3 5
1 2
7
8
9
10
11
4
1

4 Integrated light
5 Epilating head
6 Handle
7 On/off switch
8 Battery indicator
9 Socket for small plug
10 Release button
11 Power plug
Not shown: Cleaning brush
This symbol indicates that the product can be used in the bath or
shower.
Charging
-Fully charge product before using for the first time or after
non-use for a long period of time.
-Charging, recharging, or using product at temperatures below
50 °F (10 °C) or higher than 95 °F (35 °C) adversely affects
lifespan of the battery.
Note: This product can only be used without cord (Fig. 3).
-To charge the product, insert the small plug into the socket in
the bottom of the product and put the supply unit in the wall
socket.
1 Be certain the product is OFF.
2 Insert the power plug directly into the product and plug the
charging plug into any 120V AC outlet. Use only the cord
provided.
3 When the battery indicator flashes white (Fig. 4), the product is
charging.
-After 1.5 hours of charging, the product has a cordless
operating time of up to 40 minutes.
4 When the battery indicator lights up white continuously (Fig.
5), the product is fully charged.
-The charge indicator does not light up when the product is
switched on: the product contains enough energy to be used.
-When the battery indicator flashes orange (Fig. 4), the battery
is almost empty and needs to be charged. Charge the product
when you have finished using it.
NOTE: If the product is fully charged and connected to the
electrical outlet, the battery indicator blinks a few times when you
press the on/off switch. This reminds you to disconnect the
product from the electrical outlet before using.
Quick charge
-When the battery is completely empty and you start charging
it, the battery indicator flashes white quickly.
-After approximately 15 minutes, the battery indicator starts
flashing white slowly. At this point, the battery contains
enough energy for up to 10 minutes of use.
Using the product
Switching the product on and off
1 To switch on the product, press the on/off button once.
2 If you want to select the low speed setting, press the on/off
button again.
3 To switch off the product, press the on/off button once more.
Attaching and detaching the epilating head
1 To attach the epilating head, press it onto the handle ('click')
(Fig. 6).
2 To detach the epilating head, press the release button on the
back of the product (Fig. 7).
Using the epilator
-Only use the epilator attachment to epilate areas below the
neck such as your legs, underarms and bikini line.
-Attach the facial cap if you want to epilate facial hair.
-For gentle, less painful epilation, epilate in the shower or bath
on wet skin with or without shower gel or soap.
-For dry epilating, make sure your skin is clean, and free from
grease and creams. Do not apply any cream before using.
Hairs are easier to remove after a bath or shower, but your skin
should be completely dry before using your epilator.
1 Before first use, clean the epilating head (see 'Cleaning').
NOTE: The attachment will only fit onto the product in one
direction.
-Press the on/off button once to turn on the epilator (Fig. 8).
-The epilator starts running at speed II which is the most
efficient speed for epilating. The speed II light lights up.
-If you want to use speed I, press the on/off button a second
time. Speed I light lights up.
-Select speed I for areas with little hair growth, for hard-to-
reach places and for areas with bones close to the skin's
surface, such as knees and ankles.
-When you press the on/off button a third time, the epilator
switches off.
Tip: For greater visibility of fine hairs, the built-in light goes on
automatically when epilating (Fig. 9). To turn off, press the
on/off button for 3 seconds after turning on the product.
2. Gently press and move the epilator slowly over the skin against
the direction of hair growth. If you press too lightly or too hard,
the epilator will not be able to grasp and remove the hairs.
Experiment until you find the right settings and right amount of
pressure for your type of skin and hair.
Tip: When epilating sensitive areas, stretch the skin with your free
hand.
For epilating underarms, put your hand on the back of your head
to stretch the skin (Fig. 10).
3. Press the on/off button to turn the epilator OFF.
4. Pull the attachment off the epilating head and clean epilator
and attachment. (See section 'Cleaning').
IMPORTANT:
After using the epilator, some redness or irritation may occur. This
is normal and should disappear quickly.
-Clean the product and attachments after each use following
the CLEANING instructions.
Attaching and detaching the callus removal disk
1 To attach an attachment, press it onto the handle ('click') (Fig.
12).
2 To attach the disk, push it onto the coupling in the head (Fig.
13).
Look at the product from the side to check if the disk is level
with the outer rim of the head.
If the disk wobbles when you switch on the product, the disk is
not placed correctly. Remove the disk and attach it properly.
3 To remove the disk, put your thumb in the indent behind the
disk and push it forward until the disk detaches from the head
(Fig. 14).
Using the callus removal disk
-The callus removal disk is only intended for use on feet.
You can use the callus removal disk in 3 different ways,
depending on the area or callus you want to treat.
1 To treat a large, flat area, use the entire disk (Fig. 15). Make sure
you place the disk flat onto the skin for good control during
use.
2 For precision treatment of smaller areas and good visibility of
the treated area (Fig. 16), use the top part of the disk that sticks
out beyond the top of the head (Fig. 17).
3 For precision treatment and for buffing away hard skin very
quickly, use the narrow edge of the protruding top part of the
disk (Fig. 18).
Product specificaties
| Merk: | Philips |
| Categorie: | Epilator |
| Model: | Satinelle Advanced BRE612 |
Heb je hulp nodig?
Als je hulp nodig hebt met Philips Satinelle Advanced BRE612 stel dan hieronder een vraag en andere gebruikers zullen je antwoorden
Handleiding Epilator Philips

14 Juli 2025
17 April 2025
21 Maart 2025

21 Maart 2025

21 Maart 2025

20 Maart 2025

12 Maart 2025

7 Februari 2025

13 Januari 2025
Handleiding Epilator
- Livoo
- Solac
- Trisa
- BaByliss
- Shoplace
- Hyundai
- Concept
- Arzum
- OBH Nordica
- Emjoi
- Sport-Elec
- Venteo
- Rowenta
- Essentiel B
- Beurer
Nieuwste handleidingen voor Epilator
12 Augustus 2025
9 Juli 2025
8 Juli 2025

7 Juli 2025
7 Juli 2025
7 Juli 2025
7 Juli 2025
6 Juli 2025
2 Juli 2025