Panasonic RP-HD305 Handleiding
Panasonic
Hoofdtelefoon
RP-HD305
Bekijk gratis de handleiding van Panasonic RP-HD305 (4 pagina’s), behorend tot de categorie Hoofdtelefoon. Deze gids werd als nuttig beoordeeld door 88 mensen en kreeg gemiddeld 3.7 sterren uit 44.5 reviews. Heb je een vraag over Panasonic RP-HD305 of wil je andere gebruikers van dit product iets vragen? Stel een vraag
Pagina 1/4

Please check and identify the supplied accessories.
1 x USB charging cord
1 x Detachable cord
Veuillez vérifier la présence des accessoires normalement
fournis.
1 x Câble de recharge USB
1 x Câble amovible
Überprüfen Sie, ob die folgenden Teile mitgeliefert wurden.
1 x USB-Ladekabel
1 x Abnehmbares Kabel
Vakuutus vaatimustenmukaisuudesta (DoC)
“Panasonic Corporation” vakuuttaa, että tämä tuote on yhdenmukainen
direktiiviin 2014/53/EU keskeisten vaatimusten sekä sen muiden
merkityksellisten määräysten kanssa.
Asiakkaat voivat ladata alkuperäisen DoC:n kopion RE-tuotteillemme
DoC-palvelimelta:
http://www.ptc.panasonic.eu
Valtuutetun edustajan yhteystiedot:
Panasonic Marketing Europe GmbH, Panasonic Testing Centre,
Winsbergring 15, 22525 Hamburg, Saksa
Basic Operating Instructions
Mode d’emploi de base
Kurz-Bedienungsanleitung
Digital Wireless Stereo Headphones
Casque d’écoute stéréo sans fil numérique
Digitale drahtlose Stereo-Kopfhörer
RP-HD305B
Thank you for purchasing this product.
Please read these instructions carefully before using this product, and save this manual for future use.
Merci d’avoir porté votre choix sur cet appareil.
Veuillez lire attentivement les présentes instructions avant d’utiliser ce produit, et conserver ce manuel pour utilisation
ultérieure.
Wir danken Ihnen, dass Sie sich für dieses Produkt unseres Hauses entschieden haben.
Bitte lesen Sie diese Anleitung vor der Inbetriebnahme dieses Produkts aufmerksam durch, und bewahren Sie dieses
Handbuch für spätere Bezugnahme griffbereit auf.
E
Model No. / Modèle No. /
Modell Nr.
EU
Panasonic Corporation
http://www.panasonic.com
© Panasonic Corporation 2019
Manufactured by: Panasonic Corporation
Kadoma, Osaka, Japan
Importer for Europe: Panasonic Marketing Europe GmbH
Panasonic Testing Centre
Winsbergring 15, 22525 Hamburg, Germany
TQBM0499
F0319SK0
English
More detailed operating instructions
are available in “Operating
Instructions (PDF format)”.
To read it, download it from the
website.
https://panasonic.jp/support/global/
cs/accessories/oi/rp_hd300b/
• Click the desired language.
Français
Des instructions plus détaillées sont disponibles dans le
“Mode d’emploi (format PDF)”.
Pour en prendre connaissance, téléchargez-le depuis le site Web.
https://panasonic.jp/support/global/cs/accessories/oi/
rp_hd300b/
• Cliquez sur la langue désirée.
Deutsch
Eine detailliertere Bedienungsanleitung steht unter
“Bedienungsanleitung (PDF-Format)” zur Verfügung.
Laden Sie sie zum Lesen von der folgenden Website herunter:
https://panasonic.jp/support/global/cs/accessories/oi/
rp_hd300b/
• Klicken Sie auf die gewünschte Sprache.
English
Accessories
Français
Accessoires
Deutsch
Zubehör
English
Expressions used in this document
• The product illustrations may differ from the actual product.
Français
Expressions utilisées dans ce document
• Les illustrations de produit peuvent différer de l’apparence réelle du produit.
Deutsch
In diesem Dokument verwendete Symbole
• Die Produktabbildungen können vom tatsächlichen Produkt abweichen.
Suomi
Varotoimet turvallisuuden takaamiseksi
VAROITUS:
Jotta vähennetään tulipalon, sähköiskun tai tuotteen
vahingoittumisen vaaraa,
• Älä anna tämän laitteen altistua sateelle, kosteudelle, pisaroille tai
roiskeille.
• Älä laita laitteen päälle mitään nesteitä sisältäviä esineitä kuten
maljakot.
• Käytä suositeltuja varusteita.
• Älä poista suojia.
• Älä korjaa tätä laitetta itse. Anna huolto tehtäväksi pätevälle
huoltohenkilöstölle.
Vältä käyttöä seuraavissa olosuhteissa
• Erittäin korkeat tai alhaiset lämpötilat käytön, varastoinnin tai
kuljetuksen aikana.
• Akkujen heittäminen tuleen tai kuumaan uunin tai niiden mekaaninen
murskaaminen tai leikkaaminen voi aiheuttaa räjähdyksen.
• Erittäin korkea lämpötila ja/tai erittäin alhainen ilmanpaine voivat
aiheuttaa räjähdyksen tai syttyvän nesteen tai kaasun vuotamista.
Tämä laite on tarkoitettu käytettäväksi leudoissa ja trooppisissa
ilmastoissa.
Langattoman tyyppi Taajuuskaista Enimmäisteho
Bluetooth®2402 - 2480 MHz 4 dBm
∫
∫
∫
∫∫ Unit
• Avoid using or placing this unit near sources of heat.
• Do not listen with this unit at high volume in places where you need
to hear sounds from the surrounding environment for safety, such
as at railroad crossings, and construction sites.
• Wide band characteristic voltage equal or larger than 75 mV.
• Keep this unit away from something susceptible to the magnetism.
Such devices as a clock may not operate correctly.
∫
∫
∫
∫∫ Allergies
• Discontinue use if you experience discomfort with the ear pads or
any other parts that directly contact your skin.
• Continued use may cause rashes or other allergic reactions.
∫
∫
∫
∫∫ Precautions for listening with the Headphones
• Excessive sound pressure from earphones and headphones can
cause hearing loss.
• Do not use your headphones at a high volume. Hearing experts
advise against continuous extended play.
• If you experience a ringing in your ears, reduce volume or
discontinue use.
• Do not use while operating a motorised vehicle. It may create a
traffic hazard and is illegal in many areas.
• You should use extreme caution or temporarily discontinue use in
potentially hazardous situations.
Declaration of Conformity (DoC)
Hereby, “Panasonic Corporation” declares that this product is in
compliance with the essential requirements and other relevant
provisions of Directive 2014/53/EU.
Customers can download a copy of the original DoC to our RE
products from our DoC server:
http://www.ptc.panasonic.eu
Contact to Authorised Representative:
Panasonic Marketing Europe GmbH,
Panasonic Testing Centre, Winsbergring 15, 22525 Hamburg,
Germany
Clean this unit with a dry and soft cloth.
• Do not use solvents including benzine, thinner, alcohol, kitchen
detergent, a chemical wiper, etc. This might cause the exterior
case to be deformed or the coating to come off.
Keeping the battery performance.
• During the long period of disuse, full charge this unit once every 6
months to keep the battery performance.
∫
∫
∫
∫∫ General
∫
∫
∫
∫∫ Bluetooth® section
∫
∫
∫
∫∫ Headphone section
∫
∫
∫
∫∫ Speaker section
*1 It may be shorter depending on the operating conditions.
*2 The time required to charge the battery from empty to full.
• Specifications are subject to change without notice.
Before requesting service, make the following checks. If you are in doubt
about some of the check points, or if the remedies indicated do not solve
the problem, consult your dealer for instructions.
No sound.
• Make sure that the unit and the Bluetooth
® device are connected
correctly. (lRear page, )
• Check if music is playing on the Bluetooth
® device.
• Make sure that the unit is turned on and the volume is not set too low.
• Pair and connect the Bluetooth
® device and the unit again. (lRear
page, )
• Check if the Bluetooth® compatible device supports “A2DP” profile. For
details on profiles, see “Listening to music” in “Operating Instructions
(PDF format)”. Also refer to the operating manual for the Bluetooth
®
compatible device.
• If there is more than one active Bluetooth
® device around this unit, it may
be connected to the wrong one, so check that it is connected to the
correct one.
Low volume.
• Increase the volume of the unit. (lRear page, )
• Increase the volume on the Bluetooth
® device.
Sound from the device is cut off. / Too much noise. / Sound quality is
bad.
• Sound may be disrupted if signals are blocked. Do not fully cover this
unit with the palm of your hand, etc.
• The device may be out of the 10 m communication range. Move the
device closer to this unit.
• Remove any obstacle between this unit and the device.
• Switch off any wireless LAN device when not in use.
The device cannot be connected.
• Delete the pairing information for this unit from the Bluetooth
® device,
then pair them again. (lRear page, )
You cannot hear the other person.
• Make sure that the unit and the Bluetooth
® enabled phone are turned on.
• Check if the unit and the Bluetooth
® enabled phone are connected.
(lRear page, )
• Check the audio settings of the Bluetooth
® enabled phone. Switch the
calling device to the unit if it is set to the Bluetooth
® enabled phone.
(lRear page, )
• If the volume of the other person’s voice is too low, increase the volume
of both the unit and the Bluetooth
® enabled phone.
Cannot make a phone call.
• Check if the Bluetooth® compatible device supports “HSP” or “HFP”
profile. For details on profiles, see “Listening to music” and “Making a
phone call” in “Operating Instructions (PDF format)”. Also refer to the
operating manual for the Bluetooth
® enabled phone.
The unit does not respond.
• This unit can be reset when all operations are rejected. To reset the unit,
connect the unit to a computer using the USB charging cord. (The
pairing device information will not be deleted.)
• The power cannot be turned on when the detachable cord (supplied) is
connected. (lRear page, )
Cannot charge the unit.
• Is the USB port you are currently using working properly? If your
computer has other USB ports, unplug the connector from its current port
and plug it into one of the other ports.
• If the measures mentioned above are not applicable, unplug the USB
charging cord and plug it in again.
• If the charge time and operating time become shortened, the battery
may have run down. (Number of charging times of the installed battery:
Approximately 300)
The power/pairing LED does not light during charging. / Charging
takes longer.
• Is the USB charging cord connected firmly to the USB terminal of the
computer? (lRear page, )
• Make sure to charge in a room temperature between 10 oC and 35 oC.
The power does not turn on.
• Is the unit being charged? The power cannot be turned ON during
charging. (lRear page, )
• The power cannot be turned on when the detachable cord (supplied) is
connected. (lRear page, )
The audio guidance language has changed.
• The audio guidance language can be switched. (Press and hold [j] and
[Í/I ( )] for at least 5 seconds.) It is possible to switch the audio
guidance between English and French.
English
Safety precautions
WARNING:
To reduce the risk of fire, electric shock or product damage,
• Do not expose this unit to rain, moisture, dripping or
splashing.
• Do not place objects filled with liquids, such as vases, on
this unit.
• Use the recommended accessories.
• Do not remove covers.
• Do not repair this unit by yourself. Refer servicing to
qualified service personnel.
Avoid the use in the following conditions
• High or low extreme temperatures during use, storage or
transportation.
• Disposal of a battery into fire or a hot oven, or mechanically
crushing or cutting of a battery, that can result in an explosion.
• Extremely high temperature and/or extremely low air pressure
that can result in an explosion or the leakage of flammable liquid
or gas.
This unit may receive radio interference caused by mobile
telephones during use. If such interference occurs, please
increase separation between this unit and the mobile telephone.
Use only the supplied USB charging cord when connecting to a
computer.
This unit is intended for use in moderate and tropical climates.
Only for European Union and countries with recycling
systems
These symbols indicate separate collection of waste electrical and
electronic equipment or waste batteries.
More detailed information is contained in “Operating Instructions
(PDF format)”.
Type of wireless Frequency band Maximum power
Bluetooth®2402 - 2480 MHz 4 dBm
Maintenance
Specifications
Power supply DC 5 V, 500 mA
(Internal battery: 3.7 V
(Li-polymer))
Operating time*1 Approx. 24 hours (SBC)
Charging time*2
(25 oC) Approx. 5 hours
Charging temperature range 10 oC to 35 oC
Operating temperature range 0 CoC to 40 o
Operating humidity range 35 %RH to 80 %RH
(no condensation)
Mass Approx. 218 g (without cord)
Frequency band 2402 MHz to 2480 MHz
Supported profiles A2DP, AVRCP, HSP, HFP
Supported codec SBC, AAC, Qualcomm®aptXTM,
Qualcomm®aptXTM Low Latency
Impedance 34 Ω (Power off, with cord)
Max input 1000 mW (IEC)
Troubleshooting
The Bluetooth® word mark and logos are registered trademarks owned by
Bluetooth SIG, Inc. and any use of such marks by Panasonic Corporation
is under license.
Other trademarks and trade names are those of their respective owners.
Siri is a trademark of Apple Inc.
QR Code is a registered trademark of DENSO WAVE INCORPORATED.
Qualcomm aptX is a product of Qualcomm Technologies, Inc. and/or its
subsidiaries.
Qualcomm is a trademark of Qualcomm Incorporated, registered in the
United States and other countries. aptX is a trademark of Qualcomm
Technologies International, Ltd., registered in the United States and other
countries.
Other system names and product names appearing in this document are
in general the registered trademarks or trademarks of the respective
developer companies.
Note that the TM mark and ® mark do not appear in this document.
Remove the right ear pad to view authentication information. (1)
Authentication information (a) is indicated on the speaker plate portion
(b), which becomes visible when the right ear pad (R side) is removed.
(2)
To attach the ear pad, fit the part d of the ear pad into the part c. (3)
Do not pull the ear pad with force when attaching or removing.
D
D
E
D
D
D
E
B
B
E
1
23
∫
∫
∫
∫∫ Appareil
• Évitez d’utiliser ou de placer l’appareil près d’une source de
chaleur.
• N’écoutez pas cet appareil à un volume élevé dans des endroits où
vous avez besoin d’entendre les sons de l’environnement pour des
raisons de sécurité, comme aux passages à niveau et sur les
chantiers de construction.
• Tension caractéristique à large bande égale ou supérieure à
75 mV.
• Gardez cet appareil éloigné de tout ce qui pourrait être
magnétique. Certains dispositifs comme une horloge pourraient ne
pas fonctionner correctement.
∫
∫
∫
∫∫ Allergies
• Cessez toute utilisation si vous êtes gêné par les coussinets ou
toute autre pièce entrant directement en contact avec la peau.
• Toute utilisation continue peut provoquer des éruptions cutanées
ou d’autres réactions allergiques.
∫
∫
∫
∫∫ Précautions d’écoute avec le casque
• Une pression sonore excessive provenant des écouteurs ou du
casque peut causer une perte de l'audition.
• N’utilisez pas votre casque à un volume élevé. Les médecins
déconseillent l’écoute prolongée.
• Si vous rencontrez un bourdonnement dans les oreilles, réduisez le
volume ou n’utilisez pas l’appareil.
• Ne pas utiliser lorsque vous conduisez un véhicule motorisé. Il peut
créer un danger pour la circulation et est illégal dans de nombreux
lieux.
• Vous devez faire preuve d’une prudence extrême ou cesser de
l’utiliser temporairement dans les situations potentiellement
dangereuses.
Déclaration de Conformité (DoC)
Par les présentes, “ ” déclare que ce produit Panasonic Corporation
est conformes aux critères essentiels et autres dispositions
applicables de la Directive 2014/53/UE.
Les clients peuvent télécharger un exemplaire de la DoC originale
concernant nos produits relevant de la Directive RE sur notre
serveur DoC:
http://www.ptc.panasonic.eu
Pour contacter un Représentant Autorisé:
Panasonic Marketing Europe GmbH,
Panasonic Testing Centre, Winsbergring 15, 22525 Hamburg,
Allemagne
Nettoyez cet appareil à l’aide d’un chiffon doux et sec.
• N’utilisez pas de solvants, y compris essence, diluant, alcool,
liquide vaisselle, lingette chimique, etc. Cela peut déformer le
boitier externe ou décoller le revêtement.
Conservation des performances de la batterie.
• Durant une longue période de non utilisation, chargez
complètement cet appareil tous les 6 mois pour conserver les
performances de la batterie.
∫
∫
∫
∫∫ Général
∫
∫
∫
∫∫ Section Bluetooth ®
∫
∫
∫
∫∫ Section casque
∫
∫
∫
∫∫ Section haut-parleur
*1 Il peut être plus court en fonction des conditions d’utilisation.
*2 Temps nécessaire pour recharger entièrement la batterie vide.
• Caractéristiques sujettes à modifications sans préavis.
Avant de faire une demande d’assistance, effectuez les contrôles
suivants. Si vous avez des doutes sur certains points, ou si les solutions
fournies ne permettent pas de résoudre le problème, contactez votre
revendeur pour connaître la marche à suivre.
Pas de son.
• Assurez-vous que l’appareil et le dispositif Bluetooth
® sont correctement
connectés. (lVerso, )
• Vérifiez si la musique est lue sur le dispositif Bluetooth
®.
• Assurez-vous que l’appareil est sous tension et que le volume n’est pas
trop faible.
• Couplez et connectez à nouveau le dispositif Bluetooth
® et l’appareil.
(lVerso, )
• Vérifiez si le dispositif compatible Bluetooth
® prend en charge le profil
“A2DP”. Pour plus de détails sur les profils, voir “Écoute de la musique”
dans le “Mode d’emploi (format PDF)”. Consultez également le mode
d’emploi du dispositif compatible Bluetooth
®.
• S’il y a plus d’un dispositif Bluetooth
® actif à proximité de cet appareil, ce
dernier pourrait se connecter à l’un d’eux par erreur, alors vérifiez qu’il
est correctement connecté.
Volume bas.
• Augmentez le volume de l’appareil. (lVerso, )
• Augmentez le volume du dispositif Bluetooth
®
.
Le son provenant du dispositif est coupé. / Trop de bruit. / La qualité
du son est mauvaise.
• Le son peut être perturbé si les signaux sont bloqués. Ne couvrez pas
entièrement cet appareil avec la paume de la main, etc.
• Le dispositif peut se trouver en dehors de la portée de communication de
10 m. Rapprochez le dispositif de l’appareil.
• Retirez tous les obstacles se trouvant entre cet appareil et le dispositif.
• Désactivez tous les dispositifs du réseau local (LAN) sans fil qui ne sont
pas utilisés.
Le dispositif ne peut pas être connecté.
• Supprimez les informations d’appairage concernant cet appareil du
dispositif Bluetooth®, puis effectuez de nouveau l’appairage. (lVerso,
)
Vous n’entendez pas votre interlocuteur.
• Assurez-vous que l’appareil et le téléphone compatible Bluetooth
® sont
sous tension.
• Vérifiez que l’appareil et le téléphone compatible Bluetooth
® sont
connectés. (lVerso, )
• Vérifiez les paramètres audio du téléphone compatible Bluetooth
®.
Faites basculer le dispositif appelant vers l’appareil s’il est réglé sur le
téléphone compatible Bluetooth
®. (lVerso, )
• Si le volume de la voix de l’interlocuteur est trop faible, augmentez le
volume de l’appareil et du téléphone compatible Bluetooth
®.
Impossible de passer un appel téléphonique.
• Vérifiez si le dispositif compatible Bluetooth
® prend en charge le profil
“HSP” ou “HFP”. Pour avoir des détails sur les profils, lisez “Écoute de la
musique” et “Passage d'un appel téléphonique” dans le “Mode d’emploi
(format PDF)”. Consultez également le mode d’emploi du téléphone
compatible Bluetooth®.
L’appareil ne répond pas.
• Cet appareil peut être réinitialisé lorsque toutes les opérations sont
rejetées. Pour réinitialiser l’appareil, branchez l’appareil à un ordinateur
à l’aide du câble de recharge USB. (Les informations d’appairage du
dispositif ne seront pas supprimées.)
• L'appareil ne peut pas être mis sous tension lorsque le câble amovible
(fourni) est branché. (lVerso, )
Impossible de charger l’appareil.
• Le port USB que vous utilisez actuellement fonctionne-t-il correctement?
Si votre ordinateur possède d’autres ports USB, débranchez le
connecteur de son port actuel et branchez-le dans l’un des autres ports.
• Si les mesures mentionnées ci-dessus ne sont pas applicables,
débranchez le câble de recharge USB et branchez-le à nouveau.
• Si le temps de charge et le temps de fonctionnement sont réduits, la
batterie est peut-être déchargée. (Nombre de charges de la batterie
installée : Environ 300)
Le voyant d’alimentation/appairage ne s’allume pas durant la charge.
/ La charge prend plus de temps.
• Le câble de recharge USB est-il bien inséré dans la borne USB de
l’ordinateur? (lVerso, )
• Assurez-vous de charger la batterie à une température qui se situe entre
10 oC et 35 oC.
L’appareil ne s’allume pas.
• L’appareil est-il en cours de charge? L’appareil ne peut pas être mis
sous tension pendant la charge. (
lVerso, )
• L'appareil ne peut pas être mis sous tension lorsque le câble amovible
(fourni) est branché. (lVerso, )
La langue de l’aide vocale a été modifiée.
• La langue de l’aide vocale peut être changée. (Appuyez et maintenez
enfoncé [j] et [Í/I ( )] pendant au moins 5 secondes.) Il est possible
de choisir la langue de l'aide vocale entre l'anglais et le français.
Français
Précautions de sécurité
AVERTISSEMENT :
Pour réduire les risques d’incendie, d’électrocution ou de
dommages sur le produit,
• N’exposez pas cet appareil à la pluie, l’humidité,
l’égouttement ou à la projection d’eau.
• Ne placez pas d’objets remplis d’eau, tels que des vases,
sur cet appareil.
• Utilisez les accessoires préconisés.
• Ne retirez pas les caches.
• Ne réparez pas cet appareil vous-même. Confiez l’entretien
à un personnel qualifié.
Éviter l'utilisation lors des conditions suivantes
• Température extrêmement élevée ou basse lors de l'utilisation,
du rangement ou du transport.
• Jeter une batterie dans le feu ou la mettre dans un four chaud,
l'écraser mécaniquement ou la découper, peut causer une
explosion.
• Une température extrêmement élevée et/ou une pression d'air
extrêmement faible peut causer une explosion ou créer une fuite
de liquide ou de gaz inflammable.
Cet appareil peut être perturbé par des interférences causées par
des téléphones mobiles pendant l’utilisation. En présence de
telles interférences, éloignez le téléphone mobile de cet appareil.
Utilisez uniquement le câble de recharge USB fourni lors de la
connexion à un ordinateur.
Cet appareil est destiné à être utilisé sous des climats tempérés
et tropicaux.
Applicable uniquement dans les pays membres de
l’Union européenne et les pays disposant de systèmes
de recyclage.
Ces symboles signifient que l’équipement électronique et
électrique ou les batteries usagées doivent être collectés
séparément en vue de leur élimination.
Pour de plus amples informations, veuillez consulter “Mode
d’emploi (format PDF)”.
Type de connexion
à distance
Bande de
fréquence
Puissance
maximum
Bluetooth®2402 - 2480 MHz 4 dBm
Entretien
Caractéristiques
Alimentation électrique CC 5 V, 500 mA
(Batterie interne : 3,7 V
(Polymère-Li))
Temps de fonctionnement*1 Environ 24 heures (SBC)
Durée de charge*2 (25 oC) Environ 5 heures
Plage de température de
charge
10 oC à 35 oC
Plage de température en
fonctionnement
0 CoC à 40 o
Plage d’humidité de
fonctionnement
35 %RH à 80 %RH
(sans condensation)
Poids Environ 218 (sans câble)g
Bande de fréquence 2402 MHz à 2480 MHz
Profils pris en charge A2DP, AVRCP, HSP, HFP
Codec pris en charge SBC, AAC, Qualcomm®aptXTM,
Qualcomm®aptXTM Low Latency
Impédance 34 Ω (hors tension, avec câble)
Entrée Max 1000 mW (CEI)
Dépannage
Le nom de la marque Bluetooth® ainsi que les logos sont des marques
déposées appartenant à Bluetooth SIG, Inc. et toute utilisation de ces
marques par Panasonic Corporation est effectuée sous licence.
Les autres marques et noms commerciaux appartiennent à leurs
propriétaires respectifs.
Siri est une marque commerciale d’Apple Inc.
QR Code est une marque déposée de DENSO WAVE INCORPORATED.
Qualcomm aptX is a product of Qualcomm Technologies, Inc. and/or its
subsidiaries.
Qualcomm is a trademark of Qualcomm Incorporated, registered in the
United States and other countries. aptX is a trademark of Qualcomm
Technologies International, Ltd., registered in the United States and other
countries.
Les autres noms de systèmes et de produits figurant dans le présent
document sont en général les marques déposées ou les marques
commerciales des sociétés respectives qui les ont développés.
Notez que les marques TM et ® n’apparaissent pas dans ce document.
Retirez le coussinet de l’oreillette droite pour voir les informations
d’authentification. (1)
Les informations d’authentification (a) sont indiquées sur la partie de la
plaque de l’enceinte (b), qui apparaît lorsque le coussinets de l’oreillette
droite (côté R) est retiré. (2)
Pour installer le coussinets d’oreillette, insérez la partie d du coussinet
dans la partie c. (3)
Ne tirez pas trop fort sur le coussinet pour le mettre en place ou le retirer.
D
D
E
D
D
D
E
B
B
E
1
23
∫
∫
∫
∫∫ Gerät
• Dieses Gerät sollte nicht in der Nähe von Wärmequellen
verwendet oder gelagert werden.
• Hören Sie dieses Gerät nicht mit hoher Lautstärke an Orten, an
denen Sie aus Sicherheitsgründen Umgebungsgeräusche hören
müssen, z. B. an Bahnübergängen und auf Baustellen.
• Charakteristische Breitbandspannung größer oder gleich 75 mV.
• Halten Sie dieses Gerät fern von Objekten, die auf Magnetfelder
empfindlich reagieren. Bei solchen Geräten – zum Beispiel Uhren
– können Funktionsstörungen auftreten.
∫
∫
∫
∫∫ Allergien
• Stellen Sie die Verwendung ein, wenn die Hörmuscheln oder
andere Teile bei direktem Hautkontakt Beschwerden auslösen.
• Die fortgesetzte Nutzung kann zu Hautausschlägen oder anderen
allergischen Reaktionen führen.
∫
∫
∫
∫∫ Vorsichtsmaßnahmen für die Nutzung des Kopfhörers
• Übermäßiger Schalldruck von In-Ear-Ohrhörern und Kopfhörern
kann zu Hörschäden führen.
• Verwenden Sie den Kopfhörer nicht mit hoher Lautstärke.
Gehörexperten raten von einer längeren ununterbrochenen
Nutzung ab.
• Wenn Sie ein Klingeln in den Ohren hören, verringern Sie die
Lautstärke oder beenden Sie den Gebrauch.
• Beim Führen eines Kraftfahrzeugs nicht verwenden. Dies kann die
Verkehrssicherheit gefährden und ist in vielen Regionen verboten.
• In potenziell gefährlichen Situationen sollten Sie höchste Vorsicht
walten lassen oder den Gebrauch vorübergehend einstellen.
Konformitätserklärung (DoC)
Hiermit erklärt “Panasonic Corporation”, dass dieses Produkt den
grundlegenden Anforderungen sowie den anderen relevanten
Vorschriften der Richtlinie 2014/53/EU entspricht.
Kunden können eine Kopie der Original-Konformitätserklärung zu
unseren RE-Produkten von unserem KE-Server herunterladen:
http://www.ptc.panasonic.eu
Kontaktadresse des zugelassenen Vertragsbüros:
Panasonic Marketing Europe GmbH,
Panasonic Testing Centre, Winsbergring 15, 22525 Hamburg,
Deutschland
Reinigen Sie dieses Gerät mit einem trockenen, weichen Tuch.
• Verwenden Sie keine Lösungsmittel wie Benzin, Verdünner,
Alkohol, Haushaltsreiniger, einen chemischen Wischer etc. Diese
könnten dazu führen, dass sich das äußere Gehäuse verformt
oder die Beschichtung abblättert.
Leistungsfähigkeit des Akkus bewahren.
• Wenn das Gerät über längere Zeit nicht benutzt wird, laden Sie es
alle 6 Monate vollständig auf, um die Leistungsfähigkeit des Akkus
zu bewahren.
∫
∫
∫
∫∫ Allgemein
∫
∫
∫
∫∫ Bluetooth® -Abschnitt
∫
∫
∫
∫∫ Kopfhörer
∫
∫
∫
∫∫ Lautsprecher-Abschnitt
*1 Kann je nach Betriebsbedingungen kürzer sein.
*2 Dauer für die vollständige Aufladung eines leeren Akkus.
• Die Spezifikationen können ohne vorherige Ankündigung geändert
werden.
Bevor Sie sich an den Kundendienst wenden, kontrollieren Sie bitte die
folgenden Punkte. Wenn Sie bei einigen Kontrollpunkten Zweifel haben
oder das Problem mit den aufgeführten Maßnahmen nicht lösen können,
wenden Sie sich bitte an Ihren Händler.
Kein Ton.
• Stellen Sie sicher, dass dieses Gerät und das Bluetooth
®-Gerät korrekt
verbunden sind. (lRückseite, )
• Überprüfen Sie, ob das Bluetooth
®-Gerät Musik abspielt.
• Vergewissern Sie sich, dass das Gerät eingeschaltet ist und die
Lautstärke nicht zu niedrig eingestellt ist.
• Koppeln und verbinden Sie das Bluetooth
®-Gerät mit diesem Gerät
erneut. (lRückseite, )
• Überprüfen Sie, ob das Bluetooth
®-kompatible Gerät das “A2DP”-Profil
unterstützt. Einzelheiten zu den Profilen finden Sie unter “Musik hören”
in der “Bedienungsanleitung (PDF-Format)”. Lesen Sie auch die
Bedienungsanleitung des Bluetooth
®-kompatiblen Geräts.
• Wenn sich mehrere aktive Bluetooth
®-Geräte in der Nähe dieses Geräts
befinden, wird möglicherweise eine Verbindung mit dem falschen
hergestellt. Vergewissern Sie sich, dass es mit dem richtigen Gerät
verbunden ist.
Niedrige Lautstärke.
• Erhöhen Sie die Lautstärke dieses Geräts. (lRückseite, )
• Erhöhen Sie die Lautstärke des Bluetooth
®-Geräts.
Der Sound des Geräts ist abgeschnitten. / Der Sound des Geräts ist
abgeschnitten. / Die Klangqualität ist schlecht.
• Der Sound kann unterbrochen werden, wenn Signale blockiert werden.
Decken Sie dieses Gerät nicht vollständig mit der Handfläche etc. ab.
• Das Gerät befindet sich möglicherweise außerhalb der
Kommunikationsreichweite von 10 m. Stellen Sie das verbundene Gerät
näher an diesem Gerät auf.
• Entfernen Sie alle Hindernisse zwischen diesem System und dem
Gerät.
• Schalten Sie alle nicht verwendeten WLAN-Geräte aus.
Das Gerät kann nicht verbunden werden.
• Löschen Sie am Bluetooth
®-Gerät die Kopplungsinformationen zu
diesem Gerät und koppeln Sie die Geräte erneut. (lRückseite, )
Sie können den Gesprächspartner nicht hören.
• Stellen Sie sicher, dass dieses Gerät und das Bluetooth
®-fähige Telefon
eingeschaltet sind.
• Überprüfen Sie, ob dieses Gerät und das Bluetooth
®-fähige Telefon
verbunden sind. (lRückseite, )
• Überprüfen Sie die Audioeinstellungen am Bluetooth
®-fähigen Telefon.
Schalten Sie die Telefoniefunktion auf dieses Gerät um, wenn sie auf
das Bluetooth
®-fähige Telefon eingestellt ist. (lRückseite, )
• Wenn die Stimme Ihres Gesprächspartners zu leise zu hören ist,
erhöhen Sie die Lautstärke sowohl an diesem Gerät als auch am
Bluetooth®-fähigen Telefon.
Es können keine Telefonanrufe getätigt werden.
• Überprüfen Sie, ob das Bluetooth
®-kompatible Gerät das “HSP”- oder
“HFP”-Profil unterstützt. Einzelheiten zu Profilen finden Sie unter “Musik
hören” und “Einen Anruf tätigen” in der “Bedienungsanleitung
(PDF-Format)”. Lesen Sie auch die Bedienungsanleitung des
Bluetooth®-fähigen Telefons.
Das Gerät reagiert nicht.
• Wenn keine Bedienvorgänge möglich sind, kann dieses Gerät
zurückgesetzt werden. Um das Gerät zurückzusetzen, schließen Sie es
mit dem USB-Ladekabel an einen. (Die Informationen zur
Gerätekopplung werden nicht gelöscht.)
• Es ist kein Einschalten möglich, wenn das abnehmbare Kabel
(mitgeliefert) angeschlossen ist. (lRückseite, )
Das Gerät kann nicht geladen werden.
• Funktioniert der verwendete USB-Anschluss ordnungsgemäß? Wenn
Ihr Computer über weitere USB-Anschlüsse verfügt, trennen Sie den
Stecker vom aktuellen Anschluss und schließen Sie ihn an einen
anderen Anschluss an.
• Wenn die obigen Punkte nicht zutreffen, trennen Sie das
USB-Ladekabel und schließen Sie es wieder an.
• Verkürzte Lade- und Betriebszeiten können auf einen abgenutzten Akku
hinweisen. (Anzahl der Ladezyklen des verbauten Akkus: Ca. 300)
Die Power/Kopplungs-LED leuchtet nicht während des
Ladevorgangs. / Der Ladevorgang dauert länger.
• Ist das USB-Ladekabel fest in den USB-Anschluss des Computers
eingesteckt? (
lRückseite, )
• Achten Sie darauf, dass der Ladevorgang bei einer Raumtemperatur
zwischen 10 oC und 35 oC erfolgt.
Das Gerät lässt sich nicht einschalten.
• Wird das Gerät geladen? Während des Ladevorgangs kann das Gerät
nicht eingeschaltet werden. (
lRückseite, )
• Es ist kein Einschalten möglich, wenn das abnehmbare Kabel
(mitgeliefert) angeschlossen ist. (
lRückseite, )
Die Sprache der akustischen Hinweise wurde gewechselt.
• Die Sprache der akustischen Hinweise kann gewechselt werden.
(Halten Sie [j] und [Í/I ( )] mindestens 5 Sekunden lang gedrückt.)
Sie können bei den akustischen Hinweisen zwischen Englisch und
Französisch wechseln.
Deutsch
Sicherheitsmaßnahmen
WARNUNG:
Um die Gefahr von Brand, elektrischem Schlag und
Beschädigung zu verringern:
• Setzen Sie dieses Gerät weder Regen noch Feuchtigkeit,
Tropfen oder Spritzern aus.
• Stellen Sie auf diesem Gerät keine mit Flüssigkeiten
gefüllten Gefäße wie Vasen ab.
• Verwenden Sie empfohlene Zubehörteile.
• Entfernen Sie keine Abdeckungen.
• Reparieren Sie dieses Gerät nicht selbst. Überlassen Sie
Reparaturen stets qualifiziertem Fachpersonal.
Nicht unter folgenden Bedingungen verwenden
• Extrem hohe oder niedrige Temperaturen bei Gebrauch,
Lagerung oder Transport.
• Entsorgung von Batterien im Feuer oder in einem heißen Ofen
oder mechanisches Quetschen oder Zerschneiden von
Batterien, da dies zu einer Explosion führen kann.
• Extrem hohe Temperatur und/oder extrem niedriger Luftdruck,
da dies zu einer Explosion oder zum Austreten entzündlicher
Flüssigkeiten oder Gase führen kann.
Beim Betrieb dieses Geräts können Hochfrequenzstörungen
auftreten, die durch die Benutzung von Mobiltelefonen verursacht
werden. Bei einer solchen Störung sollte das Mobiltelefon in
größerer Entfernung zu diesem Gerät betrieben werden.
Verwenden Sie zum Anschließen an einen Computer
ausschließlich das mitgelieferte USB-Ladekabel.
Dieses Gerät ist zum Betrieb in Regionen mit gemäßigtem oder
tropischem Klima bestimmt.
Nur für die Europäische Union und Länder mit
Recyclingsystemen
Diese Symbole kennzeichnen die getrennte Sammlung von
elektrischen und elektronischen Altgeräten oder Altbatterien.
Weitere Einzelheiten sind in der “Bedienungsanleitung
(PDF-Format)” enthalten.
Art des drahtlosen
Betriebs Frequenzband Max. Leistung
Bluetooth®2402 - 2480 MHz 4 dBm
Reinigung
Technische Daten
Stromversorgung DC 5 V, 500 mA
(Interner Akku: 3,7 V
(Li-Polymer))
Betriebsdauer *1 Ca. 24 Stunden (SBC)
Akkuladezeit *2 (25 oC) Ca. 5 Stunden
Ladetemperaturbereich 10 oC bis 35 oC
Betriebstemperaturbereich 0 CoC bis 40 o
Betriebsluftfeuchtigkeitsbereich
35 %RH bis 80 %RH
(keine Kondensation)
Gewicht Ca. 218 (ohne Kabel)g
Frequenzband 2402 MHz bis 2480 MHz
Unterstützte Profile A2DP, AVRCP, HSP, HFP
Unterstützter Codec SBC, AAC, Qualcomm®aptXTM,
Qualcomm®aptXTM Low Latency
Impedanz 34 Ω (ausgeschaltet, über Kabel)
Max. Eingang 1000 mW (IEC)
Problembehebung
Die Bluetooth®-Wortmarke und -Logos sind eingetragene Markenzeichen
von Bluetooth SIG, Inc. und jede Verwendung dieser Marken durch
Panasonic Corporation erfolgt unter Lizenz.
Andere Warenzeichen und Handelsnamen sind Eigentum der jeweiligen
Inhaber.
Siri ist ein Warenzeichen von Apple Inc.
QR Code ist eine eingetragene Handelsmarke von DENSO WAVE
INCORPORATED.
Qualcomm aptX is a product of Qualcomm Technologies, Inc. and/or its
subsidiaries.
Qualcomm is a trademark of Qualcomm Incorporated, registered in the
United States and other countries. aptX is a trademark of Qualcomm
Technologies International, Ltd., registered in the United States and other
countries.
Andere System- und Produktnamen in diesem Dokument sind im
Allgemeinen Marken oder eingetragene Marken der jeweiligen
Entwicklerunternehmen.
Bitte beachten Sie, dass die Symbole
TM und ® in diesem Dokument nicht
verwendet werden.
Entfernen Sie die rechte Hörmuschel, um
Authentifizierungsinformationen anzusehen. (1)
Sie finden die Authentifizierungsinformationen (a) auf dem
Lautsprecherplattenbereich (b), der sichtbar wird, wenn die rechte
Hörmuschel (R-Seite) entfernt wird. (2)
Passen Sie zum Anbringen der Hörmuschel den Teil der Hörmuschel d
in den Teil c ein. (3)
Üben Sie beim Anbringen bzw. Entfernen keine übermäßige Kraft auf die
Hörmuschel aus.
D
D
E
D
D
D
E
B
B
E
1
2 3


1Audio input terminal
2[SOUND] button
3[i] button
4[1 ;/ / ] button
5[j] button
6Charging terminal (DC IN)
7Power/pairing LED
8[Í/I ( )] button*
9Microphone
Ear pads
Raised dot indicating the left side
* Í/I: Standby/ON
The rechargeable battery (installed in the unit) is not charged
initially. Charge the battery before using the unit.
Connect this unit to a computer ( ) using the USB charging a
cord (supplied) (b).
• The power/pairing LED (c) lights in red when charging is in
progress. When charging is completed, the power/pairing LED will
go out.
• It takes approx. 5 hours to charge the battery from empty to full.
• Check the direction of the terminals and plug in/out straight holding
onto the plug. (It may result in malfunction by the deforming of the
terminal if it is plugged in obliquely or in wrong direction.)
• It is not possible to turn the power on or connect to Bluetooth
®
devices during charging.
• Make sure the computer is turned on and is not on standby or
sleep mode.
• Do not use any other USB charging cords except the supplied one.
• When the battery level starts to run low, the blinking power/pairing
LED will turn from blue to red, and as it drops further, you will be
notified by one beep every 1 minute.* When the battery runs out,
an English guidance message will be heard and the power will turn
off.
* If you press [Í/I ( )] twice quickly, an English guidance
message will be heard and you can check the battery level.
Press and hold [Í/I ( )] ( ) of this unit for approx. 3 seconds a
until the power/pairing LED (blue) (b) blinks.
• A beep will sound, and the power/pairing LED (blue) will blink
slowly.
To turn the power off
Press and hold [ /I ( )] for approximately 3 seconds. An Í
English guidance message will be heard, and the power will be
turned off.
• If the unit is not connected to a Bluetooth
® device, an English
guidance message will be heard and turn off the unit automatically
approximately 5 minutes after you have stopped using it. (Auto
power off)
∫
∫
∫
∫∫ Bluetooth® pairing
1 In the power-off state, press and hold [Í/I ( )] of this unit
until the power/pairing LED blinks.
– When pairing a device for the first time:
approx. 3 seconds
– When pairing a second or subsequent devices:
approx. 5 seconds
• The unit starts to search for the Bluetooth
® device for
connection, and the power/pairing LED will blink in blue and red
alternately.
2 Turn on the power of the Bluetooth® device, and enable the
Bluetooth® function.
3 Select “RP-HD305B” (a) from the Bluetooth® device’s
menu.
• If prompted for a passkey, input the passkey “0000 (four zeros)”
of this unit.
• When the power/pairing LED (blue) blinks twice every approx.
2 seconds, pairing (registration) is completed. (Connection
established)
• If connection to a device is not established within approximately
5 minutes, the unit will be turned off. Perform pairing again.
∫
∫
∫
∫∫ Connecting a paired Bluetooth ® device
1 Turn on this unit.
2 Perform steps 2 and 3 of “Bluetooth® pairing”. (l above)
• When the power/pairing LED (blue) blinks twice every approx.
2 seconds, pairing (registration) is completed. (Connection
established)
When using the functions below that are indicated with the [ ]
mark, connect the Bluetooth ® device and the unit.
∫
∫
∫
∫∫ Listening to music [ ]
Select and play the music on the Bluetooth® device.
• The unit’s headphones will output the music or the audio of the
video being played back.
∫
∫
∫
∫∫ Remote controlling (Available only if your Bluetooth ®
device supports “AVRCP” Bluetooth® profiles) [ ]
(Operation example)
• The volume can be adjusted in 31 levels (16 levels during calls).
When the maximum or minimum volume is reached, a beep will
sound.
∫
∫
∫
∫∫ Selecting the sound mode [ ]
This changes the sound quality of the music or video being
played back.
Press the [SOUND] (d) button on this unit.
• Each press of this button changes the sound quality.
– Bass Enhancer : Produces a more dynamic sound effect with
enhanced bass.
– Clear Voice : Produces a sound effect which makes human
voices, such as vocals and dialogues, clear to listen to.
– OFF : Turns off sound effects.
• The setting immediately before the power is turned off is stored.
• You will be notified by audio guidance when the mode is switched.
• This may not be effective depending on the music or video being
played back.
A
B
F
1
2
3
C
Bluetooth
Bluetooth ON
RP-HD305B
D
E
English
APart names
BCharging
CTurning the power on/off
DConnecting a Bluetooth® device
EUsing the headphones
Play / Pause: Press [1 ;/ / ] (a).
Increase the volume: Press [ ] (ib).
Decrease the volume: Press [ ] (jc).
Forward to the start of
next track: Press [1 ;/ / ] twice quickly.
Return to the start of
current track: Press [1 ;/ / ] three times quickly.
Fast forward: Press [1 ;/ / ] twice quickly; hold the
second press.
Fast rewind: Press [1 ;/ / ] three times quickly;
hold the third press.
∫
∫
∫
∫∫ Making a phone call [ ]
1 Press [1 ;/ / ] (a) on the unit and answer the incoming
call.
• (HFP only) To reject the incoming call, press [ / ] twice 1 ;/
quickly.
2 Start talking.
3 Press [1 ;/ / ] to end the phone call.
• (HFP only) It may be difficult to hear phone conversations when the
unit is used in locations with loud ambient noise or in outdoor or
other locations exposed to powerful winds. In that case, change the
calling location or switch the calling device to the Bluetooth
®
enabled phone to continue the call. / ] on the unit (Press [1 ;/
twice quickly to switch.)
• You can have the Bluetooth® enabled phone make phone calls by
using the microphone of the unit and an app of the Bluetooth
®
enabled phone.
(
l below, “Activating voice functions”)
∫
∫
∫
∫∫ Activating voice functions [ ]
You can use a button on this unit to activate Siri or other voice
functions on your smartphone or similar device.
Press and hold [1 ;/ / ] (a) on this unit until the voice
function is activated.
∫
∫
∫
∫∫ Using the detachable cord (supplied)
While the power is turned off or the battery has no remaining
charge, this unit can be used as normal headphones by
connecting the detachable cord (supplied). (e)
• If you connect the detachable cord (supplied) when connected via
Bluetooth®, the power will turn off.
• Noise may occur due to dirt on the plug. Clean the plug with a soft
dry cloth if this occurs.
• Do not use any other detachable cords except the supplied one.
∫
∫
∫
∫∫ Restoring to the factory settings
Charge the battery before restoring the unit.
1 While the power is turned off, press and hold [Í/I ( )] for at
least 5 seconds until the power/pairing LED lights alternately
in blue and red.
2 While the power/pairing LED is lighting alternately in blue
and red, press [i] (b c) and [ j] ( ) at the same time for at
least 5 seconds.
• The default settings will be restored after the power/pairing LED
(blue) blinks fast and the unit turns off.
• When pairing a device again, delete the registering information
(Device: “RP-HD305B”) from the Bluetooth® device’s menu, and
register this unit with the Bluetooth® device again. (l)
• Disassemble after the battery runs out.
• Keep disassembled parts out of reach of children.
Regarding the handling of used batteries
• Insulate the terminals with adhesive tape or similar material.
• Do not disassemble.
∫
∫
∫
∫∫ Batteries
• Do not heat or expose to flame.
• Do not leave the battery(ies) in a car exposed to direct sunlight for
a long period of time with doors and windows closed.
• Battery mishandling can cause electrolyte leakage which can
damage items the leaked fluid comes into contact with. If
electrolyte leaks from the battery, consult your dealer. Wash
thoroughly with water if electrolyte comes in contact with any part
of your body.
• When disposing of the batteries, please contact your local
authorities or dealer and ask for the correct method of disposal.
1 Insert a flat-head screwdriver into the groove on the
outward-facing side of the left headphone (a).
2 Use the flat-head screwdriver to pry up b.
3 Remove the battery, and cut off the wires one by one with
scissors.
1Prise d’entrée audio
2Touche [SOUND]
3Touche [i]
4Touche [1 ;/ / ]
5Touche [j]
6Borne de charge (DC IN)
7Voyant d’alimentation/appairage
8Touche [Í/I ( )]*
9Microphone
Coussinets d’oreille
Pointe saillante signalant le côté gauche
* Í/I: Veille/MARCHE
La batterie rechargeable (installée dans l’appareil) n’est pas
chargée au départ. Chargez la batterie avant d’utiliser l’appareil.
Raccordez cet appareil à un ordinateur ( ) en utilisant le câble a
de recharge USB (fourni) (b).
• Le voyant d’alimentation/appairage (c) est rouge lorsque la
charge est en cours. Une fois la charge terminée, le voyant
d’alimentation/appairage s’éteint.
• Il faut environ 5 heures pour charger la batterie de vide à plein.
• Contrôlez le sens des bornes et insérez-les ou retirez-les en les
gardant droites sur la fiche. (Tout branchement à l’oblique ou dans
le mauvais sens peut entraîner un dysfonctionnement suite à une
déformation de la borne.)
• Il n’est pas possible de mettre l’appareil sous tension ou de le
connecter à des dispositifs Bluetooth® pendant le chargement.
• Assurez-vous que l’ordinateur est allumé et n’est pas en mode
veille ou veille prolongée.
•
N’utilisez aucun autre câble de recharge USB à l’exception de celui fourni.
• Lorsque le niveau de la batterie commence à être bas, le
clignotement du voyant d’alimentation/appairage passera de bleu à
rouge et lorsqu’il baissera davantage, vous serez averti par un bip
toutes les minutes.* Une fois la batterie épuisée, un message
d'assistance en anglais sera émis et l'appareil s'éteindra.
* Si vous appuyez deux fois sur la touche [Í/I ( )] rapidement,
un message d’aide en anglais est émis et vous pouvez vérifier
le niveau de la batterie.
Maintenez enfoncé [ ) sur cet appareil pendant Í/I ( )] (a
environ 3 secondes jusqu’à ce que le voyant d'alimentation/
appairage (bleu) (b) clignote.
• Un signal sonore retentit et le voyant d'alimentation/appairage
(bleu) clignote lentement.
Mise hors tension
Appuyez sur [
Í
/I ( )] pendant environ 3 secondes. Un message
d’aide en anglais sera émis et l’appareil sera mis hors tension.
• Si l'appareil n'est connecté à aucun dispositif Bluetooth
®, il émettra
un message d’aide en anglais et se mettra automatiquement hors
tension environ 5 minutes après que vous ayez cessé de l'utiliser.
(Mise hors tension automatique)
∫
∫
∫
∫∫ Appairage Bluetooth®
1 Lorsqu’il est éteint, appuyez sur la touche [ /I ( )] de cet Í
appareil jusqu’à ce que le voyant d'alimentation/appairage
clignote.
– En cas d’appairage d’un dispositif pour la première fois :
environ 3 secondes
– Lors de l’appairage d’un deuxième dispositif ou des dispositifs
ultérieurs : environ 5 secondes
• L’appareil commence à rechercher le dispositif Bluetooth® pour
se connecter et le voyant d'alimentation/appairage clignote
alternativement en bleu et rouge.
2 Activez le Bluetooth® de l’appareil, et activez la fonction
Bluetooth®.
3 Sélectionnez “RP-HD305B” (a) à partir du menu du
dispositif Bluetooth®.
• Si vous êtes invité à saisir un mot de passe, saisissez le mot de
passe “0000 (quatre zéros)” de cet appareil.
• Lorsque le voyant d'alimentation/appairage (bleu) clignote deux
fois, environ toutes les 2 secondes, l’appairage (l’enregistrement)
est terminé. (Connexion établie)
• Si la connexion à un appareil n’est pas établie au bout d’environ
5 minutes, l’appareil se met hors tension. Effectuez à nouveau
l’appairage.
∫
∫
∫
∫∫ Connexion à un dispositif Bluetooth ® appairé
1 Mettez cet appareil sous tension.
2
Effectuez les étapes 2 et 3 de la section “Appairage Bluetooth
®
”.
(l ci-dessus)
• Lorsque le voyant d'alimentation/appairage (bleu) clignote deux
fois, environ toutes les 2 secondes, l’appairage (l’enregistrement)
est terminé. (Connexion établie)
Pour utiliser les fonctions ci-dessous indiquées par le symbole
[ ], connectez le dispositif Bluetooth ® et l’appareil.
∫
∫
∫
∫∫ Écoute de la musique [ ]
Sélectionnez et lisez la musique sur le dispositif Bluetooth®.
• Le casque de l’appareil reproduira la musique ou le son de la vidéo
en cours de lecture.
∫
∫
∫
∫∫ Contrôle à distance (Disponible uniquement si votre
dispositif Bluetooth® prend en charge les profils
Bluetooth® “AVRCP”) [ ]
(Exemple d’opération)
• Le volume peut être sur 31 niveaux (16 niveaux durant les appels).
Lorsque le volume maximum ou minimum est atteint, un signal
sonore est émis.
∫
∫
∫
∫∫ Sélection du mode sonore [ ]
Ceci permet de changer la qualité sonore de la musique ou de
la vidéo en cours de lecture.
Appuyez sur la touche [SOUND] ( ) de cet appareil.d
• Chaque pression sur cette touche modifie la qualité sonore.
– Bass Enhancer : Produit un effet sonore plus dynamique avec
des graves améliorés.
– Clear Voice : Produit un effet sonore qui rend les voix humaines,
comme les chants et les dialogues, clairement audibles.
– OFF : Désactive les effets sonores.
• Le réglage effectué immédiatement avant la coupure de
l’alimentation est mémorisé.
• L’assistance audio avertira du changement de mode.
• Ceci pourrait ne pas être efficace selon la musique ou la vidéo en
cours de lecture.
FTo remove the battery when disposing of
this unit
The following instructions are not intended for repairing
purposes but for the disposal of this unit. This unit is not
restorable once disassembled.
• When disposing of this unit, take out the battery installed in
this unit and recycle it.
Troubleshooting (l Front page)
D
Français
ANoms de pièces
BChargement
CMise sous tension/hors tension
DConnexion à un dispositif Bluetooth ®
EUtilisation du casque
Lecture / Pause : Appuyez sur [1 ;/ / ] (a).
Augmentez le volume :
Pulse [i] (b).
Diminuez le volume : Pulse [j] (c).
Avance au début de la
piste suivante : Appuyez deux fois rapidement sur
[ /1 ;/ ].
Retourne au début de
la piste suivante : Appuyez trois fois rapidement sur
[ /1 ;/ ].
Avance rapide : Appuyez deux fois sur rapidement
[ /1 ;/ ]; maintenez la seconde
pression.
Retour rapide : Appuyez trois fois rapidement sur
[ /1 ;/ ]; maintenez la troisième
pression.
∫
∫
∫
∫∫ Passage d’un appel téléphonique [ ]
1 Appuyez sur la [1 ;/ / ] (a) de l’appareil et répondez à
l’appel entrant.
• (HFP seulement) Pour rejeter un appel entrant, appuyez sur
[ /1 ;/ ] deux fois rapidement.
2 Démarrez la conversion.
3 Appuyez sur [ / / ] pour mettre fin à l’appel téléphonique.1 ;
• (HFP seulement) Il pourrait être difficile d’entendre les
conversations téléphoniques lorsque l’appareil est utilisé dans des
lieux très bruyants ou à l’extérieur ou encore dans des endroits où
le vent souffle fort. Dans ce cas, changez la position de l’appel ou
basculez le dispositif appelant sur le téléphone compatible
Bluetooth® pour continuer l’appel. (Appuyez deux fois rapidement
sur la [1 ;/ / ] de l’appareil pour changer.)
• Il est possible avec le téléphone compatible Bluetooth
® d'effectuer
des appels téléphoniques à l’aide du microphone de l’appareil et
d’une application du téléphone compatible Bluetooth
®.
(
ldessous, “Activation des fonctions vocales”)
∫
∫
∫
∫∫ Activation des fonctions vocales [ ]
Vous pouvez utiliser une touche sur cet appareil pour activer
Siri ou d'autres fonctions vocales sur votre téléphone intelligent
ou appareil de même type.
Appuyez sur la touche [1 ;/ / ] (a) de cet appareil jusqu’à ce
que la fonction vocale s'active.
∫
∫
∫
∫∫ Utilisation du câble amovible (fourni)
Lorsque l’alimentation est coupée ou la batterie épuisée, cet
appareil peut être utilisé comme un casque normal en
branchant le câble amovible (fourni). (e)
• Si vous branchez le câble amovible (fourni) alors qu’il est connecté
via Bluetooth®, l'alimentation sera coupée.
• Des parasites sonores peuvent être audibles à cause de la saleté
présente sur la fiche. Nettoyez la fiche à l’aide d’un chiffon doux et
sec si cela se produit.
• N’utilisez aucun autre câble amovible que celui fourni.
∫
∫
∫
∫∫ Retour aux réglages d’usine par défaut
Chargez la batterie avant de restaurer l’appareil.
1 Pendant que l’alimentation est coupée, appuyez sur
[Í/I ( )] pendant au moins 5 secondes jusqu’à ce que le
voyant d’alimentation/appairage s’allume alternativement en
bleu et rouge.
2 Pendant que le voyant d'alimentation/appairage s’allume
alternativement en bleu et rouge, appuyez simultanément sur
[ ) et [i] (bj] (c) pendant au moins 5 secondes.
• Les paramètres par défaut sont restaurés une fois que le voyant
d'alimentation/appairage (bleu) clignote rapidement et que
l’appareil se met hors tension.
• Pour appairer un nouveau dispositif, supprimez les informations
d’enregistrement (Dispositif : “RP-HD305B”) dans le menu du
dispositif Bluetooth®, et enregistrez une nouvelle fois cet appareil
avec le dispositif Bluetooth®. (l)
• Démontez une fois la batterie épuisée.
• Conservez les pièces démontées hors de portée des enfants.
Collecte des batteries usagées
• Isolez les bornes à l’aide d’un ruban adhésif ou d’un matériau
similaire.
• Ne les démontez pas.
∫
∫
∫
∫∫ Batteries
• Ne les chauffez pas et ne les exposez pas à une flamme.
• Ne laissez pas la (les) batterie(s) dans un véhicule exposé
directement aux rayons du soleil pendant un long moment avec les
vitres et portières fermées.
• Une mauvaise manipulation de la batterie peut provoquer une fuite
d’électrolyte qui peut endommager les éléments avec lesquels le
fluide ayant fui entre en contact. Si de l’électrolyte fuit de la
batterie, consultez votre revendeur. Lavez abondamment à l’eau si
de l’électrolyte entre en contact avec une partie de votre corps.
• Pour jeter les batteries usagées, veuillez contacter l’administration
locale ou votre revendeur afin de connaître la procédure de mise
au rebut à suivre.
1 Insérez un tournevis à tête plate dans la fente du côté
extérieur gauche du casque (a).
2 Utilisez le tournevis à tête plate pour faire levier b.
3 Retirez la batterie, et couper les fils un par un à l’aide de
ciseaux.
1Audio-Eingangsanschluss
2[SOUND]-Taste
3[ ]-Tastei
4[ / / ]-Taste1 ;
5[ ]-Tastej
6Ladeanschluss (DC IN)
7Power/Kopplungs-LED
8[Í/I ( )]-Taste*
9Mikrofon
Ohrpolster
Punktförmige Erhebung kennzeichnet die linke Seite
* Í/I: Standby/EIN
Der im Gerät installierte wiederaufladbare Akku ist bei der
Auslieferung nicht geladen. Laden Sie den Akku vor dem
Gebrauch des Gerätes auf.
Um dieses Gerät an einen Computer (a) anzuschließen,
verwenden Sie das mitgelieferte USB-Ladekabel (b).
• Während des Ladens leuchtet die Power/Kopplungs-LED (c) rot.
Nach Abschluss des Ladevorgangs erlischt die Power/
Kopplungs-LED.
• Es dauert ca. 5 Stunden, den leeren Akku vollständig aufzuladen.
• Kontrollieren Sie die Ausrichtung der Anschlusskontakte und halten
Sie beim Anschließen/Abziehen den Stecker gerade. (Wenn der
Stecker schief oder falsch herum eingesteckt wird, kann es zu einer
Beschädigung der Buchse und zu Funktionsstörungen kommen.)
• Während des Aufladevorgangs kann das Gerät nicht eingeschaltet
und nicht mit Bluetooth®-Geräten verbunden werden.
• Vergewissern Sie sich, dass der Computer eingeschaltet ist und
sich nicht im Standby- oder Sleep-Modus befindet.
• Verwenden Sie ausschließlich das mitgelieferte USB-Ladekabel.
• Bei niedrigem Ladezustand des Akkus wechselt die Power/
Kopplungs-LED von Blau zu Rot, und bei weiterer Belastung des
Akkus wird im Abstand von 1 Minute ein Signalton ausgegeben.*
Wenn der Akku leer ist, wird eine englische Hinweismeldung
ausgegeben, und das Gerät wird ausgeschaltet.
* Wenn Sie [Í/I ( )] zweimal schnell hintereinander drücken,
ertönt eine englische Hinweismeldung und Sie können den
Akkuladestand prüfen.
Halten Sie im ausgeschalteten Zustand ca. 3 Sekunden lang die Taste
[
Í
/I ( )] (
a
) gedrückt, bis die Power/Kopplungs-LED blau (
b
) blinkt.
•
Ein Signalton ertönt, und die Power/Kopplungs-LED (blau) blinkt langsam.
Zum Ausschalten
Halten Sie [
Í
/I ( )] mindestens 3 Sekunden lang gedrückt. Eine
englische Hinweismeldung ertönt, und das Gerät wird ausgeschaltet.
• Wenn das Gerät nicht mit einem Bluetooth®-Gerät verbunden ist,
ertönt ca. 5 Minuten nach der letzten Verwendung eine englische
Hinweismeldung, und das Gerät wird automatisch ausgeschaltet.
(Automatische Abschaltung)
∫
∫
∫
∫∫ Bluetooth®-Kopplung
1
Halten Sie im ausgeschalteten Zustand die Taste [
Í
/I ( )] an
diesem Gerät gedrückt, bis die Power/Kopplungs-LED blinkt.
– Wenn zum ersten Mal ein Gerät gekoppelt wird:
ca. 3 Sekunden
–
Wenn ein zweites Gerät oder weitere Geräte gekoppelt werden:
ca. 5 Sekunden
• Das Gerät sucht nach dem Bluetooth
®-Gerät, zu dem eine
Verbindung hergestellt werden soll, und die Power/
Kopplungs-LED blinkt abwechselnd in blau und rot.
2 Schalten Sie das Bluetooth®-Gerät aus und aktivieren Sie die
Bluetooth ®
-Funktion.
3
Wählen Sie im Menü des Bluetooth
®
-Geräts “RP-HD305B” (
a
) aus.
• Wenn ein Passcode angefordert wird, geben Sie “0000 (vier
Nullen)” ein; dies ist der Passcode dieses Geräts.
• Wenn die Power/Kopplungs-LED ca. alle 2 Sekunden zweimal
blau blinkt, ist die Kopplung (Registrierung) abgeschlossen.
(Verbindung hergestellt)
• Wird innerhalb von ca. 5 Minuten keine Verbindung zu einem Gerät
hergestellt, schaltet sich das Gerät aus. Wiederholen Sie in diesem
Fall den Kopplungsvorgang.
∫
∫
∫
∫∫ Anschluss eines gekoppelten Bluetooth ®-Geräts
1 Schalten Sie dieses Gerät ein.
2 Führen Sie die Schritte 2 und 3 aus dem Abschnitt
“Bluetooth®-Kopplung” aus. ( oben)l
• Wenn die Power/Kopplungs-LED ca. alle 2 Sekunden zweimal
blau blinkt, ist die Kopplung (Registrierung) abgeschlossen.
(Verbindung hergestellt)
Zur Verwendung der Funktionen, die im Folgenden mit dem
[ ]-Symbol markiert sind, verbinden Sie das Bluetooth®-Gerät
mit diesem Gerät.
∫
∫
∫
∫∫ Musik hören [ ]
Wählen Sie Musik auf dem Bluetooth®-Gerät aus und starten
Sie die Wiedergabe.
• Der Kopfhörer des Geräts gibt die Musik oder den Ton des
wiedergegebenen Videos aus.
∫
∫
∫
∫∫ Fernbedienung (nur verfügbar, wenn Ihr
Bluetooth®-Gerät die Bluetooth ®-Profile “AVRCP”
unterstützt) [ ]
(Beispielhafte Bedienvorgänge)
• Die Lautstärke kann in 31 Schritten eingestellt werden (16 Stufen
während eines Anrufs). Wenn die maximale oder minimale
Lautstärke erreicht ist, wird ein Signalton ausgegeben.
∫
∫
∫
∫∫ Auswählen des Sound-Modus [ ]
So können Sie die Klangqualität beim Wiedergeben von Musik
oder Videos ändern.
Drücken Sie die [SOUND]-Taste (d) an diesem Gerät.
• Die Klangqualität wird mit jedem Tastendruck geändert.
– Bass Enhancer : Dynamischerer Soundeffekt mit verstärkter
Bassfrequenz.
– Clear Voice : Die Klarheit von menschlichen Stimmen bei
Gesang und Dialogen wird erhöht.
– OFF : Die Soundeffekte werden ausgeschaltet.
• Die vor dem Ausschalten zuletzt ausgewählte Einstellung wird
gespeichert.
• Wenn der Modus gewechselt wird, erfolgt ein akustischer Hinweis.
• Je nach Musik/Videos, die wiedergegeben werden, ist der Effekt
möglicherweise nicht wirksam.
FPour retirer la batterie lors de la mise au
rebut de cet appareil
Les instructions suivantes ne sont pas destinées à des fins
de réparation mais pour la mise au rebut de cet appareil. Cet
appareil n’est pas récupérable une fois désassemblé.
• Lors de la mise au rebut de cet appareil, retirez la batterie
installée dans ce dernier et recyclez-la.
Dépannage ( Recto)l
D
Deutsch
ATeilebezeichnungen
BWird aufgeladen
CEin-/Ausschalten
DVerbinden eines Bluetooth®-Geräts
EVerwendung von Kopfhörern
Wiedergabe / Pause: Drücken Sie [1 ;/ / ] (a).
Lautstärke erhöhen: Drücken Sie [i] (b).
Lautstärke verringern: Drücken Sie [j] (c).
Zum Anfang des
nächsten Titels
springen: Drücken Sie [1 ;/ / ] zweimal schnell
hintereinander.
Zum Anfang des
aktuellen Titels
springen: Drücken Sie [1 ;/ / ] dreimal schnell
hintereinander.
Schnellvorlauf: Drücken Sie [1 ;/ / ] zweimal schnell
hintereinander und halten Sie sie beim
zweiten Mal gedrückt.
Schnellrücklauf: Drücken Sie [ / ] dreimal schnell 1 ;/
hintereinander und halten Sie sie beim
dritten Mal gedrückt.
∫
∫
∫
∫∫ Einen Anruf tätigen [ ]
1 Drücken Sie [1 ;/ / ] (a) am Gerät, um den eingehenden
Anruf anzunehmen.
• (Nur HFP) Um den eingehenden Anruf abzuweisen, drücken Sie
[ /1 ;/ ] zweimal schnell hintereinander.
2 Sprechen Sie.
3 Drücken Sie [1 ;/ / ], um den Anruf zu beenden.
• (Nur HFP) Telefongespräche sind möglicherweise schlecht zu
verstehen, wenn das Gerät in geräuschvoller Umgebung, im
Freien oder an anderen Orten mit starkem Wind betrieben wird.
Um das Gespräch in einem solchen Fall fortsetzen zu können,
wechseln Sie den Standort oder übergeben Sie das Gespräch an
das Bluetooth®-Telefon. (Zur Übergabe drücken Sie die [1 ;/ / ]
am Gerät zweimal schnell hintereinander.)
• Sie können das Bluetooth®-fähige Gerät zum Tätigen von
Telefonanrufen verwenden, indem Sie das Mikrofon des Geräts
und eine App des Bluetooth
®-fähigen Telefons verwenden.
(
lunten, “Aktivieren der Sprachfunktionen”)
∫
∫
∫
∫∫ Aktivieren der Sprachfunktionen [ ]
Sie können eine Taste an diesem Gerät verwenden, um Siri
oder andere Sprachfunktionen auf Ihrem Smartphone oder
ähnlichen Gerät zu aktivieren.
Halten Sie [1 ;/ / ] (a) an diesem Gerät gedrückt, bis die
Sprachfunktion aktiviert wird.
∫
∫
∫
∫∫ Verwendung des abnehmbaren Kabels (mitgeliefert)
Bei ausgeschaltetem Gerät oder entladenem Akku kann dieses
Gerät als normaler Kopfhörer verwendet werden, indem das
abnehmbare Kabel (mitgeliefert) angeschlossen wird. (e)
• Wird das abnehmbare Kabel (mitgeliefert) bei vorhandener
Bluetooth®-Verbindung angeschlossen, so wird das Gerät
ausgeschaltet.
• Verschmutzungen am Stecker können Störgeräusche
verursachen. Reinigen Sie in diesem Fall den Stecker mit einem
weichen, trockenen Tuch.
• Verwenden Sie ausschließlich das mitgelieferte abnehmbare
Kabel.
∫
∫
∫
∫∫ Rücksetzen auf die Werkseinstellungen
Laden Sie den Akku auf, bevor Sie das Gerät zurücksetzen.
1 Halten Sie bei ausgeschaltetem Gerät [Í/I ( )] mindestens
5 Sekunden lang gedrückt, bis die Power/Kopplungs-LED
abwechselnd blau und rot leuchtet.
2 Wenn die Power/Kopplungs-LED abwechselnd blau und rot
leuchtet, halten Sie die Tasten [i] ( ) und [ ] (bjc)
gleichzeitig mindestens 5 Sekunden lang gedrückt.
• Nachdem die Power/Kopplungs-LED (blau) schnell blinkt und
das Gerät sich ausschaltet, werden die Standardeinstellungen
wiederhergestellt.
• Soll ein Gerät neu gekoppelt werden, löschen Sie die
Registrierungsinformation (Gerät: “RP-HD305B”) im Menü des
Bluetooth®-Geräts, und koppeln Sie dieses Gerät mit dem
Bluetooth®-Gerät erneut. (l)
• Zerlegen Sie das Gerät, nachdem der Akku das Ende seiner
Lebensdauer erreicht hat.
• Bewahren Sie die zerlegten Teile außerhalb der Reichweite von
Kindern auf.
Handhabung von verbrauchten Akkus
• Isolieren Sie die Klemmen mit Klebeband oder ähnlichem Material.
• Zerlegen Sie den Akku nicht.
∫
∫
∫
∫∫ Batterien
• Setzen Sie die Batterien niemals großer Hitze oder offenem Feuer
aus.
• Lassen Sie die Batterien niemals über längere Zeit in einem Auto
mit geschlossenen Türen und Fenstern zurück, das direkter
Sonneneinstrahlung ausgesetzt ist.
• Bei falscher Handhabung von Batterien kann Elektrolyt austreten,
und Gegenstände, die mit der ausgetretenen Flüssigkeit in
Berührung kommen, können beschädigt werden. Wenn Elektrolyt
aus der Batterie austritt, wenden Sie sich bitte an Ihren Händler.
Wenn Elektrolyt mit Körperteilen in Berührung kommt, diese
gründlich mit Wasser abspülen.
• Wenden Sie sich zur Entsorgung der Akkus an die lokalen
Behörden oder Ihren Händler und erfragen Sie die richtige
Vorgehensweise zur Entsorgung.
1 Führen Sie einen Schlitzschraubendreher in die Lücke an
der Außenseite des linken Kopfhörers (a).
2 Verwenden Sie einen Schlitzschraubendreher, um b
anzuheben.
3 Entnehmen Sie den Akku und schneiden Sie die Drähte
einzeln mit einer Schere ab.
Sales and Support Information
Customer Communications Centre
• For customers within the UK: 0344 844 3899
• For customers within Ireland: 01 289 8333
• Monday– Friday 9:00 am – 5:00 pm (Excluding public holidays).
• For further support on your product, please visit our website:
www.panasonic.co.uk
Direct Sales at Panasonic UK
• Order accessory and consumable items for your product with ease
and confidence by phoning our Customer Communications Centre
Monday – Friday 9:00 am– 5:00 pm (Excluding public holidays).
• Or go on line through our Internet Accessory ordering application
at www.pas-europe.com.
• Most major credit and debit cards accepted.
• All enquiries transactions and distribution facilities are provided
directly by Panasonic UK.
• It couldn’t be simpler!
• Also available through our Internet is direct shopping for a wide range of
finished products. Take a browse on our website for further details.
D
FEntfernen des Akkus zur Entsorgung dieses
Geräts
Die folgenden Anweisungen sind nicht für Reparaturzwecke
vorgesehen, sondern für die Entsorgung dieses Geräts.
Dieses Gerät ist nicht wiederherstellbar, sobald es einmal
zerlegt wurde.
• Entnehmen Sie für die Entsorgung dieses Geräts den in
diesem Gerät installierten Akku und recyclen Sie ihn.
Problembehebung (l Vorderseite)
Panasonic Warranty
If you require assistance regarding warranty condions or any other enquiries, please visit the Panasonic
Australia website www.panasonic.com.au or contact by phone on 132 600
If phoning in, please ensure you have your operang instrucons available.
THIS WARRANTY CARD AND THE PURCHASE DOCKET (OR SIMILAR PROOF OF PURCHASE)
SHOULD BE RETAINED BY THE CUSTOMER AT ALL TIMES
Panasonic Australia Pty. Limited
ACN 001 592 187 ABN 83 001 592 187
1 Innovation Road, Macquarie Park NSW 2113
www.panasonic.com.au
PRO-031-F11 Issue: 5.0 23-01-2018
1.
Subject to the condions of this warranty Panasonic or its Authorised Service Centre will perform necessary service on the product,
without charge for parts or labour, if in the opinion of Panasonic the product is found to have a manufacturing defect within one
(1) year or (12 months) (the “warranty period”) from the date of purchase appearing on your purchase receipt.
This warranty only applies to Panasonic products purchased in Australia and sold by Panasonic Australia, it’s Authorised Distributors, or
Dealers, and only where the products are used and serviced within Australia or its territories. Warranty cover only applies to the services
that are carried out by a Panasonic Authorised Service Centre and only if valid proof of purchase is presented when the warranty service is
requested.
This warranty only applies if the product has been installed and/or used in accordance with the manufacturer’s recommendaons (as noted
in the operang instrucons) under normal use and reasonable care (in the opinion of Panasonic). The warranty does not cover damage,
malfuncon or failure resulng from use of incorrect voltages, incorrect installaon, accident, misuse, neglect, build-up of dirt or dust,
abuse, maladjustment of customer controls, mains supply problems, thunderstorm acvity, infestaon by insects or vermin, tampering or
repair by unauthorised persons (including unauthorised alteraons), exposure to abnormally corrosive condions, or any foreign object or
maer having entered the product.
This warranty does not cover the following items unless the fault or defect existed at the me of purchase:
(a) Consumable parts
(b) Cosmec parts
(c) Worn or damaged parts
(d) Informaon stored on Hard Disk Drives, Opcal Discs, USB Devices, SD Cards, Tapes
(e) DTV recepon issues caused by TV Aerial / Cabling / Wall socket(s)
Some products may be supplied with Ethernet connecon hardware. The warranty is limited on such products and will not cover:
(a) Internet and or DLNA connecon / setup related problems
(b) Access fees and or charges incurred for internet connecon
(c) Incompable soware or soware not specifically spulated in the product operaons manual; and
(d) Any indirect or consequenal costs associated with the incorrect use or misuse of the hardware, its connecon to the internet or any
other device.
To claim warranty service, when required, you should:
• Contact Panasonic’s Customer Care Centre on 132 600 for Service Centre informaon.
• Confirm the opening and acceptance mes with the Authorised Service centre that you choose.
• Then send or take the product to a Panasonic Authorised Service Centre together with your proof of purchase receipt.
• Any freight and insurance costs associated with the transport of the product to and/or from your nearest Authorised Service Centre must
be arranged and paid for by you.
The warranes hereby conferred do not extend to, and exclude, any costs associated with the installaon, de-installaon or re-installaon
of a product, including costs related to the mounng, de-mounng or remounng of any screen, (and any other ancillary acvies), delivery,
handling, freighng, transportaon or insurance of the product or any part thereof or replacement of and do not extend to, and exclude,
any damage or loss occurring by reason of, during, associated with, or related to such installaon, de-installaon, re-installaon or transit.
2.
3.
4.
5.
6.
7.
Panasonic Authorised Service Centres are located in major metropolitan areas and most regional centres of Australia, however, coverage will
vary dependant on product. For advice on exact Authorised Service Centre locaons for your product, please telephone our Customer Care
Centre on 132600 or visit our website and use the Service Centre Locator.
In addion to your rights under this warranty, Panasonic products come with consumer guarantees that cannot be excluded under the
Australian Consumer Law. If there is a major failure with the product, you can reject the product and elect to have a refund or to have the
product replaced or if you wish you may elect to keep the goods and be compensated for the drop in value of the goods. You are also entled to
have the product repaired or replaced if the product fails to be of acceptable quality and the failure does not amount to a major failure.
If there is a major failure in regard to the product which cannot be remedied then you must nofy us within a reasonable period by contacng
the Panasonic Customer Care Centre. If the failure in the product is not a major failure then Panasonic may choose to repair or replace the
product and will do so in a reasonable period of me from receiving noce from you.
Product specificaties
| Merk: | Panasonic |
| Categorie: | Hoofdtelefoon |
| Model: | RP-HD305 |
Heb je hulp nodig?
Als je hulp nodig hebt met Panasonic RP-HD305 stel dan hieronder een vraag en andere gebruikers zullen je antwoorden
Handleiding Hoofdtelefoon Panasonic

25 November 2024

23 November 2024

23 November 2024

23 November 2024

23 November 2024
23 November 2024

20 Februari 2024

29 Augustus 2023

9 Mei 2023

3 Mei 2023
Handleiding Hoofdtelefoon
- Mitel
- Kensington
- NZXT
- Focal
- Tek Republic
- Sangean
- Tracer
- AudioQuest
- Trevi
- Shure
- Cayin
- Boompods
- Focusrite
- Mtx Audio
- Envivo
Nieuwste handleidingen voor Hoofdtelefoon
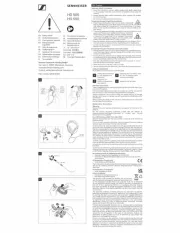
6 Augustus 2025

6 Augustus 2025
5 Augustus 2025
5 Augustus 2025
4 Augustus 2025
4 Augustus 2025

4 Augustus 2025
4 Augustus 2025
3 Augustus 2025

3 Augustus 2025