Panasonic EY3795 Handleiding
Panasonic
Niet gecategoriseerd
EY3795
Bekijk gratis de handleiding van Panasonic EY3795 (10 pagina’s), behorend tot de categorie Niet gecategoriseerd. Deze gids werd als nuttig beoordeeld door 31 mensen en kreeg gemiddeld 4.5 sterren uit 16 reviews. Heb je een vraag over Panasonic EY3795 of wil je andere gebruikers van dit product iets vragen? Stel een vraag
Pagina 1/10

EY981037941 H1611
No.1 EN, GR, FR, IT, ND, ES, DN, SW, NR, FN, PY, UK
Model No: EY3794/EY3795/EY3796
Printed in Japan
Matsushita Electric Works, Ltd.
1048, Kadoma, Osaka 571-8686, Japan
Flashlight
Leuchte
Torche
Torcia elettrica
Werklamp
Linterna
Lommelygte
Ficklampa
Lykt
Lamppu
ŇڇÂÈÌ˚È ÙÓ̇¸
ŇڇÂÈÌËÈ Î¥ıÚ‡
Operating Instructions
Bedienungsanleitung
Instructions d'utilisation
Istruzioni per l'uso
Gebruiksaanwijzing
Manual de instrucciones
Brugsvejledning
Driftsföreskrifter
Bruksanvisning
Käyttöohjeet
àÌÒÚÛ͈Ëfl ÔÓ ˝ÍÒÔÎÛ‡Ú‡ˆËË
ßÌÒÚÛ͈¥fl Á ÂÍÒÔÎÛ‡Ú‡ˆ¥ª
Before operating this unit, please read these instructions completely and save this manual for future use.
Vor Inbetriebnahme des Gerätes, die Betriebsanleitung bitte grüdlich durchlesen und diese Broschüre zum späteren
Nachschlagen sorgfältig aufbewahren.
Lire entièrement les instructions suivantes avant de faire fonctionner l'appareil et conserver ce mode d'emploi à des fins de
consultation ultérieure.
Prima di usare questa unità, leggere completamente queste istruzioni e conservare il manuale per usi futuri.
Lees deze gebruiksaanwijzing aandachtig door voor u het apparaat in gebruik neemt en bewaar de gebruiksaanwijzing
voor eventuele naslag.
Antes de usar este aparato por primera vez, lea todas las instrucciones de este manual y guarde el manual para poderlo
consultar en el futuro.
Gennemlæs denne betjeningsvejledning før brugen og gem den til fremtidig brug.
Läs igenom hela bruksanvisningen innan strålkastaren tas i bruk. Spara bruksanvisningen för senere användning.
Før enheten tas i bruk, vennligst les disse alle anvisningene og oppbevar deretter bruksanvisningen for senere bruk.
Lue ohjeet huolella ennen laitteen käyttöönottoa ja säilytä tämä käyttöohje tallessa tulevaa tarvetta varten.
è‰ ˝ÍÒÔÎÛ‡Ú‡ˆËÂÈ ‰‡ÌÌÓ„Ó ÛÒÚÓÈÒÚ‚‡, ÔÓʇÎÛÈÒÚ‡, ÔÓÎÌÓÒÚ¸˛ ÔÓ˜ÚËÚ ‰‡ÌÌÛ˛ ËÌÒÚÛÍˆË˛ Ë ÒÓı‡ÌËÚÂ
‰‡ÌÌÓ ÛÍÓ‚Ó‰ÒÚ‚Ó ‰Îfl ËÒÔÓθÁÓ‚‡ÌËfl ‚ ·Û‰Û˘ÂÏ.!
è‰ ÂÍÒÔÎÛ‡Ú‡ˆ¥π˛ ‰‡ÌÓ„Ó ÔËÒÚÓ˛, ·Û‰¸ ·Ò͇, ÔÓ‚Ì¥ÒÚ˛ ÔÓ˜ËÚ‡ÈÚ ‰‡ÌÛ ¥ÌÒÚÛ͈¥˛ ¥ Á·ÂÂÊ¥Ú¸ ‰‡ÌËÈ
ÔÓÒi·ÌËÍ ‰Îfl ‚ËÍÓËÒÚ‡ÌÌfl Û Ï‡È·ÛÚ̸ÓÏÛ.

2 3
PARTS AND CONTROLS
TEILE UND BEDIENELEMENTE
PI CES ET COMMANDESÉ
PARTI E COMANDI
ONDERDELEN EN BEDIENINGSORGANEN
PIEZAS Y CONTROLES
DELE OG KONTROLLER
DELAR OCH REGLAGE
DELER OG FUNKSJONER
OSAT JA K YTT LAITTEETÄ Ö
óÄëíà à éêÉÄçõ ìèêÄÇãÖçàü
óÄëíàçà íÄ éêÉÄçà äÖêìÇÄççü
Shoulder strap
Schulterriemen
Bandouli reè
Cinghietta da spalla
Schouderriem
Correa para los hombros
Skulderrem
Axelrem
Skulderstropp
Olkahihna
èΘ‚ÓÈ ÂÏÂ̸!
èΘӂËÈ Âϥ̸
Spare bulb
Ersatzgl hlampeü
Ampoule de r serveé
Lampadina di ricambio
Reservelamp
Bombilla de recambio
Reservep reæ
Extra gl dlampaö
Reservelysp reæ
Varalamppu
á‡Ô‡Ò̇fl ·ÏÔ‡!
á‡Ô‡Ò̇ ·ÏÔ‡!
Xenon bulb
Xenonlampe
Ampoule X noné
Lampadina allo xeno
Xenon-lamp
Bombilla de xen nó
Xenon-p reæ
Xenongl dlampaö
Xenon-lysp reæ
Xenon-poltin
äÒÂÌÓÌÓ‚‡fl ·ÏÔ‡!
äÒÂÌÓÌÓ‚‡ ·ÏÔ‡!
Shoulder strap slot
Schulterriemenschlitz
Interstice pour la bandouli reè
Asola per tracolla
Gleuf voor schouderriem
Ranura para la correa del hombro
Øje til skulderrem
Axelrems glaö
Feste for skulderstropp
Olkahihnan reikä
èÓÂÁ¸ ‰Îfl ÔÎÂ˜Â‚Ó„Ó ÂÏÌfl!
èÓ¥Á ‰Îfl ÔÎÂ˜Ó‚Ó„Ó ÂÏÂÌfl!
Note: Battery pack and charger are not included in this kit.
Hinweis: Akku und Ladeger t sind in diesem Satz nicht enthalten.ä
Remarque: La batterie et le chargeur ne sont pas compris dans ce kit.
Nota: Il pacco batteria e il caricabatteria non sono inclusi in questo kit.
Opmerking: De accu en de acculader worden niet bij deze set geleverd.
Nota: Con esta linterna no se incluye bater a ni cargador.í
Bem rk:æ Batteriet og opladeren er ikke inkluderet i dette s t.æ
Notera: Batteri och batteriladdare f ljer inte med i detta paket.ö
Merk: Batteripakke og lader f lger ikke med i denne pakken.ø
Huom: Akku ja latauslaite eiv t kuulu t h n sarjaan.ä ä ä
èËϘ‡ÌËÂ: ŇڇÂÈÌ˚È ·ÎÓÍ Ë Á‡fl‰ÌÓ ÛÒÚÓÈÒÚ‚Ó Ì ‚ıÓ‰flÚ ‚ ‰‡ÌÌ˚È ÍÓÏÔÎÂÍÚ.!
èËÏ¥Ú͇: ŇڇÂÈÌËÈ ·ÎÓÍ Ú‡ Á‡fl‰ÌËÈ ÔËÒÚ¥È Ì ‚ıÓ‰flÚ¸ ‰Ó ‰‡ÌÓ„Ó ÍÓÏÔÎÂÍÚÛ.
English: Page 5
Deutsch: Seite 6
Fran ais: Page 7ç
Italiano: Pagina 8
Nederlands: Bladzijde 9
Espa ol: P gina 10ñ á
Dansk: Side 11
Svenska: Sid. 12
Norsk: Side 13
Suomi: Sivu 14
êÛÒÒÍËÈ:+ ëÚ‡Ìˈ‡ 15
ì͇ªÌÒ¸ÍËÈ:+ ëÚÓ¥Ì͇ 16
Lens
Linse
Objectif
Lente
Lens
Cristal
Linse
Lins
Linse
Linssi
ãËÌÁ‡!
ã¥ÌÁ‡!
Reflector
Reflektor
R flecteuré
Riflettore
Reflector
Reflector
Reflektor
Reflektor
Reflektor
Heijastin
éڇʇÚÂθ!
Ç¥‰·Ë‚‡˜!
Ring
Ring
Bague
Anello
Ring
Anillo
Ring
Ring
Ring
Rengas
äÓθˆÓ!
ä¥Î¸ˆÂ!
Low voltage indicator
Niederspannungsanzeige
Témoin de faible tension
Indicatore di batteria scarica
Indicator voor lage spanning
Indicador del nivel de carga de la misma
Indikator for lav sp ndingæ
Indikator f r svagt batteriö
Indikator for lavt batterinivå
Virta v hiss merkkivaloä ä
à̉Ë͇ÚÓ ÌËÁÍÓ„Ó Ì‡ÔflÊÂÌËfl!
ß̉Ë͇ÚÓ ÌËÁ¸ÍÓª ̇ÔÛ„Ë!
Switch
Schalter
Bouton
Interruttore
Schakelaar
Interruptor
Afbryder
Str mbrytareö
Bryter
Kytkin
Ç˚Íβ˜‡ÚÂθ!
ÇËÏË͇˜!
(A)
(B)
(C)
(D)
(E)
(G)
(F)
(H)
(I)
(A)
(B)
(C)
(D)
(E)
(F)
(G)
(H)
(I)
Pictograms / Piktogramme / Symboles / Pittogrammi / Pictogrammen / Pictogramas / Piktogrammer /
Bilddiagram / Symboler / Merkit / èËÍÚÓ„‡ÏÏ˚ è¥ÍÚÓ„‡ÏË /
General warning
Allgemeine Warnung
Avertissement g n ralé é
Avvertenze in generale
Algemene waarschuwing
Aviso general
Generel advarsel
Allm n varningä
Generell advarsel
Yleinen varoitus
鷢 ԉÛÔÂʉÂÌËÂ!
ᇄ‡Î¸Ì ÔÓÔ‰ÊÂÌÌfl!
Read instructions
Lesen Sie die Anweisungen
Lire les instructions
Leggere le istruzioni
Lees de instructies
Lea las instrucciones
L s instruktionerneæ
L s anvisningarnaä
Les instruksjonene
Lue ohjeet
èÓ˜ÚËÚ ËÌÒÚÛ͈ËË!
èÓ˜ËÚ‡ÈÚ ¥ÌÒÚÛ͈¥ª!
Index / Hinweise / Index / Indice / Index / Indice / Indeks / Index / Indeks / Hakemisto / à̉ÂÍÒ / ß̉ÂÍÒ

WARNING
CAUTION
1. This flashlight is not water- proof.
• Do not use it in damp or wet locations.
• Do not expose it to rain or snow.
• Do not wash it in water.
• Keep it in a safe, dry, and clean area
when it is not in use.
2. Flashlight automatically goes off when the
battery voltage drops below a specified level.
3. Do not disassemble the flashlight. Servicing
should be performed by an authorized
service center.
4. Do not throw the battery pack into a fire.
This can cause an explosion.
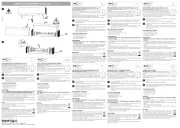
ASSEMBLY
1. To insert the battery pack; (fig.1)
Slide the battery pack in place at the bottom of
the flashlight. The battery should snap into
place. If this is loosen, it has not been properly
connected.
Make sure the battery is securely connected
to the flashlight.
2. To remove the battery pack;
Press the two tabs on the sides of the battery
pack. Slide the battery pack out of the flashlight.
3. Shoulder strap (fig.2)
Follow the steps to make the loop at the buckle.
Make sure the strap is firmly fixed on the
flashlight.
MAINTENANCE
ACCESSORIES
• To make any adjustments, changing accessory,
or storing the flashlight, remove battery pack
from the flashlight.
• To clean the flashlight, wipe with a dry, soft
cloth.
How to replace the new bulb. (fig.4)
1. Take off the ring ( )
2. Match the joint part A and B, then remove the
bulb. ( , )
3. Install the new bulb and turn to hold firmly.
( , )
4. Fit the ring. ( )
Lens, reflector, and bulb are hot immediately
after use. Wait a while before replacing the
bulb after switch off.
* To purchase a new bulb, please consult your
authorized dealer. (Please always use the
genuine bulbs.)
CAUTION:
• Read the instruction manual of the charger
to charge the battery pack, and how to
handle battery pack.
Bulb creates heat when it is in use. Heat
may be trapped and cause an accident.
• Do not cover the flashlight with cloth or
paper during use.
• Do not place the head part of the light on
the floor.
• Do not touch the lens, reflector, and bulb
during use or just after the use as they
become hot.
• Do not use any other battery pack besides
as shown in the Specifications.
Battery Pack
• See the Specification at the bottom of this page.
• For inquiries please contact an authorized dealer.
Battery Charger
OPERATION
READ ALL INSTRUCTIONS
1. Press the switch to light on.
2. Head angle adjustment; (fig.3)
Head angle can be changed at 4-locking
positions for desired angle.
3. When it is placed away from you, make sure it
will not be tumble.
4. When the battery capacity level gets low, Iow
voltage indicator will start to blink. Then charge
the battery pack.
5. Press the switch to light off after use.
SPECIFICATIONS
0
20
45
90
321
1
1
23
4 5 1
2 3
4 5
Fig.1. Assembly
Abb. 1 Montage
Fig. 1 Ensemble
Fig. 1: Montaggio
Afb. 1 Montage
Figura 1. Ensamblaje
Fig. 1. Samling
Bild 1 Hops ttningä
Fig. 1. Montering
Kuva 1 Kokoaminen
êËÒ. 1. ë·Ó͇!
êËÒ. 1. á·Ë‡ÌÌfl!
!
Fig.3. Head Angle adjustment
Abb. 3 Kopf-Winkeleinstellung
Fig. 3 Ajustement de l angle de la t te’ ê
Fig. 3: Regolazione angolazione testa
Afb. 3 Afstellen van de lamphoek
Figura 3. Ajuste de ngulo del cabezalá
Fig. 3. Indstilling af hovedets vinkel
Bild 3 Vinkling av lamphuvudet
Fig. 3. Justering av vinkelen p lykthodetå
Kuva 3 P n kulman s tää ää ö
êËÒ. 3. ê„ÛÎËӂ͇ ۄ· „ÓÎÓ‚ÍË!
êËÒ. 3. ê„Û₇ÌÌfl ÍÛÚ‡ „ÓÎÓ‚ÍË
Fig.2. Shoulder strap
Abb. 2 Schulterriemen
Fig. 2 Bandouli reè
Fig. 2: Cinghietta da spalla
Afb. 2 Schouderriem
Figura 2. Correa para los hombros
Fig. 2. Skulderrem
Bild 2 Axelrem
Fig. 2. Skulderstropp
Kuva 2 Olkahihna
êËÒ. 2. èΘ‚ÓÈ ÂÏÂ̸!
êËÒ. 2. èΘӂËÈ Âϥ̸
Fig.4. Replace the bulb
Abb. 4 Gl hlampe ersetzenü
Fig. 4 Remplacez l ampoule’
Fig. 4: Sostituzione della lampadina
Afb. 4 Vervangen van de lamp
Figura 4. Cambio de la bombilla
Fig. 4. Udskiftning af lysp renæ
Bild 4 Byte av gl dlampaö
Fig. 4. Skifte av p reæ
Kuva 4 Vaihda lamppu
êËÒ. 4. á‡ÏÂ̇ ·ÏÔ˚!
êËÒ. 4. á‡Ï¥Ì‡ ·ÏÔË
EY3794
12 V Xenon 0.7 A
12 volt battery pack
270 275 290n n n
EY9001
EY9101
EY9200
EY9005
EY9006
EY9106
EY9201
EY3795
15.6 V Xenon 0.7 A
15.6 volt battery pack
EY9136
EY9230
EY9231
EY3796
18 V Xenon 0.6 A
18 volt battery pack
EY9251
Model no.
Bulb type
Size
Weight
Applicable
battery packs
270 91 90 mm 270 113 90 mm 280 133 95 mm
A
B
4 5
Product specificaties
| Merk: | Panasonic |
| Categorie: | Niet gecategoriseerd |
| Model: | EY3795 |
Heb je hulp nodig?
Als je hulp nodig hebt met Panasonic EY3795 stel dan hieronder een vraag en andere gebruikers zullen je antwoorden
Handleiding Niet gecategoriseerd Panasonic
29 Juli 2025
5 Juli 2025
23 Mei 2025
16 Mei 2025
2 Mei 2025
28 April 2025
17 April 2025
17 April 2025

17 April 2025

16 April 2025
Handleiding Niet gecategoriseerd
- Karcher
- Europa Leisure
- Profilo
- Kenton
- DuroStar
- Gtech
- Chieftec
- GFM
- Storcube
- Mitsubishi
- Sightmark
- IOIO
- Apricorn
- Murideo
- Jean Louis David
Nieuwste handleidingen voor Niet gecategoriseerd
31 Juli 2025
31 Juli 2025
31 Juli 2025

31 Juli 2025
31 Juli 2025
31 Juli 2025
31 Juli 2025
31 Juli 2025
31 Juli 2025
31 Juli 2025