Panasonic CY-VMX6800U Handleiding
Panasonic
Niet gecategoriseerd
CY-VMX6800U
Bekijk gratis de handleiding van Panasonic CY-VMX6800U (10 pagina’s), behorend tot de categorie Niet gecategoriseerd. Deze gids werd als nuttig beoordeeld door 4 mensen en kreeg gemiddeld 3.5 sterren uit 2.5 reviews. Heb je een vraag over Panasonic CY-VMX6800U of wil je andere gebruikers van dit product iets vragen? Stel een vraag
Pagina 1/10
E
N
G
L
I
S
H
2
CY-VMX6800U
17
E
N
G
L
I
S
H
1
CY-VMX6800U
16
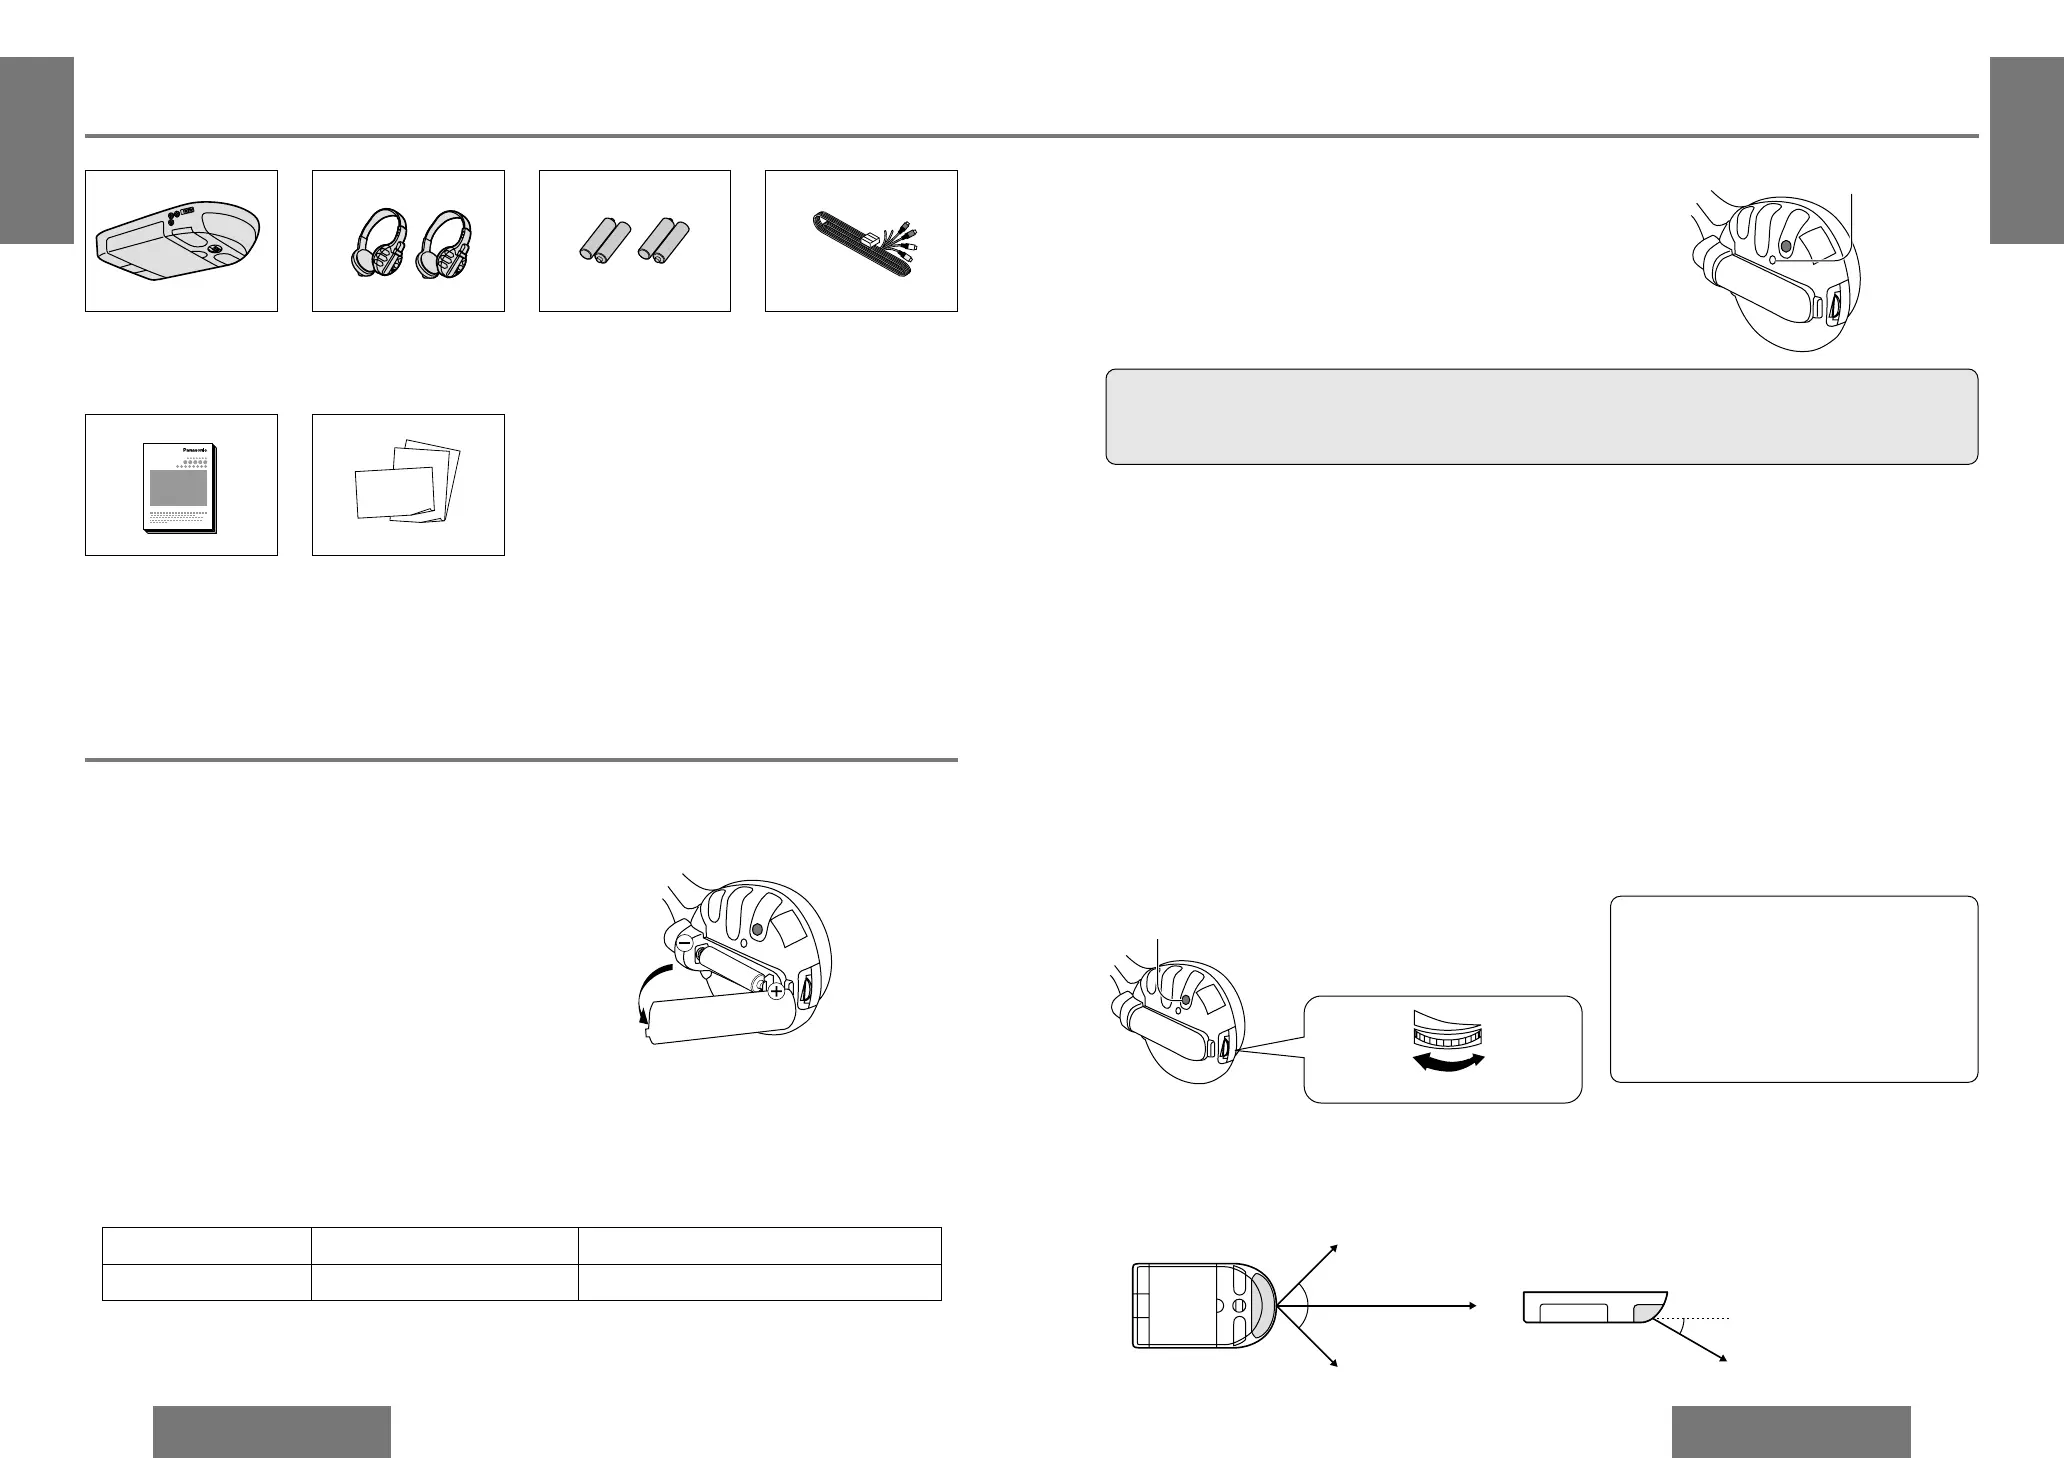
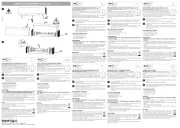
Components
≥ Display unit (1) ≥ Infrared wireless
stereo headphones (2)
≥ Batteries (R03/LR03,
AAA, UM-4) for wire-
less headphones (4)
≥ Power connector (1)
≥ Operating instructions
(1)
≥ Warranty card, etc.
Battery Installation (Inserting/Replacing the Batteries)
Battery Notes
How to Use the Wireless Headphone
❐ The Use of Range
These headphones use infrared rays for operation.
Use them within the range shown in the figure.
1. Open the battery holder cover.
2. Insert the battery.
Insert the battery in the correct direction, making sure that its
positive and negative ends match the same symbols in the bat-
tery holder.
3. Replace the cover.
The cover is fixed in place with a click.
Remove and dispose of an old battery immediately.
Battery information:
≥ Battery type: Manganese R03/LR03, AAA, UM-4 dry cells
≥ Battery life: Approximately 18 hours of continuous operation
Caution:
≥ Improper use of batteries may cause overheating, an explosion or ignition, resulting in injury or a fire.
Battery leakage may damage the unit.
≥ Do not use alkaline dry cells. (There is the danger of liquid leakage.)
≥ Do not disassemble or short the battery. Do not throw a battery into a fire.
≥ Keep batteries away from children to avoid the risk of accidents.
≥ Be careful to the local disposal rules when you dispose of batteries.
≥ If the batteries are used in the wrong way, there is the danger of liquid leakage, rupture, injuries, and failure.
Wireless Headphone Preparation
POWER
To check the remaining battery strength:
The POWER indicator on the right hand earpiece (R)
dims or fails to light when the batteries are weak.
Noise and interference also increase.
Change the batteries if any of these occur.
POWER
Volume up Volume down
Battery life When operation is possible When the battery needs to be replaced
POWER indicator Lights up green. Dims or fails to light.
POWER indicator
POWER
(Right side)
❐ Operations
Press the POWER button before wearing headphones.
Turn the volume on the headphones all the way down, then press the POWER button.
≥ The POWER indicator lights up.
❐ After Use
Press the POWER button to switch off.
❐ Volume Control
Notes:
≥ Do not play your headphones at a high
volume.
Hearing experts advise against continu-
ous extended play.
≥ Refer to the precautions for the head-
phones of “Use this Product Safely”.
POWER button
45e
45e
30e
Plane view: Vertical view:
Approximately 5 m
Approximately 2.5 m
Approximately 2.5 m
Approximately 2.5 m
≥ Installation hardware
(screws, cords, etc.)
(➡ page 26)
E
N
G
L
I
S
H
3
CY-VMX6800U
18
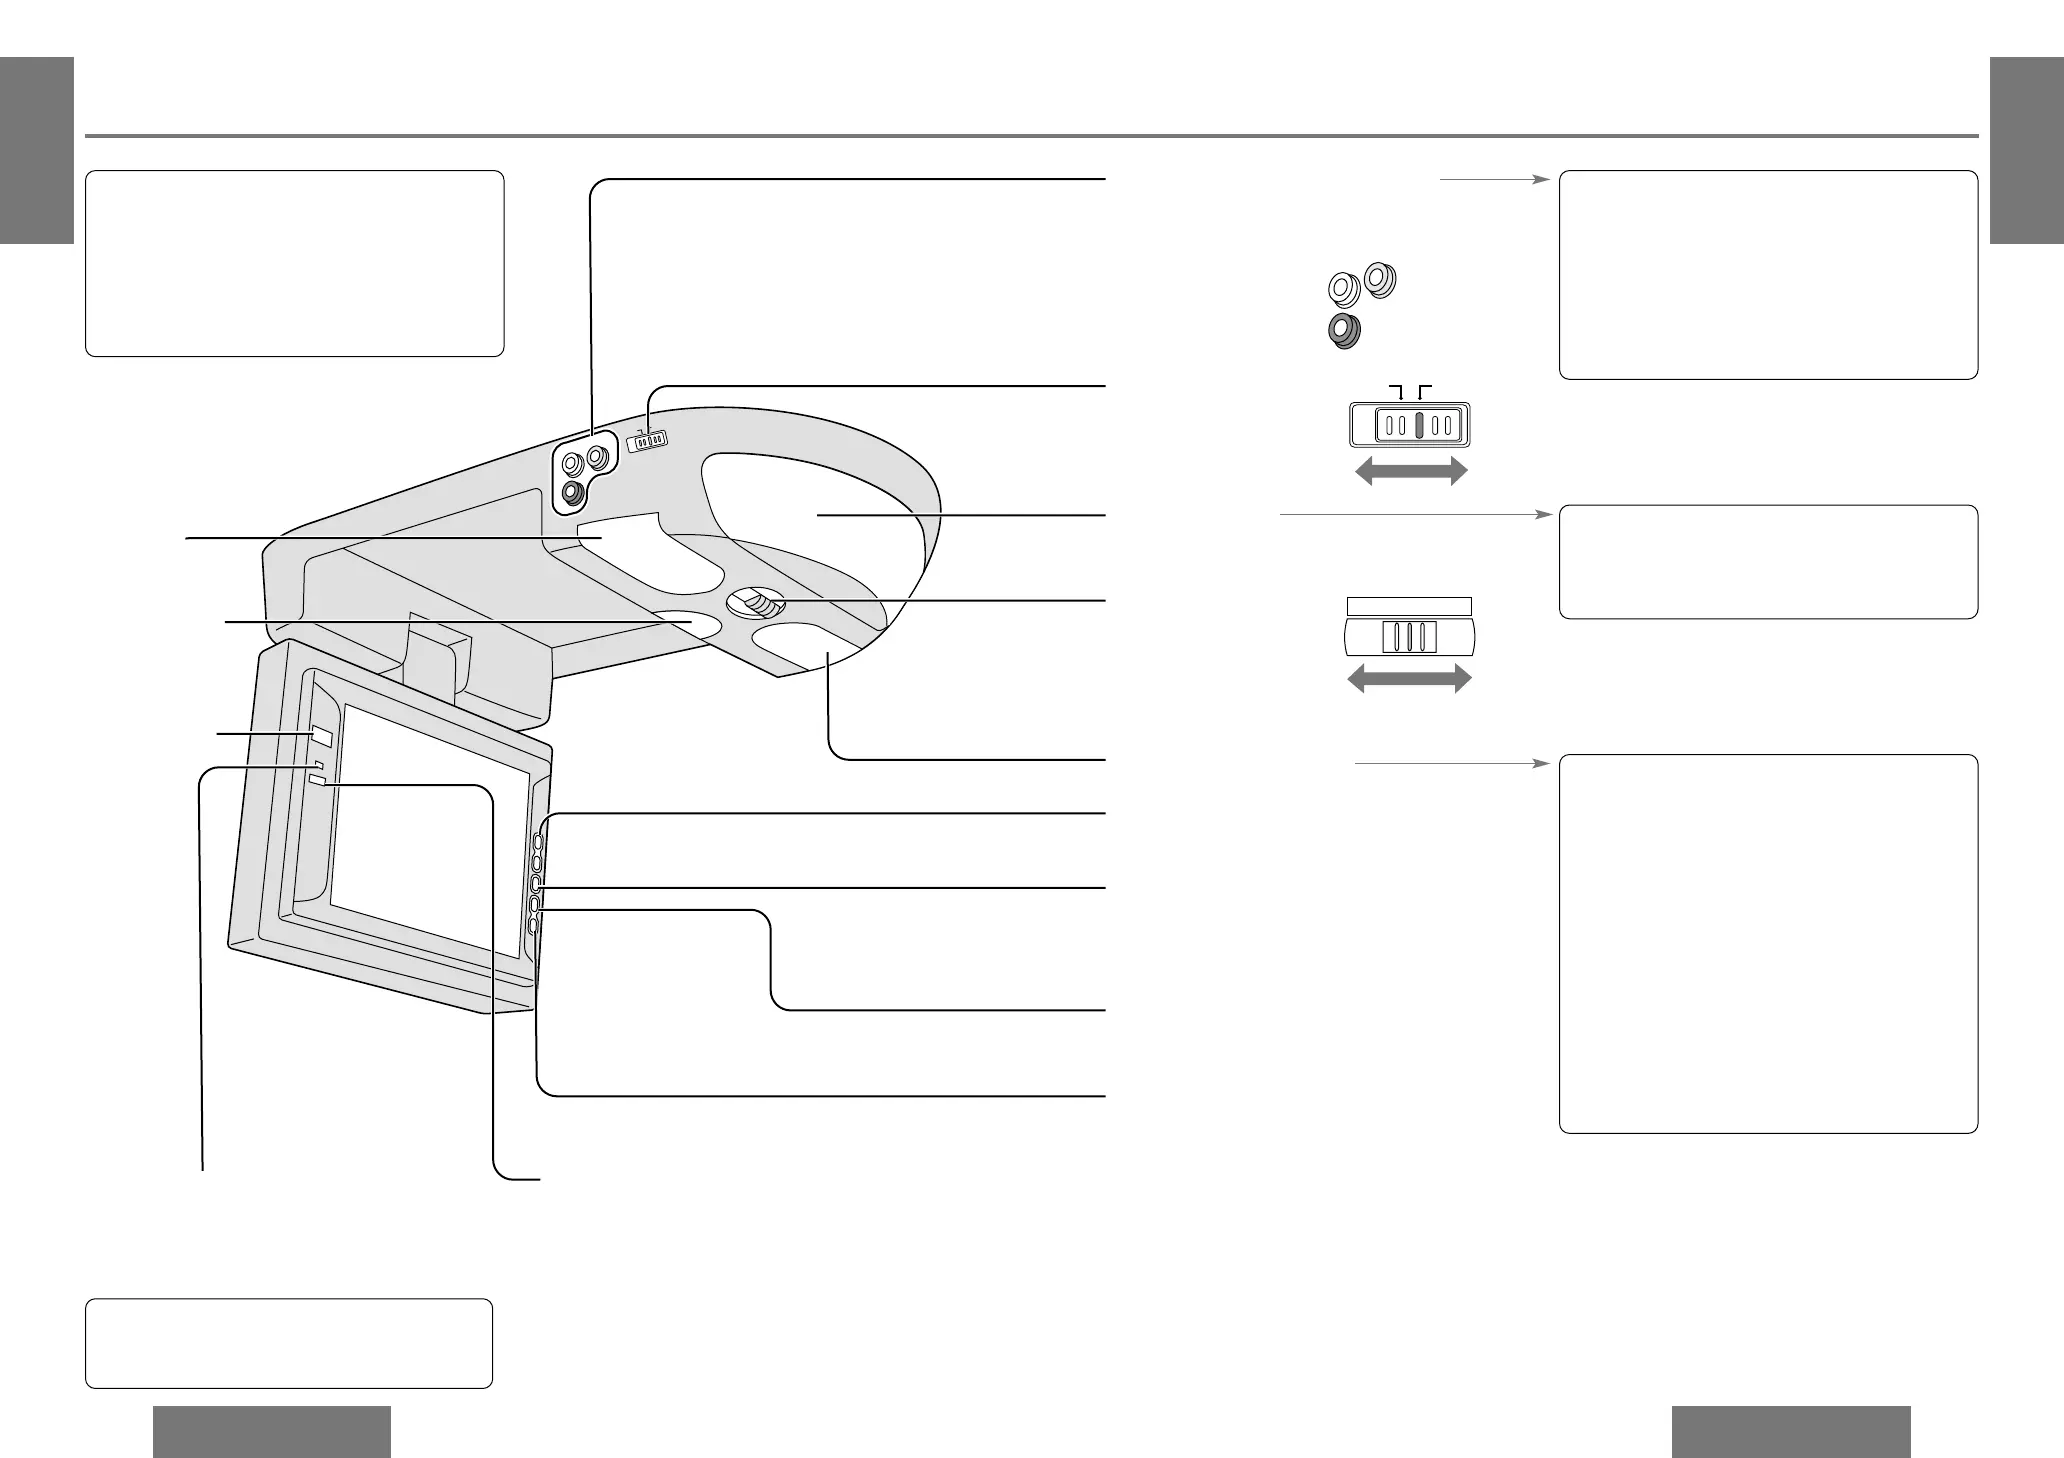
Name of Controls
Standby, power on indicator
[STANDBY (R) ON (G)]
When the power is off: red
When the power is on: green
Remote control
sensor
Dimmer sensor
This sensor automatically adjusts the screen bright-
ness.
(When automatic mode is set for the dimmer set-
ting, the screen brightness is automatically adjusted
to suit the surrounding brightness.)
(➡ pages 22, 23)
VTR input switch
(VTR1 or VTR2)
Used to select the VTR
input selection.
(➡ page 21)
V
TR1
V
TR
2
VTR
2-IN
L
R
VIDEO
Audio/video input terminal 2 (VTR2-IN)
Used to connect a game player or other device.
(➡ pages 30, 31)
E
N
G
L
I
S
H
4
CY-VMX6800U
19
Power button (POWER)
Used to turn the power ON and OFF.
(➡ page 21)
Menu button (MENU)
Used to determine the various settings.
(➡ pages 22j25)
Select buttons (", #)
Used to move the cursor. (➡ pages 22j25)
Infrared transmitter
Used to transmit audio to wireless head-
phones. (➡ page 17)
Mode button (MODE)
Used to select the dimmer mode.
(➡ pages 22, 23)
Room light,
Room light lens
Room light, Room light lens
Room light switch
DOOR: Room light is on
when door is
opened.
OFF: Room light is off.
ON: Room light is on.
Display release
button (OPEN)
(➡ page 20)
Notes:
≥ If you exchange the bulbs or encounter prob-
lems with the room lights, please consult your
nearest professional installer.
≥ Purchase 12 V, 5 W bulbs if bulbs other than the
ones supplied are to be used.
If bulb is in need of replacement:
1. Turn the power off.
2. Open the room light lens with a small flat blade
screw driver.
3. Remove old bulbs and replace with bulbs.
4. Reassemble lens covers.
5. Verify function of room lights by turning the
power on.
Note:
≥ Be sure to switch the unit to off when closing
the display.
VTR1VTR2
ONOFF
DOOR
Video (Yellow)
L (White)
R (Red)
Notes:
≥ When RCA cords have been connected to this
unit, secure them along the roof panel of the car
so that they will not dangle down or become eas-
ily disconnected.
≥ Take care to ensure that the RCA cords will not
become wrapped around your hands or neck
since this may cause an accident.
Notes:
≥ Make sure that the infrared transmitter is not
covered by hands or hair.
≥ Refrain from adhering stickers, etc.
Note:
≥ When the CX-DV700U has been connected, pro-
ceed with operation by pointing the remote con-
trol unit provided with the CX-DV700U at this
unit’s remote control sensor.
(This is done in order to operate the CX-DV700U
DVD player connected to this unit.)
Product specificaties
| Merk: | Panasonic |
| Categorie: | Niet gecategoriseerd |
| Model: | CY-VMX6800U |
Heb je hulp nodig?
Als je hulp nodig hebt met Panasonic CY-VMX6800U stel dan hieronder een vraag en andere gebruikers zullen je antwoorden
Handleiding Niet gecategoriseerd Panasonic

29 Juli 2025
5 Juli 2025
23 Mei 2025
16 Mei 2025
2 Mei 2025
28 April 2025
17 April 2025
17 April 2025

17 April 2025

16 April 2025
Handleiding Niet gecategoriseerd
- Samac
- Boneco
- Damixa
- Hangman
- Alesis
- Smart365
- Aqua Computer
- TROND
- Satechi
- Govee
- Exped
- Belva
- VCM
- Oecolux
- Angler
Nieuwste handleidingen voor Niet gecategoriseerd
31 Juli 2025
31 Juli 2025
31 Juli 2025

31 Juli 2025
31 Juli 2025
31 Juli 2025

31 Juli 2025
31 Juli 2025
31 Juli 2025

31 Juli 2025