Oliveri SB35BK Handleiding
Bekijk gratis de handleiding van Oliveri SB35BK (2 pagina’s), behorend tot de categorie Spoelbak. Deze gids werd als nuttig beoordeeld door 62 mensen en kreeg gemiddeld 5.0 sterren uit 2 reviews. Heb je een vraag over Oliveri SB35BK of wil je andere gebruikers van dit product iets vragen? Stel een vraag
Pagina 1/2
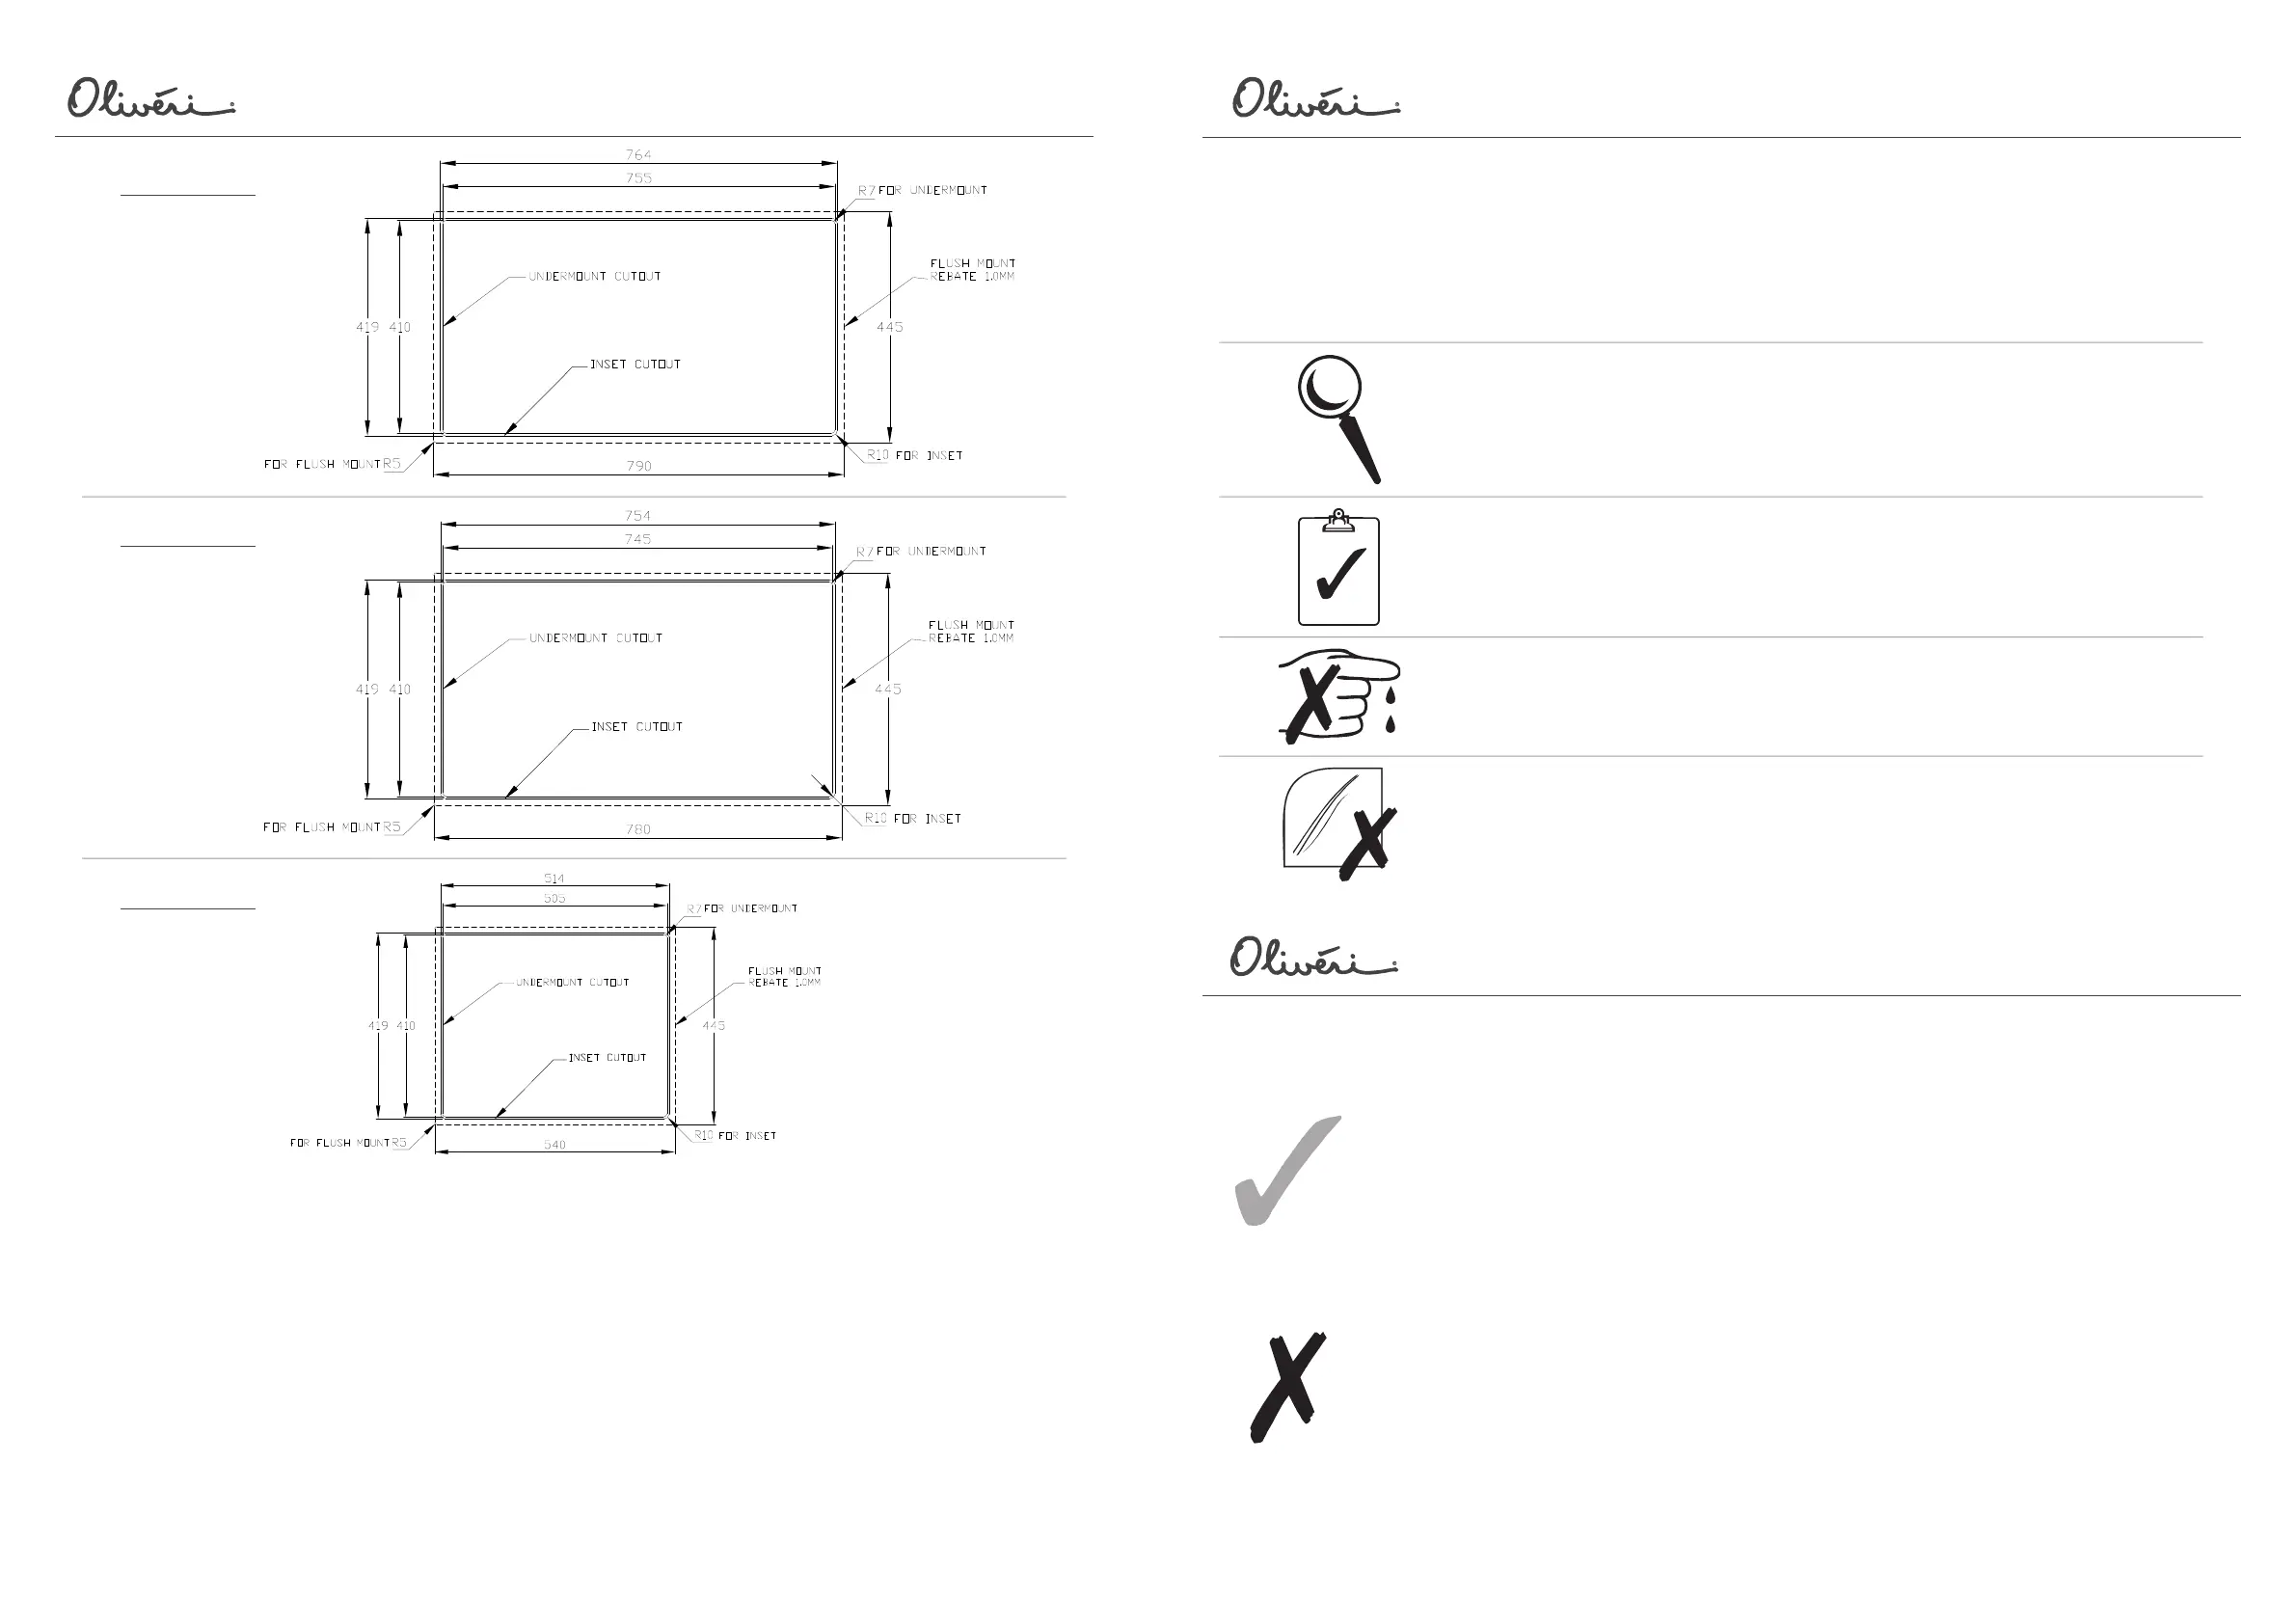
Template suits:
SB35SS
SB35GM
SB35CU
SB35BK
For topmount and undermount installation instructions see reverse.
For flushmount installation refer to your installer.
Digital templates are available at oliveri.com.au
T
emplate suits:
SB63SS
SB63GM
SB63CU
SB63BK
Template suits:
SB50SS
SB50GM
SB50CU
SB50BK
Care instructions for you coloured Oliveri stainless steel sink
AVOID CONTACT WITH ROUGH OR DIRTY SURFACES as new polished stainless steel will show scratches!
•Coloured sinks should only be cleaned with soapy water and a soft cloth or sponge, then rinsed and towelled
dry.
•The colouring is a solid coating (Physical Vapour Deposit) on the surface of the stainless steel only - harsh
scratching should be avoided.
•It is highly recommended to use the wire bowl protector provided with the sink, to protect the bottom of the
bowl
•Never use steel wool in or on the sink (steel wool should be avoided with any stainless steel sink, as it can leave
steel deposits on the sink, which can cause rust).
•Never use harsh abrasive cleaning pads to clean coloured sinks.
•Never use harsh chemicals or bleaches to clean coloured sinks.
•Do not store harsh chemical (acids, chlorines, bleaches etc.) under the sink, as the vapours (even from the closed
containers) can cause rusting on the underside of the stainless steel sinks.
•Avoid prolonged contact with ordinary steel containers (e.g. tin cans), as these can rust and stain the sink.
•Avoid prolonged exposures to acids from fruit, fruit juices, salts, tea bags etc., as these may leave stains.
•Avoid leaving liquid soaps, hand sanitizing liquids etc. to dry on the surface of the sink, as these may leave stains.
Coloured Stainless Steel Care Guide
IT IS HIGHLY RECOMMENDED THAT THE ACTUAL SINK BE PRESENT AT TIME OF INSTALLATION
All cut-out templates are available online at oliveri.com.au
It is essential that the installation is waterproof and carried out in accordance with these instructions.
Tasman Sinkware will not be held responsible for any damage caused by leakage or faulty installation.
CHECK YOU HAVE THE CORRECT MODEL SINK
The model number on the sink packaging must match the model of sink
the customer ordered. Do not install if incorrect.
AVOID CUTS
The perimeter and punch-outs on the sink may contain sharp edges.
Handle the sink carefully to avoid personal injury.
CHECK THE CONDITION OF THE SINK BEFORE INSTALLATION
Do not install if defects are found – contact your retailer / point of purchase.
By installing the sink, the owner / installer accepts that the product is free
of defects – Tasman Sinkware shall not be liable for any expense incurred
relating to the removal or replacement of a defective product.
AVOID SCRATCHES
Stainless steel can be scratched if proper care is not taken during
installation.
Any advice, recommendation, information, assistance or service provided by Oliveri Solutions inrelation
to goods manufactured by it or their use and installation, is given in good faith and is believed byOliveri
Solutions to be appropriate and reliable. However, any advice, recommendation, information,
assistance
or service is provided by Oliveri Solutions without responsibility or liability.
A
ustralia (Head Office)
Oliveri Solutions Pty Ltd
ABN 12 007 551 886
PO Box 2141 Regency Park
SA 5942 Australia
P 61 8 8348 6444
F 61 8 8348 6495
E sales@oliveri.com.au
N
ew Zealand
Fletcher Building Products Ltd
PO Box 4641 Christchurch
New Zealand 8140
P 0800 440 606
F 0800 440 532
E sales@oliveri.com.au
Stainless Steel Sink Installation Guide
Spectra Cut Out Templates
TF153d - Spectra Installation and Care Instructions.pdf
Product specificaties
| Merk: | Oliveri |
| Categorie: | Spoelbak |
| Model: | SB35BK |
Heb je hulp nodig?
Als je hulp nodig hebt met Oliveri SB35BK stel dan hieronder een vraag en andere gebruikers zullen je antwoorden
Handleiding Spoelbak Oliveri

1 April 2025
3 Maart 2025
19 Maart 2024
19 Maart 2024
19 Maart 2024
4 Maart 2024
4 Maart 2024
4 Maart 2024
4 Maart 2024
4 Maart 2024
Handleiding Spoelbak
Nieuwste handleidingen voor Spoelbak
17 Juli 2026
16 Juli 2026
14 Juli 2026
14 Juli 2026
13 Juli 2026
13 Juli 2026
16 Juni 2026
16 Juni 2026
16 Juni 2026
16 Juni 2026