Norlake AdvantEDGE NLTF23-S Handleiding
Bekijk gratis de handleiding van Norlake AdvantEDGE NLTF23-S (6 pagina’s), behorend tot de categorie Vriezer. Deze gids werd als nuttig beoordeeld door 47 mensen en kreeg gemiddeld 4.5 sterren uit 24 reviews. Heb je een vraag over Norlake AdvantEDGE NLTF23-S of wil je andere gebruikers van dit product iets vragen? Stel een vraag
Pagina 1/6

1 07/ Rev B 20 171226
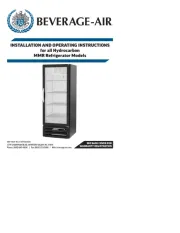
TOP MOUNT
REFRIGERATORS FREEZERS ,
Installation, Operation and Maintenance Instructions
INSPECTION
When the equipment is received, all items should be carefully checked against the Bill of
Lading to ensure all crates and cartons have been received. Do not sign the freight bill
clear until the freight has been properly inspected for damage. All units should be
inspected for damage including concealed damage by uncrating immediately. If any
damage is found, it should be reported to the carrier at once, noted on the Bill of Lading
and a claim should be led with the carrier. This equipment has been inspected and tested
in the manufacturing facility and has been crated in accordance with transportation rules
and guidelines. The manufacturer is not responsible for freight loss or damages.
INSTALLATION
CAUTION: This unit uses a ammable refrigerant. Use care when handling and
operating to avoid damaging the refrigerant tubing or increasing the risk of a leak.
The unit has been secured to the shipping base with four bolts. Remove these bolts and
separate the unit from the shipping base. Locate the casters or legs found inside the unit.
Attach the casters or legs to the unit base by screwing them into the threaded ttings that
were used to secure the shipping base. Use the wrench provided to tighten the casters to
the unit. The casters with the brakes should be installed on the front of the unit. For proper
drainage of condensate, the unit should be level when placed in its permanent location.
Leveling shims are included in the accessories package in the cabinet. Loosen the casters
and insert shims between caster and bottom of the unit. Re-tighten the caster.
The exterior of the cabinet and doors have been protected by a plastic covering. Peel this
protective covering before installation. After removing the covering, clean the interior and
exterior surfaces of the unit with soap and water and a rinse with clean water. Do not use
chlorinated cleaners on the surfaces as they can cause corrosion.
If the door(s) have come out of alignment during shipping, they will need to be adjusted.
This can be accomplished by opening the door(s) and loosening the screws that hold both
the top and bottom hinges to the cabinet. After adjusting the door so it is aligned correct,
tighten the screws to securely hold the hinges and door(s) in place.
The shelves and shelf clips are packaged inside the unit. Install the shelf clips on the
pilasters inside the unit and set the shelves on the clips. The shelves are adjustable in
12.7mm( inch)increments. ½

3 07/ Rev B 20 171226
MAINTENANCE
All service should be performed by factory authorized personnel. All component
parts will be replaced with like components to minimize the risk of possible ignition
due to incorrect parts or improper service.
Cleaning
Beginning with the initial installation, the interior surfaces of the cabinet should be
periodically cleaned with a solution of warm water and baking soda. This solution will
remove any odors from spillage that has occurred. The exterior of the cabinet should also be
cleaned frequently with a commercial stainless steel cleaner, glass cleaner or mild soap
s ution. Do not use chlorinated cleaners on the stainless steel surfaces. ol
Note: do not use stainless steel cleaner or other solvent-based chemicals on plastic
parts (door handle or facade parts) as they could cause failure. Use mild soap and
warm water on plastic parts.
The door gaskets should be cleaned in place with a mild soap solution to extend their life.
The shelving can be cleaned in a sink with a mild soap solution and a soft bristled brush.
Condenser Coil
Disconnect the unit from power prior to cleaning the condenser coil. Periodic cleaning of the
condenser coil will aid the heat transfer of the refrigeration system and increase its
eciency. Cleaning is recommended a minimum of every months. 6
To do this, lift the top grill from the cabinet and secure it. The condenser coil is located
behind the grill. Use a soft bristled brush to remove any dirt particles that are on the ns of
the condenser coil. Use a vacuum cleaner or compressed air to remove the loosened
particles. Lower the top grill and x it with screw, then reconnect the device to the power
source. Failure to clean the condenser coil can lead to performance loss and compressor
failure.

4 07/ Rev B 20 171226
ELECTRONIC CONTROL
1. ELECTRONIC CONTROLLER DISPLAY PANEL LAYOUT
※ In converting Temperature Unit ( ), 1℉↔℃ ℉(1℃) deviation can occur
Display
Description
St
Temperature Setting Mode
di
Temperature Dierential Setting Mode
th
Cabinet Temperature Verication Mode
dt
Defrost Frequency Setting Mode
tb
Rapid Freeze Mode (Freezers Only)
dF
Forced Defrost Mode
SE
Temperature Unit Converter mode ( ) ℉↔℃
Product specificaties
| Merk: | Norlake |
| Categorie: | Vriezer |
| Model: | AdvantEDGE NLTF23-S |
Heb je hulp nodig?
Als je hulp nodig hebt met Norlake AdvantEDGE NLTF23-S stel dan hieronder een vraag en andere gebruikers zullen je antwoorden
Handleiding Vriezer Norlake

14 Juni 2023

1 Juni 2023

27 Mei 2023

11 Mei 2023
Handleiding Vriezer
- Pitsos
- Hestan
- Haeger
- Kenwood
- Haier
- Tisira
- Delonghi
- Viva
- Khind
- Romo
- Domo
- ECG
- Siemens
- Elcold
- CombiSteel
Nieuwste handleidingen voor Vriezer

18 Augustus 2025

18 Augustus 2025
18 Augustus 2025

18 Augustus 2025

18 Augustus 2025

18 Augustus 2025

18 Augustus 2025

18 Augustus 2025
16 Augustus 2025
15 Augustus 2025