Newgy Robo-Pong 3050XL Handleiding
Newgy Tafeltennistafel Robo-Pong 3050XL
Bekijk gratis de handleiding van Newgy Robo-Pong 3050XL (2 pagina’s), behorend tot de categorie Tafeltennistafel. Deze gids werd als nuttig beoordeeld door 22 mensen en kreeg gemiddeld 4.8 sterren uit 7 reviews. Heb je een vraag over Newgy Robo-Pong 3050XL of wil je andere gebruikers van dit product iets vragen? Stel een vraag
Pagina 1/2
www.newgy.com
CONTACT US
Newgy Industries, Inc. • Tennessee, USA
800-556-3949 • 615-452-6470
newgy@newgy.com • www.newgy.com
© Newgy Industries, Inc., 2018 All rights reserved.
LIMITED 1 YEAR WARRANTY
*
Manufacturer warrants to the original retail purchaser this product to be
free from defects in material and workmanship for a period of 1 year
from date of purchase.
Should this product become defective due to material or workmanship
during the warranty period, contact our Customer Service Department
describing the defect. Always provide your serial number. We will
provide you with return authorization and shipping instructions. If you
are asked to return the product, pack it securely and ship it PREPAID.
If defective as provided by the terms of this warranty, we will, at our
option, repair or replace the product and return it prepaid to a
Contiguous U.S. address (other areas carry a shipping charge).
This warranty is not transferable and does not cover normal wear and
tear, or damage caused by improper handling, installation, or use. This
warranty is void if the product is in any way abused, damaged, or
modified from its original state.
This warranty gives you specific legal rights, and you may have other
rights that may vary from state to state.
*
Warranty and service valid only in territory of original sale.
For questions or troubleshooting, refer to this robot’s Owner’s Manual at www.newgy.com.
V2 6.25.18
12
INTRODUCTORY
INTERMEDIATE
BEGINNER
ADVANCED
BONUS
MY DRILL LIBRARY
SET-UP ROBOT
OWNER’S MANUAL
HELP
0.0.0/000
Drill Mode
STANDARD
PRECISION
RIGHT HANDED
Control Mode
Set-Up Robot
Your robot’s
head should be
in an upright
position.
If it isn’t, rotate
the robot head
by touching the
red arrows.
DONE
6”
6”
Ball
Dam
Set-Up Robot
THROW TEST BALL
Ball should
land centered
on table.
Place your Ball
Dam on the table
vertically from the
edge of the table.
It is about 9 inches
tall. Your ball should
land at the tip of the
Ball Dam and in the
center of the table.
If it doesn’t, adjust
its location using the
red arrows.
DONE
3
1
2
3A
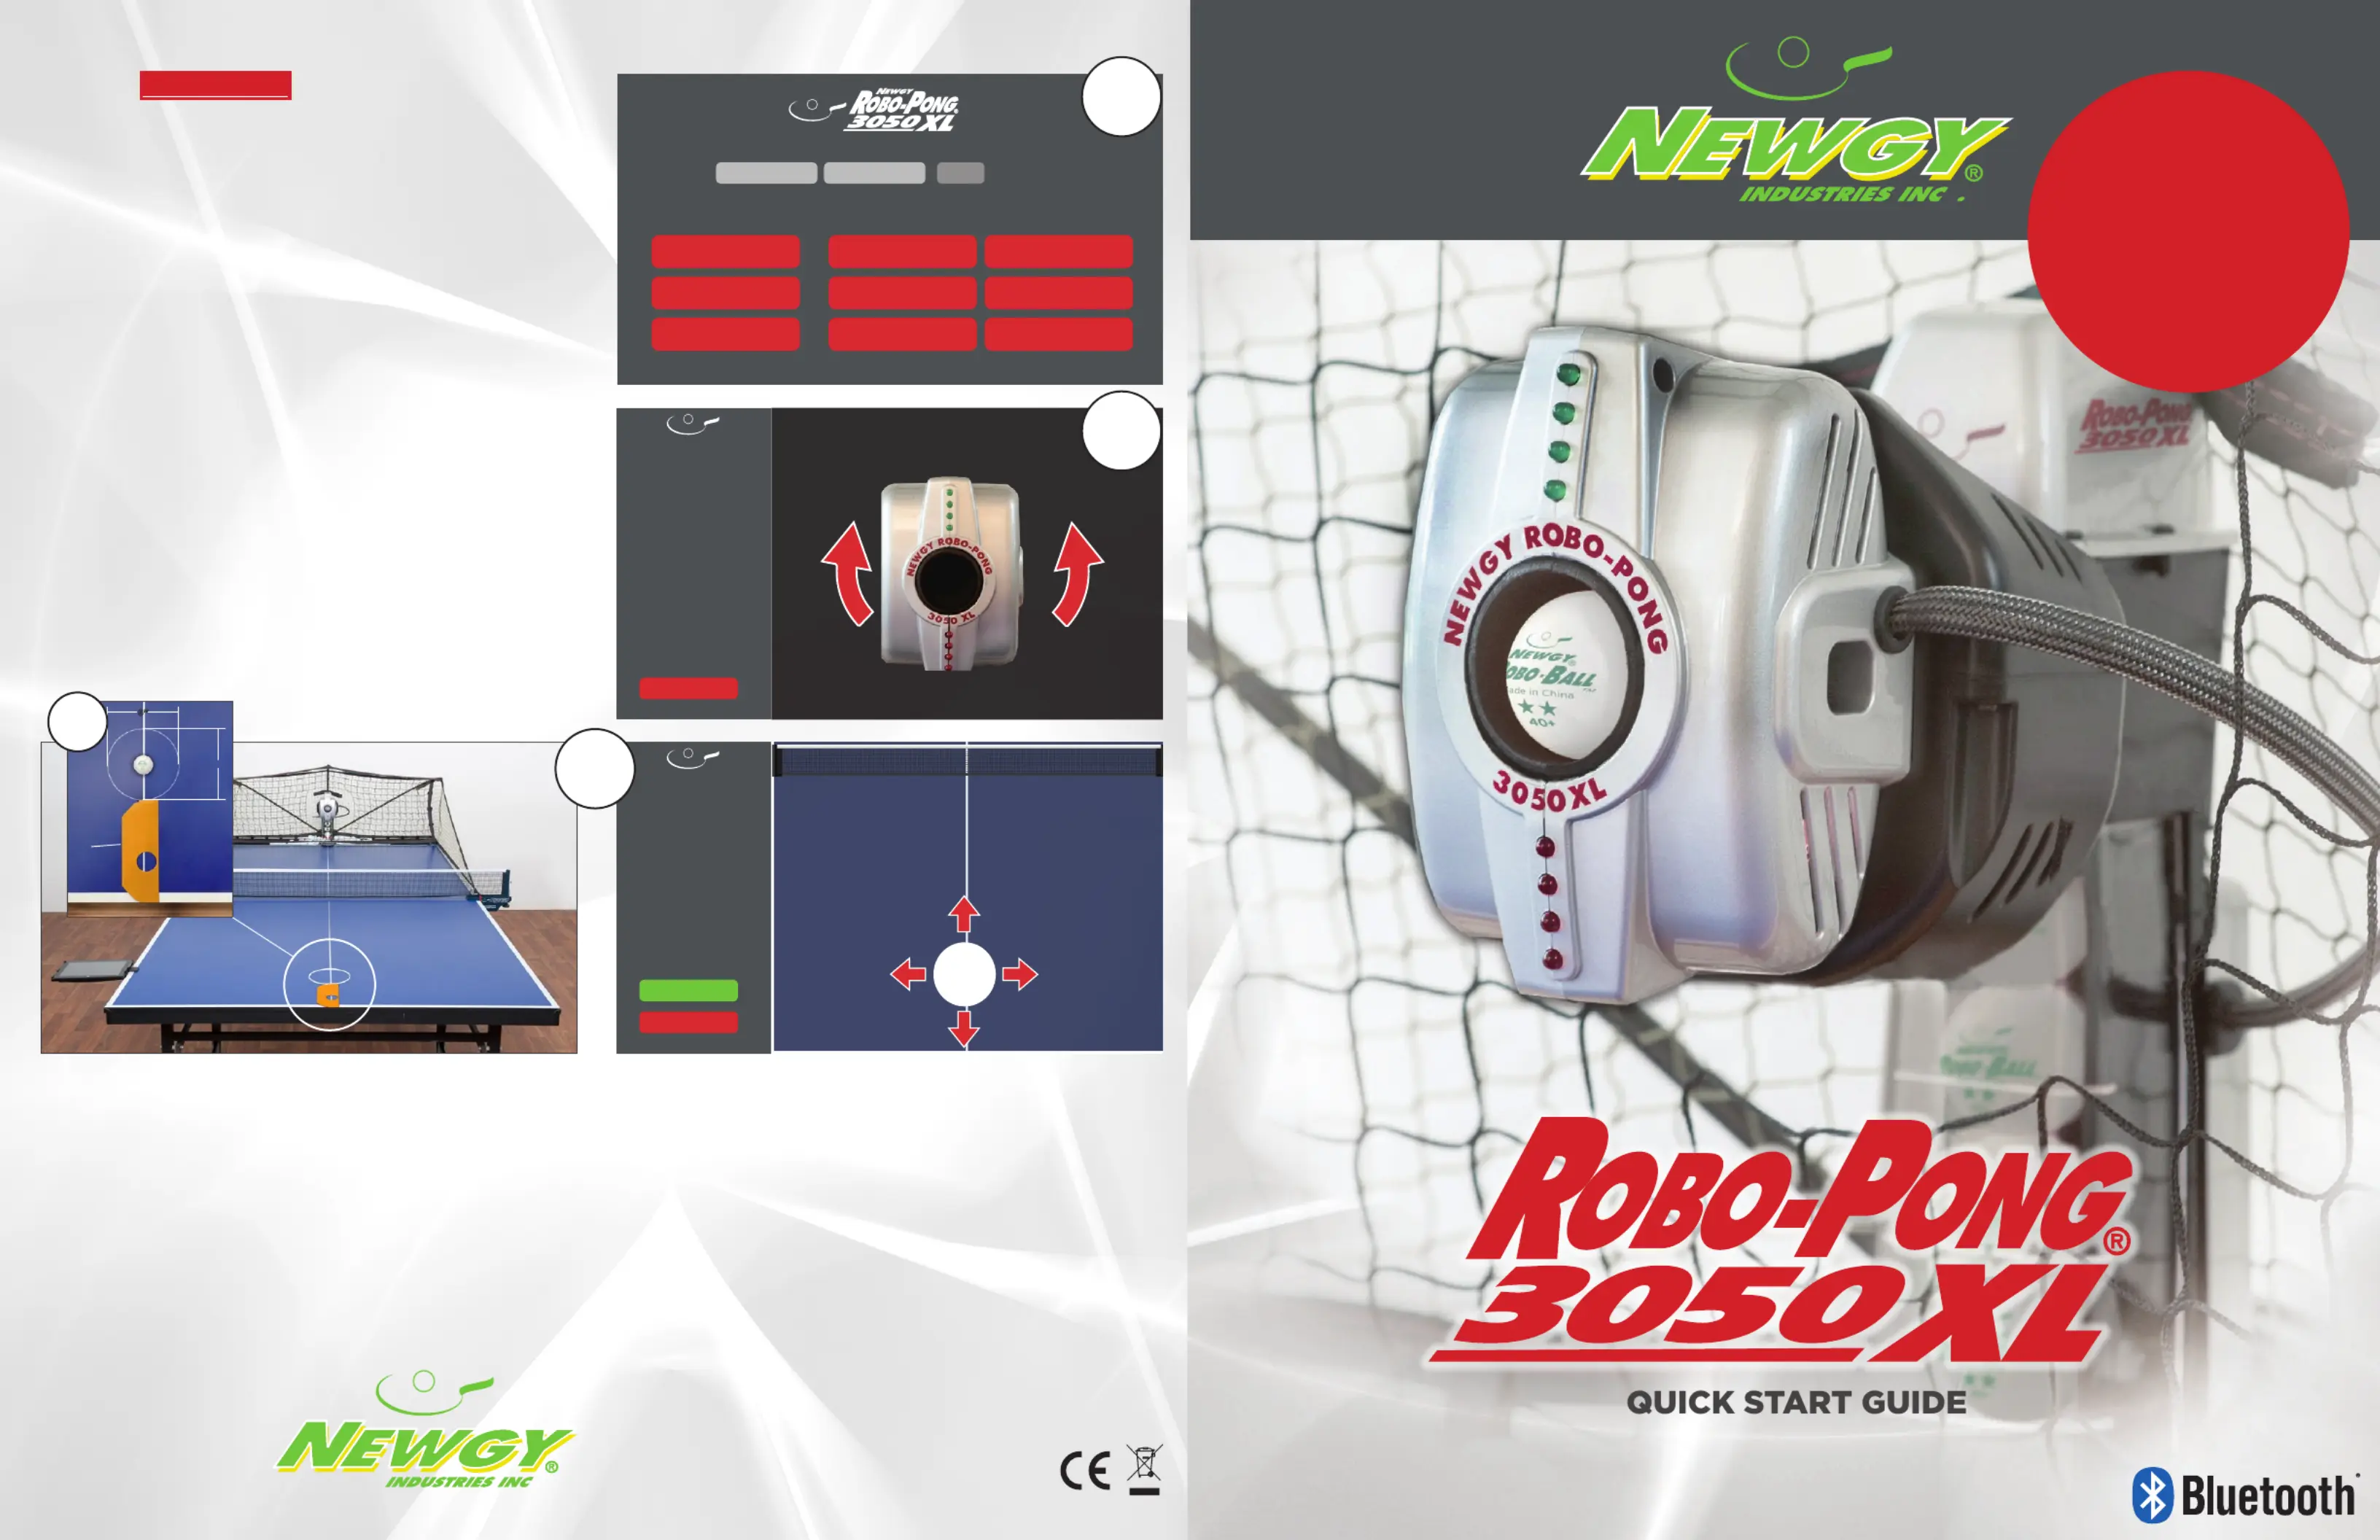
IMPORTANT - Calibrate Your Robot
The calibration step is
required
to make sure your
robot functions properly. This step will ensure all
drills perform correctly.
1.
To start the calibration process, press the gray SET-UP ROBOT
button on the bottom left of your screen (see image 1).
2. Adjust your robots head angle. The LED lights on your
robot should be as close to verticle as possible (see image 2).
Once you are finished with this step, press done.
3. This step is important to make sure all robot functions
including drills run correctly. Place your robot’s ball
dam at the center edge of player’s side of the table
(see image 3). Use the arrows on the App to adjust
placement of the ball. Adjust the throw until the ball
lands in a roughly 6” area in front of the ball dam
(see image 3A below). Once you have the head
angle and oscillation angle set it is helpful to throw a
couple more balls to make sure of placement. Once
this step is complete press done on your App to return
to the home screen.
You are now ready to begin using your
Newgy Robo-Pong 3050XL robot!
IMPORTANT
You must calibrate your
new robot before using
the first time to function
properly. See back of
this guide for
instructions.
Product specificaties
| Merk: | Newgy |
| Categorie: | Tafeltennistafel |
| Model: | Robo-Pong 3050XL |
Heb je hulp nodig?
Als je hulp nodig hebt met Newgy Robo-Pong 3050XL stel dan hieronder een vraag en andere gebruikers zullen je antwoorden
Handleiding Tafeltennistafel Newgy

14 Augustus 2025
14 Augustus 2025
14 Augustus 2025
Handleiding Tafeltennistafel
Nieuwste handleidingen voor Tafeltennistafel
24 November 2025
23 November 2025
22 November 2025
20 November 2025
8 September 2025
1 September 2025
1 September 2025
1 September 2025
18 Augustus 2025
18 Augustus 2023