Muller TS 10.00 knx Handleiding
Muller Meetapparatuur TS 10.00 knx
Bekijk gratis de handleiding van Muller TS 10.00 knx (2 pagina’s), behorend tot de categorie Meetapparatuur. Deze gids werd als nuttig beoordeeld door 77 mensen en kreeg gemiddeld 4.6 sterren uit 7 reviews. Heb je een vraag over Muller TS 10.00 knx of wil je andere gebruikers van dit product iets vragen? Stel een vraag
Pagina 1/2
Hugo Müller GmbH & Co KG, Karlstraße 90, DE-78054 VS-Schwenningen
TS 10.00 knx
GS 10.00 knx
GS 20.00 knx
Allgemeine technische Daten
Bedienungsanleitung
BA TS10 GS10 GS20 knx Hardware HM; de, en -24130- 2020.05V01
de
Montage
www.hugo-mueller.de
Frischluftabgleich (GS 20.00 knx)
WARNUNG! ES BESTEHT GEFAHR DURCH EINEN ELEKTRISCHEN SCHLAG ODER BRANDGEFAHR!
!! Einbau, Anschluss und Montage dürfen ausschließlich von einer Elektrofachkraft durchgeführt werden !!
ŸNur an die auf dem Gerät angegebene Spannung und Frequenz anschließen![KNX-Busspannung (Nennspannung 29V)]
ŸBei Eingriffen oder Änderungen am Gerät erlischt die Garantie!
ŸDas Gerät ist so zu installieren, dass auch außergewöhnlich hohe Störstrahlung die Funktion nicht beeinträchtigen kann!
ŸInstallation und Anschluss dürfen nur entsprechend den nationalen Bau- und Elektrovorschriften / Sicherheitsbestimmungen
durchgeführt werden!
ŸBeschädigte Geräte dürfen nicht in Betrieb bzw. müssen sofort außer Betrieb genommen werden!
ŸBeachten Sie die Vorschriften und Hinweise aus dem Handbuch „Haus- und Gebäudesystemtechnik" des ZVEI/ZVEH.
Dies gilt insbesondere für die fachgerechte Verlegung der Busleitungen und die Inbetriebnahme des KNX Gerätes.
ŸDas Gerät kann in folgenden Anwendungen eingesetzt werden: Überwachung der Luftgüte in der Gebäudesystemtechnik
(Schule, Büro, Hotel, Tagungsstätte etc.), Datenübertragung und Regelung per Bus-System.
ŸDas Gerät ist für den Betrieb gemäß den aufgeführten technischen Daten geeignet.
ŸDas Gerät ist nicht geeignet für sicherheitsrelevante Aufgaben, wie z.B. Fluchttüren, Brandschutzeinrichtungen, Gärkeller etc.
ŸDie bestimmungswidrige Verwendung des Gerätes kann zu Sach- und Personenschäden führen
ŸDas Gerät ist nicht für eigenmächtige bauliche Veränderungen, Reparaturen und sicherheitsrelevante Aufgaben vorgesehen.
ŸDas Gerät ist nicht für den Einsatz im Außenbereich und in Nasszellen vorgesehen.
ŸDas Gerät ist umweltgerecht und entsprechend den Elektrovorschriften zu entsorgen.
!
Sicherheitshinweise / Bestimmungsgemäße und bestimmungswidrige Verwendung / Entsorgung
Anschlussspannung
Busstrom
Bussystem
Zulässige
Umgebungstemperatur
Gehäuse
Gehäusefarbe
Montage
Anschlussart
Schutzart
Schutzklasse
über KNX-Busspannung
< 10 mA
KNX
0 ... 50 °C
selbstverlöschendes Thermoplast
Studioweiß (ähnlich RAL 9016)
Sonderfarben auf Anfrage
Wandmontage Aufputz
im Schalterprogramm mit Montageplatte
Aufputz mit Montagewinkel
Push-in Klemme
nach DIN EN 60529:
IP X1
IP X4 bei Aufputzmontage mit Montagewinkel
III bei bestimmungsgemäßer Montage
Produktbezogene technische Daten
Sensorik
VOC (Messbereich: 0...5.000 µg/m³)
relative Luftfeuchtigkeit (Messbereich: 0...100 %)
Temperatur (Messbereich: 0...+50 °C)
Luftdruck (Messbereich: 300...1.100 hPa)
Taupunkt
VAV-Lüftungssteuerung
GS 10.00 knx
relative Luftfeuchtigkeit (Messbereich: 0...100 %)
Temperatur (Messbereich: 0...+50 °C)
Luftdruck (Messbereich: 300...1.100 hPa)
Taupunkt
VAV-Lüftungssteuerung
TS 10.00 knx
Temperatur (Messbereich: 0...+50 °C)
Störquellen
Die Messergebnisse des Gerätes können durch äußere
Einflüsse negativ beeinflusst werden, wie z.B.
Ÿ
ŸZugluft und Luftbewegung: z.B. durch Fenster, Türen,
Konvektion, Heizung oder Personen.
ŸErwärmung oder Abkühlung: z.B. Sonnenbestrahlung oder der
Montage an einer Außenwand.
ŸWärmequellen: In direkter Nähe zu elektrischen Verbrauchern,
z.B. Dimmer
ŸErschütterungen oder Schläge, denen das Gerät ausgesetzt
wird oder wurde.
ŸVerschmutzung durch Farbe, Tapetenkleister, Staub, etc.:
z.B. bei Renovierungsarbeiten
ŸOrganische Lösemittel oder deren Dämpfe
z.B. Reinigungsmittel
ŸWeichmacher aus Aufklebern und Verpackungen:
z.B. Luftpolsterfolie oder Styropor
GS 20.00 knx
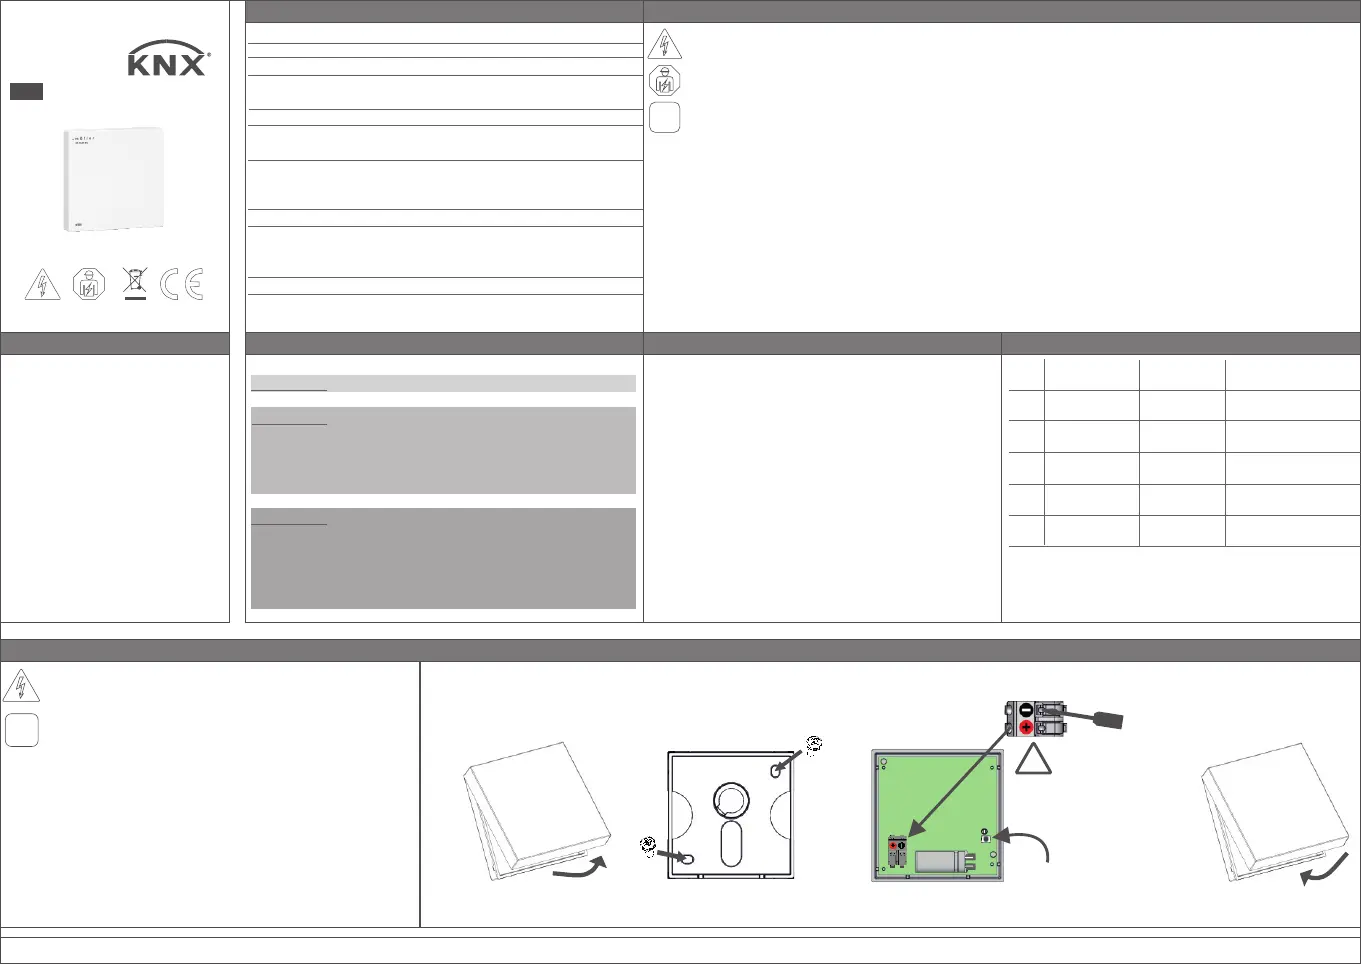
Vor Montage- und Installationsarbeiten Spannung
freischalten und Spannungsfreiheit prüfen!
Öffnen Sie das Gehäuse durch das Herausziehen
der Geräte-Rückwand.
Befestigen Sie die Geräte-Rückwand an der Wand.
Nach Verkabelung und Spannungswiederkehr
drücken Sie die „Einlerntaste", um das Gerät in
Betrieb zu nehmen (dies ist auch zu einem späteren
Zeitpunkt möglich).
Setzen Sie das Geräte-Vorderteil wieder auf.
Beachten Sie unbedingt die weiteren, oben aufgeführten
Sicherheitshinweise!
Die Montage auf eine luftdichte Unterputzdose wird
empfohlen.
!
Schritt 1
Schritt 2
Schritt 3
Schritt 4
KNX-Einlerntaste /
Phys. Adresse
Zum Lösen der Verkabelung
nur im vorderen Bereich der
Push-In Klemme drücken!
!
KNX
Status LED
Stufe
Hygienische
Bewertung
Konzentration
[µg/m³]
Empfehlungen
1
2
3
4
5
< 300
300 - 1.000
1.000 - 3.000
3.000 - 10.000
10.000 - 25.000
unbedenklich
noch
unbedenklich
auffällig
bedenklich
inakzeptabel
Zielwert
Belüftung empfohlen
verstärkte Belüftung
empfohlen
verstärkte Belüftung
notwendig
intensive Belüftung
notwendig
Bei der Inbetriebnahme benötigt das
Gerät einige Minuten bis die ersten
Sensorwerte zur Verfügung stehen.
Dabei wird die Zuführung von Frischluft
empfohlen.
Um die Genauigkeit des VOC Sensors
sicherzustellen, empfehlen wir eine
Frischluftzufuhr jeden zweiten Tag
durchzuführen.
Ein Frischluftabgleich kann per ETS
Kommunikationsobjekt oder manuell
(Programmiertaste 5 sec. gedrückt
halten) gestartet werden.
Quelle:
Bundesgesundheitsblatt – Gesundheitsforschung Gesundheitsschutz 2007,
50:990–1005, Springer Medizin Verlag 2007.
(DOI 10.1007/s00103-007-0290-y)
TVOC Beurteilung (GS 20.00 knx)
Schritt 1:
Schritt 2:
Schritt 3:
Schritt 4:
Wandmontage (Standard):
Product specificaties
| Merk: | Muller |
| Categorie: | Meetapparatuur |
| Model: | TS 10.00 knx |
Heb je hulp nodig?
Als je hulp nodig hebt met Muller TS 10.00 knx stel dan hieronder een vraag en andere gebruikers zullen je antwoorden
Handleiding Meetapparatuur Muller

5 Maart 2024
Handleiding Meetapparatuur
Nieuwste handleidingen voor Meetapparatuur
17 Juni 2026
15 Juni 2026
15 Juni 2026
3 Juni 2026
3 Juni 2026
2 Juni 2026
2 Juni 2026
2 Juni 2026
2 Juni 2026
2 Juni 2026