MSI AX1800 Handleiding


Lees hieronder de 📖 handleiding in het Nederlandse voor MSI AX1800 (4 pagina's) in de categorie Niet gecategoriseerd. Deze handleiding was nuttig voor 24 personen en werd door 2 gebruikers gemiddeld met 4.5 sterren beoordeeld

Pagina 1/4
1. Stáhněte si ovladač GUAX18 z oficiálního webu společnosti MSI.
2. Vložte GUAX18 do vašeho zařízení.
3. Dekomprimujte stažený soubor, potom dvakrát klikněte na „Setup“ (Instalace)
a potom dokončete instalaci podle zobrazených pokynů.
Introduction
Product Overview
Thank you for choosing MSI AX1800 WiFi USB Adapter for your
web surfing.
This guide provides instructions and illustrations to help you get
the most from this product including the first time setup.
System Compatibility
1. Windows® 10/11
Driver Installation
1. Please download the GUAX18 driver from the MSI official website.
2. Insert GUAX18 into your device.
3. Unzip the downloaded file, then double click “Setup,” and then
follow the on-screen instructions to complete the driver
installation.
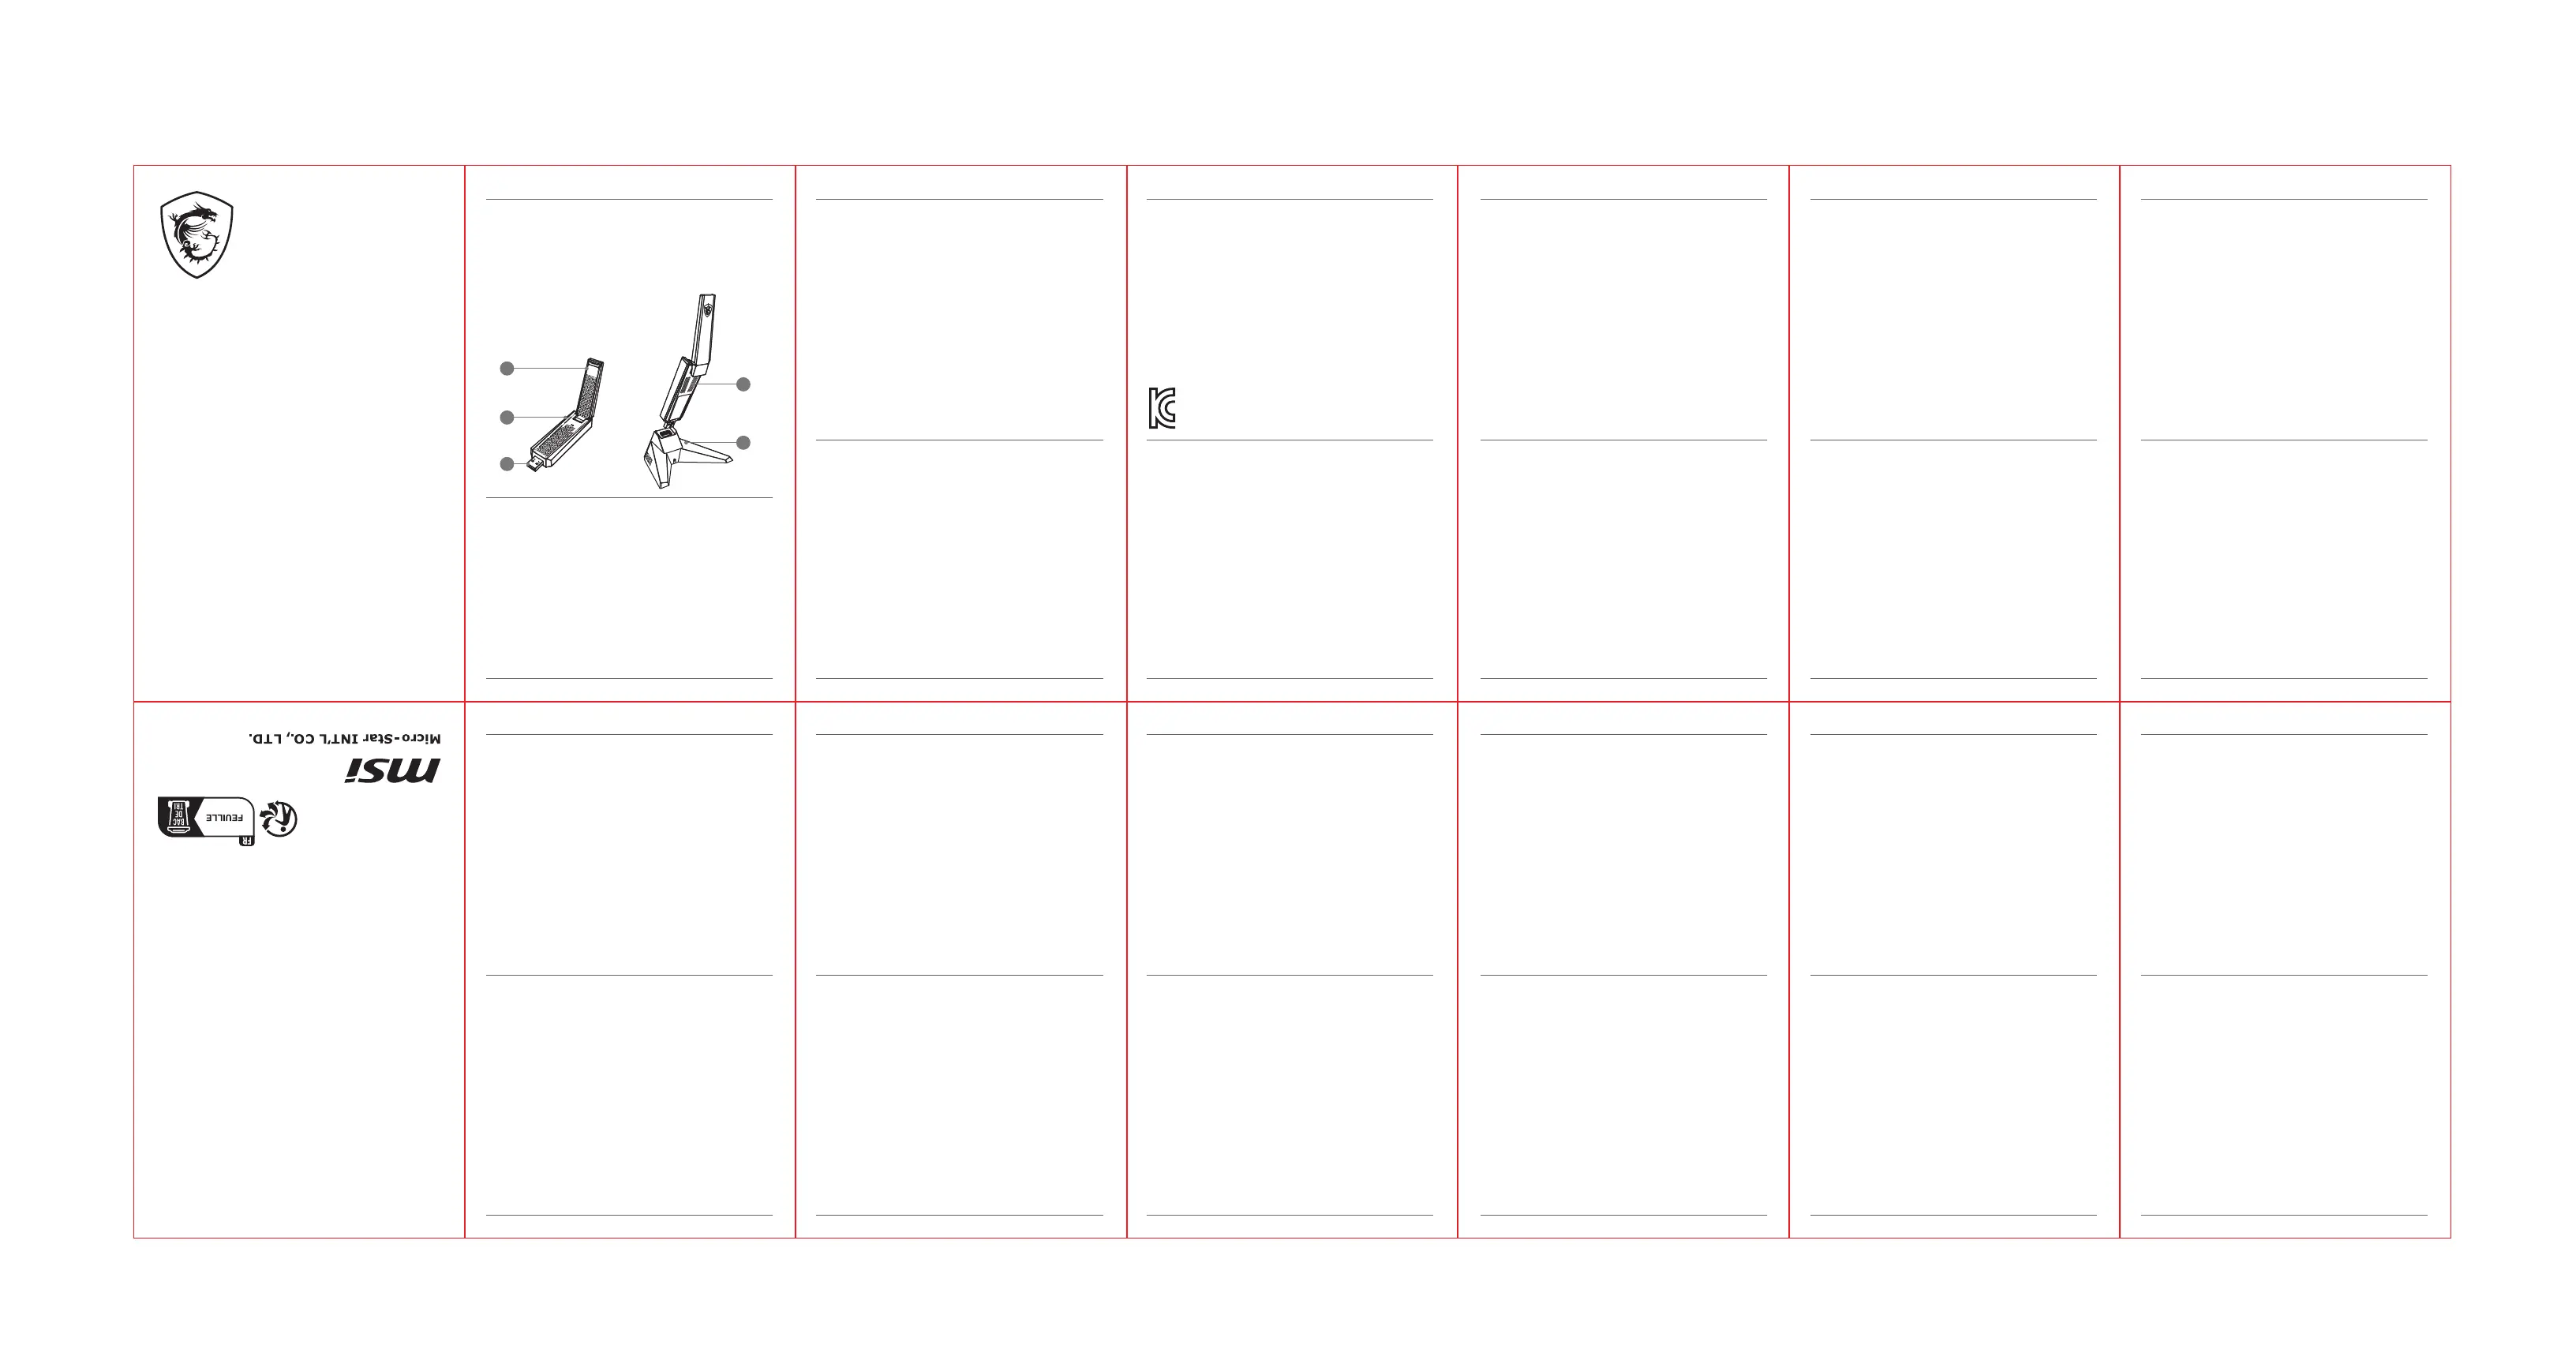
1. Antenna 2. Indicator 3. USB 3.2 Gen 1
4. Thermal Vents 5. Cradle
簡 介
感謝用MSI AX1800 WiFi USB Adapter來進網路驗。說明
書提供使用說明及圖示,幫助您認識產品,以及首次使用設定說明。
1. 天線 2. 狀態指示燈 3. USB 3.2 Gen 1 接頭 4. 散熱孔
5. 延伸底
外觀檢視
1. Windows® 10/11
系統需求
1. 請至 MSI 官網下載 GUAX18 驅動程
2. 將 GUAX18 插入您的裝置
3. 解壓縮檔案後,雙擊 Setup 並按照螢幕指示完成驅動程式安裝。
驅動程式安裝
简 介
感谢选用 MSI AX1800 WiFi USB Adapter 来进行网络体验。本说
书提供使用说明及图标,帮助您认识产品,以及首次使用设定说明。
1. 天线 2. 状态指示灯 3. USB 3.2 Gen 1 接头 4. 散热孔
5. 延伸底
外观检视
1. Windows ® 10/11
系统需求
1. 请从 MSI 官网下载 GUAX18 驱动。
2. 将 GUAX18 插入您的设备。
3. 解压下载的文件,然后双击 “Setup”,按照屏幕提示完成驱动
装。
驱动程序安装
Εισαγωγή
Σας ευχαριστούμε που επιλέξατε τον Προσαρμογέα WiFi USB MSI AX1800 για
την πλοήγησή σας στο διαδίκτυο. Αυτός ο οδηγός παρέχει οδηγίες και εικόνες για
να σας βοηθήσει να αξιοποιήσετε στο έπακρο αυτό το προϊόν, καθώς και
υποδείξεις για την πρώτη εγκατάσταση.
1. Κεραία 2. Ενδεικτική λυχνία 3. Σύνδεσμος USB 3.2 Gen 1
4. Οπές αερισμού 5. Διάταξη συγκράτησης
Επισκόπηση προϊόντος
1. Windows® 10/11
Συμβατότητα συστήματος
1. Πραγματοποιήστε λήψη του προγράμματος οδήγησης GUAX18 από τον
επίσημο ιστότοπο της MSI.
2. Τοποθετήστε το GUAX18 στη συσκευή σας.
3. Αποσυμπιέστε το αρχείο που κατεβάσατε και, στη συνέχεια, κάντε διπλό κλικ
στην επιλογή «Setup» (Εγκατάσταση) και ακολουθήστε τις οδηγίες που
εμφανίζονται στην οθόνη για να ολοκληρώσετε την εγκατάσταση του
προγράμματος οδήγησης.
Εγκατάσταση προγράμματος οδήγησης
Úvod
Děkujeme vám, že jste si pro vaše webové procházení zvolili adaptér MSI
AX1800 WiFi USB. Pokyny a obrázky v tomto návodu Vám pomohou
maximálně využít možnosti tohoto produktu, včetně počátečního nastavení.
1. Anténa 2. Indikátor 3. Konektor USB 3.2 Gen 1 4. Větrací otvory
5. Držák
Popis produktu
1. Windows® 10/11
Kompatibilní systémy
Instalace ovladače
Въведение
Благодарим Ви, че закупихте Адаптер MSI AX1800 WiFi USB за сърфиране
в Интернет. Това ръководство предоставя инструкции и илюстрации, които
да Ви помогнат да извлечете максималното от този продукт, включително
първата настройка.
1. Антена 2. Индикатор 3. USB 3.2 Gen 1 конектор
4. Отвори за отвеждане на топлината 5. Гнездо
Общ преглед на продукта
1. Windows
® 10/11
Съвместимост със системи
1. Моля, изтеглете драйвер GUAX18 от официалния уебсайт на MSI.
2. Поставете GUAX18 във вашето устройство.
3. Разархивирайте изтегления файл, след това щракнете два пъти върху
„Настройка“ и следвайте инструкциите на екрана, за да завършите
инсталирането на драйвера.
Инсталиране на драйвери
Introducere
mul umim a i ales MSI AX1800 WiFi USB Adapter pentru navigarea pe ț ț
internet. Acest ghid ofe instruc iuni i ilustra ii pentru a vă ajuta primi i cel ț ș ț ț
mai mult din acest produs, inclusiv setarea de prima dată.
1. Ante 2. Indicator 3. Conector USB 3.2 Gen 1 4. Aerisiri termice
5. Carcasă
Descriere produs
1. Windows® 10/11
Compatibilitate sistem
1. Descărca i driverul GUAX18 de pe site-ul oficial MSI.ț
2. Introduce i GUAX18 în dispozitiv.ț
3. Decomprima i fi ierul descărcat, apoi face i dublu clic pe "Setup" i urma i ț ș ț ș ț
instruc iunile de pe ecran pentru a finaliza instalarea driverului.ț
Instalare driver
Einleitung
Vielen Dank, dass Sie sich zum Surfen im Internet für den MSI AX1800 WiFi USB
Adapter entschieden haben. Diese Anleitung enthält Anweisungen und Abbildungen,
damit Sie dieses Produkt optimal nutzen können.
1. Antenne 2. Indikator 3. USB 3.2 Gen 1 Anschluss
4. Thermische Belüftungsöffnungen 5. Halterung
Produktübersicht
1. Windows® 10/11
Systemkompatibilität
1. Bitte laden Sie den GUAX18-Treiber von der offiziellen MSI-Website herunter.
2. Schließen Sie den GUAX18 in Ihr Gerät ein.
3. Entpacken Sie die heruntergeladene Datei, doppelklicken Sie dann auf „Setup“
und folgen Sie dann den Anweisungen auf dem Bildschirm, um die
Treiberinstallation abzuschließen.
Treiberinstallation
Introduzione
Grazie per aver scelto l’adattatore USB WiFi MSI AX1800 per la navigazione sul
web. Questa guida fornisce istruzioni e illustrazioni per ottenere il massimo da
questo prodotto, inclusa la prima configurazione.
1. Antenna 2. Indicatore 3. Connettore USB 3.2 Gen 1 4. Sfiati termici
5. Base
Panoramica del prodotto
1. Windows® 10/11
Compatibilità del sistema
1. Scaricare il driver GUAX18 dal sito web ufficiale di MSI.
2. Inserire GUAX18 nel dispositivo.
3. Decomprimere il file scaricato, quindi fare doppio clic su "Installazione", quindi
seguire le istruzioni visualizzate per completare l'installazione del driver.
Installazione del driver
Présentation
Merci d’avoir choisi MSI AX1800 WiFi USB Adapter pour votre navigation sur
internet. Dans ce guide, vous trouverez des instructions et des illustrations pour
vous aider à comprendre comment bien utiliser ce produit, notamment pour la
première configuration.
1. Antenne 2. Indicateur 3. Connecteur USB 3.2 Gen 1
4. Fentes d’ration 5. Support
Présentation du produit
1. Windows® 10/11
Compatibilité du système
1. Veuillez télécharger le pilote GUAX18 sur le site officiel de MSI.
2. Insérez GUAX18 dans votre appareil.
3. Décompressez le fichier téléchargé, puis double-cliquez sur « Configuration »
et suivez les instructions à l’écran pour terminer l’installation du pilote.
Installation du pilote
Giriş
İnternette gezinmek için MSI AX1800 WiFi USB Adaptörünü seçtiğiniz için
teşekkür ederiz. Bu kılavuz, ilk kurulum dahil olmak üzere bu üründen en iyi
faydayı elde etmeniz için talimatlar ve çizimler sağlamaktadır.
1. Anten 2. Gösterge 3. USB 3.2 Gen 1 Konektörü
4. Termal Menfezler 5. Yuva
Ürüne Genel Bakış
1. Windows® 10/11
Sistem Uyumluluğu
1. Lütfen GUAX18 sürücüsünü MSI resmi web sitesinden indirin.
2. GUAX18'i aygıtınıza yerleştirin.
3. İndirilen dosyayı açın, ardından “Kurulum” üzerine çift tıklayın ve ardından
sürücü kurulumunu tamamlamak için ekrandaki talimatları izleyin.
Sürücü Kurulumu
Введение
Благодарим Вас за покупку MSI AX1800 WiFi USB Adapter. Перед
использованием прочтите это руководство, в котором представлены
иллюстрации продукта и инструкции по установке.
1. Антенна 2. Индикатор 3. Разъем USB 3.2 Gen 1
4. Вентиляционные отверстия 5. Основание
Обзор
1. Windows® 10/11
Поддержка ОС
1. Скачайте драйвер GUAX18 с официального сайта MSI.
2. Вставьте GUAX18 в ваше устройство.
3. Распакуйте файл драйвера, затем дважды щелкните «Setup». Следуйте
указаниям на экране для завершения процесса установки.
Установка драйвера
Introdução
Obrigado por escolher o Adaptador WiFi USB AX1800 MSI para navegar na web.
Este manual fornece instruções e ilustrações para ajudar a tirar o máximo partido
deste produto, incluindo a primeira configuração.
1. Antena 2. Indicador 3. Conector USB 3.2 Gen 1
4. Aberturas de ventilação 5. Base
Apresentação do Produto
1. Windows® 10/11
Compatibilidade com sistemas
1. Transfira o controlador do GUAX18 a partir do website oficial da MSI.
2. Insira o GUAX18 no seu dispositivo.
3. Descompacte o ficheiro transferido, faça duplo clique em "Setup", e siga as
instruções apresentadas no ecrã para concluir a instalação do controlador.
Instalação do controlador
Inleiding
Bedankt voor het kiezen van MSI AX1800 WiFi USB-adapter voor surfen op het
web. Deze handleiding geeft instructies en illustraties om u te helpen het beste
te halen uit dit product, inclusief de eerste instelling.
1. Antenne 2. Indicator 3. USB 3.2 Gen 1-connector
4. Thermische ontluchtingsopeningen 5. Houder
Productoverzicht
1. Windows
® 10/11
Systeemcompatibiliteit
1. Download het GUAX18-stuurprogramma van de officiële MSI-website.
2. Plaats GUAX18 in uw apparaat.
3. Pak het gedownloade bestand uit, en dubbelklik vervolgens op “Instelling”,
en volg vervolgens de instructies op het scherm om de installatie van het
stuurprogramma te voltooien.
Installatie van stuurprogramma
Wprowadzenie
Dziękujemy za wybór karty Wi-Fi na USB AX1800 firmy MSI do korzystania z
Internetu. Niniejsza instrukcja obsługi zawiera instrukcje i rysunki mające pomóc
w pełnym wykorzystaniu możliwości produktu, a także przeprowadzeniu wstępnej
konfiguracji.
1. Antena 2. Wskaźnik 3. Złącze USB 3.2 Gen 1 4. Otwory wentylacyjne
5. Uchwyt
Ogólny opis produktu
1. Windows® 10/11
Obsługiwane systemy operacyjne
1. Pobierz sterownik GUAX18 z oficjalnej witryny firmy MSI.
2. Włóż GUAX18 do urządzenia.
3. Rozpakuj pobrany plik, a następnie kliknij dwukrotnie pozycję „Setup
(Instalacja) i wykonaj instrukcje ekranowe w celu ukończenia instalacji
sterownika.
Instalacja sterownika
Úvod
Ďakujeme vám, že ste si na svoje prehliadanie internetu vybrali WiFi USB
adaptér MSI AX1800. Tento návod poskytuje pokyny a obrázky, ktoré vám
pomôžu získať maximum z tohto výrobku vrátane prvého nastavenia.
1. Anténa 2. Indikátor 3. Konektor USB 3.2 Gen 1
4. Tepelné vetracie otvory 5. K olíska
Prehľad výrobku
1. Windows® 10/11
Kompatibilita systému
1. Stiahnite si ovládač GUAX18 z oficiálnej webovej stránky MSI.
2. Vložte GUAX18 do svojho zariadenia.
3. Extrahujte stiahnutý súbor, potom dvakrát kliknite na položku „Setup
(Nastavenie) a potom podľa pokynov na obrazovke dokončte inštaláciu
ovládača.
Inštalácia ovládača
소 개
웹 서핑을 위해 MSI AX1800 WiFi USB Adapter 를 선택해 주셔서 감사합니다.
이 설명서에서는 시작 설정을 포함하여 이 제품을 최대한 활용할 수 있는 지침과
그림을 제공합니다.
1. 안테나 2. 표시등 3. USB 3.2 Gen 1 커넥터 4. 열풍구 5. 크래들
제품 개요
1. Windows®
10/11
시스템 호환성
1. MSI 공식 웹사이트에서 GUAX18 드라이버를 다운로드하십시오.
2. GUAX18을 장치에 삽입합니다.
3. 다운로드한 파일의 압축을 풀고 "설정"을 두 번 클릭한 다음, 화면의 지시에 따라
드라이버 설치를 완료합니다.
드라이버 설치
はじめに
この度は、MSI AX1800 WiFi USB Adapterをお買い上げいただき、
誠にありがとうございます。本ガイドは最初の取り付けを含めて製品を最大限活
用するための説明と図が記載されています。
1. アンテナ 2. インジケーター 3. USB 3.2 Gen 1 コネクター 4. 通気口
5. クレードル
製品概要
1. Windows® 10/11
システム互換性
1. MSI 公式ウェブサイトからGUAX18ドライバーをダウンロードします。
2. GUAX18 をデバイスに挿入します。
3. ダウンロードしたファイルを解凍し、“Setup(設定)”をダブルクリックし、
画面の指示に従ってドライバーのインストールを完了します。
ドライバーのインストール
Pendahuluan
Terima kasih sudah memilih MSI AX1800 WiFi USB Adapter untuk berselancar
di web. Panduan ini memberikan petunjuk dan gambaran untuk membantu Anda
mengambil manfaat sebesar-besarnya dari produk ini, termasuk juga konfigurasi
untuk pertama kali.
1. Antena 2. Indikator 3. Konektor USB 3.2 Gen 1
4. Saluran Pembuangan Termal 5. Cradle
Mengenal Produk
1. Windows® 10/11
Kompatibilitas Sistem
1. Silakan unduh driver GUAX18 dari situs web resmi MSI.
2. Masukkan GUAX18 ke perangkat Anda.
3. Buka kompreso file yang diunduh, lalu klik dua kali “Penyiapan,” lalu ikuti
petunjuk di layar untuk menyelesaikan penginstalan driver.
Penginstalan Driver
Giới thiệu
Cảm ơn bạn đã lựa chọn Adapter USB WiFi MSI AX1800 cho trải nghiệm lướt
web của mình. Hướng dẫn này sẽ cung cấp những chỉ dẫn và hình minh họa
để giúp bạn tận dụng tối đa sản phẩm này, bao gồm cả lần thiết lập đầu tiên.
1. Ăngten 2. Đèn báo 3. Đầu nối USB 3.2 Gen 1 4. Khe tản nhiệt
5. Giá đ
Tổng quan sản phẩm
1. Windows® 10/11
Khả năng tương thích hệ thống
1. Vui lòng tải driver GUAX18 từ trang web chính thức của MSI.
2. Cắm GUAX18 vào thiết bị của bạn.
3. Giải nén tệp tin đã tải, sau đó nhấp chuột vào "Cài đặt" rồi làm theo hướng
dẫn trên màn hình đẻ hoàn tất quá trình cài đặt.
Cài đặt Driver
Introduktion
Tack för ditt val av MSI AX1800 WiFi USB-adaptern för att surfa på Internet.
Denna handledning innehåller instruktioner och illustrationer som ska hjälpa dig
att få ut det mesta av produkten, inklusive första istallationen.
1. Antenn 2. Indikator 3. USB 3.2 Gen 1-kontakt 4. Värmeventiler
5. Vagga
Produktöversikt
1. Windows® 10/11
Systemkompatibilitet
1. Ladda ned GUAX18-drivrutinen från MSI:s officiella webbplats.
2. Sätt i GUAX18 i enheten.
3. Packa upp den nedladdade filen, dubbelklicka på “Setup” (Installera) och följ
instruktionerna på skärmen för att installera drivrutinen.
Installation av drivrutin
Bevezetés
Köszönjük, hogy az MSI AX1800 WiFi USB adaptert választotta a
webböngészéshez! Ez az útmutató utasításokkal és illusztrációkkal szolgál, hogy
segítsen a lehető legtöbbet kihozni ebből a termékből, beleértve a beüzemelés
lépéseinek leírását.
1. Antenna 2. Visszajelző 3. USB 3.2 Gen 1 aljzat 4. Szellőzőnyílások
5. Dokk
A készülék áttekintése
1. Windows® 10/11
Rendszerkompatibilitás
1. Kérjük, töltse le a GUAX18 illesztőprogramot az MSI hivatalos weboldaláról.
2. Helyezze be a GUAX18-at a készülékbe.
3. Bontsa ki a letöltött fájlt, majd kattintson duplán a „Beállítás” gombra, és
kövesse a képernyőn megjelenő utasításokat az illesztőprogram telepítésének
befejezéséhez.
Az illesztőprogram telepítése
Johdanto
Kiitos, että valitsit MSI AX1800 WiFi USB adapterln web-surffailuun. Tässä
oppaassa on ohjeita ja piirroksia, joiden avulla saat kaiken irti tuotteesta, mukaan
lukien ensimmäinen asennus.
1. Antenni 2.Merkkivalo 3. USB 3.2 Gen 1 - liitin 4. Lämpöaukot
5. Telakka
Tuotteen yleiskatsaus
1. Windows® 10/11
Järjestelmän yhteensopivuus
1. Lataa GUAX18-ohjain MSI:n viralliselta verkkosivustolta.
2. Aseta GUAX18 laitteeseen.
3. Pura ladattu tiedosto, ja sitten kaksoisnapsauta ”Setup” ja suorita ohjaimen
asennus loppuun noudattamalla näytön ohjeita.
Ohjaimen asennus
상 호: ㈜엠에스아이코리아
제품명: 특정소출력 무선기기
(무선데이터통신시스템용 무선기기)
모델명: GUAX18
제조년월: 2022년
제조자 및 제조국가 : MSI/중국
주위 온도: -10°C ~ 50°C (한국만)
일반적인 사각도: 0도 (SAR 테스트용)
전원: DC 5V/1A
1
2
3
4
5
English 繁體中文
简体中
Svenska
Magyar
Ελληνικά
Română
Bahasa Indonesia
Tieng Viet
Slovenčina
Suomi
Français
Türkçe
Čeština
български
Deutsch
Italiano
한국어
日本語
Português
Nederlands
Русский
Polski
WiFi USB Adapter
AX1800
Introducción
Gracias por elegir el Adaptador USB Wi-Fi MSI AX1800 para navegar por
Internet. Esta guía proporciona instrucciones e ilustraciones para ayudarte a
sacar todo el partido a este producto, incluyendo la instalación por primera vez.
1. Antena 2. Indicador 3. Conector USB 3.2 Gen 1
4. Respiraderos térmicos 5. Base
Información general del producto
1. Windows® 10/11
Compatibilidad del sistema
1. Descargue el controlador GUAX18 del sitio web oficial de MSI.
2. Inserte GUAX18 en su dispositivo.
3. Descomprima el archivo descargado, a continuación, haga doble clic en
«Setup (Configuración)» y luego siga las instrucciones en pantalla para
completar la instalación del controlador.
Instalación del controlador
Indledning
Tak for dit valg af denne MSI AX1800 Wi-Fi USB-adapter til, at gå på nettet med.
Denne vejledning indeholder instruktioner og billeder, så du får det meste ud af
dette produkt, herunder førstegangsopsætningen.
1. Antenne 2. Lysindikator 3. USB 3.2 Gen 1-stik 4. Ventilationsåbninger
5. Holder
Produktoversigt
1. Windows® 10/11
Systemkompatibilitet
1. Download venlist driveren til din GUAX18 på MSI’ officielle hjemmeside.
2. Sæt din GUAX18 i din enhed.
3. Pak den downloadede fil ude, dobbeltklik på “Setup” og følg instruktionerne
på skærmen for, at installere driveren.
Driverinstallation
Introduksjon
Takk for at du velger MSI AX1800 WiFi USB Adapter for websurfing. Denne
veiledningen inneholder instruksjoner og illustrasjoner som hjelper deg med å
mest mulig ut av dette produktet, inkludert oppsett for første gang.
1. Antenne 2. Indikator 3. USB 3.2 Gen 1-kontakt 4. Varmeventiler
5. Vugge
Produktoversikt
1. Windows® 10/11
Systemkompatibilitet
1. Last ned driveren til GUAX18 fra MSIs offisielle nettsted.
2. Sett GUAX18 inn i enheten.
3. Pakk ut den nedlastede filen, dobbeltklikk deretter på «Setup», og følg
instruksjonene på skjermen for å fullføre driverinstallasjonen.
Installere driver
Вступ
Дякуємо за вибір адаптера MSI AX1800 WiFi USB для перегляду веб-сторінок.
У цьому посібнику надано інструкції та ілюстрації, які допоможуть найкраще
користуватися виробом, а також провести налаштування перед початком
роботи.
1. Антена 2. Індикатор 3. З'єднувач USB 3.2 Gen 1
4. Вентиляційні отвори 5. Штатив
Знайомство з виробом
1. Windows® 10/11
Сумісність із системами
1. Завантажте драйвер GUAX18 з офіційного веб-сайту MSI.
2. Вставте до пристрою GUAX18.
3. Розархівуйте завантажений файл, двічі натисніть Setup (Налаштування)
і виконуйте інструкції на екрані, щоб завершити інсталяцію драйвера.
Інсталяція драйвера
FCC Compliance Statement
This device complies with Part 15 of the FCC Rules. Operation is subject to the
following two conditions: (1) this device may not cause harmful interference,
and (2) this device must accept any interference received, including interference
that may cause undesired operation.This equipment has been tested and found
to comply with the limits for a Class B digital device, pursuant to Part 15 of the
FCC Rules. These limits are designed to provide reasonable protection against
harmful interference in a residential installation.
This equipment generates, uses and can radiate radio frequency energy and, if
not installed and used in accordance with the instructions, may cause harmful
interference to radio communications. However, there is no guarantee that
interference will not occur in a particular installation.
If this equipment does cause harmful interference to radio or television reception,
which can be determined by turning the equipment off and on, the user is
encouraged to try to correct the interference by one or more of the following
measures:
► Reorient or relocate the receiving antenna.
► Increase the separation between the equipment and receiver.
► Connect the equipment into an outlet on a circuit different from that to which
the receiver is connected.
► Consult the dealer or an experienced radio/TV technician for help.
Any changes or modification not expressly approved by the party responsible for
compliance could void the user's authority to operate the device. Where shielded
interface cables have been provided with the product or specified additional
components or accessories elsewhere defined to be used with the installation of
the product, they must be used in order to ensure compliance with FCC
regulations.
CE RED Compliance Statement
Regulatory Statements
Japan Compliance Statement
屋外での使用について
本製品は、5GHz 帯域での通信に対応しています。電波法 の定めにより5.2GHz、
5.3GHz 帯域の電波は屋外で使用が 禁じられています。
法律および規制遵守
本製品は電波法及びこれに基づく命令の定めるところに 従い使用してください。
日本国外では、その国の法律ま たは規制により、本製品を使用
ができないことがありま す。このような国では、本製品を運用した結果、
罰せら れることがありますが、当社は一切責任を負いかねます のでご了承
ください。
VCCI: Japan Compliance Statement
この装置は、情報処理装置等電波障害自主規制協議会( VCCI)の基準に基づく
クラスB情報技術装置です。こ の装置は、家庭環境で使用aすることを目的
としています が、 この装置がラジオやテレビジョン受信機に近接して 使用さ
れると、受信障害を引き起こすことがあります。 取り扱い説明書に従って正
しい取り扱いをして下さい。
Korea Compliance Statement
Class B equipment
(For Home Use Broadcasting
& Communication Equipment)
B급 기
(가정용 방송통신기자재)
이 기기는 가정용(B급) 으로 전자파적합등록을 한.
기기로서 주로 가정에서 사용하는 것을 목적으로. 하며,
모든 지역에서 사용할 수 있습니다.
This equipment is home use (Class B) electromagnetic
wave suitablility and to be used mainly at home and
it can be used in all areas.
RF Exposure Information
This MSI product has been tested and meets applicable European SAR limits.
The SAR limit is 2.0 W/kg in countries that set the limit averaged over 10 grams
of tissue.
The specific maximum SAR values for this device are as follows:
Body: 1.293 W/kg
When you carry this device or use it, either use an approved accessory such as
a holster or otherwise maintain a distance of 5 mm from the body to ensure
compliance with RF exposure requirements.
Informations concernant l'exposition aux fréquences radio (RF)
Ce produit MSI a été testé et est conforme à la limite de DAS européenne.
La limite de DAS est de 2,0 W/kg dans les pays qui fixent la limite moyenne sur
10 g de tissus humains. Les valeurs de DAS spécifiques maximales pour cet
appareil :
Corps : 1.293 W/kg
Lorsque vous transportez ou utilisez cet appareil, utilisez un accessoire agréé tel
qu'un étui ou maintenez-le à une distance de 5 mm du corps pour assurer la
conformité aux exigences concernant l'exposition aux fréquences radio (RF).
The WiFi operating in the band 5150-5350MHz shall be restricted to indoor use
for countries listed in the table below:
● Use this product in environments with ambient temperatures between 0°C(32°F)
and 40°C(104°F).
● Refer to the rating label on the bottom of your product and ensure your power
adapter complies with this rating.
● DO NOT place on uneven or unstable work surfaces. Seek servicing if the
casing has been damaged
● DO NOT place or drop objects on top and do not shove any foreign objects into
the product.
● DO NOT expose to or use near liquids, rain, or moisture.
● DO NOT use the modem during electrical storms.
● DO NOT cover the vents on the product to prevent the system from getting
overheated.
● DO NOT use damaged power cords, accessories, or other peripherals.
● DO NOT mount this equipment higher than 2 meters.
● If the Adapter is broken, do not try to fix it by yourself. Contact a qualified
service technician or your retailer.
● To prevent electrical shock hazard, disconnect the power cable from the
electrical outlet before relocating the system.
Safety Notices
Prohibition of Co-location
This device and its antenna(s) must not be co-located or operating in conjunction
with any other antenna or transmitter.
FCC Radiation Exposure Statement:
This device has been tested and meets applicable limits for Radio Frequency (RF)
exposure. This device was tested with a separation distance of 5 mm. Always keep
the device away from your body to ensure exposure levels remain at or below the
as-tested levels.This device has been tested and meets the FCC RF exposure
guidelines. The maximum SAR value reported is 1.17 w/kg
Compliance Statement of Innovation, Science and Economic
Development Canada (ISED)
This device complies with Innovation, Science and Economic Development Canada
licence-exempt RSS standard(s). Operation is subject to the following two conditions:
(1) this device may not cause interference, and (2) this device must accept any
interference, including interference that may cause undesired operation of the
device.
Operation in the band 5150-5250 MHz is only for indoor use to reduce the potential
for harmful interference to co-channel mobile satellite systems.
CANICES-003(B)/NMB-003(B)
IC Radiation Exposure Statement
This device has been tested and meets applicable limits for Radio Frequency (RF)
exposure. This device was tested with a separation distance of 5 mm. Always keep
the device away from your body to ensure exposure levels remain at or below the
as-tested levels.
This device has been certified for use in Canada. Status of the listing in the
Innovation, Science and Economic Development Canada's REL (Radio Equipment
List) can be found at the following web address:
http://www.ic.gc.ca/eic/site/ceb-bhst.nsf/eng/h tt00020.html
Additional Canadian information on RF exposure also can be found at the following web:
https://www.ic.gc.ca/eic/site/smt-gst.nsf/eng/sf08792.html
The portable device is designed to meet the requirements
for exposure to radio waves established by the ISED.
These requirements set a SAR limit of 1.17 W/kg averaged over one gram of tissue.
The highest SAR value reported under this standard during product certification for
use when properly worn on the body.
Déclaration de conformité de Innovation, Sciences et
Développement économique Canada (ISED)
Le présent appareil est conforme aux CNR d'Innovation, Sciences et Développement
économique Canada applicables aux appareils radio exempts de licence.
L'exploitation est autorisée aux deux conditions suivantes : (1) l'appareil ne doit pas
produire de brouillage, et (2) l'utilisateur de l'appareil doit accepter tout brouillage
radioélectrique subi, même si le brouillage est susceptible d'en compromettre le
fonctionnement. La bande 5150 - 5250 MHz est réservée uniquement pour une
utilisation à l'intérieur afin de réduire les risques de brouillage préjudiciable aux
systèmes de satellites mobiles utilisant les mêmes canaux.
CAN ICES-003(B)/NMB-003(B)
Informations concernant l'exposition aux fréquences radio (RF)
La puissance de sortie émise par cet appareil sans fil est inférieure à la limite
d'exposition aux fréquences radio d'Industrie Canada (IC). Utilisez l'appareil sans
fil de façon à minimiser les contacts humains lors d'un fonctionnement normal.
Cet appareil a été testé et respecte les limites applicables en matière d'exposition
aux radiofréquences (RF).
Cet appareil a été testé avec une distance de séparation de 5 mm. Gardez toujours
l'appareil éloigné de votre corps pour vous assurer que les niveaux d'exposition
restent égaux ou inférieurs aux niveaux testés.
UKCA Simplified Declaration of Conformity
Micro-Star INT'L CO., LTD. hereby declares that GUAX18 is in compliance with
the essential requirements and other relevant provisions of The Radio Equipment
Regulations 2017. The full text of UKCA declaration of conformity is available at
https://www.msi.com/support.
The frequency, channel and the maximum transmitted power in UK are listed below:
NCC警語
取得審驗證明之低功率射頻器材,非經核准,公司、商號或使用者均不得擅自變更
頻率、加大功率或變更原設計之特性及功能。低功率射頻器材之使用不得影響飛航
安全及干擾合法通信;經發現有干擾現象時,應立即停用,並改善至無干擾時方得
繼續使用。前述合法通信,指依電信管理法規定作業之無線電通信。低功率射頻器
材須忍受合法通信或工業、科學及醫療用電波輻射性電機設備之干擾。
應避免影響附近雷達系統之操作
CMIIT ID 标示于产品上
安全说明:
- 请在温度为0°C (32°F)至40°C(104°F)之间的环境中使用本产品
- 请依照产品上的电源功率贴纸说明使用正确的电源变压器,如果使用错误规格的
电源变压器有可能会造成内部零件的损坏。
- 请勿将产品放置于不平坦或不稳定的表面,若产品的机壳段损,请联络维修服务人
员。
- 请勿在产品上放置其他物品,请勿将任何物品塞入产品内,以避免引起组件短路或
电路损毁
- 请保持机器在干燥的环境下使用、雨水、湿气、液体等含有矿物质将会腐蚀电子
线路,请勿在雷电天气下使用数据机。
- 请勿堵塞产品的通风孔,以避免因散热不良而导致系统过热。
- 请勿使用破损的电源线,附件或其他周边产品。
- 如果电源已毁损,请不要尝试自行修复,请将其交给专业技术服务人员或经销商
来处理。
- 为了防止电击风险,在搬动主机之前,请先将电源线插头暂时从电源插座上拔除。
电子电气产品有害物质限制使用标识要求:图中之数字为产品之环保使用期限。
仅指电子电气产品中含有的有害物质不致发生外泄或突变从而对环境造成污染或对
人身、财产造成严重损害的期限
10
AT
DE
LV
NO
FI
BE
IS
LI
PL
SE
BG
IE
LT
PY
CH
CZ
IT
LU
RO
HR
DK
EL
HU
SI
UK(NI)
EE
ES
MT
SK
FR
CY
NL
TR
UA
EU Simplified Declaration of Conformity
Micro-Star INT'L CO., LTD. hereby declares that GUAX18 is in compliance with
the essential requirements and other relevant provisions of Directive 2014/53/EU.
Full text of EU declaration of conformity is available at
https://www.msi.com/support This equipment complies with EU radiation exposure
limits set forth for an uncontrolled environment. This equipment should be installed
and operated with minimum distance 5 mm between the radiator & your body.
All operational modes:
2.4GHz: 802.11b, 802.11g, 802.11n (HT20), 802.11n (HT40), 802.11ac
(VHT20), 802.11ac (VHT40), 802.11ax (HE20), 802.11ax (HE40)
5GHz: 802.11a, 802.11n (HT20), 802.11n (HT40), 802.11ac (VHT20),
802.11ac (VHT40), 802.11ac (VHT80), 802.11ac (VHT160),
802.11ax (HE20), 802.11ax (HE40), 802.11ax (HE80)
The frequency, channel and the maximum transmitted power in EU are listed below:
L'utilisation de cet appareil est autorisée au Canada. Pour consulter l'entrée
correspondant à l'appareil dans la liste d'équipement radio (REL - Radio
Equipment List) d'Industrie Canada, rendez-vous sur:
http://www.ic.gc.ca/ app/sitt/reltel/srch/nwRdSrch.do?lang=eng
Pour des informations supplémentaires concernant l'exposition aux fréquences
radio au Canada, rendez-vous sur:
http://www.ic.gc.ca/eic/site/ smt-gst.nsf/eng/sf08792.html
Cet équipement est conforme aux limites d’exposition aux rayonnements ISED
établies pour un environnement non contrôlé. L’utilisateur final doit suivre les
instructions spécifiques pour satisfaire les normes. Cet émetteur ne doit pas être
co-implanté ou fonctionner en co njonctionavec toute autre antenne ou
transmetteur. Result for highest Simultaneous Transmission SAR value is
1.17 W/kg.
KC: Korea Warning Statement
REACH
Complying with the REACH (Registration, Evaluation, Authorisation, and
Restrictionof Chemicals) regulatory framework, we published the chemical
substances in our products at msi REACH website at
https://csr.msi.com/global/Product-Chemical-Management
RED RF Output Power:
Technologies
WLAN 2.4 GHz
WLAN 5 GHz
WLAN 5 GHz
WLAN 5 GHz
Frequency range (MHz) Max. Transmit Power(dBm)
2412-2472 MHz
5150-5250 MHz
5250-5350 MHz
5470-5725 MHz
20
23
23
30
The adapter shall be installed near the equipment and shall be easily accessible.
RED RF Output Power:
Technologies
WLAN 2.4 GHz
WLAN 5 GHz
WLAN 5 GHz
WLAN 5 GHz
Frequency range (MHz) Max. Transmit Power(dBm)
2412-2472 MHz
5150-5250 MHz
5250-5350 MHz
5470-5725 MHz
20
23
23
30
The adapter shall be installed near the equipment and shall be easily accessible.
UKCA Compliance Statement
UK
JOIN MSI REWARD PROGRAM NOW!
MSI Reward Program lets you earn points that turn into rewards and benefit.
You can rack up points and exclusive benefits at each membership level.
How To Join the MSI Reward Program:
1. Go to msi.gm/rewards
2. Create your account.
3. Start earning points & claim rewards.
Deutsch
Das MSI Prämienprogramm bietet die Möglichkeit, Punkte zu sammeln, um
Prämien und weitere Vorteile zu erhalten. Du kannst als Mitglied jeder
Statusebene Punkte erwerben und exklusive Vorteile erzielen.
Wie nehme ich am MSI Prämienprogramm teil:
1. Besuche msi.gm/rewards
2. Erstelle dein Konto
3. Beginne mit dem Sammeln von Punkten und dem Einlösen deiner Prämien
Polski
MSI Reward Program pozwala Ci zdobywać punkty, które później możesz
wykorzystać odbierjąc nagrody lub inne korzyści. Zwiększanie puli punktów
pozwoli Ci zdobywać ekskluzywne nagrody nakonkretnych poziomach
członkostwa.
Jak dołączyć do MSI Reward Program
1. Wejdź na msi.gm/rewards
2. Stwórz konto
3. Zacznij zdobywać punkty i odbieraj Nagrody
Français
Le Programme de récompenses MSI vous permet de récolter des points et de
les transformer en cadeaux ou avantages. Plus vous accumulez de points, plus
votre niveau augmente et plus la valeur de vos cadeaux et avantages est
élevée !
Comment rejoindre le Programme de récompenses MSI
1. Rendez-vous sur msi.gm/rewards
2. Créez votre compte
3. Commencez à gagner des points et à obtenir des cadeaux
Nederlands
De MSI Reward Programma laat jou punten verdienen dat je kan omzetten in
beloningen en voordelen. Je kan meer punten verdienen en exclusieve voordelen
ontvangen bij elke deelnemer niveau.
Hoe doe je mee met de MSI Reward Programma?
1. Ga naar msi.gm/rewards
2. Creëer je account
3. Begin met het verdienen van punten en claim jou beloning
Türkçe
MSI Ödül Programı, puan toplayarak çeşitli ödüller kazanmanızı sağlar.
Puanları toplayarak her üyelik seviyesinde farklı avantajlara sahip olabilirsiniz.
MSI Ödül Programına nasıl katılırsınız?
1. msi.gm/rewards adresine gidin
2. Hesabınızı oluşturun
3. Puan toplamaya ve hediyeleri kazanmaya başlayın
Русский
MSI Rewards: зарабатывай баллы и обменивай их на ценные призы и
подарки.
С ростом твоего уровня в MSI Rewards растет и ценность призов
Как присоединиться к MSI Rewards
1. Перейди на msi.gm/rewards
2. Создай аккаунт
3. Начни зарабатывать баллы и получай призы
Español
El Programa de Recompensas MSI te permite ganar puntos que se convierten en
recompensas y beneficios. Puedes acumular puntos y beneficios exclusivos
mientras subes de rango.
Cómo unirse al programa de recompensas de MSI
1. Dirígete a msi.gm/rewards
2. Crea tu cuenta
3. Empieza a ganar puntos y reclama tu recompensa
日本語
MSI Reward Programでは、たくさんのポイントを貯めてレベルを上げると特別
報酬や特典を受け取ることができます。さらに貯めたポイントは報酬やアイテム
と交換できます。
MSI Reward Programへの参加方法
1. msi.gm/rewards に移動します
2. アカウントを作成します
3. ポイントの獲得と報酬の受け取りを開始します
한국어
MSI 보상 프로그램을 통해 혜택으로 전환되는 포인트를 얻을 수 있습니다.
회원 등급에 따라 제공되는 포인트와 독점 혜택을 직접 확인해보십시오.
MSI 보상 프로그램에 참여하는 방법
1. msi.gm/rewards로 이동합니다.
2. 계정을 생성합니다.
3. 포인트 획득 및 보상 신청을 시작합니다.
简体中文
加入MSI会员奖励计划后,可以累积红利点数并换取奖励,不同会员等级将解锁新
的权益和专属优惠。
如何加入MSI会员奖励计划
1. 访问 msi.gm/rewards
2. 建立个人账号
3. 开始累积红利点数并换取奖励
繁體中文
加入MSI會員獎勵計劃,始可累積紅利點數並換取獎勵。不同會員等級將解鎖專屬
優惠及紅利點數累積方式。
如何加入MSI 會員獎勵計劃
1. 造訪 msi.gm/rewards
2. 建立個人帳號
3. 開始累積紅利點數並換取獎勵

󰍵
󰌇
 󴔄

󰌇


󰌇

)
󰔥


(PBB)
󱽙


(PBDE)
󰀪
 

󰘠


󰇞󰆱


+6
󰀾󰀂󰀾
󰌇󰎃
R c c c c o          
󰄡


󰌇󰉒󰔣
Declaration of the Presence Condition of the Restricted Substances Marking
󳛉󳿞󲪰
󳮤󰀂󳴞
󲠇
󳿞
󳶷
(PBB) 󱽙
(PBDE)
󴅌
(P )
(H )󴇐
(C )󰢕󴅳

󲪰
󳽸󳿞󳽸󳿞󳨭󳼅

󳽸󳿞󳽸󳿞󳨭󳼅

󳮤󰀂󳴞󳮤󰀂󰁀󳮤󰍵
󳨭󲡛󳼅
󳞁󲟻󰁽󲙖󴆇󳮤󳛉󴊍󳨭󳨭󳨭󲙖󲸁
󲞯󳤿󳛉󲡿
10
Complies with
IMDA Standards
(DA100880)
RoHS
Español
Norsk
Dansk
Українська


Product specificaties

Merk: MSI
Categorie: Niet gecategoriseerd
Model: AX1800

Heb je hulp nodig?

Als je hulp nodig hebt met MSI AX1800 stel dan hieronder een vraag en andere gebruikers zullen je antwoorden


Handleiding Niet gecategoriseerd MSI

Handleiding Niet gecategoriseerd

Nieuwste handleidingen voor Niet gecategoriseerd