Merlin 6-IN-1 DIY Educational Solar Toy Kit Handleiding
Bekijk gratis de handleiding van Merlin 6-IN-1 DIY Educational Solar Toy Kit (13 pagina’s), behorend tot de categorie Speelgoed. Deze gids werd als nuttig beoordeeld door 154 mensen en kreeg gemiddeld 4.6 sterren uit 8 reviews. Heb je een vraag over Merlin 6-IN-1 DIY Educational Solar Toy Kit of wil je andere gebruikers van dit product iets vragen? Stel een vraag
Pagina 1/13
1
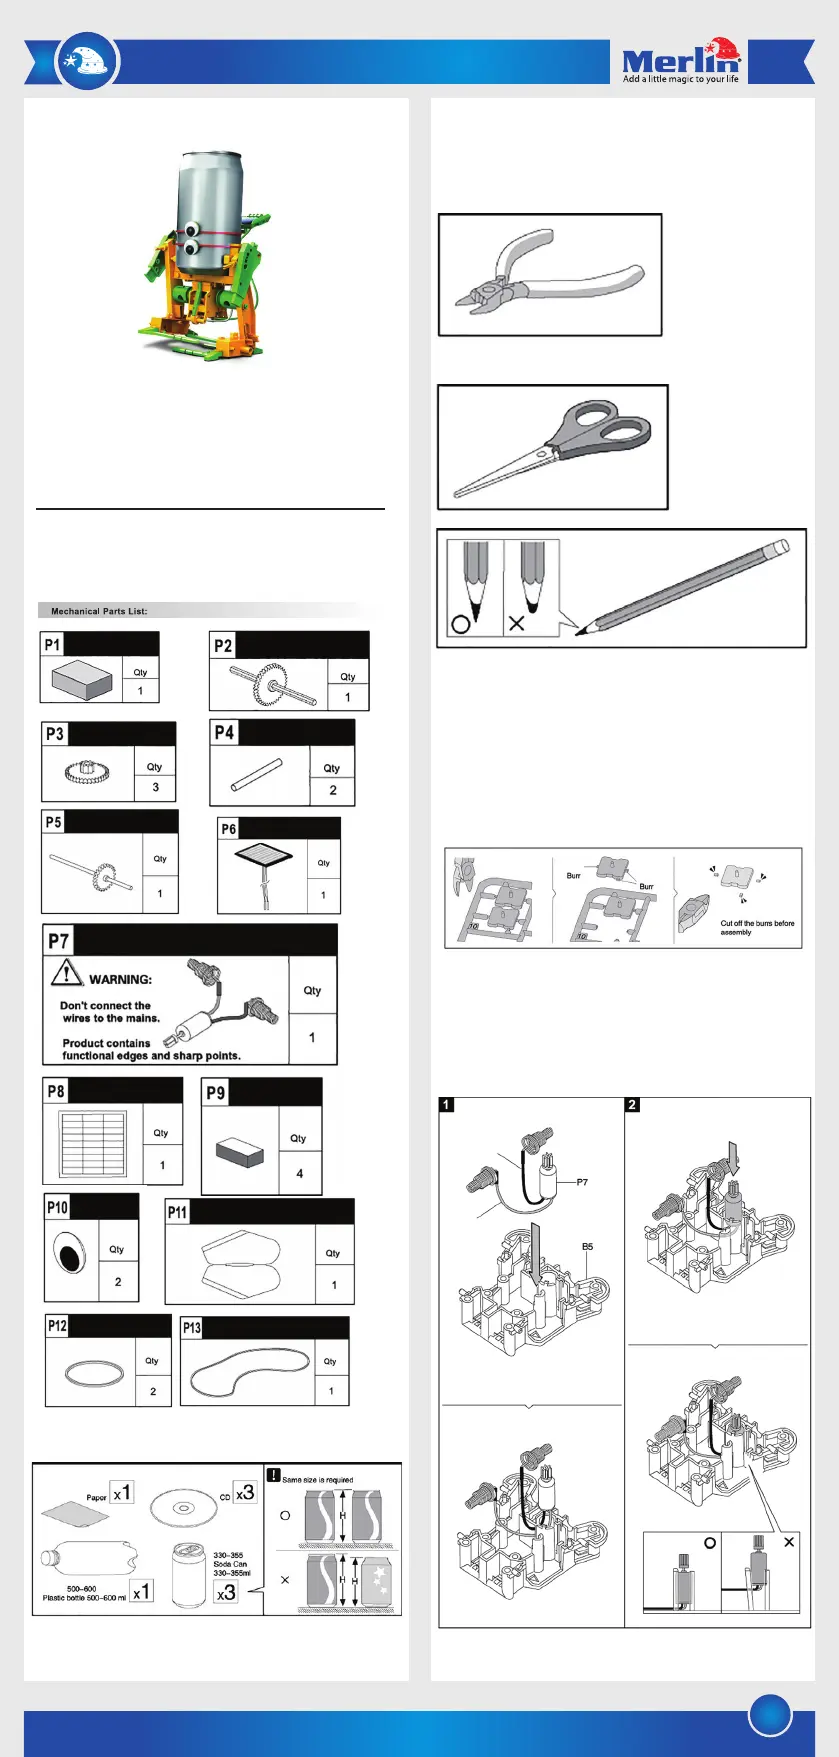
Tools you may need:
Diagonal Cutter
Scissors
Pencil
Instructions:
For the assembly of all the different toys in this product two items
need to be assembled first. The Gearbox and the Solar Module.
Hint: Use a small side cutter to remove the individual pieces from
the main plastic assembly. Also remember to cut off the burr to
make a smoother edge.
1). Gearbox:
The gearbox drives the different toys.
a) Start by fitting the motor in its slot as per figure
1 and 2. Be careful to not put the motor in skew it can
damage the plastic parts.
6-in-1 DIY Educational Solar Toy Kit
Thank you for purchasing this Merlin Product. Please read the
instruction manual carefully before using the product.
The documentation provided will allow you to fully enjoy all the
features this unit has to offer.
Please save this manual for future reference.
The following items are enclosed in the box. Please note that this
product contains small plastic items that can easy be swallowed
by children. Adult supervision is recommended when having
children assemble this product.
Aditional recycled items required for assembly
of different toys:
Colored Box
Gear ( Orange )
Gear with Shaft ( Purple )
Motor with Connectors
Adhesive Tape
Eyes
Rubber Band
Rubber Belt
Wing
Black
Push
Red
Sponge
Solar Panel
Round Shaft
Gear with Shaft ( Green )
Product specificaties
| Merk: | Merlin |
| Categorie: | Speelgoed |
| Model: | 6-IN-1 DIY Educational Solar Toy Kit |
| Kleur van het product: | Green, Yellow |
| Gewicht: | 80 g |
| Breedte: | 165 mm |
| Hoogte: | 192 mm |
| Gebruikershandleiding: | Ja |
| Aanbevolen leeftijd (max): | 99 jaar |
| Aanbevolen leeftijd (min): | 8 jaar |
| Materiaal: | Acrylonitrielbutadieenstyreen (ABS) |
| Voorgesteld geslacht: | Jongen/meisje |
| Thema: | Bouwkunde |
| Type product: | Experimentset |
| EU TSD-waarschuwing: | Niet geschikt voor kinderen onder de 36 maanden |
Heb je hulp nodig?
Als je hulp nodig hebt met Merlin 6-IN-1 DIY Educational Solar Toy Kit stel dan hieronder een vraag en andere gebruikers zullen je antwoorden
Handleiding Speelgoed Merlin
Handleiding Speelgoed
Nieuwste handleidingen voor Speelgoed

21 Juli 2026
20 Juli 2026
19 Juli 2026
19 Juli 2026
17 Juli 2026
16 Juli 2026
15 Juli 2026
15 Juli 2026
15 Juli 2026
14 Juli 2026