Manfrotto MVR901EPLA Handleiding
Manfrotto Controller MVR901EPLA
Bekijk gratis de handleiding van Manfrotto MVR901EPLA (2 pagina’s), behorend tot de categorie Controller. Deze gids werd als nuttig beoordeeld door 52 mensen en kreeg gemiddeld 4.0 sterren uit 4 reviews. Heb je een vraag over Manfrotto MVR901EPLA of wil je andere gebruikers van dit product iets vragen? Stel een vraag
Pagina 1/2
INSTRUCTIONS
MVR901EPLA
Cod. 1010,86 - 05/11 Copyright © 2011 Manfrotto Bassano Italy
Daher ist es, um mit einer Sony SD ar-
beiten zu können, erforderlich, die Fern-
bedienung manuell wie folgt neu zu kon-
figurieren:
1. Schalten Sie die Kamera aus.
2. Drücken Sie gleichzeitig die Knöpfe
“Fokuskontrolle” und “RET”und halten
diese gedrückt.
3. Schalten Sie die Kamera ein.
4. Warten Sie, bis die “LED-Anzeige” an-
und wieder ausgeht.
5. Nun lassen Sie die Knöpfe bitte wie-
der los.
Der gesamte Vorgang dauert ca. 6 Sekun-
den. Die neuen Einstellungsinformationen
werden dauerhaft in dem internen Flash-
Speicher des Controllers gespeichert und
nach jedem Ausschalten wiederherge-
stellt.
HINWEIS: Die Kontrollen des Mehrge-
schwindigkeitsfokus arbeiten in der Sony
SD Konfiguration, wenn ebenfalls ein
Sony HD Camcorder verwendet wird,
nicht. Sie müssen daher, um diese Befeh-
le nutzen zu können, die Werkseinstellun-
gen zurücksetzen (siehe “Werkszurück-
setzung”).
Werkszurücksetzung
AF
RET
Gehen Sie bitte, um die Werkseinstellung
der Fernbedienung zurückzusetzen, fol-
gendermaßen vor:
1. Schalten Sie die Kamera aus.
2. Drücken Sie gleichzeitig die Knöpfe
“Fokuskontrolle”, “RET” und “REC /
STOPP”und halten diese gedrückt.
3. Schalten Sie die Kamera ein.
4. Warten Sie, bis die “LED-Anzeige”
an- und wieder ausgeht.
5. Nun lassen Sie die Knöpfe bitte
wieder los.
Der gesamte Vorgang dauert ca. 6 Sekun-
den. Die neuen Einstellungsinformationen
werden dauerhaft in dem internen Flash-
Speicher des Controllers gespeichert und
nach jedem Ausschalten wiederherge-
stellt.
Stand-by-Modus
Drücken Sie einmal auf den
Knopf, um den Stand-by-Modus
der Kamera zu aktivieren.
Im Stand-by-Modus drücken Sie wieder-
um auf den Knopf, um den Normalbetrieb
der Kamera wieder zu aktiveren. Es hat,
wenn Sie, während die Kamera ausge-
schaltet ist, auf diesen Knopf drücken,
keine Auswirkung auf den Betrieb der
Kamera.
ZOOMFOCUS
KNOB
Auswahl des Knopfmodus
Der Knopf ermöglicht die
Kontrolle des Zooms und
des Fokus.
Die “Knopfmodus-LEDs”
zeigen an, welche Funktion
aktiviert ist.
Drücken Sie, um den Knopfmodus zu
ändern, auf die Auswahl “Knopfmodus
(Zoom / Fokus)”.
AF
Autofokus drücken
Halten Sie den Knopf für min-
destens eine halbe Sekunde ge-
drückt, um den Autofokus-Modus
der Kamera zeitweilig zu aktivie-
ren.
Sobald Sie den Knopf loslassen, springt
die Kamera in den manuellen Autofokus-
Modus zurück. Dieser Knopf hat, wenn
sich die Kamera bereits im Autofokus-
Modus befindet, keinen Effekt. Diese
Funktion arbeitet nicht mit allen Kameras
– z. B. Canon XL1 / XL2.
MAN.AUTO
FOCUS
Manueller / Autofokus-
Modus
Drücken Sie auf die Aus-
wahl, um zwischen dem ma-
nuellen und dem Autofokus-
Modus zu wechseln.
Der Fokusmodus wird im Kameradisplay
und mittels der “LED-Anzeige Fokussta-
tus”(13) angezeigt. Diese Funktion ar-
beitet nicht mit allen Videokameras - z.
B.Canon XL1 / XL2.
Es kann bei einigen Camcorder-Modellen
erforderlich sein, die Man- / Auto-Ein-
stellung hinsichtlich der Erkennung der
passenden Einstellung mehrere Male zu
wiederholen. Die Fernbedienung führt
jedes Mal, wenn sie eingeschaltet wird,
eine “Fokus-Angleichungsabstimmung”
durch.
Dieser Vorgang kann bei einigen Cam-
corder-Modellen bis zu 10 Sekunden
dauern. Während dieser Zeit blinkt die
“LED-Anzeige für den Fokusstatus” (13).
Aufnahme Start / Stopp
Drücken Sie zum Starten der
Aufnahme den Knopf einmal.
Drücken Sie den Knopf erneut,
um die Aufnahme zu stoppen.
Die LED-Anzeige blinkt, wenn
die Kamera aufnimmt.
IRIS
-
IRIS
+
BLENDENwertregulierung
Halten Sie BLENDE+ oder
BLENDE– für mindestens eine
halbe Sekunde gedrückt, um
den Objektivblendenwert zu
verändern. Der Blendenwert der
Kamera wird üblicherweise im
Kameradisplay angezeigt.
Mit der Kamera verbinden
Hinweis! Trennen Sie, um einen
unbeabsichtigten Kurzschluss
des Kameraanschlusses zu ver-
hindern, das Kabel NIEMALS
vom Controller.
1. Die Kamera ausschalten
2. Verbinden Sie das andere Ende des
Kabels mit dem LANC-Stecker der
Kamera
Verbinden Sie den Controller niemals mit
einem anderen Anschluss. Dies kann in
einer dauerhaften Beschädigung des Con-
trollers und / oder der Kamera resultieren!
Hinweis: Der LANC-Controller ist als
selbstständiges Kontrollsystem für Vi-
deokameras konzipiert – er ist nicht für
die gleichzeitige Verwendung mit anderen
LANC-Kontrollsystemen gedacht.
3. Schalten Sie die Kamera ein – nun
können Sie den Controller verwenden
Für den Fall, dass der Knopf des Control-
lers in der neutralen Position justiert ist,
bewegen Sie diesen, nachdem Sie die
Kamera eingeschaltet haben, bitte nicht.
Der Justierungsvorgang ist nach ungefähr
2 Sek., wenn die LED-Anzeige kontinuier-
lich blinkt, beendet und Sie können den
Controller verwenden.
Für den Fall, dass die LED-Anzeige nicht
blinkt, könnte dies ein Problem mit der
Stromversorgung des Controllers bedeu-
ten.
Überprüfen Sie in diesem Fall bitte die
LANC-Kabelverbindungen zur Kamera
und zum Controller.
BETRIEB
HINWEIS: Es stehen abhängig vom Ar-
beitsmodus der Kamera nicht alle Funk-
tionen zur Verfügung. So funktioniert
beispielsweise, wenn Sie den Memory-
Modus einer Sony Kamera verwenden,
die Funktionen “Aufnahme Start / Stopp”
nicht. Die Drucktaste für den Autofokus
funktioniert nicht in Verbindung mit Ca-
non XL1, XL2 Camcordern.
Knopffunktion
Der Knopf ermöglicht die Kontrolle der
Rotationsbewegung des Zooms oder des
Fokus nach links oder rechts.
Je mehr der Winkel des Knopfs gedreht
wird, umso schneller ist die Geschwindig-
keit des Zooms oder des Fokus.
Die Anzahl der Geschwindigkeitsstufen
für den Zoom / den Fokus hängen von
den Kameramodellen ab.
-+
Auswahl der Begrenzung
der Geschwindigkeit des
Zooms
Drehen Sie an der Begren-
zung für die Zoomgeschwin-
digkeit im Uhrzeigersinn, um
eine höhere Begrenzung der
Zoomgeschwindigkeit einzustellen.
Drehen Sie die Begrenzung in die entge-
gengesetzte Richtung, um die Begren-
zung der Geschwindigkeit herabzuset-
zen.
Variabler Zoom-Modus
Drehen Sie den Zoomknopf nach links
oder rechts, um im Tele- oder Weitwin-
kelbereich zu zoomen (abhängig von der
Einstellung der Zoomrichtung).
Je mehr der Winkel des Knopfs gedreht
wird, umso schneller ist die Geschwindig-
keit des Zooms.
Die Zoomgeschwindigkeit wird durch die
“Begrenzung der Zoomgeschwindigkeit”
begrenzt.
Die Zoomrichtung individuell
einstellen
Gehen Sie bitte, um die Zoom-
richtung zu verändern, folgen-
dermaßen vor:
1. Schalten Sie die Kamera aus.
2. Drücken Sie auf den “REC/STOP”-
Knopf und halten diesen gedrückt.
3. Schalten Sie die Kamera ein.
4. Warten Sie, bis die “LED-Anzeige” an-
und wieder ausgeht.
5. Nun lassen Sie den “REC/STOP”-
Knopf bitte los.
Dieser ganze Vorgang nimmt ungefähr 6
Sekunden in Anspruch. Die neuen Ein-
stellinformationen werden dauerhaft in
dem Flash-Speicher des Controllers ge-
speichert und nach jedem Ausschalten
wiederhergestellt.
AF
Die Fokusrichtung individuell
einstellen
Gehen Sie bitte, um die Fokus-
richtung zu verändern, folgender-
maßen vor:
1. Schalten Sie die Kamera aus.
2. Drücken Sie auf den “Fokuskontroll”-
Knopf und halten diesen gedrückt.
3. Schalten Sie die Kamera ein.
4. Warten Sie, bis die “LED-Anzeige” an-
und wieder ausgeht.
5. Nun lassen Sie den “Fokuskontroll”-
Knopf bitte los.
Der gesamte Vorgang dauert ca. 6 Se-
kunden.
Die neuen Informationen zur Fokusrich-
tung werden dauerhaft in dem internen
Flash-Speicher des Controllers gespei-
chert und nach jedem Ausschalten wie-
derhergestellt.
AF
RET
Auswahl der Serie der Kamera
Die Werkseinstellungen der Fern-
bedienung sind konfiguriert, um
mit Sony HD und Canon SD / HD
Kameras zu arbeiten. Der Fokus
ist in diesem Modus nicht mit den
Sony SD Kameras kompatibel.
IRIS
-
IRIS
+
Manueller / Auto-BLENDEN-
Modus
Doppelklicken Sie auf BLENDE+
oder BLENDE-, um den BLEN-
DENstatus der Kamera von Auto
auf manuell und umgekehrt zu
ändern (Sony HD).
IRIS
-
IRIS
+
Auto-BLENDE drücken
Halten Sie BLENDE+ und BLEN-
DE- zusammen für mindestens
eine halbe Sekunde gedrückt, um
den AutoBLENDENmodus (Sony
HD) der Kamera zu aktivieren.
HINWEIS: Es ist, um die BLENDENsteue-
rung über die Fernbedienung zu aktivieren,
üblicherweise erforderlich, die Kamera bei
Sony HD- in den manuellen BLENDENMO-
DUS und bei Canon HD-Kameras in den
AutoBLENDENmodus voreinzustellen.
RET
Drücken Sie auf den Knopf, um
die Ruhezustand-Funktion
auszuführen.
SICHERHEITSHINWEISE
Wasserdichtigkeit:
Wir haben uns bemüht, die LANC-Fern-
steuerung so wasserdicht wie möglich
zu machen, ohne ihren Preis in die Höhe
zu treiben. Dessen ungeachtet können
wir keine 100%ige Garantie für Wasser-
dichtigkeit unter allen Umständen über-
nehmen. Vermeiden Sie den Einsatz der
Fernsteuerung unter erschwerten Um-
weltbedingungen, wie im Regen oder bei
mehr als 70% relativer Feuchtigkeit.
Hohe Temperaturen:
Meiden Sie Temperaturen über +70°C.
Setzen Sie die Fernsteuerung insbeson-
dere keinem direkten, starken Sonnen-
licht aus, z.B. in einem in der Sonne ge-
parkten Fahrzeug.
Elektrisches System:
Bei jedem elektronischen System sind
Kabel stets am stärksten gefährdet, weil
sie bei entsprechender mechanischer Be-
lastung brechen können.
Um die Lebensdauer des Geräts zu verlän-
gern und das Gerät so reparaturfreundlich
wie möglich zu machen, haben wir des-
halb auf leichten Kabelwechsel geachtet.
Um ein versehentliches Kurzschließen
des Kamera-LANC-Anschlusses zu ver-
hindern, sollten Sie darauf achten, dass
das Kabel stets zuerst an die Fernsteue-
rung angeschlossen wird.
Wir empfehlen, das Kabel nicht von der
Fernsteuerung zu trennen, wenn dies
nicht unbedingt nötig ist.
BETRIEBSDATEN
Betriebstemperatur
-10°C (14°F) + 60°C (140°F)
Lagerungstemperatur
-20°C (-4°F) + 70°C (158°F)
Rel. Feuchtigkeit (ohne Kondensation)
max. 70%
HAFTUNGSAUSSCHLUSS
Die in dieser Anleitung enthaltenen Infor-
mationen sind unverbindlich und können
jederzeit ohne Ankündigung geändert
werden. Manfrotto behält sich Irrtümer
vor und übernimmt keine Haftung für
eventuell in dieser Anleitung enthaltene
Irrtümer. LANC steht für Local Application
Control Bus System and ist ein Warenzei-
chen der SONY Corp. sowie der Name
Panasonic sind Warenzeichen der Mat-
suchita Corp.
KONFORMITÄTSERKLÄRUNG
Konformität für Europa
Die Kennzeichnung mit dem CE-Symbol
weist darauf hin, dass dieses System den
geltenden Richtlinien der Europäischen
Union entspricht
Informationen zu FCC Klasse B
Dieses Gerät wurde geprüft und ent-
spricht den Grenzwerten für digitale Ge-
räte der Klasse B gemäß Abschnitt 15
der FCC-Vorschriften. Diese Grenzwerte
bieten einen angemessenen Schutz vor
schädlichen Störungen in Wohngebie-
ten. Dieses Gerät erzeugt, verwendet und
emittiert möglicherweise Hochfrequenz-
energie und kann bei unsachgemäßer Ins-
tallation oder Verwendung zu schädlichen
Interferenzen im Funkverkehr führen. Es
kann nicht garantiert werden, dass bei
einer bestimmten Installation keine Stö-
rungen auftreten. Verursacht dieses Ge-
rät schädliche Störungen des Radio- oder
Fernsehempfangs, was durch Ein- und
Ausschalten des Geräts festgestellt wer-
den kann, sollte der Benutzer versuchen,
die Störungen durch eine der folgenden
Maßnahmen zu beheben:
-Neuausrichtung oder -positionierung
der Empfangsantenne.
-Vergrößern des Abstands zwischen
dem Gerät und dem Empfangsgerät.
-Anschließen des Geräts an eine
Steckdose, die nicht an denselben
Schaltkreis angeschlossen ist wie der
Empfänger.
-Nachfragen bei einem Händler oder
erfahrenen Radio-/Fernsehtechniker.
Änderungen oder Modifikationen, die
nicht ausdrücklich von Manfrotto geneh-
migt wurden, können zum Verlust der Be-
triebszulassung für das Gerät führen.
ICES-003/NMB-003 Hinweis
Dieses Gerät der Klasse B erfüllt die Be-
stimmungen der kanadischen Norm ICES-
003.
pour obtenir une vitesse plus élevée.
Tournez-le dans le sens inverse des
aiguilles d'une montre pour obtenir une
vitesse plus faible.
Zoom en mode variable
Tournez la molette de zoom vers la droite
ou vers la gauche pour zoomer (télé) ou
pour dézoomer (large) (en fonction de la
position du bouton d'inversion de la di-
rection du zoom).
Plus vous tournez la molette, plus la vi-
tesse du zoom est rapide. La vitesse du
zoom est limitée par le réglage "limite de
vitesse du zoom".
Réglage de la direction du
zoom
Pour changer de direction de
zoom, procédez de la manière
suivante:
1. éteignez le caméscope.
2. pressez le bouton "REC/STOP" sans
le relâcher
3. allumez le caméscope
4. attendez que le "voyant LED"
s'allume et s'éteigne
5. relâchez le bouton "REC/STOP".
Cette opération ne nécessite que 6 se-
condes. La nouvelle configuration restera
sauvegardée dans la mémoire flash in-
terne de la télécommande puis sera res-
taurée après chaque phase d'extinction.
AF
Réglage de la direction de la
mise au point
Pour changer de direction de mise
au point, procédez de la manière
suivante:
1. éteignez le caméscope.
2. pressez le bouton de commande de
mise au point sans le relâcher
3. allumez le caméscope
4. attendez que le "voyant LED"
s'allume et s'éteigne
5. relâchez le bouton de commande de
mise au point
Cette opération ne nécessite que 6 se-
condes. La nouvelle direction de la mise
au point restera sauvegardée dans la mé-
moire flash interne de la télécommande
puis sera restaurée après chaque phase
d'extinction.
AF
RET
Sélection du type de caméra
Les paramètres de la télécom-
mande réglés en usine sont
configurés pour fonctionner avec
les caméras Sony HD et Canon
SD / HD. Dans ce mode, la fonc-
tionnalité de Mise au point n'est
pas compatible avec les caméras
Sony SD.
Pour que la télécommande fonctionne
avec les modèles Sony SD, il est néces-
saire de la reconfigurer manuellement de
la manière suivante :
1. éteignez le caméscope.
2. appuyez simultanément sur les
boutons "Commande de mise au
point" et "RET" sans les relâcher
3. allumez le caméscope
4. attendez que le "voyant LED"
s'allume et s'éteigne
5. relâchez les boutons.
Cette opération ne nécessite que 6 se-
condes. La nouvelle configuration restera
sauvegardée dans la mémoire flash in-
terne de la télécommande puis sera res-
taurée après chaque phase d'extinction.
REMARQUE : Dans la configuration Sony
SD, mais aussi avec un caméscope Sony
HD, les commandes de mise au point
multi-vitesses ne seront pas fonction-
nelles. Pour retrouver ces commandes,
vous devez restaurer les paramètres
d'usine (voir Restauration des paramètres
d'usine).
Restauration des paramètres
d'usine
AF
RET
Pour restaurer les paramètres d'usine de
la télécommande, procéder de la manière
suivante:
1. éteignez le caméscope.
2. appuyez simultanément sur les
boutons "Commande de mise au
point", "RET" et "REC/STOP" sans
les relâcher
3. allumez le caméscope
4. attendez que le "voyant LED"
s'allume et s'éteigne
5. relâchez les boutons.
Cette opération ne nécessite que 6 se-
condes. La nouvelle configuration restera
sauvegardée dans la mémoire flash in-
terne de la télécommande puis sera res-
taurée après chaque phase d'extinction.
Mode veille
Appuyez une fois sur ce bouton
pour mettre le caméscope en
mode veille. Une fois en mode
veille, appuyez de nouveau sur le
bouton pour revenir en mode de
fonctionnement normal. Si vous
appuyez sur ce bouton alors que
le caméscope est éteint, cela
n'aura aucun effet sur le fonction-
nement de l'appareil.
ZOOMFOCUS
KNOB
Sélection du mode de la
molette
La molette permet de
contrôler le zoom ou la mise
au point.
Les "voyants du mode de
la molette" indiquent la fonction activée.
Pour changer le mode de la molette,
commutez le sélecteur "Mode molette
(Zoom/Mise au point)".
AF
Mise au point automatique
Maintenez le bouton enfoncé une
demi-seconde afin de passer
l'appareil provisoirement en mode
mise au point automatique.
Dès que vous relâchez le bouton, le ca-
méscope revient en mode mise au point
manuelle. Cette fonction n'a pas d'effet si
le caméscope est déjà en mode mise au
point automatique. Cette fonction n'est
pas compatible avec toutes les caméras
(par ex. Canon XL1/XL2).
MAN.AUTO
FOCUS
Mode manuel ou
automatique de la mise au
point
Commutez le sélecteur pour
passer du mode de mise
au point manuelle au mode
automatique.
Le mode de mise au point s’affichera à
l’écran du caméscope et sera indiqué
par le voyant "État de la mise au point"
(13). Cette fonctionnalité risque de ne pas
fonctionner avec tous les caméscopes
(par ex. le Canon XL1/XL2).
Sur certains modèles de caméscopes, il
peut être nécessaire de répéter plusieurs
fois l’opération de paramétrage Man/
Auto pour une reconnaissance correcte
des paramètres. Chaque fois que la télé-
commande est allumée, elle réalise un
"paramétrage d’alignement de la mise au
point".
Sur certains caméscopes, cette opéra-
tion peut prendre jusqu’à dix secondes,
pendant lesquelles le voyant "État de la
mise au point" (13) clignote.
Mise en marche / arrêt de
l'enregistrement
Appuyez une fois sur cette
touche pour démarrer l'enregis-
trement.
Appuyez de nouveau sur la touche pour
arrêter l'enregistrement.
Le voyant lumineux clignote lorsque le
caméscope est en train d'enregistrer.
IRIS
-
IRIS
+
Commande de la valeur d’IRIS
Maintenez IRIS+ ou IRIS- pressé
pendant une demi-seconde pour
modifier la valeur d’ouverture du
caméscope. La valeur d’IRIS est
généralement indiquée à l’écran
du caméscope.
IRIS
-
IRIS
+
Mode IRIS manuel/
automatique
Double-cliquez sur IRIS+ ou IRIS-
pour modifier l’état de l’IRIS du
caméscope en le faisant passer
d’Auto à Manuel et inversement
(Sony HD).
IRIS
-
IRIS
+
IRIS Auto
Maintenez IRIS+ et IRIS-
enfoncés pendant au moins une
demi-seconde afin de basculer
temporairement le caméscope en
mode IRIS Auto (Sony HD).
REMARQUE: Pour activer la commande
de l’IRIS avec la télécommande, il est
généralement nécessaire de paramétrer
le caméscope en mode IRIS manuel pour
les modèles Sony HD et en mode IRIS
Auto pour les modèles Canon HD.
RET
Appuyez sur le bouton pour
activer la fonction RET (retour).
PRÉCAUTIONS D’EMPLOI
Étanchéité:
Nous nous sommes attachés à rendre la
télécommande la plus étanche possible
sans que cela ne se répercute sur le prix.
Toutefois, nous ne pouvons garantir une
étanchéité à 100% en toutes circons-
tances. Il est donc préférable d’éviter
d’utiliser la télécommande sous la pluie
ou si le niveau d’humidité ambiante est
supérieur à 70%.
Hautes températures:
Évitez les températures excédant +70°C
– ne laissez jamais la télécommande à
une exposition directe au rayons du soleil
(par exemple, dans une voiture garée en
plein soleil).
Précautions électriques:
Le câble est toujours l’un des éléments
les plus fragiles des systèmes électro-
niques, en particulier lorsqu’il est exposé
à une usure d’ordre mécanique.
Par conséquent, pour optimiser la durée
de vie de votre télécommande et limiter le
coût des réparations de base, nous avons
opté pour un câble amovible et donc fa-
cile à remplacer.
Cependant, afin d’éviter tout court-cir-
cuit accidentel au niveau de la connexion
LANC du caméscope, souvenez-vous de
toujours brancher le câble à la télécom-
mande en premier.
Nous vous conseillons de ne pas débran-
cher le câble de la télécommande, sauf si
cela est nécessaire.
SPÉCIFICATIONS DE
FONCTIONNEMENT
Températures de fonctionnement
-10°C (14°F) + 60°C (140°F)
Températures de stockage
-20°C (-4°F) + 70°C (158°F)
DD
Taux d’humidité (sans condensation) 70%
AVIS DE NON RESPONSABILITÉ
Les informations contenues dans la pré-
sente notice d’utilisation peuvent être
sujettes à modification sans avis préa-
lable. Manfrotto ne pose aucune garan-
tie et ne saura être tenu responsable des
erreurs quant aux informations contenues
dans ce document. LANC signifie Local
Application Control Bus System et est
une marque de SONY Corp. et le nom
Panasonic sont des marques de Matsu-
chita corp.
DÉCLARATION DE CONFORMITÉ
Conformité Européenne
Le marquage CE indique la conformité de
cet équipement au Conseil des Directives
de l’Union Européenneen vigueur
Information de la FCC pour les
utilisateurs d’appareils de classe B
Cet équipement a été testé et jugé
conforme aux limites des appareils nu-
mériques de la classe B, conformément
à la partie 15 des règlementations de la
FCC (Federal Communications Commis-
sion). Ces restrictions sont destinées à
offrir une protection raisonnable contre
des interférences nuisibles dans le cadre
d’une installation résidentielle. Cet équi-
pement génère, utilise et peut émettre de
l’énergie radioélectrique. S’il n’est pas
installé et utilisé selon les instructions
fournies, il peut causer des interférences
nuisibles aux communications radio.
Cependant, il n’est pas garanti que des
interférences ne se produisent pas lors
d’installations particulières. Si cet équi-
pement vient à causer des interférences
nuisibles qui affectent la réception radio
et télévisuelle, ce qui peut être le cas en
mettant l’équipement sous ou hors ten-
sion, l’utilisateur est encouragé à tenter
de corriger les interférences d’une ou de
plusieurs des façons suivantes:
-En réorientant ou déplaçant l’antenne
de réception.
-En éloignant l’équipement du récep-
teur.
-En branchant l’équipement sur un
circuit électrique différent de celui du
récepteur.
-En contactant le revendeur ou un tech-
nicien radio/TV expérimenté.
Tout changement ou modification non
expressément approuvés par Manfrotto
pourront entraîner l’annulation de votre
autorisation d’utilisation de cet équipe-
ment.
DéclarationICES-003/NMB-003
Cet appareil numérique de la classe B
est conforme à la norme ICES-003 du
Canada.
VERPACKUNGSINHALT
Bitte überprüfen Sie, ob Sie folgende Arti-
kel erhalten haben:
-Bedienungsanleitungen
-Fernbedienung “pro” für die Videokamera
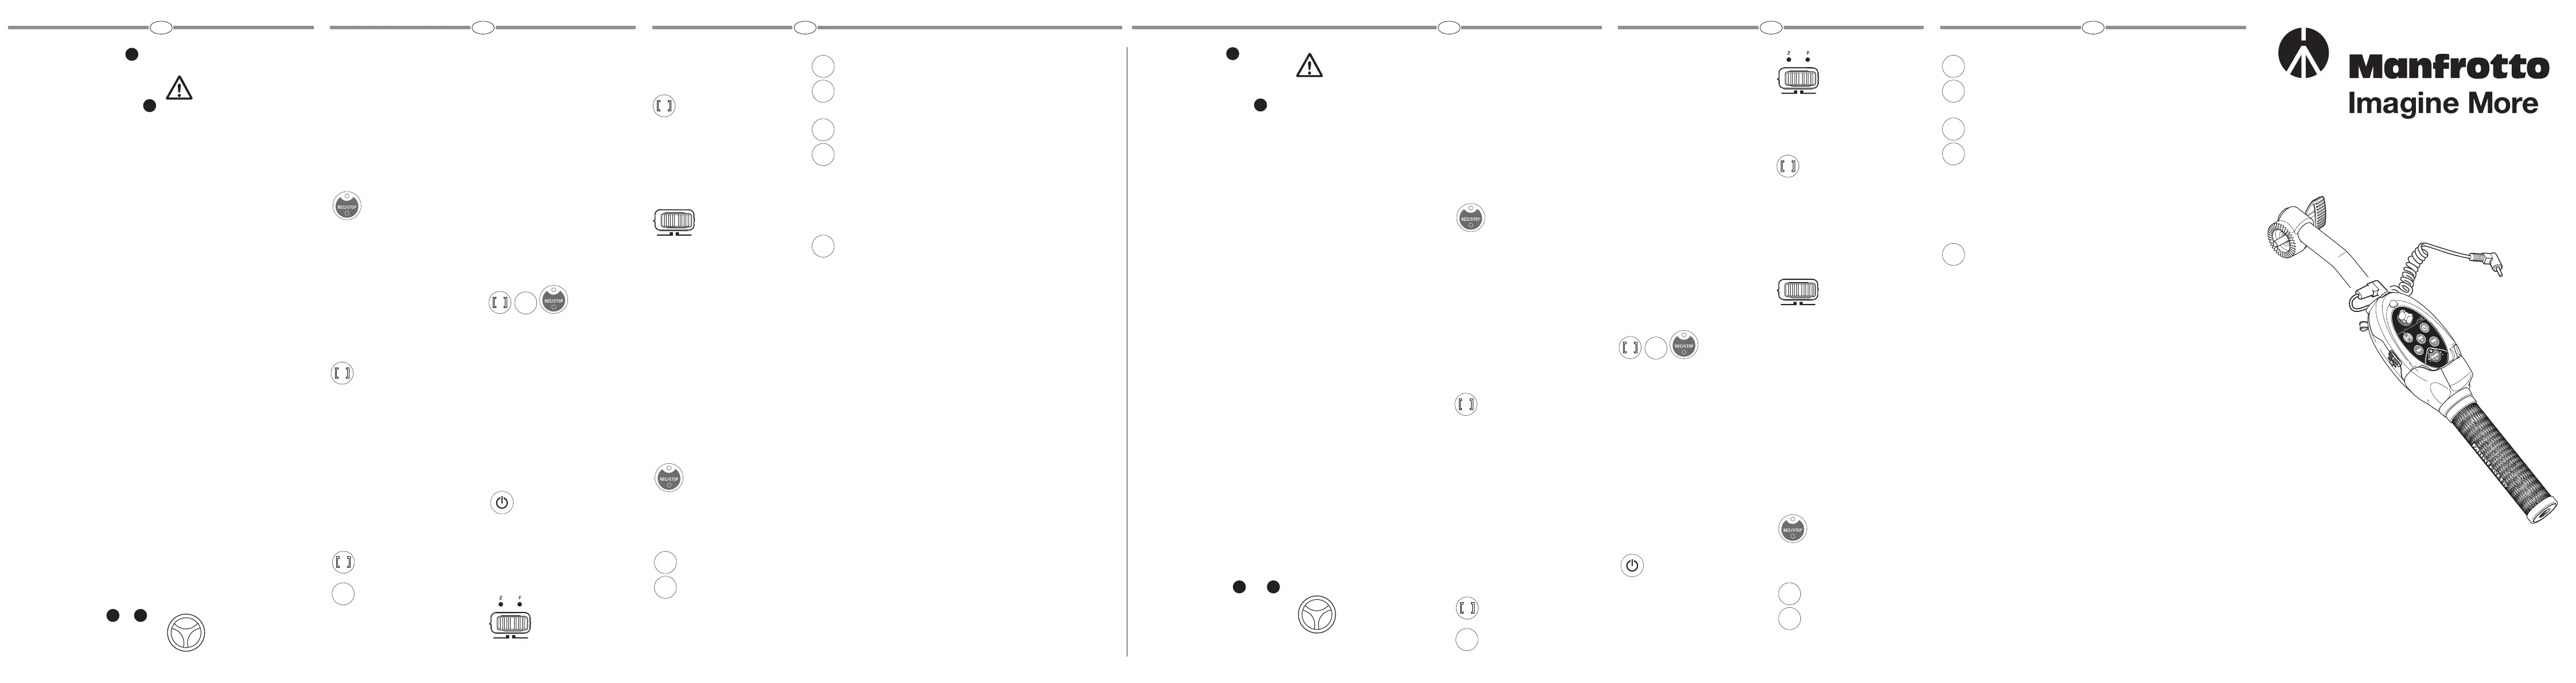
ÜBERSICHT ÜBER DAS GERÄT
Bei dem Controller handelt es sich um
eine Fernbedienung mit Schwenkarm
für sämtliche Videokameras mit einem
LANC- oder einem 10-poligen AVR-An-
schluss (für welche Kabel mit dem Code
522AV verwendet werden).
1. LED-Anzeige
2. STAND-BY
3. Begrenzung der Geschwindigkeit des
Zooms
4. REC/STOP
5. 2,5 mm Stereo-Anschlussbuchse
6. Scharfeinstellung
7. Knopfmodus- (Zoom/Fokus)-Auswahl
8. LEDs für den Knopfmodus
9. Knopf für den Zoom / Fokus
10. RUHEZUSTAND
11. BLENDENregulierung
12. Auswahl Auto- / manueller Fokus
13. LED-Anzeige für den Fokusstatus
Merkmale
•Ein ultrapräziser, achtstufiger, variabler
Geschwindigkeitszoom (Sony SD/HD,
Canon SD)
•Ein ultrapräziser, 16stufiger, variabler
Geschwindigkeitszoom (Canon HD)
•Ein weicher Zoomgeschwindigkeitsverlauf
•Eine Stand-by Drucktaste
•Eine Druckfunktion für den Autofokus
•Ein manueller Fokus mit Zoomknopf
(Sony SD, Canon SD)
•Variable Geschwindigkeit für den
manuellen Fokus mit Zoomknopf (Sony
HD, Canon HD)
•Manueller- / Autofokus
•Individuell einstellbare Begrenzung der
Zoomgeschwindigkeit
•Individuell einstellbare Zoomrichtung
•Individuell einstellbare Fokusrichtung
•LED-Anzeigen
•140 cm Spiralkabel (wenn ausgezogen)
•BLENDEN- / Objektivblendensteue-
rung (Sony HD, Canon HD)
•Wiedergabe der letzten 3 – 5 Sekunden
der Aufnahme (Ruhezustand)
•Manfrotto Rosettenhalterung
•Mit der Universalklemme MVR901AP-
CL kompatibel (nicht in dem Lieferum-
fang enthalten. Bereich: rundes Rohr,
19 bis 25 mm, 0,75“ bis 0,98“)
QUICK-START-ANLEITUNG UND
Mit dem Support verbinden
Manfrotto Rosettenhalterung
Mit der Universalklemme MVR901APCL
kompatibel (nicht in dem Lieferumfang
enthalten. Bereich: rundes Rohr, 19 bis
25 mm, 0,75“ bis 0,98“)
1
2
34
FDF
CONTENU DE L'EMBALLAGE
Vérifiez que vous avez reçu les éléments
suivants:
-Manuels d'utilisation
-Télécommande "Pro" pour caméscope
VUE D'ENSEMBLE DE L'APPAREIL
La télécommande est un dispositif sur
levier panoramique pour la commande
déportée de tous les caméscopes dotés
d'une fiche jack LANC ou d'un connec-
teur AVR 10 broches (à l'aide du câble
adaptateur code 522AV).
1. Voyant lumineux
2. STAND-BY (veille)
3. Molette de réglage de la vitesse du
zoom
4. REC/STOP(Mise en marche/arrêt de
l'enregistrement)
5. Prise mini jack stéréo de 2,5 mm.
6. Commande de mise au point
7. Sélecteur de mode de la molette
(Zoom/mise au point)
8. Voyants du mode de la molette
9. Molette de zoom/mise au point
10. RET
11. Commandes IRIS
12. Sélecteur de mise au point Auto/Man
13. Voyant d’état de mise au point
Caractéristiques
•Vitesse de zoom variable ultra précise
8 paliers (Sony SD/HD, Canon SD)
•Vitesse de zoom variable ultra précise
16 paliers (Canon HD)
•Progression constante de la vitesse
du zoom
•Bouton-poussoir de mise en veille
•Fonction de mise au point automatique
•Mise au point manuelle avec molette
zoom (Sony SD, Canon SD)
•Mise au point manuelle (vitesse
variable) avec molette zoom (Sony HD,
Canon HD)
•Mise au point manuelle/automatique
•Réglage de la limite de vitesse du
zoom
•Réglage de la direction du zoom
•Réglage de la direction de la mise au
point
•Témoins lumineux
•Câble spirale de 140 cm (en extension)
•Commande de l’ouverture de l’IRIS/
l’objectif (Sony HD, Canon HD)
•Visionnage arrière des 3-5 dernières
secondes d’enregistrement (RET)
•Fixation de la rosette Manfrotto
•Compatibilité avec la pince universelle
MVR901APCL (non fournie, diamètre :
tube rond de 19 à 25 mm).
GUIDE DE
PRÉSENTATION RAPIDE
ET
Connexion au support
Fixation de la rosette Manfrotto
Compatibilité avec la pince universelle
MVR901APCL (non fournie, diamètre :
tube rond de 19 à 25 mm).
Connexion à la caméra
Remarque: Afin d'éviter tout
court-circuit accidentel au ni-
veau du connecteur LANC du
caméscope, ne débranchez
JAMAIS le câble de la télécom-
mande.
1 Éteignez la caméra.
2 Connectez l'autre extrémité du câble
à la prise LANC du caméscope
Ne connectez jamais votre télécom-
mande à une autre prise. Cela pourrait
endommager la télécommande et/ou le
caméscope de manière irréversible.
REMARQUE : La télécommande LANC est
conçue comme système de contrôle indé-
pendant pour caméscope – elle ne peut
agir sur plusieurs systèmes de contrôle
LANC en même temps.
3 Allumez la caméra – vous pouvez à
présent utiliser la télécommande.
Après avoir allumé la caméra, ne tournez
pas la molette du zoom, car la télécom-
mande effectue un calibrage de la posi-
tion neutre de la molette. Après environ 2
secondes, lorsque l'indicateur LED reste
constamment allumé, la procédure de
calibrage est terminée et vous pouvez
commencer à utiliser la télécommande.
Si le voyant lumineux ne s'allume pas du
tout, il existe un problème d'alimentation
de la télécommande.
Dans ce cas, vérifiez les connexions du
câble LANC au caméscope et à la télé-
commande.
UTILISATION
REMARQUE : Selon le mode de fonc-
tionnement du caméscope utilisé, toutes
les fonctions ne seront peut-être pas dis-
ponibles (par exemple, si vous utilisez le
mode Mémoire des caméscopes Sony,
vous ne pourrez pas utiliser les fonctions
de mise en marche et d'arrêt de l'enregis-
trement, et la mise au point automatique
par bouton poussoir ne fonctionnera pas
avec les caméscopes Canon XL1 et XL2.
Fonctionnalité de la molette
La molette permet de contrôler le zoom
ou la mise au point en la tournant vers la
droite ou vers la gauche.
Plus vous tournez la molette, plus la
vitesse du zoom/de la mise au point est
rapide.
Les paliers de vitesse du zoom/mise au
point dépendent des modèles de camés-
cope.
-+
Sélection de la vitesse du
zoom
Tournez le réglage de la vi-
tesse du zoom dans le sens
des aiguilles d'une montre
1
2
34
F
Product specificaties
| Merk: | Manfrotto |
| Categorie: | Controller |
| Model: | MVR901EPLA |
Heb je hulp nodig?
Als je hulp nodig hebt met Manfrotto MVR901EPLA stel dan hieronder een vraag en andere gebruikers zullen je antwoorden
Handleiding Controller Manfrotto

17 Januari 2024
17 Januari 2024
Handleiding Controller
Nieuwste handleidingen voor Controller
11 Mei 2026
28 April 2026
15 April 2026
15 April 2026
14 April 2026
2 April 2026
30 Maart 2026
28 Maart 2026