LumenRadio MoonLite Handleiding
LumenRadio
Controller
MoonLite
Bekijk gratis de handleiding van LumenRadio MoonLite (4 pagina’s), behorend tot de categorie Controller. Deze gids werd als nuttig beoordeeld door 56 mensen en kreeg gemiddeld 4.6 sterren uit 28.5 reviews. Heb je een vraag over LumenRadio MoonLite of wil je andere gebruikers van dit product iets vragen? Stel een vraag
Pagina 1/4

MoonLite
INTRODUCTION
Thank you for buying a LumenRadio CRMX MoonLite product. This guide is intended to give you a quick
start to experience the benets of LumenRadio’s CRMX system.
The CRMX product you just purchased are designed to give you the highest reliability on the market
and are fully compatible with other CRMX products in entertainment lighting (CRMX Nova,
CRMX Outdoor, CRMX Slim, CRMX OEM). Through this you are able to expand
your wireless system with units from our other product lines as well as
with those of our partners. For the latest updates please visit
the LumenRadio website www.lumenradio.com.
The information furnished in this start guide is for informational use only and is subject to change without notice. Please
check www.lumenradio.com for latest version. LumenRadio AB assumes no responsibility or liability for any errors or
inaccuracies that may appear in this start guide.
All information and graphics are property of LumenRadio AB, Svangatan 2B, SE-416 68 Gothenburg, Sweden.
lumenradio
Creating Connectivity for a Better Tomorrow
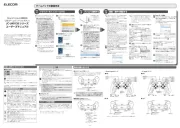
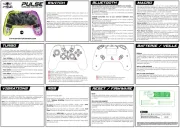
Right green >80%
Mid green >60%
Left green >40%
Amber >20%
Red <20%
Link button - press
to link with, or unlink
from, another unit.
LED indicators - Mode, Status, Data
(See specications below)
We hope that you will enjoy
our products and that they
will bring benets and positive
experiences.
Mode (M)
BLE on (TX mode)
BLE on (RX mode)
RX mode
TX mode
RX mode
TX mode
Linked and synced
Transmitting
Linking or linked but not synced
Linking
color of ST = universe color selected by user
(green by default)
Not linked
DMX present
RDM, no DMX
RDM, with DMX
No DMX
when D = green, level bar displays battery level
when D = amber, level bar displays signal quality
Level indicators
- Signal quality and battery level
(See specications below)
CRMX MOONLITE CONTROL PANEL
See the operation section for details on how to link and unlink CRMX MoonLite units.
Indicators turn off after 30 sec inactivity when running on battery, press the button to wake up.
Status (ST) Data (D)
Level indicators

LINKING
MoonLite can link with any other LumenRadio CRMX unit.
POWER ON/OFF
Power on the device by pressing and holding its link button for 5 seconds until the LEDs lights up.
Power off the device by pressing and holding its link button for 5 seconds until the LEDs turn off.
FLEX MODE CHANGING
MoonLite offers the ultimate exibility to operate as either a transmitter or a receiver. (RX by default)
The Mode LED indicator shows different colors depending on the units current conguration
Mode LED displays yellow: Receiver mode selected
Mode LED displays red: Transmitter mode selected
The mode can be changed in the CRMX Toolbox app. You can also switch mode by using a manual button
press sequence (see below).
MANUAL CHANGE OF MODE
1. If LEDs are off – press the link button once to wake up the device.
2. Press and release the link button ve times in succession, then immediately press and hold the button
for three seconds (until ST LED is lit).
3. You can now change the Flex mode as desired. The mode LED will indicate the selected mode by
blinking in the modes corresponding color (red/yellow).
• To step between Flex modes: Press and release the link button to move to the next mode.
• To save changes: Press and hold the link button for three seconds. The unit will revert to normal oper-
ation using the newly selected mode.
• To exit without saving changes: The unit will revert to normal operation if you do not press the link
button within fteen seconds.
The unit will continue to act as congurated until you activly change the mode (even if you turn the unit off).
MANUAL RESET OF PIN CODE
If LEDs are off – press the link button once to
wake up the device. Press and release the link
button seven times in succession. Then immedi-
ately press and hold the button for three seconds.
You have now successfully reseted the pin code.
SWITCHING BLUETOOTH ON/OFF
If LEDs are off – press the link button once to wake
up the device. Press and release the link button.
Then immediately press and hold the button for three
seconds. For full DMX integrity we recommend to
switch off Bluetooth during operation.
TO LINK
1. Power on the MoonLites you would like to connect.
2. Congure the MoonLite for RX/TX mode (see instructions below)
3. Ensure that the Status LED indicators on all receivers are off to
indicate that the receivers are ready to be linked. (If necessary,
follow the unlink procedure.)
4. On the transmitter, press and release the link button.
5. The transmitter will search for any unlinked receivers. Its Status
LED indicator will ash for 10 seconds and normal operation will
resume.
6. Status LED will display (in the selected universe color)
on successfully linked receivers.
TO UNLINK
• Unlink one:
On the receiver, press and hold
its link button for more than 3
seconds (until ST LED is lit) to
unlink it from a transmitter. The
Status LED indicator will turn off.
• Unlink all:
On the transmitter, press and
hold its link button for more
than 3 seconds (until ST LED is
lit) to unlink all of its receivers.
Product specificaties
| Merk: | LumenRadio |
| Categorie: | Controller |
| Model: | MoonLite |
Heb je hulp nodig?
Als je hulp nodig hebt met LumenRadio MoonLite stel dan hieronder een vraag en andere gebruikers zullen je antwoorden
Handleiding Controller LumenRadio

27 Juni 2025

19 Maart 2024

19 Maart 2024

19 Maart 2024

19 Maart 2024

19 Maart 2024

19 Maart 2024

19 Maart 2024

19 Maart 2024

19 Maart 2024
Handleiding Controller
- Tascam
- Kanex
- ATen
- Kicker
- Nintendo
- Audibax
- Media-tech
- IK Multimedia
- Sonoff
- Konig
- Manhattan
- Morningstar
- Broadcom
- Wolfmix
- Irritrol
Nieuwste handleidingen voor Controller

15 September 2025
15 September 2025
15 September 2025
15 September 2025

15 September 2025

2 September 2025

1 September 2025
1 September 2025
1 September 2025

31 Augustus 2025