Lindell Audio LiNTEC Handleiding


Lees hieronder de đź“– handleiding in het Nederlandse voor Lindell Audio LiNTEC (2 pagina's) in de categorie Niet gecategoriseerd. Deze handleiding was nuttig voor 14 personen en werd door 2 gebruikers gemiddeld met 4.5 sterren beoordeeld

Pagina 1/2
©2024 Lindell Audio. This manual and any associated intellectual property are subject to copyright
protection. No part of this document may be reproduced in any form without explicit written
consent from Lindell Audio. Lindell Audio is a RAD Global Distribution company.
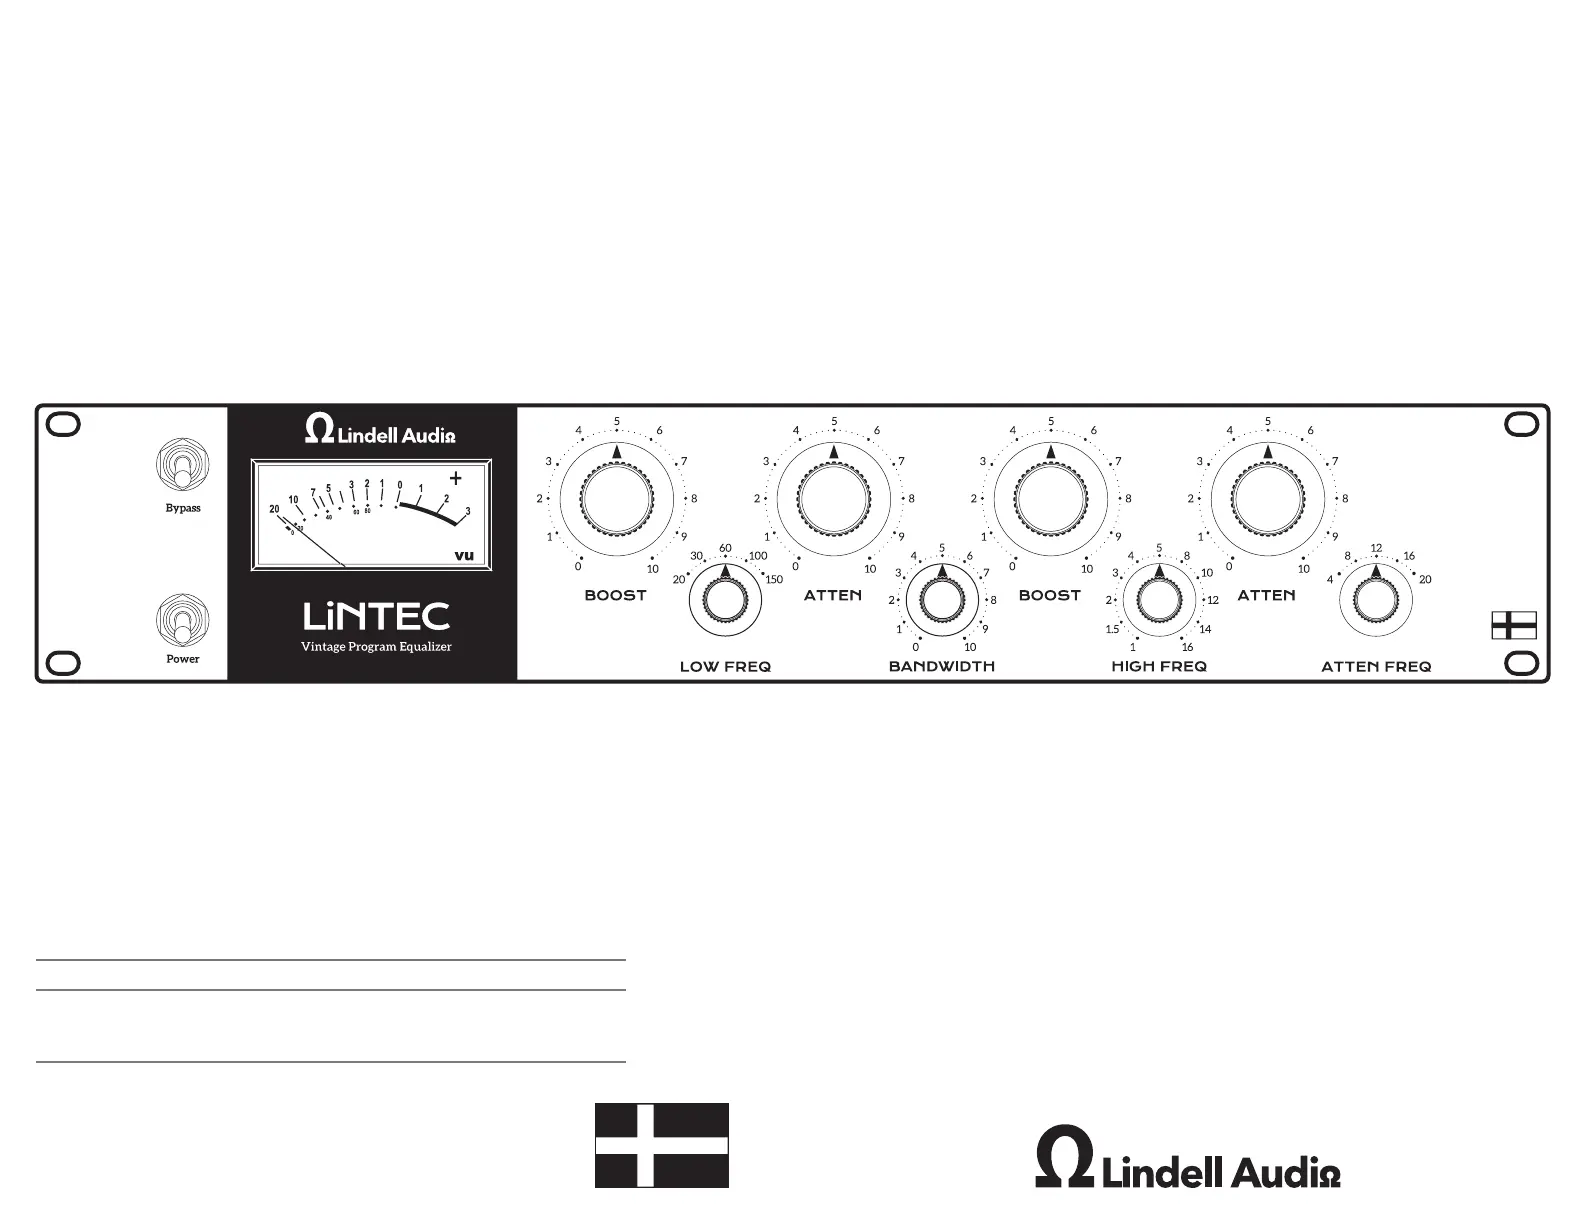
LiNTEC
Vintage Program Equalizer
Specications
EQ Switch
Settings
5-Step Switched EQ Low Freq Boost/Atten:
20, 30, 60, 100, 150 Hz +/-10%
11-Step Switched EQ High Freq Boost:
1, 1.5, 2, 3, 4, 5, 6, 10, 12, 14, and 16 kHz +/-10%
5-Step Switched Eq High Freq Atten:
4, 8, 12, 16, and 20 kHz +/-10%
Voltage 115 VAC, 230 VAC rear panel switchable AC Mains Input: IEC320-C14 standard plug.
Dimensions Width: 438 mm (19”)
Height: 88 mm (2U)
Depth: 250 mm
1. Read these instructions.
2. Keep these instructions
3. Heed all warnings.
4. Follow all instructions.
5. Do not use this apparatus near water.
6. Clean only with dry cloth.
7. Install in accordance with the
manufacturer’s instructions.
8. Do not install near any heat sources such
as radiators, heat registers, stoves, or
other apparatus that produce heat.
9. Protect the power cord from being walked
on or pinched particularly at plugs,
convenience receptacles, and the point
where they exit from the apparatus. If the
power cord becomes frayed, stop using
immediately.
10. Use only attachments/accessories
speciîť°ed by the manufacturer
11. Use only with a cart, stand, tripod, bracket
or table speciîť°ed by the manufacturer, or
sold with the apparatus. When a cart is
used, use caution when moving the cart/
apparatus combination to avoid injury
from tip-over.
12. Unplug this apparatus during lightning
storms or when unused for long periods
of time.
13. Refer all servicing to qualiîť°ed service
personnel. Servicing is required when
the apparatus has been damaged in any
way, such as power supply cord or plug
is damaged, liquid has been spilled or
objects have fallen into the apparatus,
the apparatus has been exposed to rain
or moisture, does not operate normally, or
has been dropped.
14. This apparatus shall not be exposed to
dripping or splashing, and no object îť°lled
with liquids, such as vases, shall be placed
on the apparatus.
15. Note that this apparatus is not completely
disconnected from the AC mains service
when the power switch is in the OFF
position.
16. The mains plug or power inlet on the
product is used as the disconnect device,
so the disconnected device shall remain
readily operable when reconnected.
17. Any changes or modiîť°cations not
expressly approved in this manual
could void your authority to operate this
apparatus.
Important!
Be sure to only use the supplied 12V AC
supply with this unit. Other supplies can
potentially damage the unit.
The lightning îť±ash with an arrowhead sym-
bol within an equilateral triangle is intended
to alert the user to the presence of uninsu-
lated “dangerous voltage” within the prod-
uct’s enclosure that may be of sufcient
magnitude to constitute a risk of electric
shock to persons.
The exclamation point within an equilater-
al triangle is intended to alert the user to
the presence of important operating and
maintenance (servicing) instructions in the
literature accompanying the product.
The Lindell Audio LiNTEC complies with
all applicable / RoHS / WEEE European
Union directives.
Do not attempt to service this unit yourself,
1. Power switch: Turns the unit off.
2. Bypass switch: Bypasses the EQ
circuit, useful for A/B compar-
isons.
3. VU Meter: Displays output VU
level.
4. (LF) Boost: Selects the amount of
boost at the frequency selected
by the Low Freq control.
5. Low Freq: Selects the frequency
affected by the LF Boost and LF
Atten controls.
6. (LF) Atten: Selects the amount
of attenuation at the frequency
selected by the Low Freq control.
7. Bandwidth: Selects the width
(Q) of the HF Boost control.
Left=narrow, right=wide.
8. (HF) Boost: Selects the amount of
boost at the frequency selected
by the High Freq control.
9. High Freq: Selects the frequen-
cy affected by the HF Boost
control.
10. (HF) Atten: Selects the amount
of boost at the frequency select-
ed by the High Freq control.
11. HF Atten Freq: Selects the fre-
quency affected by the HF Atten
control.
12. TRS Output: Balanced line-level
output.
13. TRS Input: Balanced line-level
input.
14. Meter Calibration: Use this
control to adjust the 0 VU point
at +4 dB.
15. Output Level: Use this control
to adjust the output level of the
LiNTEC to match that of another
LinTEC for stereo use.
16. Voltage setting: Select the volt-
age suitable to your region. Do
not power the LiNTEC by inap-
propriate voltage.
17. AC Adapter Input: ONLY use
the supplied 12VAC to power
this unit.
Note: For proper
performance, balanced
TRS must be used for all
inputs and outputs.
Important Safety Instructions
as it will void your warranty. Please check
your unit carefully upon receipt and return
to place of purchase immediately if there
are any problems with the product. After
that, the standard Lindell Audio 1 YEAR
warranty will apply to defects in materials
and workmanship.
International Service
For service or warranty assistance, please
contact the Lindell Audio distributor in your
country through the dealer from whom you
purchased this product.
Limited 1 Year Warranty
Lindell Audio’s LiNTEC is warranted by Lin-
dell Audio to be free from defects in ma-
terials and workmanship for the period of
ONE (1) YEAR to the original purchaser. In
the event of such defects, the product will
be repaired without charge or, at our op-
tion, replaced with a new one if delivered to
Lindell Audio prepaid, together with a copy
of the sales slip tor other proof of purchase
date. The warranty excludes problems due
to normal wear, abuse, shipping damage
or failure to use the product in accordance
with the speciîť°cations.
All parts and labor are covered under this
Limited Warranty. However, if it is deter-
mined by Lindell Audio that the device was
damaged or made defective through abuse,
we reserve the right to charge the customer
for the cost of the repair.
Lindell Audio shall not be liable for damag-
es based upon inconvenience, loss of use
of the product, loss of time, interrupted
operation or commercial loss or any other
damages, whether incidental, consequen-
tial or otherwise. This warranty gives you
speciîť°c legal rights, and you may have oth-
er rights, which will vary from state to state.
This warranty is not transferable.
Quick Start Guide
1. Mute your studio monitors.
2. Connect your LiNTEC to your mix-
ing bus or patch bay then using bal-
anced TRS cables.
3. Set all controls to noon (straight up.)
4. Set the switch to ON, Bypass Power
to OFF, and apply power. Power
LED meter will light up.
5. Unmute your monitors, and verify
that signal is passing to and from
the unit.
6. Send your desired signal through
the LiNTEC.
7. Adjust the controls and listen for
changes in the program material.
8. If you hear the controls affecting
the character of your music, the
unit is functioning correctly.
Basic Use
The LiNTEC works a little differently than other
parametric or graphic EQs you may have used in
the past.
The three control knobs on the left of the LiN-
TEC (Boost, Low Freq, and Atten) affect low-fre-
quency content. The Boost and Atten controls
both affect the frequency chosen by the Low Freq
control.
The ve control knobs on the right of the LiN-
TEC (Bandwidth, Boost, High Freq, Atten, and
Atten Freq) affect high-frequency content. The
Boost and Atten controls each have their own
corresponding frequency selectors, (High Freq
for the Boost control, Atten Freq affects the Atten
control.)
The Low-End Trick
Documentation for the original Pultec rather
bullishly asserted “Do not attempt to boost
and attenuate simultaneously on the low
frequencies.” So, of course, that’s exactly what
curious, rascally engineers did. The result of this
simultaneous boost/cut operation is a low-end
boost below the selected frequency, with a cut
slightly above the selected frequency.
Because the bandwidth (Q) of the Boost and At-
ten controls differ, the two controls do not cancel
each other out. This setting results in satisfying
thump and body that doesn’t risk muddying the
midrange, and has been a not-so-secret trick of
engineers and producers ever since.
Try it, you’ll like it.
Meter Calibration
Meter should be calibrated so that 0 VU = +4 dB.
This is controlled the the master calibration set
screw on the back of the unit.
Allow 1-2 minutes to let the LiNTEC warm up
after powering on before calibrating the meter’s
zero-point — heat from the bulb can gently affect
the meter.
To calibrate, ensure that no audio is passing
through the unit. Then, using a athead screw-
driver, rotate the screw on the rear panel until the
needle rests on 0. Use very small movements... a
little goes a long way in meter calibration!
Voila! Meter calibrated.
Output Calibration
All LiNTECs are hand-calibrated at the factory
to match each other at unity gain within 0.2 dB
for use in matched stereo pairs. This calibration
is measured with all controls set fully count-
er-clockwise.
We doubt it will be necessary, but if you would
like to re-calibrate your unit, adjust the Output
Calibration control on the back of the unit.
The 1731 op-amp
The LiNTEC’s “VINTAGE OPA 1731” is our take on
the classic vintage 1731 op-amp – the predecessor
to the 2520, known for its smooth, punchy char-
acter.
We think you’ll like it as much as we do.
2 3 4 9 10
12 14
11
13 15 16
6 85
1
7
17


Product specificaties

Merk: Lindell Audio
Categorie: Niet gecategoriseerd
Model: LiNTEC

Heb je hulp nodig?

Als je hulp nodig hebt met Lindell Audio LiNTEC stel dan hieronder een vraag en andere gebruikers zullen je antwoorden


Handleiding Niet gecategoriseerd Lindell Audio

Handleiding Niet gecategoriseerd

Nieuwste handleidingen voor Niet gecategoriseerd