Liftmaster CAPXLCAM Handleiding


Lees hieronder de 📖 handleiding in het Nederlandse voor Liftmaster CAPXLCAM (8 pagina's) in de categorie Niet gecategoriseerd. Deze handleiding was nuttig voor 61 personen en werd door 2 gebruikers gemiddeld met 4.5 sterren beoordeeld

Pagina 1/8
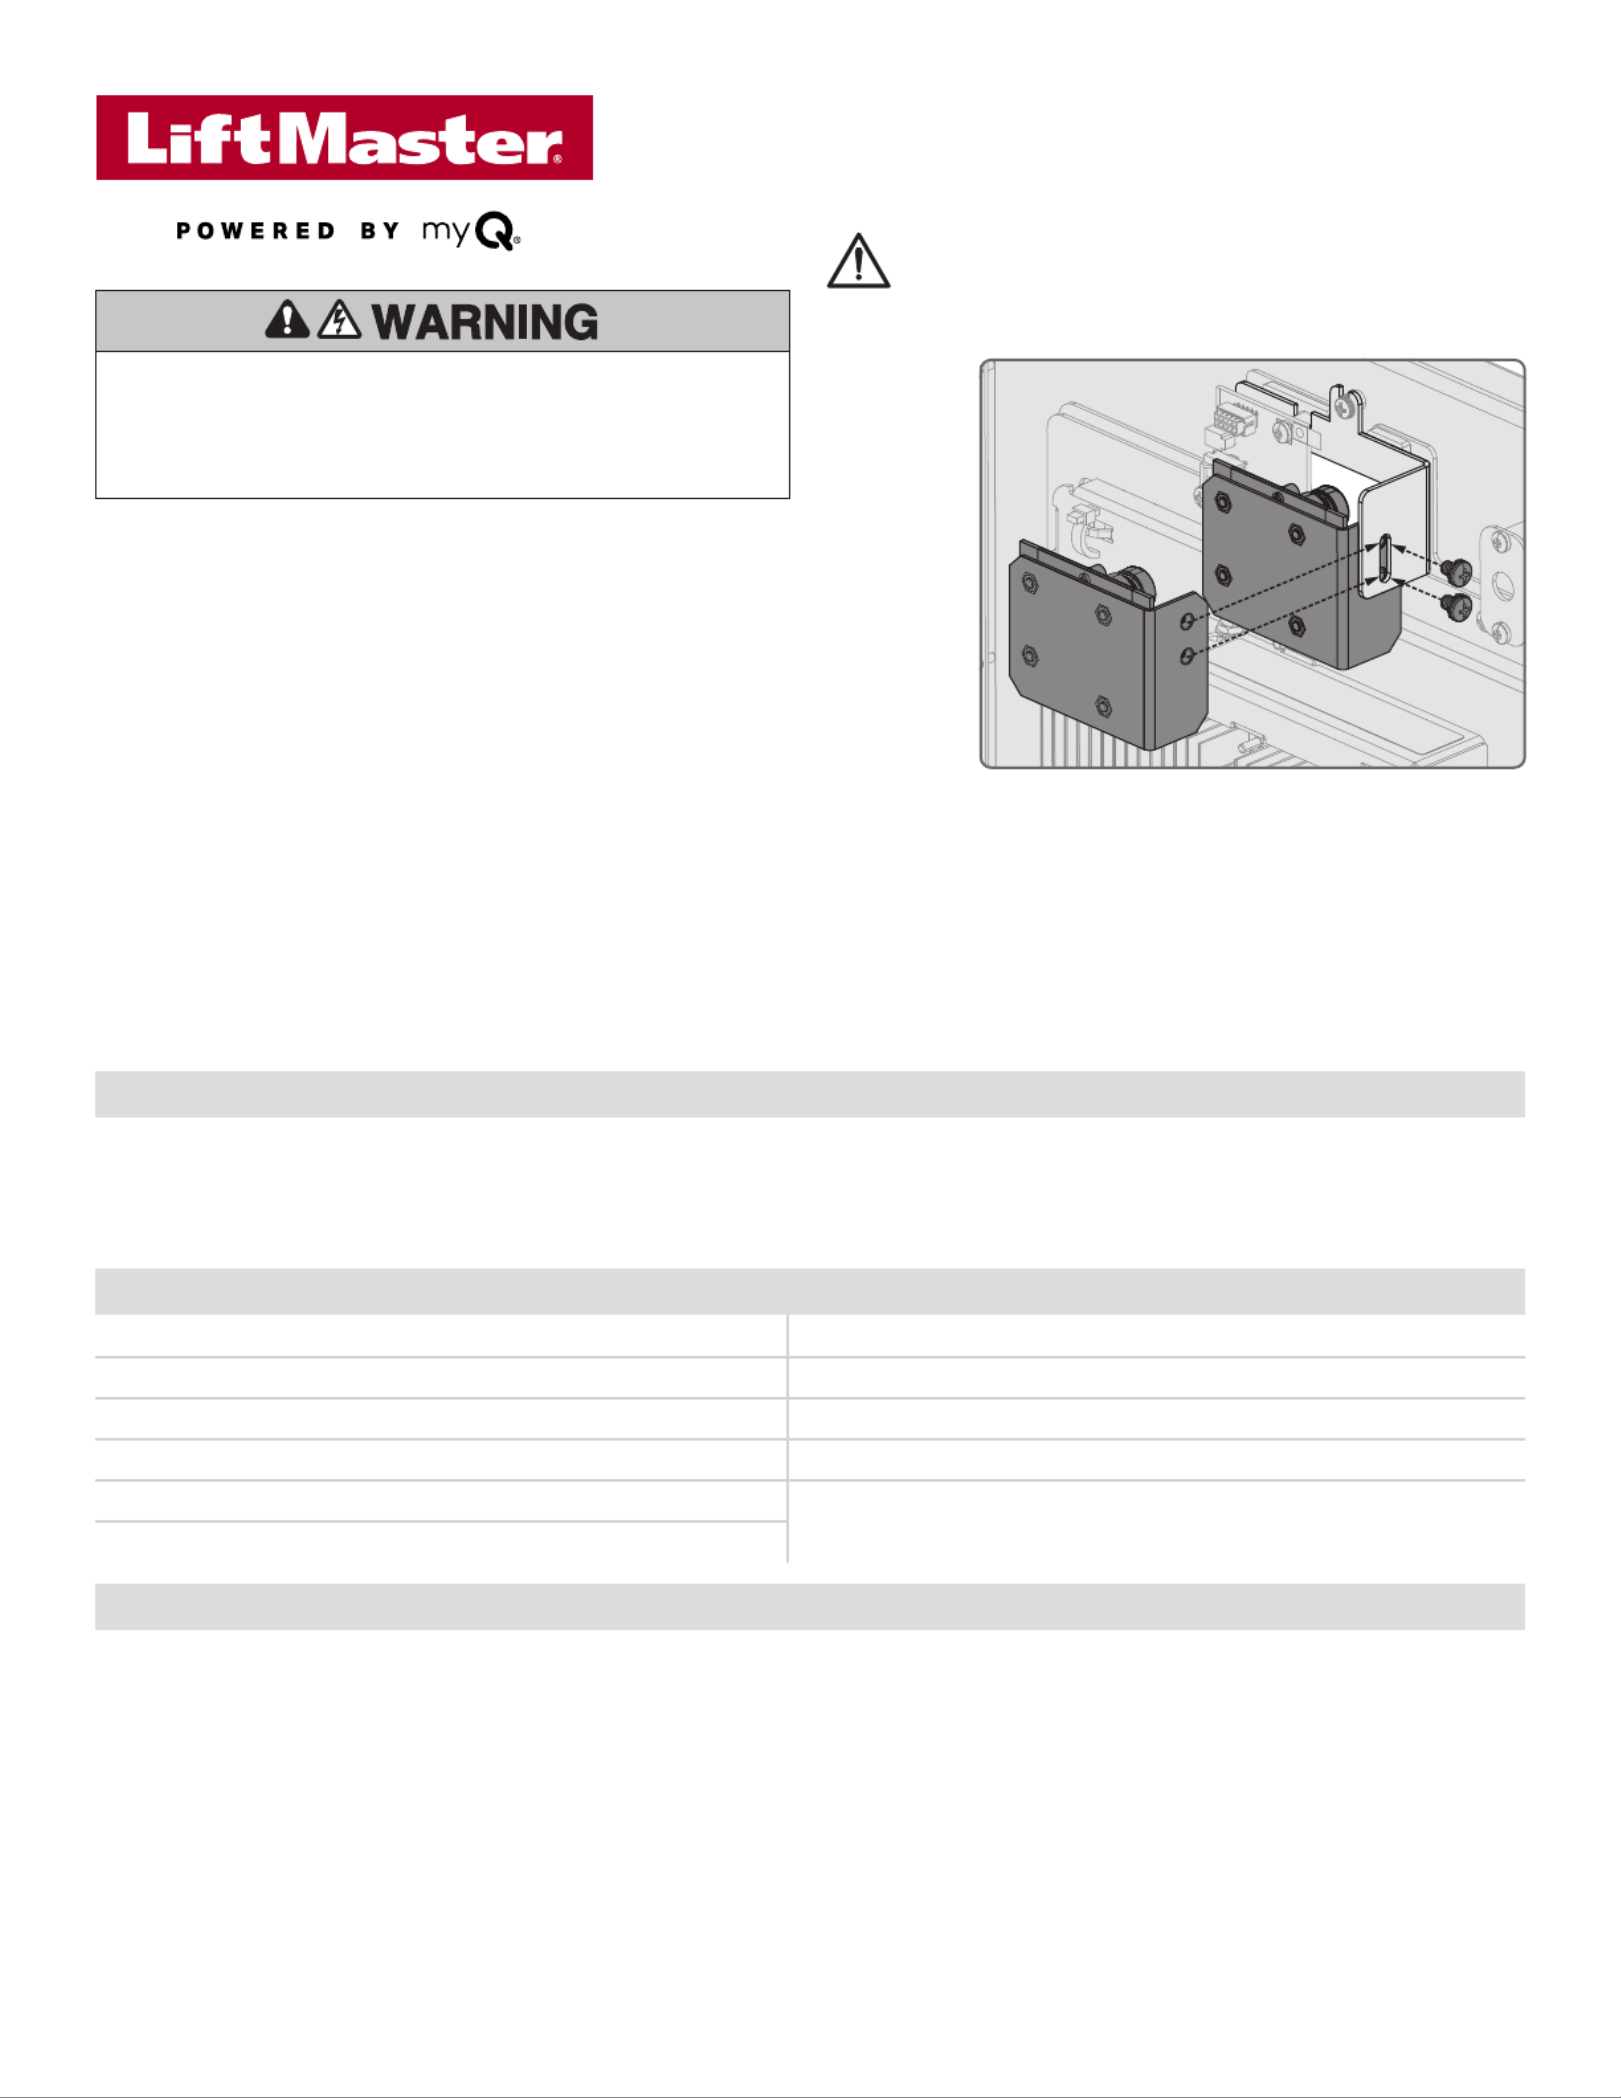
CAPXLCAM – USB Camera Kit
Instructions for installing the USB Camera into the CAPXL
CAPXL / CAPXLV Wi-Fi Security Compatibility
Compatible Not Compatible
WPA2-PSK (AES) (Recommended) WPA2 Enterprise
WPA2-PSK (TKIP) (Recommended) WEP
WPA2 Personal (Recommended) Open (No password or encryption)
WPA-PSK (AES)
WPA-PSK (TKIP)
Prior to Camera Installation
NOTE: CAPXLCAM is the only USB camera supported by CAPXL and myQ®
Business™ video features. CAPXLCAM is the only camera evaluated by UL for use
with CAPXL.
1. Make note of all Internet connectivity settings before anyrmware update.
When updatingrmware Internet settings will be deleted. Go to the CAPXL
connection screen in admin mode and write down or take picture of settings.
2. Ensure CAPXL is running or higher. The CAPXL upgrade Firmware version 2.0
process requires a restart and could be non-functional for up to 30 minutes
while this upgrade takes place. Please ensure the gates/doors are open or
residents have an alternate means to enter to the community during this brief
period prior to hitting the upgrade button in myQ
® Business™. This may require
a technician on site to ensure safe operation and resident ow.
3. Turn off power by disconnecting the power input on the I/O board.
4. Remove the protective LENS cover from the camera assembly lens.
NOTE: Camera lens cover must be removed prior to mounting in the CAPXL.
Additional Compatibility Considerations
Recommended Tools
Network Test Software
Philips Screwdriver
Network LAN Cable Tester
Wi-Fi / Wi-Fi Hotspot
Wi-Fi Analyzer App
Pliers
To prevent possible SERIOUS INJURY or DEATH, disconnect
electric power to operator BEFORE installing.
ALL installations and electrical connections MUST be made by
a qualified individual.
WARNING: This product can expose you to chemicals including
lead, which are known to the State of California to cause cancer
or birth defects or other reproductive harm. For more information
go to www.P65Warnings.ca.gov.
Don’t use Wi-Fi extender devices. These may introduce latency
in the connection leading to choppy or loss of reliable video
transmission.
If using a Wi-Fi signal strength tool or app, a continuous Wi-Fi
signal strength connection of at least -65 DBM (numbers closer
to zero are stronger strength) at the CAPXL / CAPXLV must
be guaranteed to ensure an acceptable connection to the local
network.
Hidden network SSID’s are not supported. The network must be
selectable from the CAPXL / CAPXLV display.
Wi-Fi networks requiring secondary authentication are not
supported, for example, Hotels and airport Wi-Fi.
When checking signal strength in CAPXL / CAPXLV admin
mode, we recommend at least two bars, as shown on the
CAPXL screen.
If two bars are not available, relocate the router, the antenna
or use accessory WFAEXT (Wi-Fi Antenna Extension Kit
15) to move the CAPXL / CAPXLV antenna higher up or to a
location resulting in two or more bars.
CAPXL/CAPXLV can be connected to a router via a wired connection or Wi-Fi. LiftMaster recommends a minimum upload/download speed of
5Mbps for each CAPXL/CAPXLV supporting video camera feeds.
NOTE: This upload speed should be met when considering usage of other devices on the network like cameras and computers.
Internet Requirements CAPXL / CAPXLV - Use the information below for router compatibility.
Carton Inventory
Camera assembly
Camera bracket
USB cable
Mounting hardware
bag (2x Screws)
LiftMaster Support Resources
Web LiftMaster.com
Dealer Installation FAQ& myQ® Business Support Videos https://support.partner.liftmaster.com/s/community-access-support
Commercial / Professional support: 877-247-6764 Mon-Fri 5:00 a.m. to 6:00 p.m. MST
LiftMaster Partner Portal https://partner.liftmaster.com
Figure 2. Routing the USB cable.
Figure 3. Admin Mode.
ON
ON
1 2 3 4
Installation
1. Open CAPXL and remove the existing black camera bracket
(top middle) by loosening and removing the wingnut.
2. Ensure CAPXL camera window is clean and free of any
obstructions. Cleaning the camera window with a clean lens
wipe or lens cloth is recommended.
3. Remove all items from shipping carton and ensure all
required items are present: camera assembly, camera
bracket, USB cable, and mounting hardware bag.
4. Use the mounting hardware to attach the new bracket with
camera to the CAPXL. Securely tighten.
5. Use pliers to unplug the upper right dust plug from USB
socket on control board (controller). (Figure 1.A)
6. USB PORT #3 MUST BE USED to connect the camera. The
Micro USB end of the USB cable goes into the camera and
the standard USB end of the cable specically connects to
USB port 3, (the upper right USB port on the controller.)
(See Figure 1.B)
7. Route and secure USB cable with included tie-wraps.
(Figure 2)
8. Turn on power to the CAPXL.
9. Enter CAPXL Admin Mode using the Dip Switch #1 on
the Power/Internet board. Select the Audio / Video” tab
and confirm the video feed appears, and the angle and
orientation are correct. (Figure 3)
10. Refer to the myQ® Business Quickstart Guide and visit the
help section of the myQ
® Businesswebsite for tutorial
videos and futher assistance with setting up the camera
functions. Features such as the recording of events, the
Guest View Feature, and more are set up within the myQ
®
Business account.
Access your myQ® Business account at:
https://www.myQBusiness.com
myQ® Business Help and Tutorial Videos:
https://support.partner.liftmaster.com/s/community-access-
support
NOTES: Options such as live streaming within myQ®
Businessrequire an access control subscription.
Please refer to the specific jurisdiction to determine if specific
signage will be required for video use and monitoring.
Figure 1. Removing the dust plug and connecting to USB Port #3 on the upper right side of the controller.
Top Right USB Port #3
Top
Bottom
1. B1. A
Dip Switch #1
on the Power / Internet board
enters Admin Mode.
CAPXLCAM Trousse de caméra USB
Mode d’installation de la caméra USB dans le CAPXL
Compatibilide sécurité avec le CAPXL / CAPXLV Wi-Fi
Compatible Non compatible
WPA2-PSK (AES) (recomman) WPA2 Enterprise
WPA2-PSK (TKIP) (recomman) WPA2 Enterprise
WPA2 Personal (recomman) Ouvert (Pas de mot de passe ni de chiffrement)
WPA-PSK (AES)
WPA-PSK (TKIP)
Avant l’installation de la caméra:
REMARQUE: La CAPXLCAM est la seule caméra USB prise en charge par les fonctions vidéo
du CAPXL et de myQ® Business. La CAPXLCAM est la seule caméra évaluée par l’UL pour
utilisation avec le CAPXL.
1. Prendre note de tous les paramètres de connectivité internet avant toute mise à jour
logicielle. Lors de la mise à jour logicielle, les paratres internet seront supprimés.Aller à
lécran de connexion du CAPXL en mode Admin et noter ou prendre une photo des paratres.
2. Vérifier que le CAPXL exécute ou ultérieure. Le processus de mise à Logiciel version 2.0
niveau du CAPXL exige un redémarrage et le dispositif pourrait ne pas être fonctionnel pendant
30minutes pendant que la mise à niveau est réalisée. rier que les barrres/portes sont
ouvertes ou que les résidents ont dautres moyens dentrer dans le complexe résidentiel
pendant cette brève période avant dappuyer sur le bouton «Upgrade» dans myQ® Business.
Il faudra peuttre recourir au service dun technicien pour assurer un bon fonctionnement et
une circulationuide des résidents.
3. Couper le courant en déconnectant l’entrée dalimentation sur la carte I/O.
4. Retirer le capuchon protecteur de la lentille de la cara.
REMARQUE: Le capuchon protection de la lentille de la caméra doit être reti avant de la
monter dans le CAPXL.
Considérations supplémentaires de compatibilité
Outils recommandés
• Logiciel de mise à l’essai du
réseau
• Tournevis à tête cruciforme
• Testeur de câblage de réseau local
• Wi-Fi / point d’accès sans fil Wi-Fi
• Application d’analyse Wi-Fi
• Pinces
Afin de prévenir le risque de BLESSURES GRAVES ou
MORTELLES, débrancher l’alimentation électrique à
l’actionneur AVANT l’installation.
TOUTES les connexions électriques DOIVENT être effectuées
par un professionnel compétent.
AVERTISSEMENT: Ce produit peut vous exposer à des
produits chimiques, y compris du plomb, reconnus par
l’État de la Californie comme étant cancérigènes ou pouvant
causer des anomalies congénitales ou d’autres préjudices
à l’appareil reproducteur. Pour plus d’information, aller à
www.P65Warnings.ca.gov.
Ne pas utiliser d’amplificateurs de signal Wi-Fi. Ceux-ci peuvent
cer un lai de transit dans la connexion entraînant une
transmission vidéo intermittente ou manquant deabilité.
Si un outil ou une appli de puissance du signal Wi-Fi est utilisé,
une connexion ayant une puissance de signal Wi-Fi d’au moins
-65 DBM (les nombres plus proches de zéro indiquent un signal
plus puissant) au CAPXL / CAPXLV doit être garantie pour
assurer une connexion acceptable au réseau local.
Les noms de seau sans fil cachés ne sont pas pris en charge.
Le seau doit être sélectionnable à partir de lécran d’affichage
du CAPXL / CAPXLV.
Les seaux Wi-Fi exigeant une authentification secondaire
ne sont pas pris en charge, par exemple, les seaux Wi-Fi
d’hôtels et d’aéroports.
Lors de la rication de la puissance du signal en mode
Admin du CAPXL / CAPXLV, on recommande d’obtenir au
moins deux barres, comme illust à l’écran du CAPXL.
Si deux barres ne sont pas disponibles, relocaliser le
routeur, l’antenne ou se servir de l’accessoire WFAEXT
(trousse de rallonge d’antenne Wi-Fi 4,6m [15pi]) pour
placer l’antenne du CAPXL / CAPXLV plus haut ou à un
endroit permettant d’obtenir deux barres ou plus.
Le CAPXL / CAPXLV peut être connecté à un routeur par le biais d’une connexion câblée ou par le Wi-Fi. LiftMaster recommande une vitesse minimale de
léversement/téléchargement de 5Mb/s pour chaque CAPXL/CAPXLV prenant en charge la transmission à la caméra.
REMARQUE: Cette vitesse de téléversement devrait être assurée lorsqu’on envisage d’utiliser d’autres dispositifs sur le réseau comme des
caméras et des ordinateurs.
Exigences internet pour le CAPXL / CAPXLV - Utiliser linformation ci-dessous pour vérifier la compatibili du routeur.
Contenu de la boîte
• Assemblage de la
caméra
• Support de la
caméra
• CâbleUSB
• Sac de visserie de
montage (2x vis)


Product specificaties

Merk: Liftmaster
Categorie: Niet gecategoriseerd
Model: CAPXLCAM

Heb je hulp nodig?

Als je hulp nodig hebt met Liftmaster CAPXLCAM stel dan hieronder een vraag en andere gebruikers zullen je antwoorden


Handleiding Niet gecategoriseerd Liftmaster

Handleiding Niet gecategoriseerd

Nieuwste handleidingen voor Niet gecategoriseerd