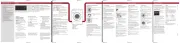
LG WFL-9KG Handleiding
LG
Wasmachine
WFL-9KG
Bekijk gratis de handleiding van LG WFL-9KG (4 pagina’s), behorend tot de categorie Wasmachine. Deze gids werd als nuttig beoordeeld door 39 mensen en kreeg gemiddeld 4.6 sterren uit 20 reviews. Heb je een vraag over LG WFL-9KG of wil je andere gebruikers van dit product iets vragen? Stel een vraag
Pagina 1/4

4
1
2
3
5
7
1 2
3 4
6
60 - 100 cm
@
• Water supply is not adequate in
area
• Water supply taps are not
completely open.
• Water inlet hose(s) are kinked.
• The filter of the inlet hose(s) are
clogged.
• Drain hose is kinked or clogged.
• The drain filter is clogged.
• Load is too small.
• Load is out of balance.
• The appliance has an unbalance detection
and correction system. If individual heavy
articles are loaded (ex. bath mat, both robe,
etc.), this system may stop spinning or even
interrupt the spin cycle altogether.
• If the laundry is still too wet at the end of the
cycle, add smaller articles of laundry to
balance the load and repeat the spin cycle.
• Is the door opened or not
completely closed?
• Water overfills due to the faulty water
valve.
• Water level sensor has malfunctioned.
• Over load in motor.
• The washer experienced a power failure.
Check another tap in the house.
Fully open tap.
Straighten hose(s).
Check the filter of the inlet hose(s).
Clean and straighten the drain hose.
Clean the drain filter.
For more detailed information,
please refer to “Cleaning the drain pump filter”
Add 1 or 2 similar items to help
balance the load.
Rearrange load to allow proper
spinning
Close the door completely.
If “ ”is not released, call for service.
Unplug the power plug and call for service.
Close the water tap.
Unplug the power plug.
Call for service.
Restart the cycle.
N
Green and
Yellow (Earth)
Brown(Live)
Blue(Neutral) Fuse
Cord
grip
E
L
N
Owner s Manual‘
F1403FD(1~9)
Safety instructions for use
Read all instructions and explanations of the installation before use. Follow the instructions carefully. Keep the operating
instructions handy for later use. If the appliance is sold or passed on then ensure that the new owner always receives these
operating instructions. The following warnings must be strictly observed for safety reasons. They must be read before instal-
ling the appliance and putting it into operation.
• Intended use: This appliance has been designed exclusively for use in dry-interior households. Use the appliance only with cold
drinking water and only for washing textiles with washing detergents designed for washing machines. Every other use is improper and
may lead to injuries, whereby the liability of the manufacturer will cease.
• This appliance may only be used by adults. Do not allow children to touch the controls or to play with the product.
• Never modify the appliance on your own, as this is dangerous.
• This appliance is heavy. Transporting with care.
• Remove all packaging and transport bolts before using the appliance. Otherwise serious damage may result.
• All installation work must be carried out by a qualifi ed fi tter or technician.
• Have electrical connections done by a qualifi ed electrician.
• Never place the appliance on the power cord.
• If the appliance is placed on a carpet then place the feet so that air can circulate underneath the appliance.
• Always unplug the machine and turn off the water supply after use. Disconnect appliance by pulling only the plug - never disconnect
by pulling the power cord. Never touch the plug with wet fi ngers or hands.
• Do not overload the appliance.
• Wash only machine-washable textiles. If you have doubts regarding this, then observe the markings on the label.
• Never place electrical heaters, candles etc. in the vicinity of the appliance. They could cause the appliance to ignite or parts to warp.
• Protect the appliance from wet and damp. Otherwise, there is danger of electric shock and fi re.
• Connect the appliance to a suitable wall socket for 220-240V. Never use an extension cord or double adapter.
• Empty all pockets. Hard or sharp objects such as coins, needles, nails, screws or stones may cause serious damage.
Unbalanced mass may create heavy vibrations. If heavy vibrations remain also without load, call for an authorized customer service.
• Do not wash or dry articles that have been cleaned in, washed in, soaked in, or dabbed with combustible or explosive substances
(such as wax, oil, paint, gasoline, degreasers, dry-cleaning solvents, kerosene, etc.). This may result in fi re or explosion.
• Never insert products coated with mineral oils (e.g. nylon coating, plastic belts, etc. ) into the machine. If a stain remover has been
used then make sure that the solvent has been carefully washed out before inserting the clothes into the appliance. Oil may remain in
the tub after a whole cycle resulting in fi re during drying. So, do not load oily clothes.
• Do not operate the appliance at locations where fl ammable substances are present such as oil, benzene or highly infl ammable gas.
Such materials may cause fi re or explosion. Never use combustible detergents.
• Only add the prescribed amount of softener. Excessive amounts may damage the clothes.
• After washing, keep the drum door open to protect the door seal.
• Make sure that all water has run off before opening the door. Never open the door if water still remains. Danger of scalding.
• Animals and children may get into the washing machine. So always check the appliance before using it.
• During washing, the glass door becomes very hot. Keep children away from the appliance when in operation.
• Never try to repair the machine yourself. Incorrect repairs may result in injuries and/or serious defects to the machine.
• The product should be serviced and repaired only by the authorised customer service using original replacement parts.
• When disposing of your old machine, the power cable must be capped and the door lock must be made unusable in order to protect children.
• When placing on a carpeted fl oor, make sure that the opening in the socket is not blocked.
• If the appliance has been under water then contact the customer service. There is danger of electric shock and fi re.
• The cover cup of the fi lter as well as the dispenser drawer may not be opened during the operation.
• Keep all washing powder and detergents away from children. Danger of poisoning.
Disposal
Before use please read carefully the safety instructions!
Thank you for buying an LG fully automatic washing machine.
Please read this owner‘s manual carefully, it provides instructions on safe installation, use and maintenance.
Keep it handy for future reference of this machine. Make a note of the model and serial numbers of your washing machine.
Remove Packaging
Requirements for installation site
Transit bolts
Electrical connection
Connecting water supply hose
• The appliance is fi tted with transit bolts to prevent internal
damage during transport. Be careful, heavy load!
• Packing and all transit bolts must be removed before using
the washing machine.
• When unpacking the base, be sure to remove the additional
packing support in the middle of the base packing.
Store original packing for future move.
Dispose of packing material according to local regulations.
Unscrew the 4 bolts
using the spanner
supplied.
Level fl oor: Permissible fl oor gradient under entire washing machine
is 1˚ .
Power socket: Must be within 100 cm of either side of location of
washing machine. Do not overload the socket with more than one
appliance.
Additional Clearance: For wall, fl oor and door space is needed.
(10cm: rear / 2cm:right & left side). Do not place or store laundry pro-
ducts on top of the washing machine at any times. They can damage
the fi nish or controls of the machine.
• Two rubber seals are supplied with the water inlet
hoses. They are used for preventing water leaks.
• Make sure the connection to taps is tight enough.
• Periodically check the condition of the hose and
replace the hose if necessary.
• Make sure that there is no kink on the hose and
that it is not crushed.
When your washing machine has two valves:
• The inlet hose with the red connector is for the hot
water tap.
• If the washing machine has two valves, power
saving is achieved through using hot valve.
Water supply pressure must be between 1.0-10 bar (100kPa~1000kPa)
Don’t strip or crossthread when connecting inlet hose to the valve.
If the water supply pressure is more than 1000kPa, a decompression
device should be installed.
• The drain hose should not be placed higher than 100 cm above the fl oor.
• Proper securing of the drain hose will protect the fl oor from damage due to any water leakage.
• If the drain hose is too long do not force back into the washing machine. This will cause unusual noise.
• Proper level-adjustment of the washing ma-
chine prevents excessive noise and vibration.
Install the appliance on a solid and level fl oor
surface, preferably in a corner of the room.
• If the fl oor is uneven, adjust feet as required.
(Do not insert pieces of wood etc. under the
feet). Make sure that all four feet are stable
and resting on the fl oor. Then check that
the appliance is perfectly level. (Use a spirit
level).
Safety instuctions for the installation
CAUTION about positioning the appliance
CAUTION about the power cord
CAUTION about location and moving
CAUTION about the fl oor surface
Rattling and clanking noise Extraneous objects such as coins or safety pins maybe in drum or pump.
Thumping sound Heavy wash loads may produce a thumping sound. This is usually normal.
Vibrating noise Have all transit bolts and packing been removed?
Water leaks. Check and tighten hose connections. Unclog drain pipe.
Contact plumber if necessary.
Excessive suds Too much detergent or unsuitable detergent.
Washing machine does not start Power cord may not be plugged in or connection may be loose.
Washing machine won’t spin Check that the door is fi rmly shut.
Door does not open Once started, the door can not be opened for safety reasons.
Wait one or two minutes before opening the door to allow the electric
locking mechanism time to release.
Troubleshooting
Level adjustment
To prevent internal dama-
ge during transport, the
special 4 bolts are locked.
If they are not removed, it
may cause heavy vibrati-
on, noise and machine to
malfunction.
Installation of drain hose
Technical Specifi cation
If after completing connection water leaks from the hose, repeat the same steps. Use the most conventional
type of tap for water supply. In case the faucet is square or too big, remove the spacing ring before inserting
the tap into the adaptor.
iFor the U.K. customer
CUSTOMER SERVICES Tel. : +44-(0) 844 847 LGLG(5454) Fax. : +44-(0) 844 847 1413
LGEUK SERVICE WEB-SITE : http://www.lge.co.uk
i
• When this crossed-out wheeled bin symbol is attached to a product it means the product is covered
by European Directive 2002/96/EC.
• All electrical and electronic products should be disposed of separately from municipal waste stream
via designated collection facilities appointed by the government or the local authorities.
• The correct disposal of your old appliance will help prevent potential adverse consequences for the
environment and human health.
• For more detailed information about disposal of your old appliance, please contact your city offi ce,
waste disposal service or the shop where you purchased the product.
The hose supplied with the machine must be used. Old hoses may not be reused
Close the holes with
the caps supplied.
Remove the 4 bolts
along with the rubber
bungs by slightly
twisting the bung.
P/No. :MFL41480109


1
2
3
AC
B
ABC
1 2 3 4 5
1 3
Program
Fabric Type Water Temp.
(Option)
Cotton
Lightly soiled clothing and
small loads
Cotton
Quick
Synthetic
Baby Care
Delicate
Quick 30
Duvet
Hand Wash
Wool
Color fast garments (shirts,
nightdresses, pajamas...)and
lightly soiled white cotton
(underwear)
Polyamide, Acrylic, Polyester
Lightly soiled baby wear
Delicate laundry easily
damaged
“Hand wash” marked delicate
and wool laundry
Machine washable woolens
with pure new wool only
Colored laundry which is lightly
soiled fast
Cotton bedding with filling duvet,
pillow, blanket, sofa cover with
light filling
- Time Delay
- Intensive
- Soak
- Pre Wash
- Crease Care
- Rinse+Spin
- Medic Rinse
- Time Delay
- Intensive
- Crease Care
- Rinse+Spin
1 king size (9 Tog)
60°C
(Cold, 30°C,
40°C, 95°C)
Rating
Less than 2.0kg
Less than 4.5kg
Less than 7kg
40°C (Cold,
30°C, 60°C)
30°C
(Cold, 40°C)
30°C
(Cold, 40°C)
40°C
(Cold, 30°C)
40°C
(Cold, 30°C)
60°C
(40°C, 95°C)
Maximum LoadOption
12
1 2 3 4 5
5
2
1 2 3 4 5
4
INSERT PLUS INTO THE MAINS SOCKET
Never touch the plug with wet hands!
Never remove the plug from the
socket by pulling on the cord.
HANG UP WASTE WATER HOSE
Hose elbow connection e.g. attach to water tap
WATER CONNECTION
Turn on the water tap
CHECKING THE MACHINE
Never use a defective machine! In case of any
failure, first unplug the machine and turn off the
water
tap.
DOING LAUNDRY AND USING MACHINE
WITH CARE
- empty all pockets
- remove all metal parts
- place the delicate textiles into the laundry net
- close zippers
WATER TREATMENT
- with hardness III water
- use water softening agent
DRUM CARE
- remove extraneous objects
- leave door open to dry the drum
- check the rubber seals regularly
ECOLOGICAL WASHING
- make use of the max. washing quantity
- do not “pre wash” if possible
- use short program if possible
LAUNDRY WITH DIFFERENT AMOUNTS OF
SOILING
- wash new textiles separately
- do not prewash
- pretreat dirty spots
- pre wash
Sort the laundry
note washing instruction symbols -
Degree of soiling -
Type of textile / colour -
Fill the drum
Check the folds of the flexible gasket (grey) -
and remove any small articles, if any. .
Check inside of the drum and remove -
any left in items for next wash cycle. .
Remove any clothing or items on the flexible gasket -
to prevent clothing and the gasket damages .
Fill detergent
Refer to the
written information
on the detergent's packing
Turn the machine ON
by pressing the Power button
Select a
Program
Select the
Spinning speed
Select an Option
Pre Wash / Soak / Crease Care / Rinse+Spin
Select Rinse mode
and Washing temperature
4 additional programs
Press Start / Pause
to start the washing process
Turn off tap
- close water supply
- clean the machine
- unplug machine
Additional Steps
- Turn the machine off
- leave door open to
allow drum to dry
Remove laundry
- open the door
- remove the laundry
Wait t until washing
i
s
f
i
n
i
s
h
e
d
Time Delay / Favorite / Intensive / Medic Rinse
Main Wash
For very dirty clothes fill 1/4 of the
portion of detergent in here and
select a prewashing programm
Softener
Do not exceed the MAX-Level.
Highly densed softeners are to
be diluted with some water.
Pre Wash
For normal dirty clothes use a small
amount of detergent. Don't pre wash.
Mount the level plate to use fluid detergents.
Dry fl at
Do not bleach
Handy to bleach
Do not
tumble dry
Hang to dry
Drip dry
Medium hot
ironing
Hot ironing
Do not iron
Washing
temperature
Do not wash
Luke warm ironing
Turn off the water
tap
Unscrew the water
inlet hose
Pull out the water
inlet filter
Clean the filter using
a hard bristle brush
Pull out the
dispenser drawer
Clean the dispenser
drawer under flow-
ing water
Clean inside the
recess with an old
toothbrush
Insert the dispenser
drawer
Cleaning the water inlet fi lter
Cleaning the dispenser drawer
Open the lower cover
cap. Drain plug to
pull out the hose
Unplug the drain plug.
Then open the filter
by turning to the left
Remove any
extraneous matter
from the pump filter
After cleaning, turn
the pump filter and
insert the drain plug
Time Delay
Setting “Time Delay” determines when machine stops.
How to set “Time Delay”
- Press button.Power
- Turn the dial to select the program you require.Program
- Press button and set time required.Time Delay
- Press the button.Start/Pause
Favorite
- Favorite program allows you to store a customized wash cycle for future use.
- To make a Favorite program:
(1) Select a cycle.
(2) Select
The course, washing method, number of rinses, spin speed, water temperature etc.
(3) Press and hold Favorite program button 3 econds (2 beep sounds).
The Favorite program is now stored for future use.
To reuse the program, select Favorite program and press Start/Pause.
Intensive
If the laundry is heavily soiled “Intensive”option is effective.
- By selecting the Intensive option, the washing duration may be extended,
depending on the program selected.
- To use this option, press the intensive button once before the wash program is started.
Medic Rinse
For best results or for cleaner rinsing, select the “Medic Rinse” option.
Available in the Cotton, Cotton Quick, Synthetic and Baby Care programs.
Medic Rinse is set by default in the Baby Care program.
The respective temperature indicator will light up.
Spinning cycle
Temperature
Rinse
Options
Start / PauseProgram Cycle
Power button
Drum
Dispenser
drawer
Cover cap
Control panel
Washing program table
Additional programs Child Lock
Tub Clean
To activate:
press and hold
the Option buttons
simultaneously
To deactivate:
press and hold
the Option buttons
simultaneously
Change to the desired program, whilst in child lock mode:
Empty the drum
completly and close
the door
Add anti-limescale
(Calgon) to the main
wash compartment.
Close the disp. drawer
Power ON with
Then press and
hold Rinse and
Temp. button
Press the
Start/Pause
button to start Tub
Clean process
After the cycle is
complete, leave the
door open to dry
Select this function to lock the buttons on the control panel and to prevent tampering.
Press and hold
the Option buttons
simultaneously
Press
Start/Pause
Select the desired
program
press
Start/Pause
TUB CLEAN is special cycle to clean the inside of the washing machine.
A higher water level is used in this cyle at higher spin speed. Perform this cycle regularly.
Preparation
lightly
heavily
Tighten up the inlet
hose
Cleaning the drain pump fi lter
Close the lower
cover cap
Washing symbols
Dispenser drawer
Once you
have finished
cleaning, replace
the drawer and
run a rinse cycle
without laundry.
Cleaning and Maintenance
Warning: Before cleaning the washing machine interior, unplug the electrical power cord to avoid the risk of electric shock.
DisplayAdditional programs
6
3 sec.
6
3 sec.
6
3 sec.
Exterior
Proper care of your washing machine can extend its service life. The
outside of the machine can be cleaned with warm water and a neutral
non-abrasive household detergent. Immediately wipe off any spillage.
Wipe with damp cloth. Avoid striking the surface with sharp objects. Never
hose down the machine!
Interior
Dry around the washing machine door
opening, flexible gasket and door glass.
Run washing machine through a complete
cycle using hot water. Repeat process if
necessary.
Cleaning in general Important: Do not use methylated spirits, solvents or similar products.
Water Temperature: Select water temperature to suit wash cycles. Always follow garment manufacture’s care label or instructions when washing.
Intensive: If the laundry is heavily soiled “Intensive” option is effective.
Set program at “Cotton 60°C + Intensive” option for test in accordance or in conformity with EN60456 and IEC60456.
Pre Wash: If the laundry is heavily soiled, “Pre Wash” Cotton is recommended. Pre Wash is available in the Cotton, Cotton Quick, Synthetic and Baby Care program.
Crease Care: If you want to prevent creasing, select Crease Care option.
Medic Rinse: For best results or for cleaner rinsing, you can choose Medic Rinse option. Medic Rinse is set by default in the Baby Care program.
6
3 sec.
The Beep on/off function can be set by pressing and
holding the Option and Rinse button simultaneously.
Beep on / off
The Beep on/off function can be set at any time and it is
automatically cancelled in the event of a power cut.
The Beep on/off function also works when power is off.
The wool wash cycle of this machine has been approved by Woolmark for the washing of machine washable Woolmark products provided that the products are
washed according to the instructions on the garment label and those issued by the manufacturer of this washing machine M0708.
Notes
Neutral detergent is recommended. The wool cycle features gentle tumbling and low-speed spin for garment care.
Warning: Keep all washing powder and detergents away from children. Danger of poisoning
Product specificaties
| Merk: | LG |
| Categorie: | Wasmachine |
| Model: | WFL-9KG |
Heb je hulp nodig?
Als je hulp nodig hebt met LG WFL-9KG stel dan hieronder een vraag en andere gebruikers zullen je antwoorden
Handleiding Wasmachine LG
7 Juli 2025

5 Juli 2025

5 Juli 2025
5 Juli 2025
5 Juli 2025
5 Juli 2025
5 Juli 2025

5 Juli 2025
5 Juli 2025

5 Juli 2025
Handleiding Wasmachine
- Bendix
- FORS
- PolyJohn
- Asko
- Euromaid
- Hestan
- Tricity Bendix
- Logik
- Haden
- Thomson
- Sunny
- Smart Brand
- Ahma
- Singer
- MegaMove
Nieuwste handleidingen voor Wasmachine
30 Juli 2025
30 Juli 2025

29 Juli 2025
29 Juli 2025
29 Juli 2025

29 Juli 2025
29 Juli 2025

29 Juli 2025
29 Juli 2025

29 Juli 2025