Lenovo IdeaCentre Y720 Handleiding
Bekijk gratis de handleiding van Lenovo IdeaCentre Y720 (2 pagina’s), behorend tot de categorie Desktop. Deze gids werd als nuttig beoordeeld door 21 mensen en kreeg gemiddeld 4.5 sterren uit 4 reviews. Heb je een vraag over Lenovo IdeaCentre Y720 of wil je andere gebruikers van dit product iets vragen? Stel een vraag
Pagina 1/2
ideacentre
Y720 Cube
Quick Start Guide
Replacing or upgrading hardware
Safety information for replacing CRUs
Do not open your computer or attempt any repairs before reading the “Important
safety information” in the Safety, Warranty, Environment, Recycling Information
GuideImportant Product Information Guide and that was included with your
computer.
If you no longer have this copy of the Safety, Warranty, Environment, Recycling
Information GuideImportant Product Information Guide and , you can obtain
one online from the website at http://www.lenovo.com/UserManuals.
Pre-disassembly instructions
Before proceeding with the disassembly procedure, make sure that you do the
following:
1. Turn off the power to the system and all peripherals.
2. Unplug all power and signal cables from the computer.
3. Place the system on a flat, stable surface.
CRUs for your computer include:
• keyboard• optical drive
• mouse• memory module
• power cord• hard disk drive
The parts listed below are optional CRUs for experienced users:
• graphics card• power supply
• fans• Wi-Fi card
• heat sink
Instructions for replacing these parts can be found in the Hardware
Maintenance Manual from the Lenovo Support Web Site. To obtain a copy of
the , go to: www.lenovo.com/UserManuals.Hardware Maintenance Manual
This part contains instructions for cleaning or replacing the following parts:
• Memory module (Follow steps:
1
2
)
• Hard disk drive (Follow steps:
1
3
)
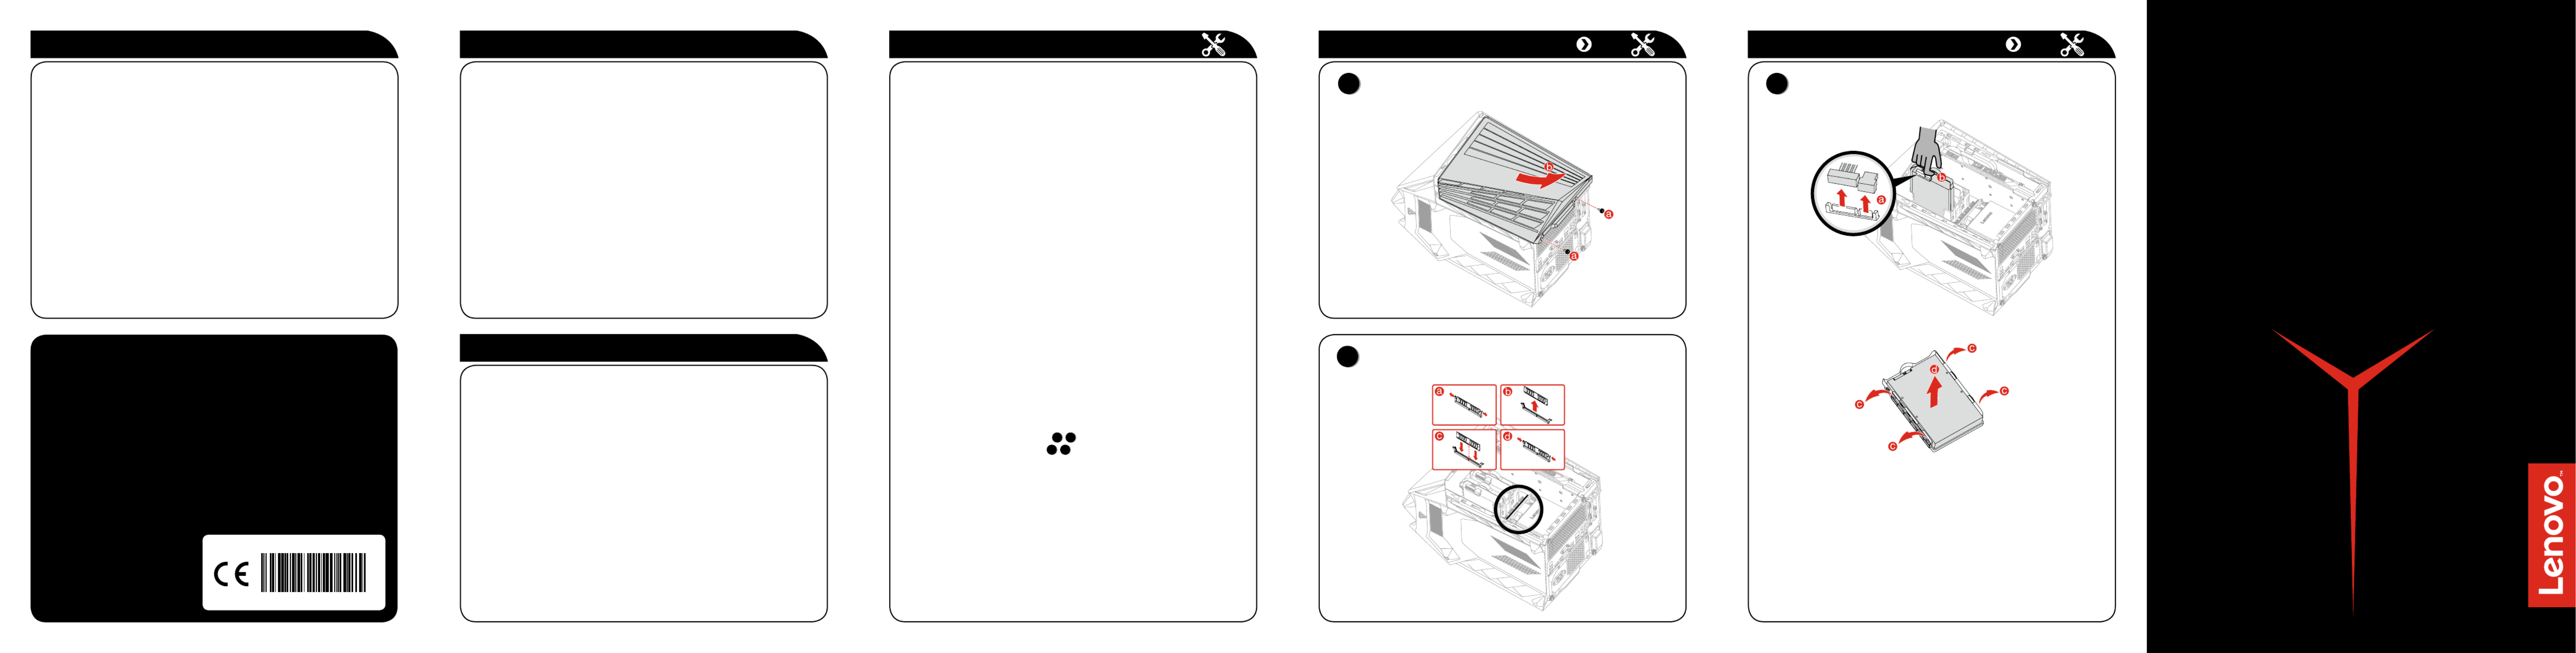
Replacing or upgrading hardware
2
Replacing a memory module
Replacing or upgrading hardware
1
Removing the computer cover
3
Replacing a hard disk drive
Service and Support information
The following information describes the technical support that is available for
your product, during the warranty period or throughout the life of your product.
Refer to the Lenovo Limited Warranty for a full explanation of Lenovo warranty
terms. See “Lenovo Limited Warranty notice” later in this document for details
on accessing the full warranty. If you purchased Lenovo services, refer to the
following terms and conditions for detailed information:
– For Lenovo Warranty Service Upgrades or Extensions,
go to: http://support.lenovo.com/lwsu
– For Lenovo Accidental Damage Protection Services,
go to: http://support.lenovo.com/ladps
– Online technical support is available during the lifetime of a product at:
http://www.lenovo.com/support
Accessing other manuals
The has been preloaded onto your Important Product Information Guide
computer. To access this guide, do the following:
For models come with Lenovo Companion:
1. Open the Start menu and then click or tap .Lenovo Companion
2. Click or tap Support →.User Guide
For models without Lenovo Companion:
Open the Start menu and then click or tap to access this guide.Manual
For models without preinstalled operating systems:
Go to the Lenovo Support Web site to access your manuals. See “Downloading
manuals” for additional information.
Downloading manuals
The latest electronic publications for your computer are available from the
Lenovo Support Web site. To download the publications,
go to: www.lenovo.com/UserManuals.
Windows help system
The Windows help system provides you with detailed information about using
the Windows operating system.
To access the Windows help system, do the following:
Open the Start menu and then click or tap to get more details.Get Started
You can also enter or what you’re looking for in the search box Get Started
on the taskbar. You’ll get suggestions and answers to your questions about
Windows and the best search results available from your PC and the Internet.
To perform system recovery after a serious error in Windows 10, click or tap
the Start button and select Settings → Update & security →. Recovery
Then, follow the instructions on the screen for system recovery.
ATTENTION: The Windows operating system is provided by Microsoft
Corporation. Please use it in accordance with the END USER LICENSE
AGREEMENT (EULA) between you and Microsoft. For any question related
to the operating system, please contact Microsoft directly.
The following information refers to ideacentre Y720 machine type:
90H2 [Y720 Cube-15ISH/Energy Star] / 90H3 [Y720 Cube-15ISH/None Energy Star]
The descriptions in this guide might be different from what you see on your computer,
depending on the computer model and configuration.
Product design and specifications may be changed without notice.
Lenovo, the Lenovo logo and ideacentre are trademarks of Lenovo in the United States,
other countries, or both.
Windows is a trademark of the Microsoft group of companies.
Other company, product, or service names may be trademarks or service marks of others.
© Copyright Lenovo 2016. LIMITED AND RESTRICTED RIGHTS NOTICE: If data or
software is delivered pursuant to a General Services Administration “GSA” contract, use,
reproduction, or disclosure is subject to restrictions set forth in Contract
No. GS-35F-05925.
Version 1.02016.12
SP40L78843
Product specificaties
| Merk: | Lenovo |
| Categorie: | Desktop |
| Model: | IdeaCentre Y720 |
Heb je hulp nodig?
Als je hulp nodig hebt met Lenovo IdeaCentre Y720 stel dan hieronder een vraag en andere gebruikers zullen je antwoorden
Handleiding Desktop Lenovo

24 Maart 2026
10 Maart 2026
28 November 2025
23 September 2025
4 Augustus 2025
13 Mei 2025
10 April 2025
8 April 2025
8 April 2025
30 Maart 2025
Handleiding Desktop
Nieuwste handleidingen voor Desktop
6 Mei 2026
5 Mei 2026
3 Mei 2026
2 Mei 2026
2 Mei 2026
2 Mei 2026
1 Mei 2026
1 Mei 2026
25 Maart 2026
25 Maart 2026