Leisure NUN9501 Handleiding

Leisure Spoelbak NUN9501

Lees hieronder de 📖 handleiding in het Nederlandse voor Leisure NUN9501 (4 pagina's) in de categorie Spoelbak. Deze handleiding was nuttig voor 25 personen en werd door 2 gebruikers gemiddeld met 4.5 sterren beoordeeld

Pagina 1/4
05/04 1978
Any machining operation will produce ne particles of dust.
Drilling or cutting must be carried out in a well-ventilated
area.
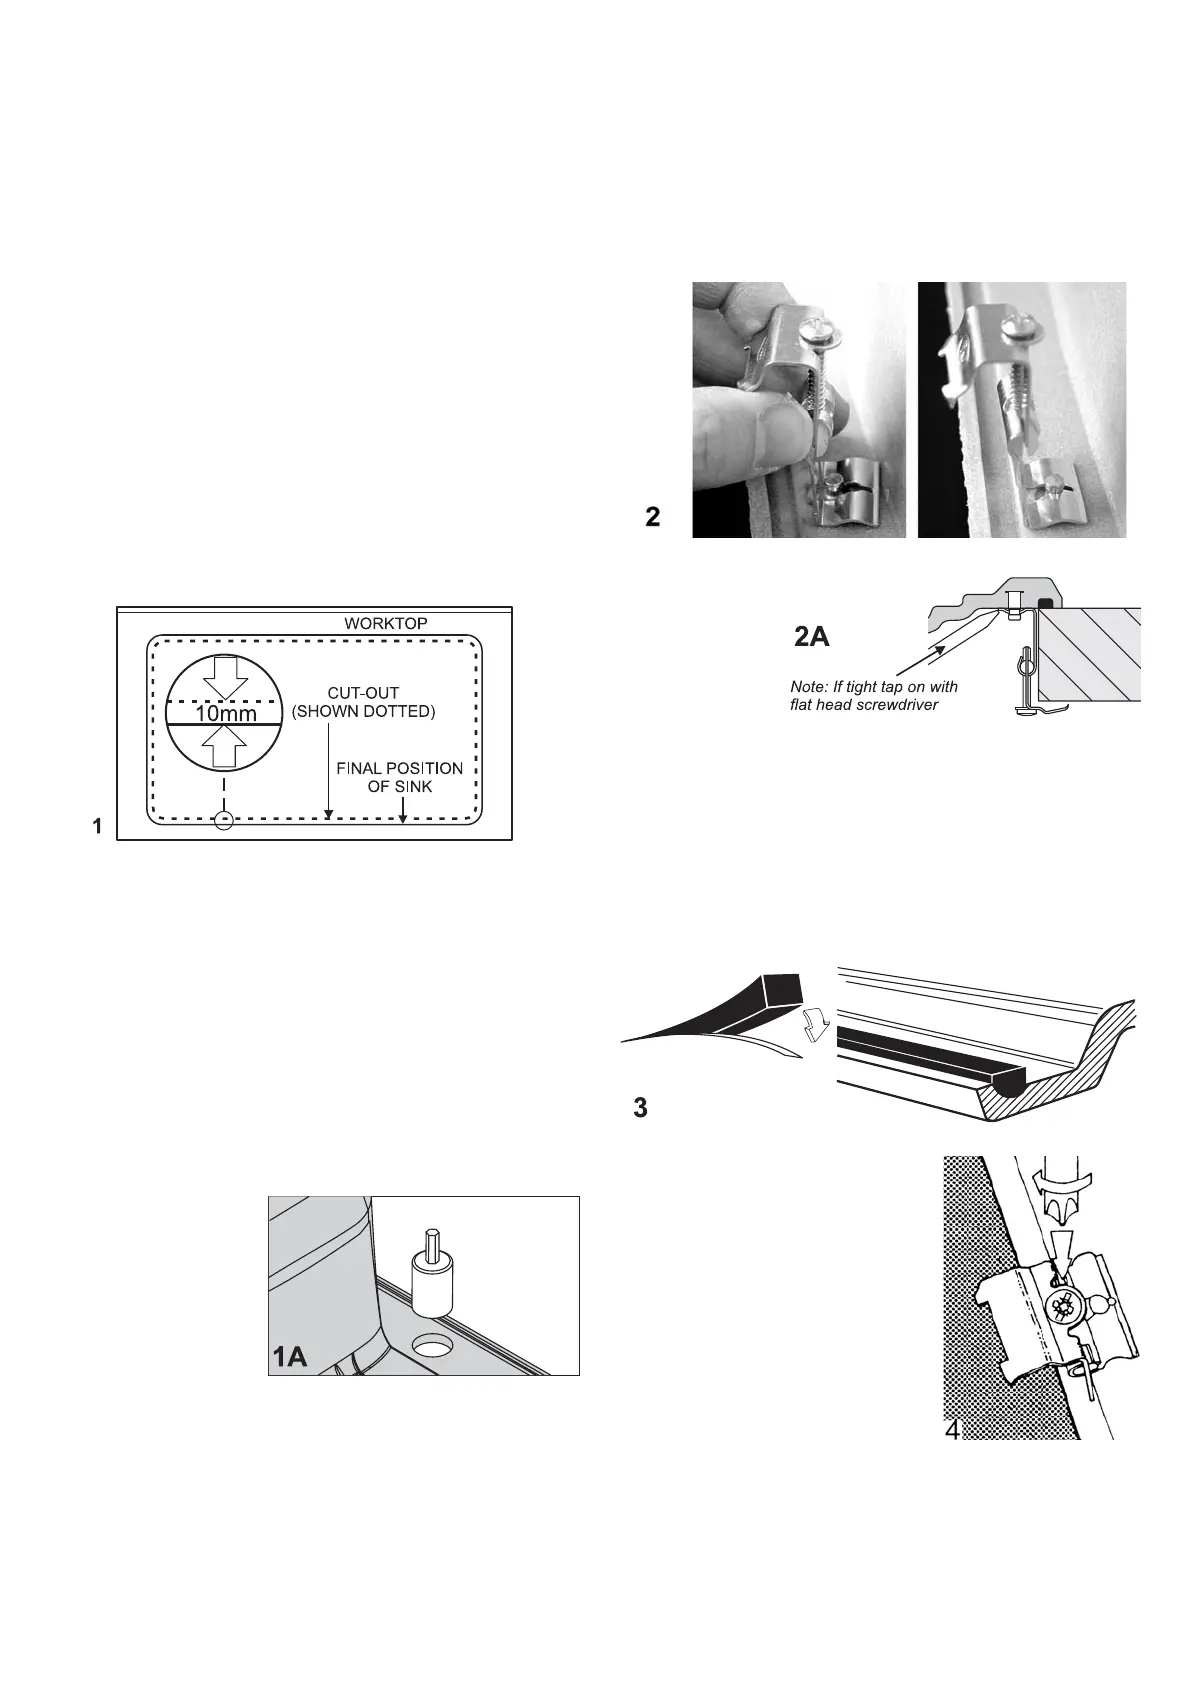
2. Position clips over pins moulded in sink. The clips are pulled
& twisted towards the edge of the sink as shown in fi g. 2.
If a clip is tight tap on with at head screwdriver as shown in
g. 2A and hinge
them back away
from sink edge.
3. At thi s p oin t
try the sink in
t h e c u t - o u t ,
some localised
enlargement of the hole may be necessary around the
clips.
4. Fit the tap to the sink.
5. Fit the wastes to the sink following the instructions packed
with them.
6. Fit the foam seal to the edge of the sink. Peel off the paper
backing strip and stick the seal to the recess in the sink as
shown in g. 3. Ensure that a neat butt joint is achieved
where the ends of the seal meet.
FITTING THE SINK
1. Position the sink in the cut out.
2. Tension the xing clips as shown
in g. 4. Ensure that the foam
seal is carefully compressed but
do not overtighten the clips.
3. Complete the plumbing of the
hot and cold supply to the tap.
IMPORTANT
This sink has been coated with
a thin layer of protective lm.
It is essential that the sink be
cleaned with cream cleaner (i.e. Cif Cleaner) before use.
INSTALLATION DETAILS FOR SNAP ON FIXING SYSTEM
VELSTRA & NEOSTONE SINKS
NOTE: During installation care should be taken to ensure
the sink is protected from scuffs and scratches. Straining and
overtightening of all plumbing xtures connected to the sink
should be avoided. Installers should carefully check that the
moulding and the edges of the sink are dead level so that
water will fl ow off the drainer.
PLEASE READ THOROUGHLY BEFORE
ATTEMPTING TO INSTALL SINK.
PREPARING THE WORKTOP
1. It is recommended that the inset sink is tted to the worktop
before being permanently fi xed to the cabinet.
2. Place the sink upside down on worktop. Position the sink
relative to the worktop as required, ensuring that the cabinet
framework will be clear of all parts of the sink.
With a sharp soft pencil draw round sink as accurately as
possible. See fi g. 1.
3. Remove the sink and draw another line 10mm inside
the out-line of the sink top. This is the cutting line for the
aperture.
4. Drill as large a hole as possible inside the cutting line. Using
a pad saw, jigsaw or similar, cut out the aperture. At this
point we would recommend that the worktop aperture is
sealed. To do this paint over with a p.v.a. adhesive, paint,
varnish or smear with silicone sealant.
PREPARING THE SINK
1. If a taphole is required, but has not been supplied in the
sink, proceed as follows:
Decide whether the bowl is to be left or right hand when
sink is tted. Cut the appropriate taphole into the sink
using a 35mm hole
saw (supplied with
selected product).
On the reverse side
of the sink there
is a location hole
this is to be used
for positioning the
hole saw as shown
in fi g. 1A.
Before drilling please read safety instructions supplied
with hole saw.
Front face must be fully supported to prevent cracking
carefully drill out taphole.
Warning: Velstra & Neostone products include a silica ller.
05/04 1978
ALTERNATIVE METHOD OF SEALING
VELSTRA® & NEOSTONE SINKS
1. Apply silicone sealant (not supplied) to the underside of
the sink rim, as shown in fi g. 5.
2. Remove surplus sealant from around the sink using a damp
cloth.
VELSTRA AND NEOSTONE CARE INSTRUCTIONS
Congratulations on purchasing your new sink. Vel-
stra and Neostone are revolutionary sink materials
that are extremely robust and hard wearing. How-
ever both materials will benefi t from a little care
and attention to ensure lasting good looks and per-
formance. Please read the following care advice
carefully.
Cleaning
For every day cleaning a damp cloth with ordinary
washing up liquid will suf ce. Heavier staining can
be removed with a cream cleaner eg. Cif on a damp
cloth. Really stubborn stains should be treated to
an overnight soaking in diluted bleach. Please do
not use abrasive powders or steel scouring pads
as they may affect the surface gloss. Do not at-
tempt to remove limescale by scraping it off, an
application of citric acid (lemon juice) should, with
the help of a stiff brush, remove any deposits. Sil-
ver streaks on the surface of the sink are caused
by aluminium utensils and are not scratches, they
can be easily removed with a cream cleaner.
Heat Resistance
Velstra and Neostone are highly resistant to ex-
tremes of temperature and will withstand hot pans
up to 230°C but avoid pans containing very hot oil
above this temperature.
Chemical Resistance
Velstra and Neostone are resistant to just about
any chemical found in the home, but be careful,
these days waste systems are made from plastic
materials which may not be. The coloured wastes
supplied as standard with the sink, are made from
a tough plastic material but these are not resistant
to some solvents, especially nail varnish remover,
acetone and nitro thinners.
Further Advice
Do not use the drainer as a chopping board. A hard
wood chopping board or polyethylene food board
is available as an optional extra.
Avoid plastic washing up bowls, they pick up ne
particles of grit which transforms them into very
effi cient grinding surfaces causing wear on your
sink. We recommend a rubber mat in this case.
20 Year Guarantee
We guarantee to replace any Velstra or Neostone
sink that breaks due to material or manufacturing
defects within 20 years from the date of purchase.
The guarantee does not cover normal wear and
tear occurring through use of the product.
For the guarantee to apply the owner must follow
the use, care and cleaning instructions provided.
Accessories and waste ttings are not included in
this guarantee.
05/04 1978
EINBAUANLEITUNG FÜR CLIPBEFESTIGANGSSYSTEM VELSTRA
UND NEOSTONE EINBAUSPULEN
HINWEIS: Beim Einbau ist darauf zu achten, daß die Spüle
nicht durch Scheuern oder Kratzen beschädigt wird. Die
an die Spüle angeschlossenen Leitungen und Armaturen
möglichst nicht verschmutzen und nicht übermäßig
fest verschrauben. Der Installateur sollte sorgfältigst
kontrollieren, ob Deckleiste und Kanten der Spüle
vollkommen waagerecht sind, damit das Wasser von der
Ablaufftäche abfl ießen kann.
BITTE VOR EINBAU DER
SPÜLE AUFMERKSAM LESEN.
VORBEREITUNG DER ARBEITSPLATTE
1. Es empfi ehlt sich, die Einbauspüle zuerst in die Arbeitsplatte
einzulassen und dann erst dauerhaft am Unterschrank zu
befestigen.
2. Drehen Sie die Spüle um und legen Sie sie in der
gewünschten Einbaulage auf die Arbeitsplatte. Dabei darauf
achten, daß die Spüle und dazugehörigen Teile nicht ans
Gestell des Unterschranks anstoßen. Dann zeichnen Sie
die Umrisse der Spüle mit einem angespitzten weichen
Bleistift möglichst genau nach. Siehe Abb. 1.
3. Nehmen Sie die Spüle von der Platte ab und zeichnen
Sie parallel zu den markierten Umrissen und lOmm nach
innen versetzt eine weitere Linie, die dann als Vorlage zum
Aussägen der Ausnehmung r die Spüle dient.
4. Die markierte Fläche mit einem möglichst großen Bohrer
anbohren und dann mit einer Stichge, Lochsäge o.ä.
aussägen. Wir empfehlen, die Schnittkante der Arbeitsplatte
jetzt abzudichten. Dazu die Kante mit PVA-Kleber oder Lack
bestreichen bzw. Silikondichtmasse auftragen.
VORBEREITUNG DER SPÜLE
1. Wenn ein Loch für den Wasserhahn benötigt wird, geht man
folgendermaßen vor:
Entscheiden Sie, ob das Becken nach Einbau der Spüle
links oder rechts sein soll, und schneiden Sie ein passendes
Loch für den Wasserhahn in die Spüle. Dazu benötigen Sie
eine Lochsäge oder einen Tankschneider, der auf auf einen
Lochausschnitt von
35mm Durchmesser
eingestellt sein muß.
Auf der Unterseite
der Spüle befindet
si c h eine kl e i n e
Vertiefung, das als
Ansatzpunkt für den
Vorbohrer dient. (siehe Abbildung 1A).
Bitte lesen Sie vor dem Bohren die Sicherheitsvorschriften,
die der Lochsäge beigefügt sind!.
Die Vorderseite der Spüle muß gut befestigt werden, damit
das Bohren keine Risse in der Spüle verursacht.
Achtung! Velstra- und Neostone enthalten einen
Silikafüllstoff. Bei Bohr- und
Schneideaiteiten fällt feiner Quarzstaub an. Material daher
nur in gut belüfteten Räumen bearbeiten!
2. Die Befestigungsklemmen über die in die Spüle
eingelassenen Metallstäbchen stecken. Die Klemmen
herunterziehen und zum Spülenrand hin gerade drehen
(siehe Abbildung 2).
Wenn eine Klemme sich nicht einfach auf das Stäbchen
stecken läßt, mit einem Schraubenzieher mit Flachkopf
vorsichtig daraufklopfen, bis sich die Klemme in der
gewünchten
Position befi ndet
(siehe Abbildung
2A).
3. Probieren Sie,
ob die Spüle in
das Loch paßt. Eventuell muß es im Bereich der Klemmen
etwas vergrößert werden.
4. Wasserhahn an der Spüle anbringen.
5. Ablaufgarnituren nach der beigefügten Anleitung in die
Spüle einbauen.
6. Schaumstoffdichtung an der Spülenkante anbringen.
Schutzpapier abziehen und den Dichtungsstreifen, wie in
Abb. 3 dargestellt, an der Spüle festkleben. Dabei darauf
achten, daß die Dichtungsenden sauber und bündig
abschließen.
EINBAU DER SPÜLE
1. Spüle in die Ausnehmung
einsetzen.
2. Die Befestigungklemmen, wie
in Abb 4 dargestellt, spannen.
D a r a u f a c h te n , d a ß di e
Schaumstotidichtung so fest
wie möglich zusammengedrückt
ist, die Klemmen jedoch nicht zu
fest anziehen.


Product specificaties

Merk: Leisure
Categorie: Spoelbak
Model: NUN9501
Kleur van het product: Zwart
Breedte: 950 mm
Diepte: 508 mm
Soort wastafel: Opbouwwasbak
Vorm gootsteen: Rechthoekig
Aantal gootstenen: 1 kommen
Vorm eerste spoelbak: Rechthoekig
Eerste kom dimensies (WxL): 370 x 424 mm
Eerste kom diepte: 180 mm
Kraangat: Ja
Tap-gat grootte: 35 mm
Aantal kraangaten: 2
Aanrecht: Ja

Heb je hulp nodig?

Als je hulp nodig hebt met Leisure NUN9501 stel dan hieronder een vraag en andere gebruikers zullen je antwoorden