Ledino Köpenick 209 Handleiding
Ledino Verlichting Köpenick 209
Bekijk gratis de handleiding van Ledino Köpenick 209 (4 pagina’s), behorend tot de categorie Verlichting. Deze gids werd als nuttig beoordeeld door 57 mensen en kreeg gemiddeld 4.7 sterren uit 7 reviews. Heb je een vraag over Ledino Köpenick 209 of wil je andere gebruikers van dit product iets vragen? Stel een vraag
Pagina 1/4
Bedienungsanleitung
18
LedinoLED LIGHTING
the energy saving company
Spitzahornweg 1
14974 Ludwigsfelde/ Berlin
Germany
LedinoDeutschland GmbH
the energy saving company
IP54/IP20
We hereby confi rm that the products are in line with the regulations ‒ and in particular
with the protection requirements ‒ of the European Unionʼs directive on the harmonisati-
on of the legislation relating to electromagnetic compability (2014/30/EU), the low voltage
directive 2014/35/EU, the directive for Energyrelated Products 2009/125/EG and the RoHS
directive 2011/65/EC.
Used units must not be disposed of with household waste!
Every consumer is required by law to bring all batteries and rechargeable batteries,
whether they contain harmful substances or not, to a collection point run by the com-
munal authority or borough or run commercially , so that they can be disposed of in an
environmentally friendly manner.
Please only hand in fully discharged batteries !
Batteries and rechargeable batteries must not be disposed of with household waste!
Dispose battery separatly.
Every consumer is required by law to bring all batteries and rechargeable batteries,
whether they contain harmful substances or not, to a collection point run by the com-
munal authority or borough or run commercially , so that they can be disposed of in an
environmentally friendly manner. Please only hand in fully discharged batteries !
Spitzahornweg 1
14974 Ludwigsfelde/ Berlin
Germany
LedinoDeutschland GmbH
the energy saving company
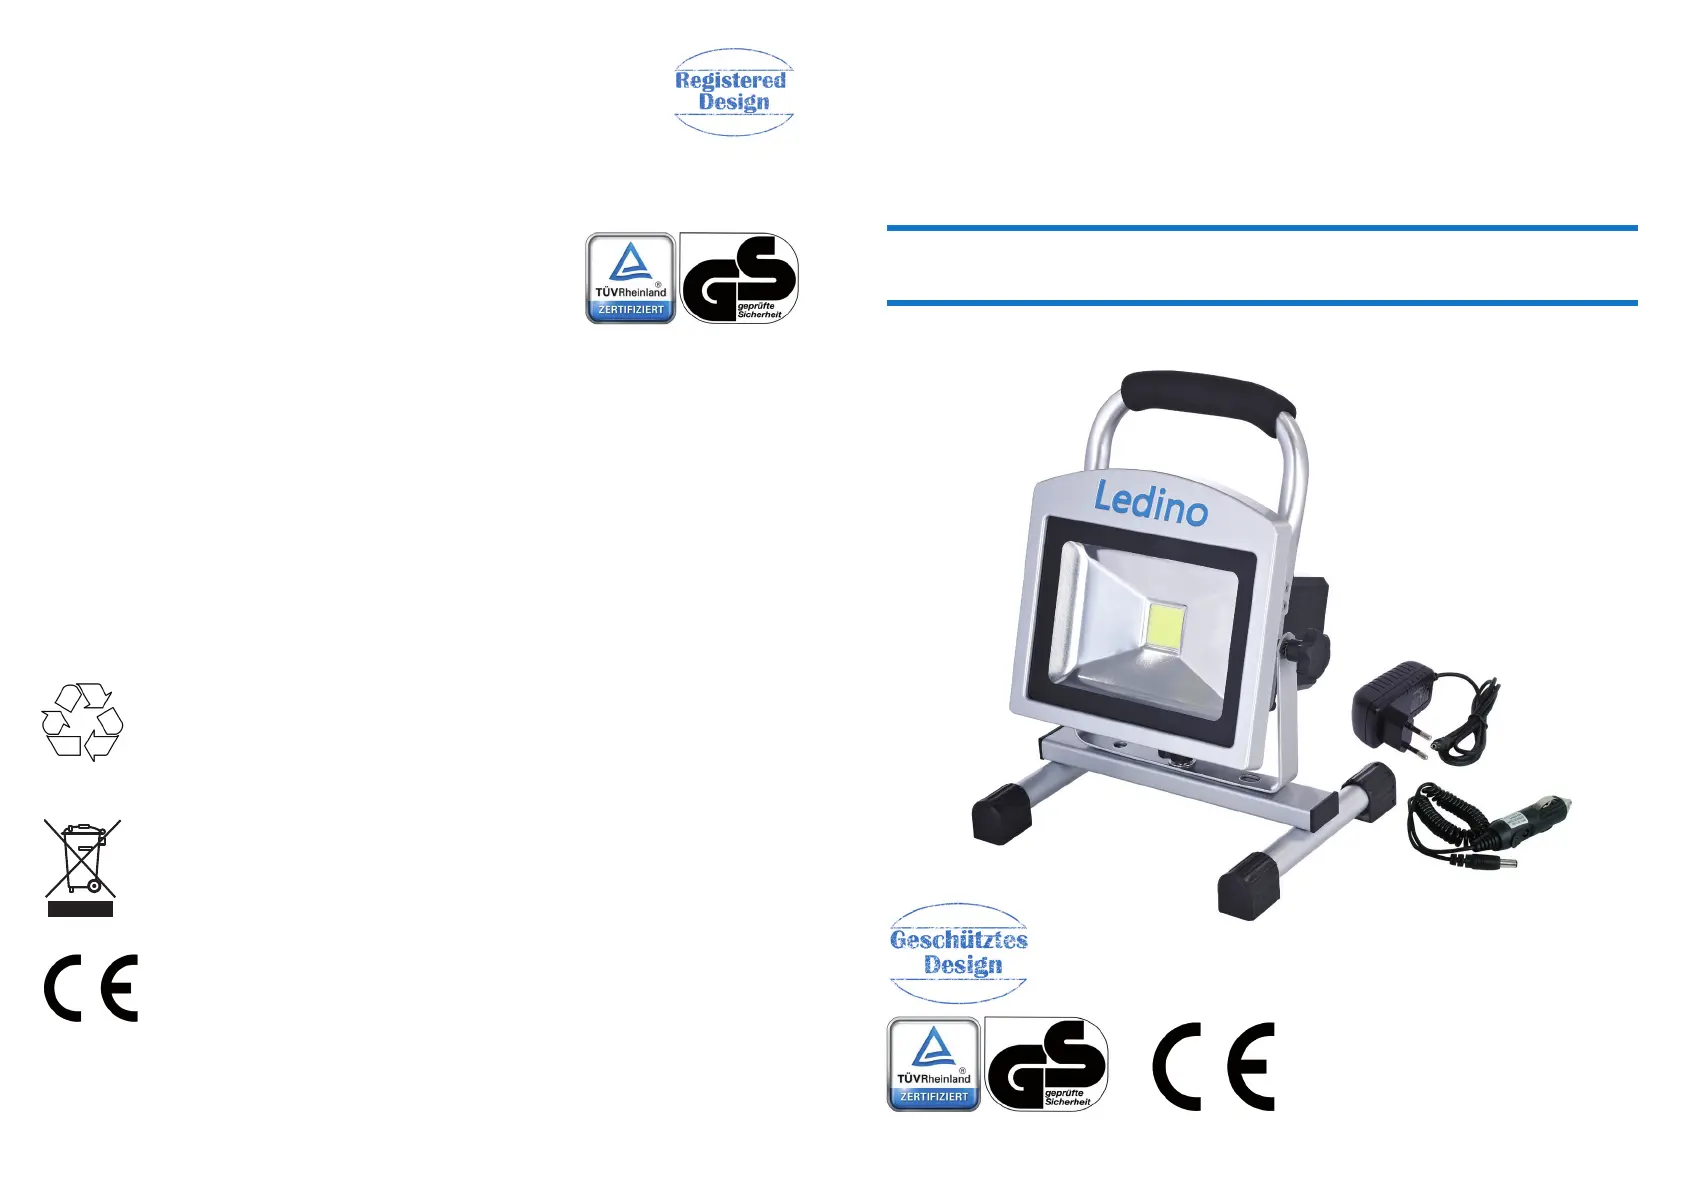
Technical Data:
Ledino 20 W LED Workinglight „Köpenick 209“ 11140206001111
with Li-Ion battery 8.8 Ah
20 watts Epistar LED chip (100 lm/W)
100-240 V AC 50/60 Hz, 12-24 V DC
TÜV/GS approval
cold white 6500 K, 1360 lm LED light
Operating temperature: charging 0 up to 45 °C / working -20 up to 50 °C
100° beam angle, aluminium die-cast housing
LED battery charge indicator
deep discharge/ overcharging protected
protected switch on housing, with magnet stand bracket
IP54 - fl oodlight protected against splashing water
IP20 - AC/DC adaptor with GS approval (output: 13 V, 1200 mA)
IP20 - 12-24 V car adaptor (fuse: 6 x 30 mm, F5A-250 V)
8.8 Ah Li-Ion battery (can be re-ordered separatly)
Li-Ion battery have min. 500 charging cycles
charging time 6 h, 4 switching steps: 25 % light - approx. 18 h working time
50 % light - approx. 9 h working time
100 % light - approx. 4.5 h working time
fl ashing light - approx. 4.5 h working time
fl oodlight W: 210 mm, H: 290 mm, D: 180 mm, 1.8 kg
5 years functional warranty* (does not apply to battery)
Item-No. 11800200001022: Spare part Li-Ion battery 8.8 Ah
Item-No. 11800200004022: 100-240 V AD/DC adaptor
Item-No. 11800100006022: 12-24 V car adaptor
Köpenick 209
11140206001111
LED-Standstrahler 20 Watt
mit Li-Ionen Akku
www.tuv.com
ID1419042483
www.tuv.com
ID1419042483
*) The conditions of our functional warranty can
be found on enclosed sheet and on the
internet at
„http://ledino.com/garantiebestimmungen/“
Product specificaties
| Merk: | Ledino |
| Categorie: | Verlichting |
| Model: | Köpenick 209 |
| Kleur van het product: | Zwart, zilver |
| Gewicht: | 1800 g |
| Breedte: | 210 mm |
| Diepte: | 180 mm |
| Hoogte: | 290 mm |
| Internationale veiligheidscode (IP): | IP54 |
| Certificering: | TÜV / GS |
| Lichtstroom: | 1360 lm |
| Kleur licht: | Koel wit |
| Kleurtemperatuur: | 6500 K |
| Totaal vermogen: | 20 W |
| Lichtrendement: | 100 lm/W |
| Stralingshoek: | 100 ° |
| Lamptechnologie: | LED |
| AC-ingangsspanning: | 100 - 240 V |
| AC-ingangsfrequentie: | 50 - 60 Hz |
| Bedrijfstemperatuur (T-T): | 0 - 45 °C |
Heb je hulp nodig?
Als je hulp nodig hebt met Ledino Köpenick 209 stel dan hieronder een vraag en andere gebruikers zullen je antwoorden
Handleiding Verlichting Ledino

15 Februari 2024
14 Februari 2024
14 Februari 2024
Handleiding Verlichting
Nieuwste handleidingen voor Verlichting
30 Juni 2026
30 Juni 2026
30 Juni 2026
30 Juni 2026
30 Juni 2026
29 Juni 2026
29 Juni 2026
29 Juni 2026
29 Juni 2026
26 Juni 2026