Kramer VM-4DKT Handleiding
Bekijk gratis de handleiding van Kramer VM-4DKT (2 pagina’s), behorend tot de categorie Receiver. Deze gids werd als nuttig beoordeeld door 61 mensen en kreeg gemiddeld 4.4 sterren uit 7 reviews. Heb je een vraag over Kramer VM-4DKT of wil je andere gebruikers van dit product iets vragen? Stel een vraag
Pagina 1/2
VM-4DKT Quick Start
P/N:
2900-301544QS
Rev:
1
Scan for full manual
VM-4DKT Quick Start Guide
This guide HELPS you install and use your VM-4DKT for the first time.
Go to www.kramerav.com/downloads/VM-4DKTto download the latest user manual and check if firmware
upgrades are available.
Step 1: Check what’s in the box
VM-4DKT1:4 4K HDMI/DGKAT Distribution Amplifier Transmitter
4 Rubber feet
1 Quick start guide
1 Power cord and adapter
IMPORTANT NOTICE!
We highly recommend using only Kramer UNIKAT cables with these products. If using 3
rd
party shielded CAT-6A cables, both ends of the
shield must be soldered to the connectors for the products to function properly. Do not use any jumpers, unshielded wall plates or mid-
span cable connections. These extenders are not compatible with HDBaseT technologies. Prior to signal extension, ensure that the
extension line cable is lying straight and not coiled.
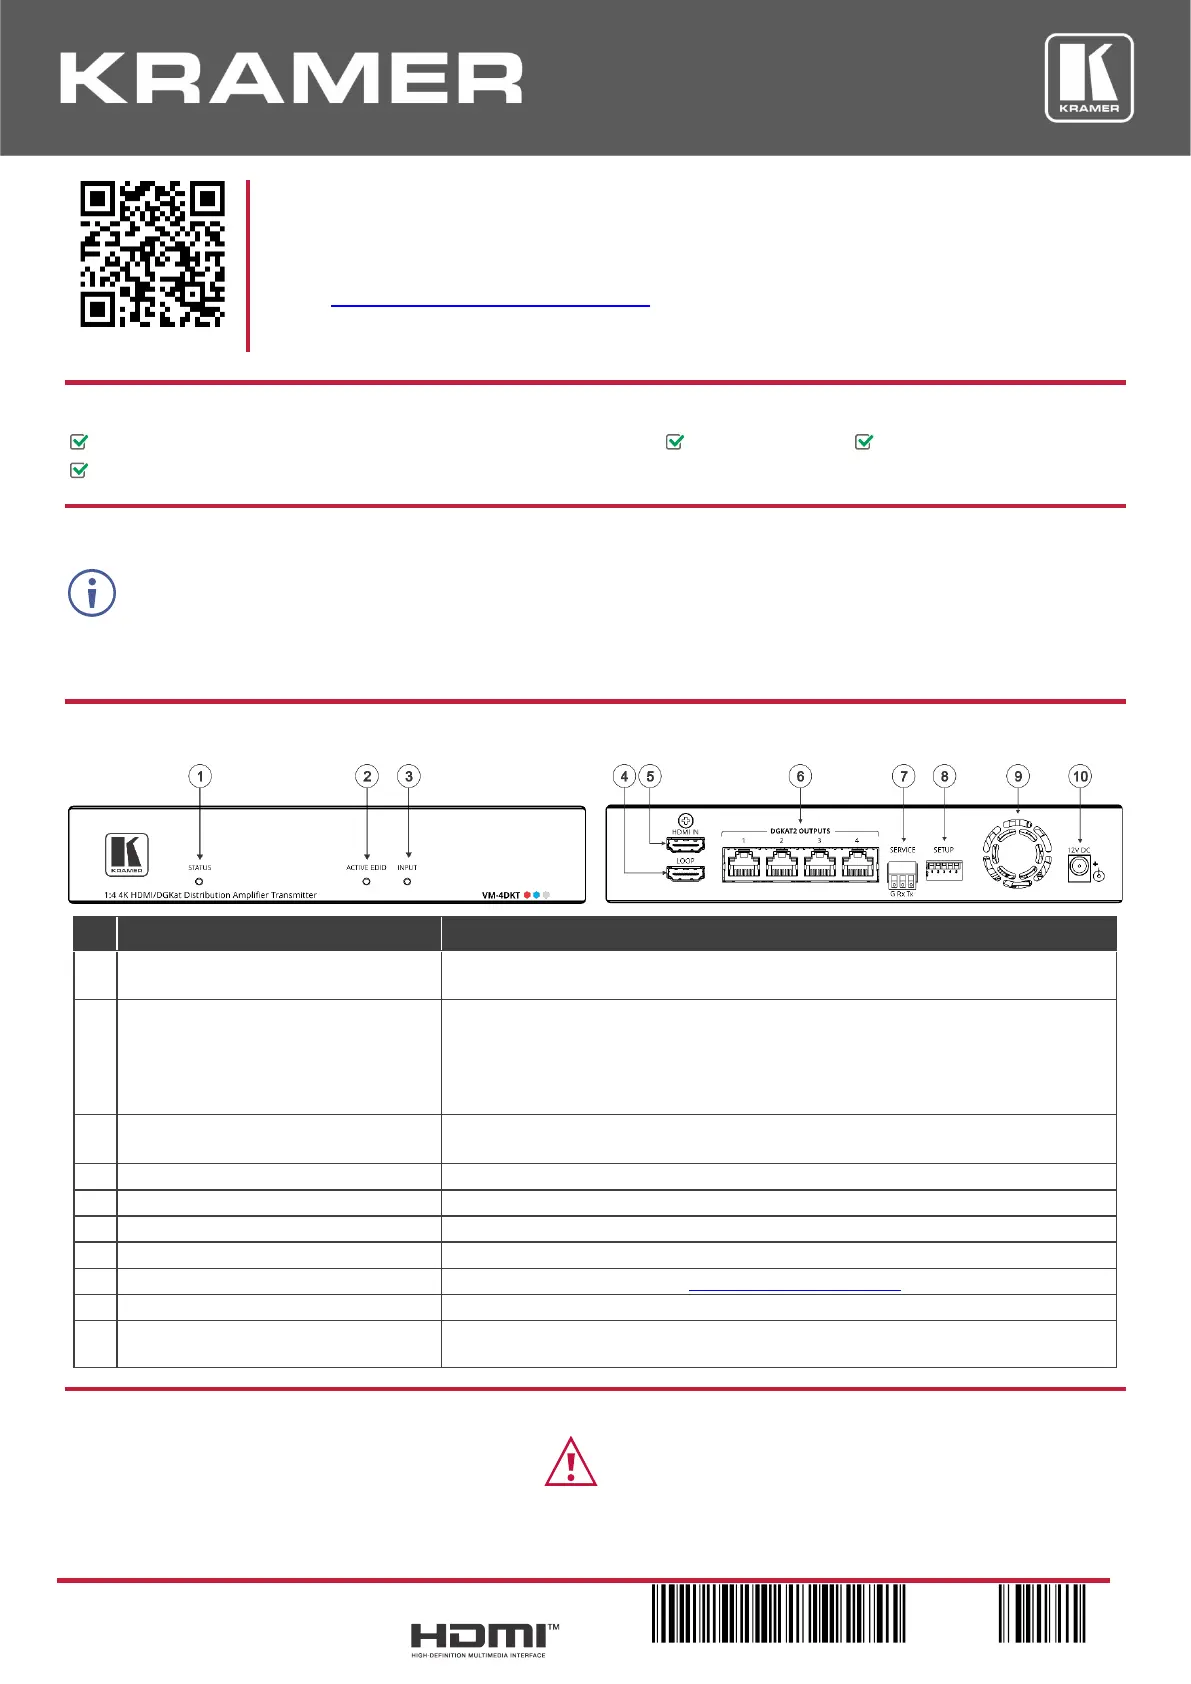
Step 2: Get to know your VM-4DKT
#
Feature
Function
1
STATUS LED
Red – Power up.
Green – Power is on.
2
ACTIVE EDID LED
The LED color indicates the active EDID type. When flashing, the state is in the
process of being activated.
Yellow – Default EDID.
Blue – Output-acquired EDID.
Green – Custom EDID.
3
INPUT LED
On– Input signal detected.
Flashing – Source connected, but no signal detected.
4
HDMI IN Connector
Connect to an HDMI source.
5
LOOP Connector
Connect to a local HDMI display.
6
DGKAT2 OUTPUTS Connectors (x4)
Connect to a DGKat-2.0 receiver (for example, PT-872xr) using twisted pair cable.
7
SERVICE 3-pin terminal block
Connect to a serial controller.
8
SETUP DIP-switches
Sets the device behavior (see Step 6: Operate VM-4DKT).
9
Fan Vent
For heat ventilation.
10
12V DC Power Connector
Connect the 12V DC power adapter into the device and then connect it to the
mains.
Step 3: Mount VM-4DKT
Install VM-4DKT using one of the following methods:
•Attach the rubber feet and place the unit on a flat
surface.
•Ensure that the environment (e.g., maximum ambient temperature & air flow) is
compatible for the device.
•Avoid uneven mechanical loading.
•Appropriate consideration of equipment nameplate ratings should be used for avoiding
overloading of the circuits.
•Reliable earthing of rack-mounted equipment should be maintained.
•Maximum mounting height for the device is 2 meters.
Product specificaties
| Merk: | Kramer |
| Categorie: | Receiver |
| Model: | VM-4DKT |
| Kleur van het product: | Zwart |
| Gewicht: | 500 g |
| Breedte: | 214.6 mm |
| Diepte: | 163 mm |
| Hoogte: | 43.6 mm |
| Gewicht verpakking: | 1300 g |
| Breedte verpakking: | 345 mm |
| Diepte verpakking: | 165 mm |
| Hoogte verpakking: | 52 mm |
| LED-indicatoren: | Ja |
| Stroom: | 2.8 A |
| HDCP: | Ja |
| Temperatuur bij opslag: | -40 - 70 °C |
| Rack-montage: | Ja |
| HDMI in: | 1 |
| RJ-45 uitgang ports: | 1 |
| Max. overdrachtssnelheid: | 18 Gbit/s |
| Bandbreedte: | - MHz |
| Aantal HDMI-uitgangen: | 1 |
| Bedrijfstemperatuur (T-T): | 0 - 40 °C |
| Relatieve vochtigheid in bedrijf (V-V): | 10 - 90 procent |
Heb je hulp nodig?
Als je hulp nodig hebt met Kramer VM-4DKT stel dan hieronder een vraag en andere gebruikers zullen je antwoorden
Handleiding Receiver Kramer

20 December 2025
29 September 2025
19 Maart 2025
26 November 2024
26 November 2024
26 November 2024
25 November 2024
25 November 2024
25 November 2024
25 November 2024
Handleiding Receiver
Nieuwste handleidingen voor Receiver
9 Maart 2026
9 Maart 2026
9 Maart 2026
9 Maart 2026
9 Maart 2026
8 Maart 2026
8 Maart 2026
8 Maart 2026
7 Maart 2026
7 Maart 2026