Konig & Meyer Performance 26250 Handleiding
Konig & Meyer Statief Performance 26250
Bekijk gratis de handleiding van Konig & Meyer Performance 26250 (2 pagina’s), behorend tot de categorie Statief. Deze gids werd als nuttig beoordeeld door 40 mensen en kreeg gemiddeld 4.8 sterren uit 9 reviews. Heb je een vraag over Konig & Meyer Performance 26250 of wil je andere gebruikers van dit product iets vragen? Stel een vraag
Pagina 1/2
KÖNIG & MEYERGmbH & Co. KG
Kiesweg 2, 97877 Wertheim, www.k-m.de
26250-300-55/26250-500-55 Rev.06 03-80-214-00 4/14
SICHERHEITSHINWEISE
- Zur Aufnahme von Mikrofonierung - nicht für andere Lasten bestimmt
- Rundsockel 1mit Vorsicht handhaben - nicht fallen lassen
- Beide Gewinde sind vor dem Einschrauben auf Schäden zu überprüfen;
-Gewindegänge vor Stößen u.Ä. schützen
- Grundrohr 2bis zum Anschlag fest in Rundsockel 1schrauben
- Auszug beim Verstellen der Höhe NICHT GEWALTSAM anschlagen!
- Beim Transport ist das Stativ am Grundrohr zu fassen -
-nicht am Auszug!
- Auf ebenen und tragfähigen Untergrund achten
- Vor schädlichen Einflüssen schützen: Nässe, Witterung, Stöße
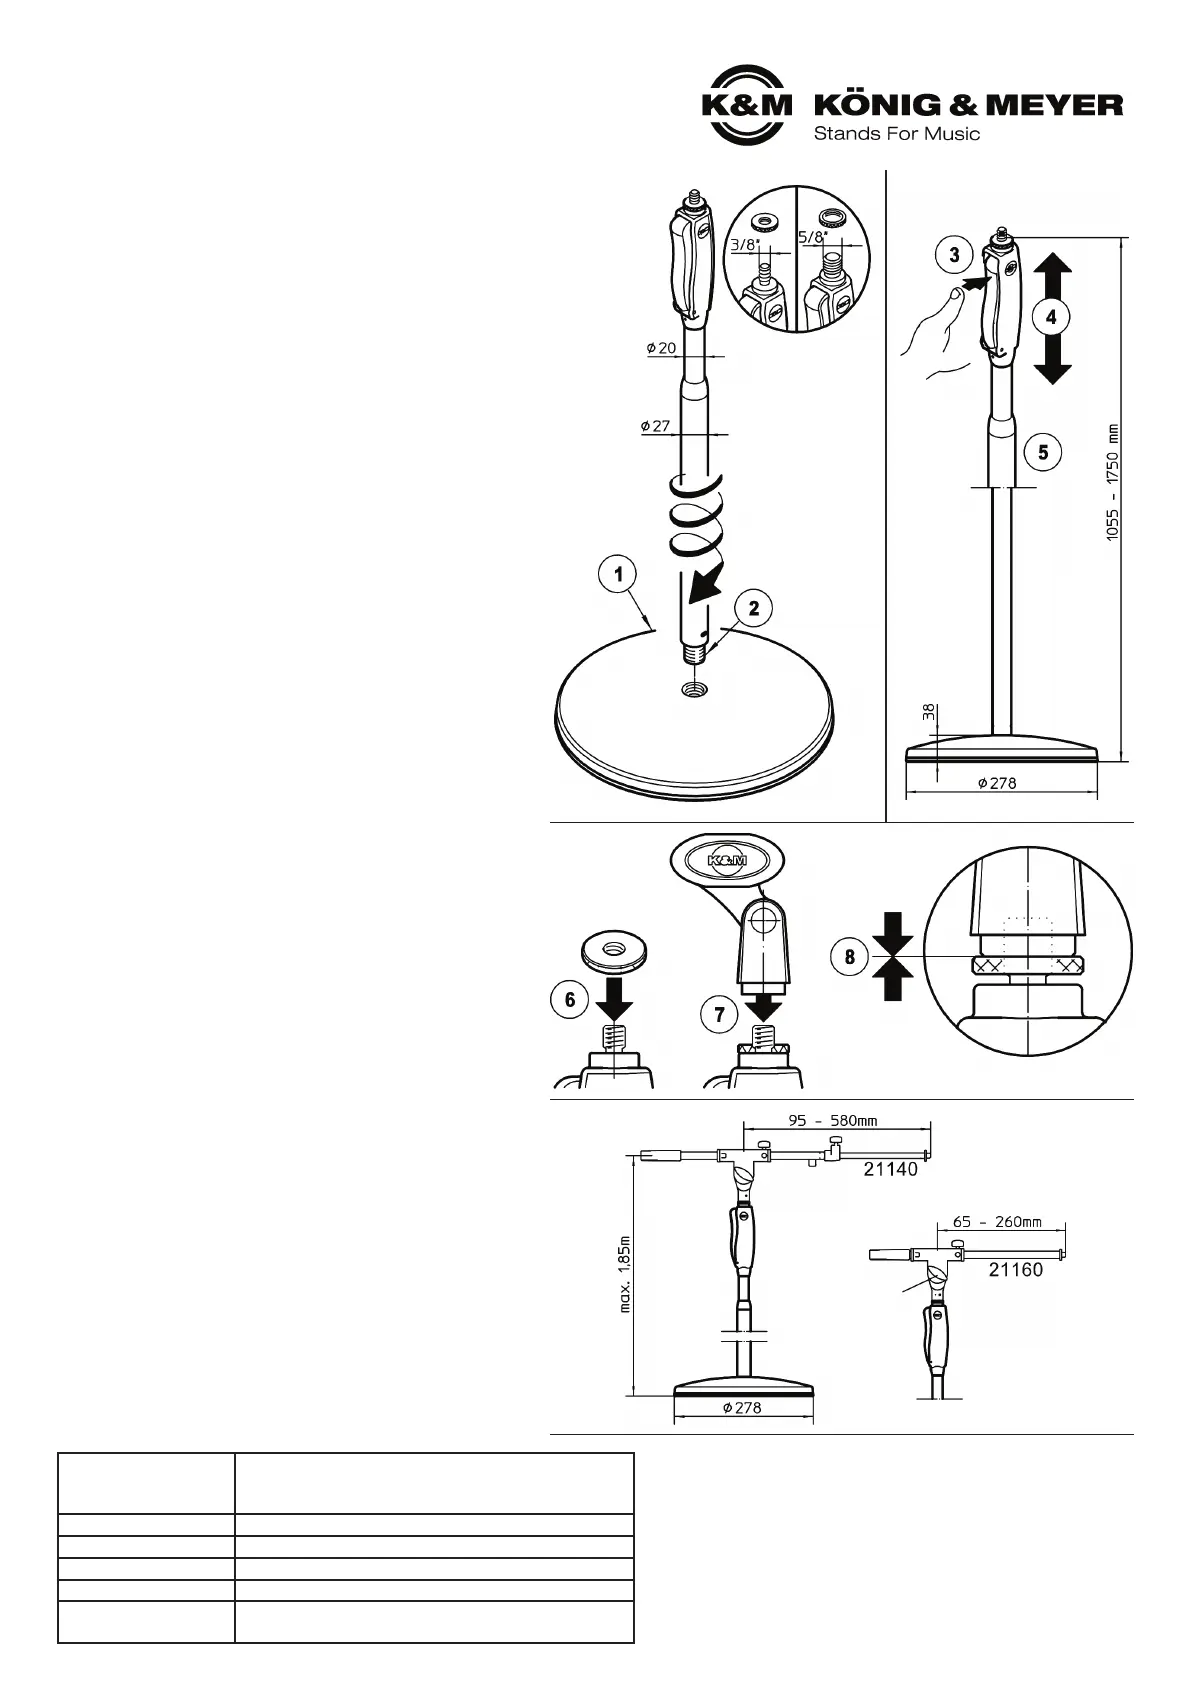
A. AUFBAU
- Rundsockel 1auf Boden legen, Einschraubgewinde 2der Rohr-
-kombination möglichst gerade ansetzen und bis zum Anschlag
-handfest einschrauben.
B. HÖHENVERSTELLUNG
Drücker 3betätigen, halten und Auszug 4bis zur
gewünschten Höhe aus dem Grundrohr 5herausziehen.
Sobald die Höhe erreicht ist, den Drücker 3einfach wieder loslassen.
C. BEFESTIGUNG
C.von Mikrofonklammer / Schwenkarm
6Zunächst die Rändelscheibe (3/8",5/8") bis zum
6Anschlag auf den Gewindebolzen des Stativs drehen
7Anschließend die Mikrofonklammer bzw. den Schwenkarm
7auf eben diesen Gewindebolzen aufschrauben.
8Rändelscheibe etwas zurückdrehen und mit der Mikrofon-
8klammer bzw. dem Schwenkarm verspannen.
Die Demontage erfolgt in umgekehrter Reihenfolge.
D. EINSATZ VON SCHWENKARMEN
Rundsockelstative sind typische Solostative, können
aber selbstverständlich auch einen Schwenkarm tragen.
BEACHTE:
Tragkraft und Kippneigung hängen maßgeblich ab vom:
a. Fußkreisdurchmesser des Mikrofonstativs (hier: 278 mm)
b. Abstand der Traglast (=Mikrofon) vom zentralen Stativrohr
c. Haltekraft des Schwenkarmgelenks (Klemme fest anziehen)
TIPP:
- Im Vergleich zu Dreibeinstativen verfügen Rundsockelstative
-über kleinere Fußkreise. Daher empfehlen wir den Einsatz von
-kurzen Schwenkarmen, z.B. die Modelle 21140 oder 21160.
- Erst Eignung des Schwenkarms zusammen mit Mikrofon prüfen.
- Rohrkombination stets sauber und trocken halten
- Durch Eindringen von Schmutz oder Flüssigkeiten in das Grundrohr
-kann die Bremswirkung beinträchtigt werden!
- Zur Reinigung und Pflege am besten ein leicht feuchtes Tuch und
-ein nicht scheuerndes Reinigungsmittel benutzen.
BENUTZERHINWEISE / FUNKTIONEN
TECHNISCHE DATEN / SPEZIFIKATIONEN
PRÜFEN, INSTANDHALTEN, REINIGEN
Material
Sockel/Haube: Stahl verzinkt/PA-schwarz
Rohre: Alu schwarz eloxiert
Kunststoffteile: PA, POM, PC, TPU
TraglastMikrofonierung
AbmessungenSockel ø 275 mm, Höhe 1055-1750 mm, 3/8" oder 5/8“
KartonB x T x H: 380 x 50 x 1000 mm; 3,4 kg
Gewicht3,0 kg
Zubehör
(nicht im Lieferumfang)
Mikrofonklammern 85040/50/55/60, Popkiller 23956/66
Mikrofonschienen 23550, 236 etc.
26250 Einhand-Mikrofonstativ
»Performance«
Stimmig in jeder Beziehung: Design, Bedienung, Zuverlässigkeit.
- Neuer größerer Rundsockel für mehr Standfestigkeit bei gleichzeitig
-geringerem Gewicht dank innovativer Werkstoffauswahl
-(Stahlkern umhüllt von gediegener Kunststoffabdeckung)
- Ein umlaufender Gummiring schützt den Boden (z.B. Parkett)
-selbst bei extrem zur Seite geneigtem Stativ und reduziert
-wirksam Vibrationen und unerwünschten Trittschall
- Mit stabiler Rohrkombination die per Einhandbedienung sanft,
-bequem und geräuschlos in der Höhe verstellt werden kann
- Mit Anschlussgewinde zur Befestigung von Mikrofonen,
-Mikrofonklammern oder Schwenkarmen:
-3/8" = Art.-Nr.: 26250-300-55
-5/8" = Art.-Nr.: 26250-500-55
Vielen Dank, dass Sie sich für dieses Produkt entschieden haben. Diese Anleitung
informiert Sie über alle wich ti gen Schritte bei Aufbau und Hand habung. Wir
empfehlen, sie auch für den späteren Gebrauch aufzubewahren.
A. AUFBAU
B. HÖHENVERSTELLUNG
C. BEFESTIGUNG
D. EINSATZ VON
D.SCHWENKARMEN
Haltekraft
im Gelenk
Product specificaties
| Merk: | Konig & Meyer |
| Categorie: | Statief |
| Model: | Performance 26250 |
Heb je hulp nodig?
Als je hulp nodig hebt met Konig & Meyer Performance 26250 stel dan hieronder een vraag en andere gebruikers zullen je antwoorden
Handleiding Statief Konig & Meyer

27 Maart 2024
27 Maart 2024
27 Maart 2024
5 Maart 2024
5 Maart 2024
5 Maart 2024
6 Juli 2023
5 Juli 2023
Handleiding Statief
Nieuwste handleidingen voor Statief
14 Juli 2026
14 Juli 2026
13 Juli 2026
13 Juli 2026
25 Juni 2026
22 Juni 2026
22 Juni 2026
6 Mei 2026
5 Mei 2026