Konig & Meyer Elegance 26200 Handleiding
Konig & Meyer Statief Elegance 26200
Bekijk gratis de handleiding van Konig & Meyer Elegance 26200 (12 pagina’s), behorend tot de categorie Statief. Deze gids werd als nuttig beoordeeld door 57 mensen en kreeg gemiddeld 5.0 sterren uit 7 reviews. Heb je een vraag over Konig & Meyer Elegance 26200 of wil je andere gebruikers van dit product iets vragen? Stel een vraag
Pagina 1/12
KÖNIG & MEYERGmbH & Co. KG
Kiesweg 2, 97877 Wertheim, www.k-m.de
26200-300-55/26200-500-55 Rev.07 03-80-194-00 9/12
SICHERHEITSHINWEISE
- Zur Aufnahme von Mikrofonen - nicht für andere Lasten bestimmt
- Dieses Stativ eignet sich insbesondere für Mikrofone die direkt oder per Klammer
-montiert werden; die Verwendung eines Armes ist nicht vorgesehen aber möglich;
-in diesem Falle hat der Nutzer durch geeignete Maßnahmen (z.B. Gegengewicht)
-für die Sicherheit der Installation zu sorgen
- Stahl-Rundsockel mit Kunststoffabdeckung 1mit Vorsicht handhaben, insbesondere
-bei der Montage nicht fallen lassen
- Beide Gewinde sind vor dem Einschrauben auf Beschädigungen hin zu prüfen; durch
-unsachgemäse Handhabung (z.B. Stöße) könnten Gewindegänge verformt werden
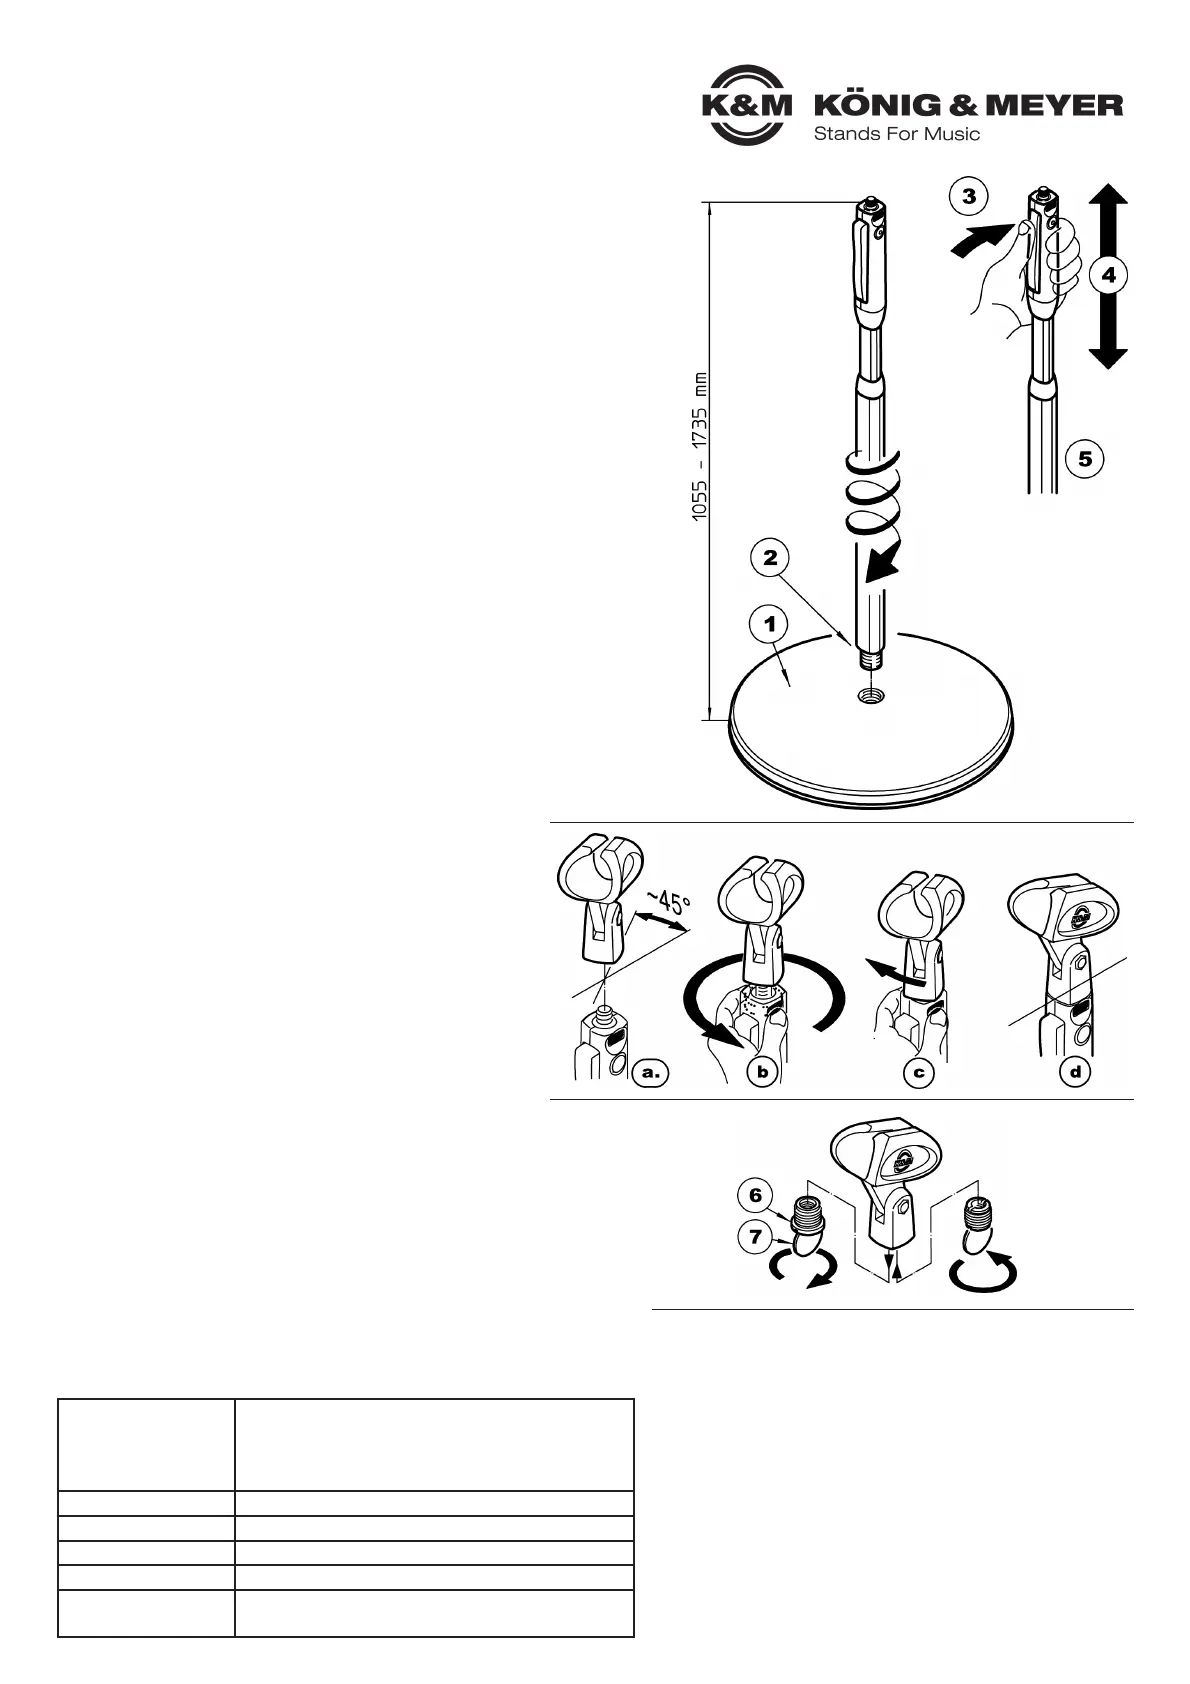
- Rohr 2bis zum Anschlag fest in Rundsockel 1schrauben
- BEACHTE: Auszugrohr NICHT GEWALTSAM an die obere bzw. untere Endlage
-anschlagen!
- Insbesondere beim Transport ist das Stativ am Grundrohr zu fassen nicht am Auszug!
- Auf ebenen Untergrund achten
AUFBAU
- Rundsockel 1auf Boden legen, Einschraubgewinde 2der Rohrkombination
-möglichst gerade ansetzen und bis zum Anschlag handfest einschrauben.
- Rohrkombination stets sauber und trocken halten
- Durch Eindringen von Schmutz oder Flüssigkeiten in das Grundrohr
-kann die Bremswirkung beinträchtigt werden!
- Zur Reinigung und Pflege am besten ein leicht feuchtes Tuch und
-ein nicht scheuerndes Reinigungsmittel benutzen.
BENUTZERHINWEISE / FUNKTIONEN
HÖHENVERSTELLUNG
Drücker 3betätigen, halten und Auszug 4bis zur
gewünschten Höhe aus dem Grundrohr 5herausziehen.
Sobald die Höhe erreicht ist, den Drücker 3einfach wieder loslassen.
MIKROFONKLAMMER mit Anschlußgewinde
TIPP Nr. 1: Wie bekommt man die Mikrofonklammer schön fest?
a. Klammer schräg zur Endposition ansetzen
b. Integriertes Rändel drehen bis die (nach wie vor schräg stehende)
b.Mikroklammer aufsitzt
c. Rändel festhalten und Mikrofonklammer durch Drehen im
c.Uhrzeigersinn nach vorne ausrichten.
d. So zieht sich das Gewinde fest und die Klammer sitzt wackelfrei.
TIPP Nr. 2: Eine Frage der Optik?
Viele Mikrofonklammern verfügen über ein Reduziergewinde
mit Bund 6dessen runde Form sich deutlich absetzt vom
viereckigen Design der Mikroklammer und des Bedienelements.
Wer einen formschönen Übergang ohne runden Bund bevorzugt,
kann die ursprüngliche Reduzierung durch das K&M-Modell 85040
ersetzen.
3/8"-5/8" REDUZIERGEWINDE
Mithilfe einer Münze 7kann die 3/8"-Reduzierung herausgeschraubt werden.
Das ist notwendig bei:
- einem WECHSEL: z.B. gegen K&M-Reduziergewinde 85040, siehe TIPP Nr.2
- NICHTGEBRAUCH: für Mikrostativ mit 5/8"-Gewindeanschluss
TECHNISCHE DATEN / SPEZIFIKATIONENPRÜFEN, INSTANDHALTEN, REINIGEN
Material
Sockel/Haube: Stahl verzinkt/PA-schwarz
Rohre: Aluprofile schwarz eloxiert
Griffschalen: Zink-Druckguß
Kunststoffteile: PA, POM, PC, TPU
TraglastMikrofonierung
AbmessungenSockel ø 275 mm, Höhe 1055-1735 mm, 3/8" oder 5/8“
KartonB x T x H: 380 x 50 x 1000 mm; 3,4 kg
Gewicht3,0 kg
Zubehör
(nicht im Lieferumfang)
Mikrofonklammern 85040/50/55/60, Popkiller 23956/66
Mikrofonschienen 23550, 236 etc.
26200 Einhand-Mikrofonstativ
»Elegance«
Avantgardistisch und elegant in Design und Funktion
- Neu: mit großem Sockel und schnittigen trilobularen Rohren
- Gediegenes, schlankes und sehr praktisches Bedienelement
- Bequeme und sanft gleitende Höhenverstellung
- Standfest und trittschallgedämpft: der Stahl-Rundsockel mit
-formschöner Kunststoffabdeckung bietet die perfekte Mischung
-aus Kippsicherheit, Unempfindlichkeit, Vibrationsarmut und
-schützt durch seinen umlaufenden Gummiring wirksam den Boden
- mit unverlierbarer Rändelschraube und 3/8" (5/8") Gewinde
Vielen Dank, dass Sie sich für dieses Produkt entschieden haben. Diese Anleitung
informiert Sie über alle wich ti gen Schritte bei Aufbau und Hand habung. Wir empfehlen,
sie auch für den späteren Gebrauch aufzubewahren.
K&M 85040
Reduziergewinde
3/8"-5/8"
(ohne Bund)
Product specificaties
| Merk: | Konig & Meyer |
| Categorie: | Statief |
| Model: | Elegance 26200 |
Heb je hulp nodig?
Als je hulp nodig hebt met Konig & Meyer Elegance 26200 stel dan hieronder een vraag en andere gebruikers zullen je antwoorden
Handleiding Statief Konig & Meyer

27 Maart 2024
27 Maart 2024
27 Maart 2024
5 Maart 2024
5 Maart 2024
5 Maart 2024
6 Juli 2023
5 Juli 2023
Handleiding Statief
Nieuwste handleidingen voor Statief
14 Juli 2026
14 Juli 2026
13 Juli 2026
13 Juli 2026
25 Juni 2026
22 Juni 2026
22 Juni 2026
6 Mei 2026
5 Mei 2026