Klark Teknik Vnet Interface Rack Mount Handleiding
Klark Teknik Speaker Vnet Interface Rack Mount
Bekijk gratis de handleiding van Klark Teknik Vnet Interface Rack Mount (7 pagina’s), behorend tot de categorie Speaker. Deze gids werd als nuttig beoordeeld door 39 mensen en kreeg gemiddeld 4.5 sterren uit 4 reviews. Heb je een vraag over Klark Teknik Vnet Interface Rack Mount of wil je andere gebruikers van dit product iets vragen? Stel een vraag
Pagina 1/7
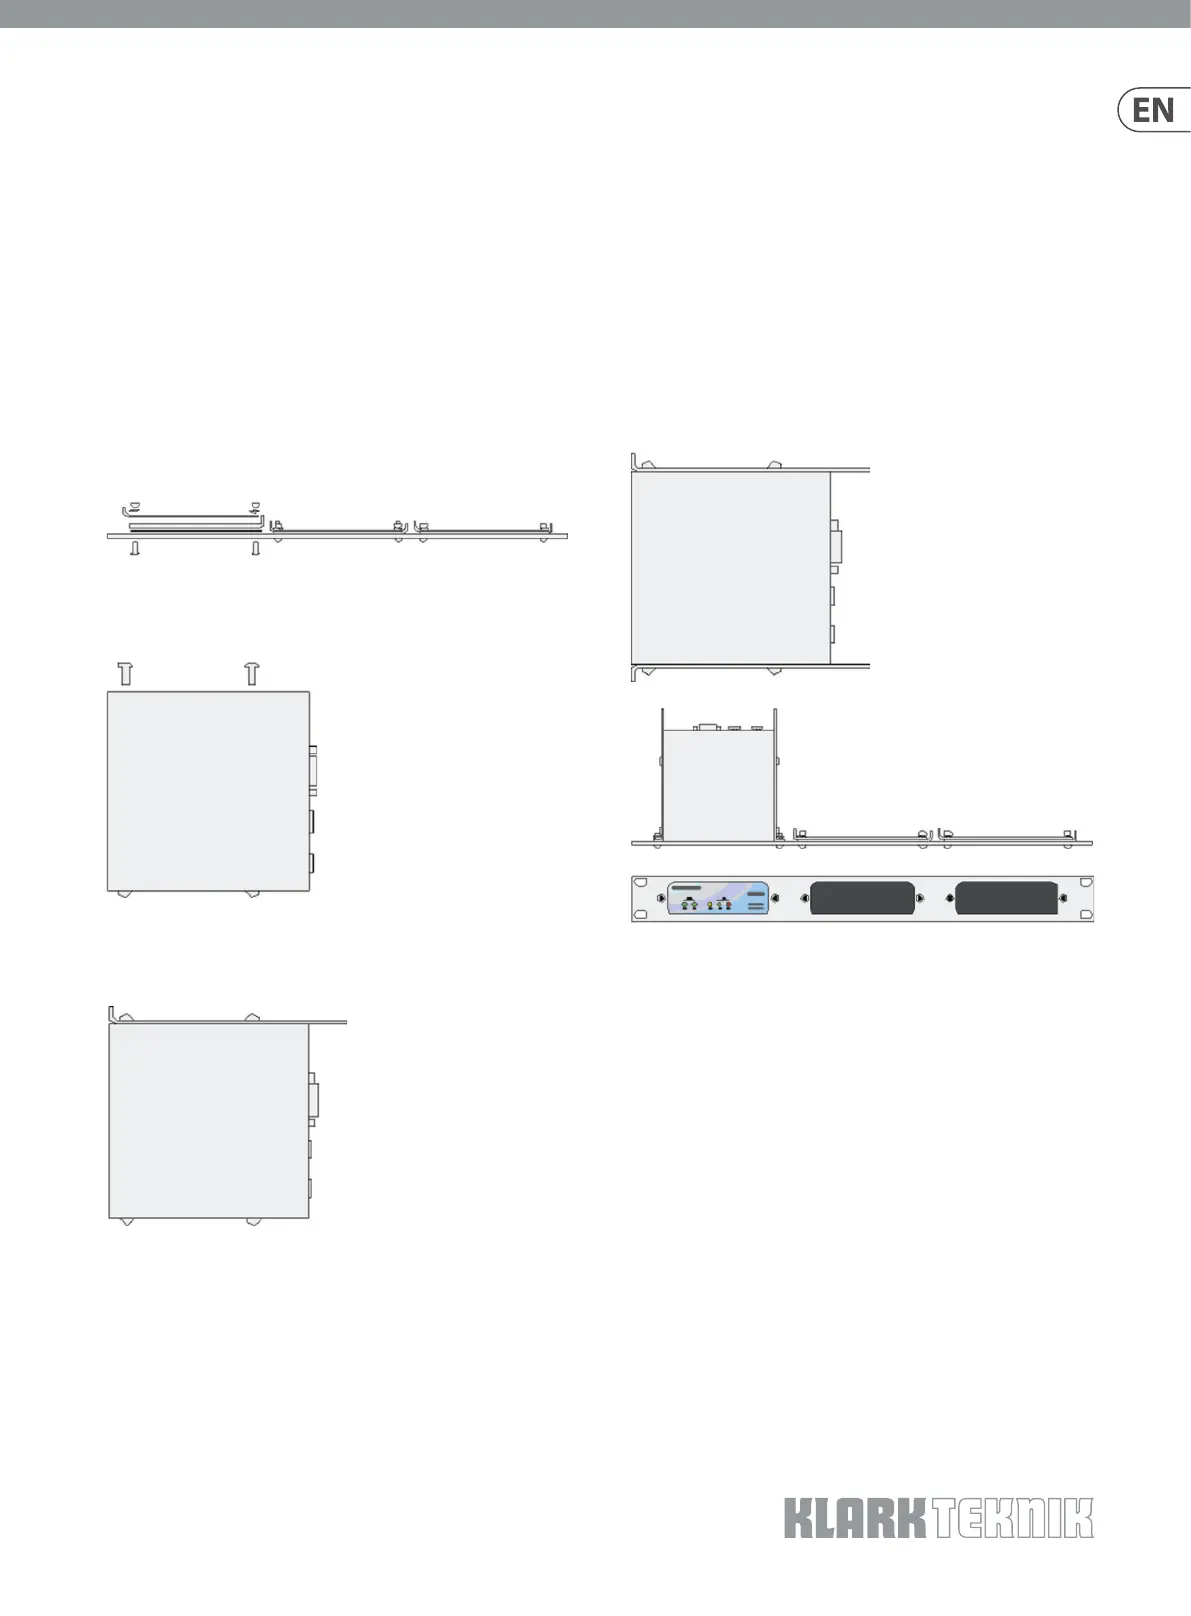
RACKING
To mount an Accessory in the Mounting Kit panel:
(1) Remove the two mounting brackets and blanking sheet from the
aperture in which you would like to install the accessory. Remove the two
nuts to disassemble the pieces, but keep the nuts, screws and washers
for reassembly.
(2) Remove the two screws from one side of the accessory.
(3) Using the two screws removed in step 2, attach one mounting bracket
loosely to the side of the accessory with the ‘ear’ towards the front,
pointing outwards.
(4) Repeat 2 and 3 for the other side. Push the lid towards the back of the
unit as far as it will go, then align the bracket ears with the front edge
of the lid. Tighten the screws to secure.
(5) Oer the accessory with its mounting brackets up to the reverse side of
the Mounting Panel, and x it in place using the two sets of screws,
washers and nuts removed in step 1.
Note that the holes at the rear ends of the brackets may be used as cable tie-o
points if desired.
LEGAL DISCLAIMER
Music Tribe accepts no liability for any loss which may be suered by any person who
relies either wholly or in part upon any description, photograph, or statement contained
herein. Technical specications, appearances and other information are subject to change
without notice. All trademarks are the property of their respective owners. Midas,
Klark Teknik, Lab Gruppen, Lake, Tannoy, Turbosound, TC Electronic, TC Helicon, Behringer,
Bugera, Oberheim, Auratone, Aston Microphones and Coolaudio are trademarks or
registered trademarks of Music Tribe Global Brands Ltd. © Music Tribe Global Brands Ltd.
2021 All rights reserved.
LIMITED WARRANTY
For the applicable warranty terms and conditions and additional information regarding
Music Tribe’s Limited Warranty, please see complete details online at musictribe.com/
warranty.
VNET INTERFACE RACK MOUNT
Quick Start Guide
GRAP-TMP-00065
V 1.0
Product specificaties
| Merk: | Klark Teknik |
| Categorie: | Speaker |
| Model: | Vnet Interface Rack Mount |
Heb je hulp nodig?
Als je hulp nodig hebt met Klark Teknik Vnet Interface Rack Mount stel dan hieronder een vraag en andere gebruikers zullen je antwoorden
Handleiding Speaker Klark Teknik

7 December 2024
3 Augustus 2023
3 Augustus 2023
3 Augustus 2023
3 Augustus 2023
3 Augustus 2023
3 Augustus 2023
3 Augustus 2023
Handleiding Speaker
Nieuwste handleidingen voor Speaker
17 Juni 2026
17 Juni 2026
17 Juni 2026
17 Juni 2026
16 Juni 2026
16 Juni 2026
16 Juni 2026
16 Juni 2026
16 Juni 2026
16 Juni 2026