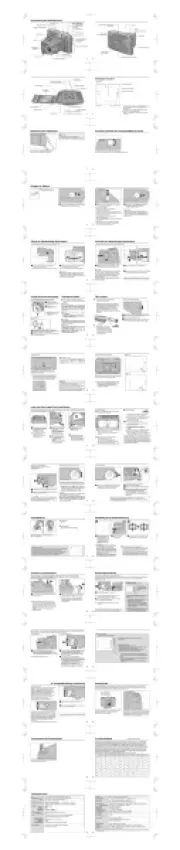
JVC ProHD GY-HM710 Handleiding
Bekijk gratis de handleiding van JVC ProHD GY-HM710 (141 pagina’s), behorend tot de categorie Camcorder. Deze gids werd als nuttig beoordeeld door 120 mensen en kreeg gemiddeld 4.9 sterren uit 60.5 reviews. Heb je een vraag over JVC ProHD GY-HM710 of wil je andere gebruikers van dit product iets vragen? Stel een vraag
Pagina 1/141
HD MEMORY CARD CAMERA RECORDER
GY-HM710U
© 2011 Victor Company of Japan, Limited LST1250-001A
Thank you for purchasing this JVC product.
Before operating this unit, please read this sheet and the instructions of the separate volume carefully to ensure the best possible
performance.
Please change the model number under [For Customer Use:] on the cover of the instructions of the separate volume to
“GY-HM710U” and take down the serial number.
Accessories and Dimensional Outline Drawing of GY-HM710U is the same as GY-HM750U in the specifications listed in the
instructions of the separate volume.
Functions may vary according to the model. The details are as follows.
TThe INT setting of IEEE1394 Interface Terminal Switch is invalid.
The specifications of the MENU changes to the following due to the differences in the functions listed above.
[RECORD Set Menu] Record Format Menu
[Camera Function Menu] Switch Set Item
[Camera Process Menu] Detail/ Adjust. . . Item
Configuring Setup Files
�Preset Setup Files (Page 117)
The scene file and picture file that are loaded according to different shooting conditions are as follows.
� : Provided : Not Provided-
GY-HM710U
GY-HM750U
GY-HM750CHU
GY-HM750E
GY-HM750CHE
Main Page
1280 × 720p
Recording & Playback -�
1440 × 1080 / 50i
Recording & Playback -�
1920 × 1080 / 50i, 25p
Recording & Playback -�
Variable Frame Rec Page 60-�
Dual Rec Page 57-�
Accessory Connection Terminal Page 15 Rear -�B
IEEE1394 Interface Terminal Switch INT / EXT INT / EXTTPage 14
Side Terminal H
Item Setting Value Page
Camera Resolution 1920 × 1080
1440 × 1080
720 × 480
Page 75
Frame & Bit Rate
When [Camera Resolution] is
“1440 × 1080”
60i(HQ)
60i(SP)
When [Camera Resolution] is
“1920 × 1080”
60i(HQ)
30p(HQ)
24p(HQ)
Item Setting Value Page
AE LEVEL AE LEVEL
Disable Page 80
Item Setting Value Page
V Frequency Not displayed Page 84
Scene file [CINEMA 1080/24p]
Picture file [CINEMA]

1
1
●
●
●
2
( )R
●
● •
•
●
3 ( )R
●
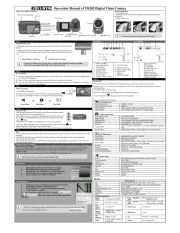
SYSTEM DIAGNOSIS
When this unit is turned on for the first time
after purchase, initial configuration through
[SYSTEM DIAGNOSIS] starts.
1 Set the [POWER] switch to “ON”.
●The initial screen appears.
Memo :
●It is recommended to use an AC adapter for
power supply.
●Make sure that the lens cap is attached.
2 After checking that the lens cap is
attached, press the set button (R).
●Diagnosis starts.
●During execution, “•” changes to “>”.
Diagnosis is complete when all “•” have
changed to “>”.
Memo :
●The diagnosis takes about 6 minutes to
complete. Do not operate this unit or turn off
the power during execution.
3 After the completion screen appears,
press the set button (R).
●The [Initial Setting] screen appears.
For details on [Initial Setting], refer to the
instructions manual.
SYSTEMDIAGNOSE
Wenn Sie dieses Gerät nach dem Erwerb zum
ersten Mal einschalten, beginnt die
Ersteinstellung mit einer [SYSTEM
DIAGNOSIS].
1 Stellen Sie den [POWER]-Schalter auf
ON.
●Der Startbildschirm wird angezeigt.
Notiz:
●Wir empfehlen, für die Stromversorgung ein
Netzteil zu benutzen.
●Vergewissern Sie sich, dass die
Objektivabdeckung angebracht ist.
2 Nachdem Sie sich davon überzeugt
haben, dass die Objektivabdeckung
angebracht ist, betätigen Sie die
Einstellungstaste (R).
●Die Diagnose beginnt.
●Während der Diagnose verändert sich das
Symbol zu >. Die Diagnose ist •
abgeschlossen, wenn für alle das Symbol •
> angezeigt wird.
Notiz:
●Der Diagnosevorgang dauert etwa 6
Minuten. Benutzen Sie das Gerät während
der Diagnose nicht und schalten Sie es nicht
aus.
3 Wird der Endbildschirm angezeigt,
betätigen Sie die Einstellungstaste (R).
●Der Bildschirm [Initial Setting] wird
angezeigt.
Einzelheiten zu [Initial Setting] finden Sie in der
Dokumentation.
DIAGNOSTIC DU SYSTÈME
Lorsque cette unité est allumée pour la
première fois après lachat, la configuration
initiale via [SYSTEM DIAGNOSIS] démarre.
1 Réglez le sélecteur [POWER] sur ON.
●Lécran initial saffiche.
Memo :
●Il est recommandé dutiliser un adaptateur
AC pour lalimentation électrique.
●Assurez-vous que le capuchon dobjectif est
fixé.
2 Après avoir vérifié que le capuchon
dobjectif est fixé, appuyez sur le bouton
de réglage (R).
●Le diagnostic commence.
●Pendant lexécution les se transforment •
en >. Le diagnostic est terminé lorsque
tous les sont devenus des >.•
Memo :
●Le diagnostic dure environ 6 minutes.
Pendant lexécution, ne faites pas
fonctionner pas cette unité et ne coupez pas
lalimentation.
3 Une fois que lécran final saffiche,
appuyez sur le bouton de réglage (R).
●Lécran [Initial Setting] saffiche.
Pour de plus amples détails concernant [Initial
Setting], reportez-vous au manuel
dinstructions.
- - - Y TEM DIAGNO I - - -S S S S
PLEA E EXECUTE DIAGNO IS S S
ON U ING AT FIR T.S S
FIT LEN CAP!S
THE TIME I ABOUT 6 MIN.S
PU H ET BUTTONSS
- - - SYSTEM DIAGNOSIS - - -
DIAGNOSING . . .
PLEASE DO NOT REMOVE
LENS CAP
>>>>>>>>>>
- - - Y TEM DIAGNO I - - -S S S S
COMPLETE
PU H ET BUTTONSS
Initial Screen/
Startbildschirm/Écran initial
Execution Screen/
Ausführungsbildschirm/Écran dexécution
Completion Screen/
Endbildschirm/Écran final
[Initial Setting] Screen/
[Initial Setting]-Bildschirm/
Écran de [Initial Setting]
ENGLISH
DEUTSCH
FRANÇAIS

HD MEMORY CARD CAMERA RECORDER
GY-HM750U
GY-HM750CHU
GY-HM750E
GY-HM750CHE
INSTRUCTIONS
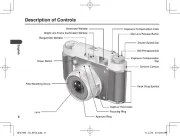
* The illustration shows the GY-HM750E with the supplied viewfinder, microphone and lens attached.
* GY-HM750CHU/GY-HM750CHE does not come with a lens.
For Customer Use:
Enter below the Serial No. which is located on the body.
Retain this information for future reference.
Model No. GY-HM750U/GY-HM750CHU
Serial No.
Please read the following before getting started:
Thank you for purchasing this JVC product.
Before operating this unit, please read the instructions
carefully to ensure the best possible performance.
In this manual, each model number is described without the last letter
(U/E) which means the shipping destination. (U: for USA and Canada,
E: for Europe)
Only “U”models (GY-HM750CHU/GY-HM750U) have been evaluated by
UL.
LST1190-001A
Product specificaties
| Merk: | JVC |
| Categorie: | Camcorder |
| Model: | ProHD GY-HM710 |
Heb je hulp nodig?
Als je hulp nodig hebt met JVC ProHD GY-HM710 stel dan hieronder een vraag en andere gebruikers zullen je antwoorden
Handleiding Camcorder JVC

2 Juli 2023

19 Juni 2023

7 Juni 2023

6 Juni 2023

23 Mei 2023

22 Mei 2023

21 Mei 2023

20 Mei 2023

20 Mei 2023

19 Mei 2023
Handleiding Camcorder
- Salora
- T'nB
- Overmax
- Ion
- Blackmagic Design
- Maginon
- Kyocera
- Abus
- Contour Design
- Contax
- Panasonic
- Sencor
- Goclever
- Vivitar
- SJCAM
Nieuwste handleidingen voor Camcorder
8 September 2025
1 September 2025
6 Augustus 2025
9 Juli 2025
9 Juli 2025
6 Juli 2025
5 Juli 2025

5 Juli 2025
4 Juli 2025
17 Juni 2025