Homedics BPW-800BT Handleiding
Homedics Niet gecategoriseerd BPW-800BT
Bekijk gratis de handleiding van Homedics BPW-800BT (6 pagina’s), behorend tot de categorie Niet gecategoriseerd. Deze gids werd als nuttig beoordeeld door 18 mensen en kreeg gemiddeld 5.0 sterren uit 9 reviews. Heb je een vraag over Homedics BPW-800BT of wil je andere gebruikers van dit product iets vragen? Stel een vraag
Pagina 1/6
The appearance of the icon indicates that a pulse irregularity consistent with an
irregular heartbeat was detected during measurement. Usually this is not a cause
for concern. However, if the symbol appears often, we
recommend you seek medical advice. Please note that the
device does not replace a cardiac examination, but serves
to detect pulse irregularities at an early stage. Movement,
shaking or talking during the measurement can result in
pulse irregularities that may cause the appearance of this
icon. Therefore, it is of great importance to not move or
talk during measurement. To determine the presence of an
irregular heartbeat, the average of the heartbeat intervals
is calculated with the first 3 normal effective heartbeat
values. It is important to note that the average is not a strict
mathematical averaging of all recorded intervals. At least
3 beats with 25% or greater difference from the average
heartbeat interval will generate the
icon on the screen.
IMPORTANT INFORMATION: This blood pressure monitor is not designed for use
by people with arrhythmias nor for diagnosing or treating an arrhythmia problem.
As a safeguard, we recommend that if you have arrhythmias such as atrial or
ventricular premature beats and atrial fibrillation or any other special conditions
you should check with your physician before using your blood pressure monitor.
INSTALLING BATTERIES
1. The battery cover is located on the back of the monitor.
Remove battery cover by pressing down and pulling away from
the monitor (Fig. 1).
2. Install or replace batteries according to the polarity indications
inside the compartment (Fig. 2).
NOTE: For easy battery removal, place batteries on top of the
ribbon located inside of the battery compartment.
3. Replace the cover by inserting it back into place (Fig. 3).
Replace the batteries if:
The low battery symbol appears. When any button is pressed and
nothing is displayed on the screen.
NOTE:
• If batteries are removed or replaced, the date and time will need
to be reset either manually or automatically using your Bluetooth
®
mobile device.
• Replace all batteries at one time (as simultaneous set). Use only
1.5V “AAA” alkaline batteries. DO NOT mix alkaline, standard
(carbon zinc) or rechargeable (cadmium) batteries.
• When the batteries are removed, the measurement values stored
in memory are retained. However, the date and time must be reset.
• Remove batteries when unit is not in use for extended periods of time.
• Clean contacts on battery and in battery compartment with a soft, dry cloth
each time you install batteries.
• Remove depleted batteries from the unit promptly. Dispose of used batteries
safely.
• Batteries are hazardous waste. DO NOT dispose of them together with the
household garbage.
• DO NOT dispose of batteries in fire. Batteries may explode or leak.
• Recycle or dispose of properly in accordance with local, state, province, and
country regulations.
• Keep batteries away from children.
• Batteries are small objects and could be ingested. If swallowed, contact a
physician at once.
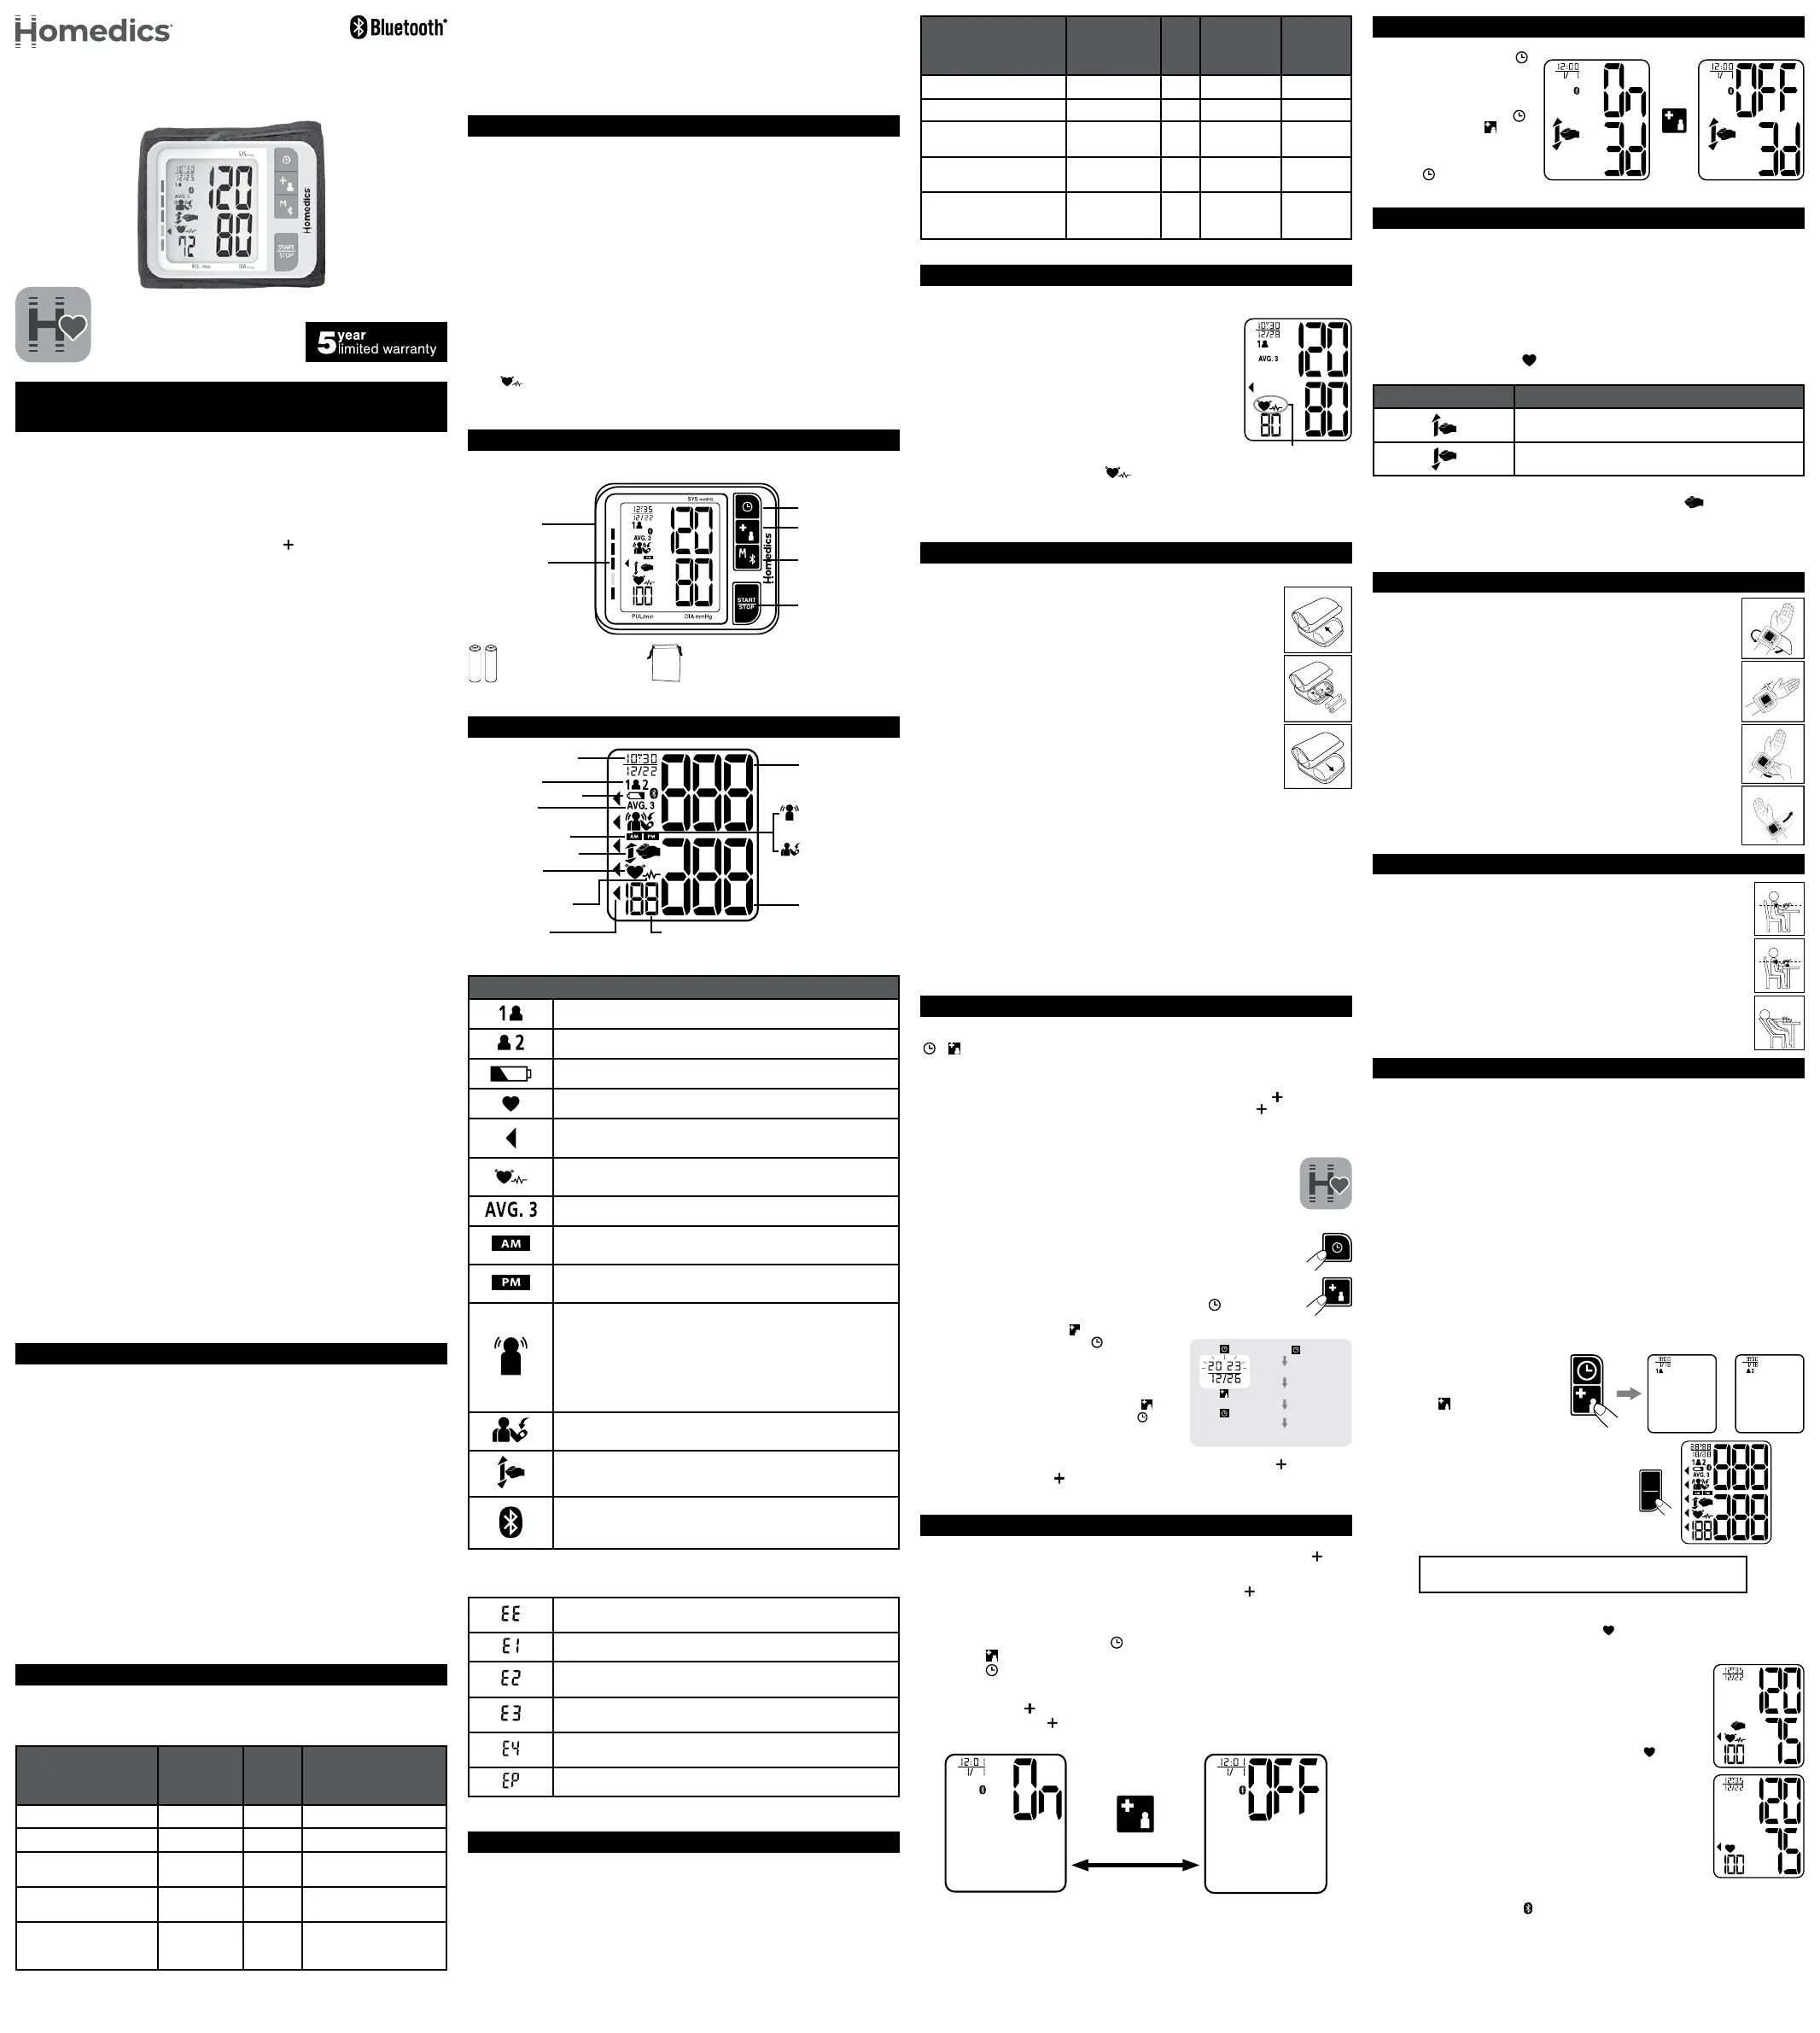
DATE & TIME SET PROCEDURE
Date and time can be set by two methods; either sync automatically using your
Bluetooth
®
mobile device, or set manually using the DATE/TIME and SET buttons
(
& ) on the monitor. If setting the date and time by syncing with your mobile
device, it is important that this is done prior to taking any measurements to ensure
the date and time are accurate.
To set using your device with Bluetooth
®
wireless technology:
1. Before taking the first measurement, open the Homedics Healthapp on your
device. If you have not already installed the Homedics Healthapp onto your
device, it is available to download on the App Store
®
and on Google Play™.
Make sure you have the app downloaded and open on your mobile device
before trying to sync the Date & Time. Make sure the Bluetooth is on your
mobile device and your App is open.
2. Follow the prompts in the app to select your device, sync to the app,
and auto set the date & time.
NOTE:
• Once the date and time have been successfully synced, future readings
will automatically have the correct date and time.
• If you are having trouble automatically syncing the date and time, make
sure Bluetooth
®
is ON on your device and ON on the blood pressure
monitor.
To set manually:
1. To set the date and time, in standby mode, press the
button.
2. The display will show a blinking number showing the YEAR. Change
the YEAR by pressing the
button. Each press will increase the number by one
in a cycling manner. Press the button again
to confirm the entry, and the screen will show a
blinking number representing the MONTH.
3. Change the MONTH, DAY, HOUR and MINUTE
and select OFF, or leave ON Bluetooth
function, as described above, using the
button to change the numbers and the
button to confirm the entries.
NOTE:
• The date and time will only need to be set
manually if the monitor will not be used with the Homedics Health
app.
• If the Homedics Health
app is used after manually setting the date and time on
the blood pressure monitor, the date and time on the mobile device will override
the date and time on the blood pressure monitor.
BLUETOOTH
OPERATION
This monitor has Bluetooth® function ON for your convenience.
This will allow your readings to automatically transmit to the Homedics Health
app.
By turning this function OFF, the measurements cannot be transmitted. Before
attempting to sync the device with your smart device and the monitor, and make
sure your Bluetooth-enabled device had the Homedics Health
app downloaded
and open.
Turning Bluetooth
®
Function ON/OFF:
1. After setting the year, date and time (please refer to the setting year, date and
time section), users can press the button to enter the Bluetooth® function.
2. Press the
button to turn the Bluetooth
®
function ON or OFF.
3. Press the
button to switch to Wrist Position Guide setting.
NOTE:
• When Bluetooth
®
is OFF, measurements cannot be transmitted to the
Homedics Health app.
• The Homedics Health
app must be open on your mobile device in order to
establish a connection with the monitor.
Bluetooth
®
function OFF
Bluetooth
®
function ON
Press
button
• Be sure to select the correct User on the monitor before your blood pressure
measurements begins.
• Bluetooth® data transmission is not available under measurement.
WRIST POSITIONING GUIDE SETTINGS
NOTE: By default, the Wrist Positioning Guide is ON.
In standby mode, press the
button. The device will enter to
setting YEAR, DATE, MONTH,
HOUR, MINUTE and Bluetooth
®
function first. When these
setting are done, press the
button again, use the
button
to turn the Wrist Positioning
Guide ON and OFF.
When the settings are complete,
press the
button to confirm
the entries.
The device will switch to standby mode and is ready to measure.
WRIST POSITIONING GUIDE
• This model has a built-in Wrist Positioning Guide function used as an aid to help
the user determine if the device is at the appropriate height.
• When using wrist blood pressure monitors, it is important to take the
measurement while relaxing your wrist at heart level. This will help ensure an
accurate reading will be taken. Because it is difficult to find the ideal location
for a wrist measurement, we have included an optional Wrist Positioning Sensor
that will assist in directing your wrist to the ideal location for a blood pressure
measurement.
• After you press START/STOP button, the display will illuminate with different
icons that are designed to help you move your wrist. Once the appropriate height
is found, the Pulse Symbol
will flash and measurement will begin. Keep your
arm still until measurement is completed.
SymbolAction
Move your wrist up.
Move your wrist down.
NOTE: Even if the monitor is not in the ideal position after 10 seconds, the
measurement will still begin. If this occurs, the wrist symbol
will appear and be
stored in the memory with the measurement.
NOTE: Due to the differences in individual sizes and physique, this feature may
not be helpful in all cases and you may wish to turn this feature OFF. If you feel the
suggested wrist position does not match your heart level, please turn this feature
OFF and consult your health care provider.
APPLYING THE CUFF
1. Remove all watches, wrist jewelry, etc. prior to attaching the wrist
monitor. Clothing sleeves should be rolled up and the cuff should
be wrapped around bare skin for correct measurements.
2. Apply cuff to left wrist with palm facing up as shown in Fig. A.
3. Make sure the edge of the cuff is about 0.4″ (10mm) from the palm
as shown in Fig. B.
4. In order to ensure accurate measurements, fasten the hook and
loop strap securely around your wrist so there is no extra space
between the cuff and the wrist as shown in Fig. C. If the cuff is
not wrapped tight enough, the measurement values will not be
accurate.
5. If your physician has diagnosed you with poor circulation in your
left arm, place the cuff around your right wrist as shown in Fig. D.
NOTE:
• This device should not be used when your wrist is wounded or
injured.
• If it is not possible to use the cuff on your left wrist, it can also be used
on your right wrist. However, all measurements should be made using
the same wrist. If the cuff does not stop inflating, unwrap the cuff at
once.
CORRECT MEASUREMENT POSTURE
It is extremely important that the cuff be at the same height as the
heart. Having the cuff higher or lower may cause inaccurate results.
1. Place your elbow on a table so that the cuff is at the same level as
your heart as shown in Fig. 1. Relax your entire body, especially
between your elbow and fingers.
NOTE: Your heart is located slightly below your armpit.
2. If the cuff is not at the same level as your heart or if you cannot keep
your arm completely still throughout the reading, use a soft object
such as a folded towel to support your wrist as shown in Fig. 2.
3. Turn your palm upwards.
4. Sit upright in a chair, and take 5–6 deep breaths.
NOTE: Avoid leaning back while the measurement is being taken as
shown in Fig. 3.
MEASUREMENT PROCEDURE
NOTE:
• Position the monitor at the same level as your heart during measurement to
ensure accurate readings.
• Blood pressure changes with every heartbeat and is in constant fluctuation
throughout the day.
• Blood pressure measurement can be affected by the position of the user, his or
her physiologic condition and other factors.
Before Measurement:
To help ensure an accurate reading, follow these instructions before taking a
measurement:
• Wait 30 minutes after exercising, bathing, eating, drinking beverages with
alcohol or caffeine, or smoking to measure blood pressure.
• Sit quietly and rest for 5 minutes.
• Empty your bladder, as a full one can temporarily raise blood pressure.
• Stress raises blood pressure. Avoid taking measurements during stressful times.
• Take your reading in a comfortable environment as measurements can be
affected by hot or cold temperatures. Take your blood pressure at normal body
temperature.
During Measurement:
• DO NOT talk or move your arm or hand muscles.
• DO NOT cross your legs. Sit with
feet flat on the floor.
• DO NOT touch cuff or monitor
during measurement.
1. Press the
button to choose
User 1 or User 2. To exit, press the
START/STOP button to switch to
Sleeping Mode.
2. With the cuff wrapped around your wrist,
press the START/STOP button. DO NOT start
the measurement process unless the cuff
is wrapped around your wrist. All digits will
light up, checking the display functions. The
checking procedure will be completed after
about 3 seconds.
BPW-800BT-WT
BPW-800BTA-WT
Doc # L-03001, Rev.3
700 series automatic
wrist blood pressure monitor
IMPORTANT PRODUCT NOTICES
AND SAFETY INSTRUCTIONS
When using your blood pressure monitor, basic precautions should always be
followed. Please read and follow all instructions and warnings before using this
product. Savethese instructions for future reference.
Measurement position is on human being’s wrist. This device is intended for over-
the-counter home use in adults aged 18 years and older with a wrist circumference
ranging from 5.3 inches to 7.7 inches (approx. 135 mm to 195 mm). This device
features a built-in “Bluetooth
®
Data Transmission” function, which enables the
device to automatically transmit measuring results to a paired Bluetooth-enabled
device. This function allows users to synchronize to current date and time, and
check the battery status with the Homedics Health
app.
• Please note that this is a home health care product only and this manual and
device are not intended to serve as a substitute for the advice of a physician or
medical professional.
• This device uses oscillometric method to measure systolic and diastolic blood
pressure, as well as heart rate.
• DO NOT use this device for diagnosis or treatment of any health problem or
disease. Measurement results are for reference only. Consult a health care
professional for interpretation of pressure measurements. Contact your
physician if you have or suspect any medical problem. DO NOT change your
medications without the advice of your physician or health care professional.
• This product is not suitable for people with arrhythmias.
• Excessive use may result in blood flow interference, which is likely to cause
uncomfortable sensations, such as partial subcutaneous hemorrhage, or
temporary numbness to your wrist. In general these symptoms should not last
long. However, if you continue to experience these sensations, please seek
advice from a medical professional.
• We recommend using the same wrist (preferably the left wrist) and measuring
around the same time each day.
• Perform measurements in a quiet and relaxed environment at room temperature.
• DO NOT move or shake the device during a measurement. Please keep quiet and
DO NOT talk during measurements.
• This product is not suitable for:
–Pregnant women
–People with arrhythmias
–People undergoing intravenous injection on any limb
–People currently in a dialysis treatment
–Pregnant women in preeclampsia condition
• For those who have had a mastectomy or lymph node clearance, it is
recommended to take a measurement on the unaffected side.
• This device may have difficulty determining proper blood pressure for pregnant
women and for users with irregular heartbeat, diabetes, liver disease, kidney
disease, poor circulation of the blood or for users who have suffered a stroke.
Please consult your health care professional before using this device.
• When used along with other electronic medical equipment on the same
limb, pressurization of the cuff may cause the other devices to temporarily
malfunction.
• The pulse display is not suitable for checking the frequency of heart pacemakers.
• Electromagnetic interference: This device contains sensitive electronic
components. Avoid strong electrical or electromagnetic fields in the direct
vicinity of the device (e.g. cell phones, microwave ovens). These may lead to
temporary impairment of measurement accuracy.
• Consider the electromagnetic compatibility of the device (ex. power
disturbance, radio frequency interference, etc.). Please use this device in a home
health care environment only.
• Use blood pressure monitor only for its intended use.
• DO NOT wrap the cuff around body parts other than your wrist.
• The patient is an intended operator.
• The applied part is the cuff.
• DO NOT use this device on infants, children, or those who cannot express their
own intention.
• Blood pressure measurements determined with this device are equivalent to
those obtained by a trained observer using the cuff/ stethoscope auscultatory
method within the limits prescribed by the American National Standard, manual,
electronic, or automated sphygmomanometers.
• Please rest for at least 5-10 minutes before taking a measurement.
• To allow your blood vessels to return to the condition prior to taking the
measurement, please wait at least 3-5 minutes between measurements. You may
need to adjust the wait time according to your personal physiological situation.
• Wait 30-45 minutes before measurement if you’ve just consumed caffeinated
beverages or smoked cigarettes.
• In the event that the device needs to be checked for calibration, contact
the distributor.
ABOUT BLOOD PRESSURE
What is blood pressure?
Blood pressure is the measurement of the force exerted on the artery walls while
blood flows through the arteries. The pressure measured when the heart contracts
and sends blood out of the heart is systolic (highest) blood pressure. The pressure
measured when the heart dilates with blood flowing back into the heart is called
diastolic (lowest) blood pressure.
Why measure your blood pressure?
Among today’s various health problems, those associated with high blood pressure
are very common. High blood pressure dangerously correlates with cardiovascular
diseases. Therefore, blood pressure monitoring is important for identifying those
at risk.
Why do my readings vary?
Blood pressure is a body parameter that is subject to normal variations throughout
the day. A single reading that is different from yours or your doctor’s readings are
not necessarily inaccurate. The average of several readings, taken under similar
conditions, using the same arm is preferred for accurate blood pressure readings.
Why are my readings different than those taken at my doctor's office?
Having one's blood pressure measured by a doctor in a hospital or a clinic is often
associated with an event called “White Coat Hypertension” where the patient
becomes nervous or anxious, thus raising the blood pressure. There are also
numerous other factors that might cause your blood pressure to be raised at a
specific time of day. This is why medical physicians recommend home monitoring
as it is important to get readings of blood pressure during different times of the day
to really get an idea of your real blood pressure.
BLOOD PRESSURE STANDARD
The table below contains defined levels for hypertension that are publicly available
from the American Heart Association
®
(AHA 2017).
Users can compare their own blood pressure readings against these defined levels
to determine if they may be potentially at increased risk.
Blood Pressure
Category
Systolic
mm Hg
(upper
number)
Diastolic
mm Hg
(lower
number)
Normal<120and<80
Elevated120–129and<80
High Blood Pressure
(hypertension) Stage 1
130–139or80–89
High Blood Pressure
(hypertension) Stage 2
≥140or≥90
Hypertension Crisis
(consult your doctor
immediately)
>180and/or>120
*Source: American Heart Association
®
(AHA) 2017
Fig. 1
Fig. 2
(X)
Fig. 3
Systolic Pressure
Irregular Heartbeat
Detector
Diastolic Pressure
Date/Time Indicator
User Symbol
Low Battery Symbol
Average of 3
Measurements
Wrist Position Guide
AM/PM Averaging
Pulse Symbol
Risk Category
Indicator Bar
Heart Rate
1. Excessive
Body Motion
Detector
2. Cuff Fitness
Detection
Irregular Heartbeat
Detector
Press
button
START
STOP
Blinking YEAR
Increasing YEAR
Confirm the Entry
Press
Repeat Process to set MONTH, DAY, HOUR, and MINUTE
and select OFF, or leave ON Bluetooth function.
Fig. A
Fig. C
Fig. D
Fig. B
0.4"(10mm)
Blood Pressure
Category
Systolic
mm Hg
(upper
number)
Diastolic
mm Hg
(lower
number)
Indicator
Color
NormalLess than 120andLess than 80Green
Elevated120–129andLess than 80Yellow
High Blood Pressure
(hypertension) Stage 1
130–139or80–89Red
High Blood Pressure
(hypertension) Stage 2
140 or Higheror90 or HigherRed
Hypertension Crisis (consult
your doctor immediately)
Higher than 180
and/
or
Higher than
120
Red
*Source: American Heart Association
®
(AHA) 2017
IRREGULAR HEARTBEAT DETECTOR
Display Symbol Explanations:
User 1: Appears when the monitor is operated by User 1.
User 2: Appears when the monitor is operated by User 2.
Low Battery Symbol: Appears when battery power is
excessively low, or the polarities are reversed.
Pulse Symbol: Shows the heart rate per minute. Once pulse is
detected, the symbol flashes with each pulse beat.
Risk Category Index: The arrow points out the specific Risk
Category that your measurement reading falls in. See Risk
Category Index section for more information.
Irregular Heartbeat Detector: Appears when an irregular heart
beat was detected. See Irregular Heartbeat Detector section for
more information.
Memory Average: This symbol appears when LCD displays
average value of last 3 readings.
AM Averaging: Indicates the reading being displayed is an
average from the last 3 mornings measurements. AM is defined
as 4:00 AM – 12:00 PM.
PM Averaging: Indicates the reading being displayed is an
average from the last 3 evening measurements. PM is defined as
6:00 PM – 2:00 AM.
Excessive Body Motion Detector: Displayed if body movement
is detected during measurement, especially, the movement
on the arm the blood pressure monitor is worn on. If the cuff is
worn improperly, or the shape of the upper arm is unusual (for
example, the circumference of the upper arm differs largely from
the circumference of the forearm), excessive gap might exist
between the arm cuff and the arm.
NOTE: The measured blood pressure reading may not be
accurate if the icon is displayed.
Cuff Fitness Detection: Displayed if the cuff was wrapped
incorrectly, which is too tight or too loose. This is the function aid
in detecting if the cuff is wrapped properly.
Wrist Positioning Guide: The Wrist Position Guide is used as an
aid in determining if the device is at the appropriate angle and
height. See Wrist Positioning Guide section for more information.
Bluetooth
®
Symbol: LCD displays this symbol when Bluetooth
®
is active and data is transmitting to your mobile device.
If any of the following letters and numbers appear in the area that systolic
pressure should be displayed, an error has occurred with your reading. See
Troubleshooting section of this manual for more information.
Measurement Error: Wrap the cuff correctly and keep wrist
steady during measurement. Measure again.
Air Circuit Abnormality: Measure again.
Pressure Exceeding 300 mmHg: Switch the unit off to clear,
then measure again.
Error Determining Measurement Data: Rewrap cuff properly,
keep steady, and measure again.
Data Transmission Error: Monitor cannot connect to the
mobile device to transmit data. Make sure Bluetooth
®
is ON.
System Error: Contact Consumer Relations.
Memory Recall/
Bluetooth® Button
Start/Stop
Button
LCD Display
Date/Time Set
Button
Set/User Select
Button
Risk Category
Indicator
Accessories For Unit:
(2) “AAA” “LR03” (1.5V)
Alkaline Batteries
Storage Bag
If you are using this blood pressure monitor for the rst
time, please remove the protective lm from the screen.
3. Adjust the position of your wrist according to the Wrist Positioning Guide
symbol that appears on the display. When the device senses that your wrist is in
the appropriate height, the Pulse Symbol
will flash with beep sound 3 times
and measurement will begin.
NOTE: When the Wrist Positioning Guide Function is turned OFF, this
instruction will not appear.
4. Even if the monitor is not in the ideal position after 10
seconds, the measurement will still begin. If this occurs, the
wrist symbol will appear and be stored in the memory with
the measurement.
5. As the cuff inflates, the monitor automatically determines
your ideal level. This monitor detects your blood pressure
and pulse rate during inflation. The Pulse Symbol
flashes
at every pulse beat. Remain still and DO NOT move until
the entire measurement process is completed. The device
will detect your pulse and determine the blood pressure.
6. After the monitor has determined your blood pressure and
heart rate, the cuff automatically deflates. Your systolic
rate, diastolic rate, heart rate, corresponding Risk Category
Indicator, Irregular Heartbeat Detector, Excessive Body
Motion Detector and Wrist Positioning Guide (if any) are
displayed with date and time for 1 minute and save results
to memory automatically.
7. If Bluetooth is connected successfully to the device and
the App is open, the device will activate the Bluetooth function automatically
and the Bluetooth symbol
will flash on the screen. If the monitor cannot be
connected to paired Bluetooth-enabled device over 45 seconds, the LCD will
display the Error message “E4” and Bluetooth will be turned off.
NOTE:
• This monitor automatically turns off approximately 1 minute after last operation.
You may also press the START/STOP button to turn the unit off.
• To interrupt the measurement, you may press the START/STOP button. The cuff
will deflate immediately after this button is pressed.
Fig. 1
Fig. 2
Fig. 3
Blood pressure tends to go up and down, even in people who normally don’t have
high readings. If your numbers stay above the normal range most of the time, you
may be at increased risk and should consult your physician. Although one can
easily find where their own blood pressure readings fall on this table, this monitor
comes equipped with a Risk Category Indicator that automatically compares each
reading to the defined levels and provides a helpful cue if your reading falls into
one of the stages that could potentially indicate increased risk.See Risk Category
Index section for more information on this feature.
HOW THIS BLOOD PRESSURE MONITOR WORKS
This monitor uses SmartMeasure® inflation technology to detect your blood
pressure. With one touch of the start/stop button, the monitor will turn on and
the inflation will automatically start, creating pressure around the arteries inside
the wrist. Within the cuff is a gauge which senses the fluctuations (oscillations) in
pressure. The fluctuation measured represents the degree of intensity that your
arteries are contracting with each heartbeat, which is also a result of the pressure
that the cuff has placed on the wrist. The monitor measures these contractions and
converts the information to a digital value. Once the measurement is complete,
the cuff will automatically deflate, and the result is displayed on the screen.
To help guide your wrist into the ideal position, this blood pressure monitor
comes equipped with an optional wrist positioning guide to help you take an
accurate blood pressure reading. Please see wrist position guide section for more
information on this feature. Please note that any muscle movement during inflation
will cause measurement error. When measurement is complete, the monitor will
display your systolic pressure, diastolic pressure, and pulse readings. The monitor
automatically finds where your measurement results fall on the American Heart
Association
®
(AHA 2017) table and provides a cue if your reading falls into one
of the stages that could potentially indicate increased risk. Please see the Risk
Category Index section for more information on this feature. The appearance
of the icon indicates that a pulse irregularly consistent with an irregular
heartbeat was detected during measurement. Refer to Irregular Heartbeat
Detector section for more information on this feature.
NAME/FUNCTION OF EACH PART
DISPLAY SYMBOL EXPLANATIONS
RISK CATEGORY INDEX
This monitor comes equipped with a Risk Category Index that automatically
compares each reading to defined levels established by the American Heart
Association
®
(AHA 2017) as described earlier in this manual, and provides a helpful
cue if your reading falls into one of the stages that could potentially indicate
increased risk. Please note that the cues provided by this monitor are only intended
to assist you in using this table.
The table and cues are only provided for convenience to help you understand your
non-invasive blood pressure reading as it relates to the AHA 2017 information. They
are not a substitute for a medical examination or diagnosis by your physician. It is
important for you to consult your physician regularly. Your physician will tell you
your normal blood pressure range as well as the point at which you may actually be
considered to be at risk.
INSTRUCTIONS MANUAL
Product specificaties
| Merk: | Homedics |
| Categorie: | Niet gecategoriseerd |
| Model: | BPW-800BT |
Heb je hulp nodig?
Als je hulp nodig hebt met Homedics BPW-800BT stel dan hieronder een vraag en andere gebruikers zullen je antwoorden
Handleiding Niet gecategoriseerd Homedics

21 April 2026
26 Februari 2026
26 Februari 2026
26 Februari 2026
25 Februari 2026
25 Februari 2026
25 Februari 2026
25 Februari 2026
8 Februari 2026
8 Februari 2026
Handleiding Niet gecategoriseerd
Nieuwste handleidingen voor Niet gecategoriseerd
29 Juni 2026
29 Juni 2026
29 Juni 2026
29 Juni 2026
29 Juni 2026
29 Juni 2026
29 Juni 2026
27 Juni 2026
27 Juni 2026
27 Juni 2026