Hisense AX3100G Handleiding
Bekijk gratis de handleiding van Hisense AX3100G (24 pagina’s), behorend tot de categorie Soundbar. Deze gids werd als nuttig beoordeeld door 54 mensen en kreeg gemiddeld 3.5 sterren uit 27.5 reviews. Heb je een vraag over Hisense AX3100G of wil je andere gebruikers van dit product iets vragen? Stel een vraag
Pagina 1/24

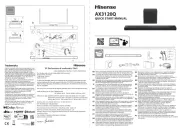
Before using the soundbar, please read this manual thoroughly and retain
it for future reference.
280W
Max Audio Power
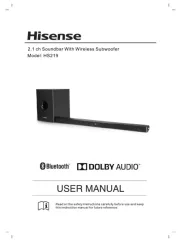
Model: AX3100G
3.1CH Soundbar with Wireless Subwoofer

2
Contents
1. Important Safety Instructions ......................................................................................................... 3
1.1 Safety .........................................................................................................................................................................................................3
1.2 Warning ....................................................................................................................................................................................................4
1.3 Supported Input Audio Formats ....................................................................................................................................................6
2. What’s in the Box .............................................................................................................................. 7
3. Identifying the Parts ........................................................................................................................ 8
3.1 Main Unit ................................................................................................................................................................................................8
3.2 ..............................................................................................................................................................................8Wireless Subwoofer
3.3 Remote Control 9 .....................................................................................................................................................................................
4. Preparations ....................................................................................................................................10
4.1 Prepare the Remote Control ...........................................................................................................................................................10
4.2 Replace the Remote Control Battery ...........................................................................................................................................10
4.3 Placement and Mounting ................................................................................................................................................................10
4.4 Mounting the Soundbar on the Wall...........................................................................................................................................11
5. Connections .................................................................................................................................... 12
5.1 Dolby Atmos® ...................................................................................................................................................................................... 12
5.2 DTS: X ..................................................................................................................................................................................................... 12
5.3 Use the HDMI eARC Socket ........................................................................................................................................................... 12
5.4 Use the OPTICAL Socket .................................................................................................................................................................12
5.5 Connect to AUX Socket ....... ............................................................................................................................................................ 13
5.6 Use the COAXIAL Socket .................................................................................................................................................................13
5.7 Connect Power .................................................................................................................................................................................. 13
5.8 Pair up with the Subwoofer .......................................................................................................................................................... 14
6. Basic Operation .............................................................................................................................. 14
6.1 Standby/On ......................................................................................................................................................................................... 14
6.2 Auto-Standby / Auto-Wake Feature .......................................................................................................................................... 14
6.3 Select Modes ....................................................................................................................................................................................... 15
6.4 Adjust the Bass/Treble Level ....................................................................................................................................................... 15
6.5 Switch the Surround Sound ON/OFF ........................................................................................................................................ 15
6.6 Adjust the Soundbar’s Volume .................................................................................................................................................... 15
Adjust the Brightness
6.7 ...................................................................................................................................................................... 15
6.8 Select Equalizer ( ) Eect ............................................................................................................................................................ 15EQ
6.9 Set the Audio Delay (AV SYNC) ..................................................................................................................................................... 15
7. ............................................................................................................................ 16DTS: X Operation
7.1 DRC / Dialog Control / Neural:X / Virtual:X Features ........................................................................................................... 16
8. OPTICAL / COAXIAL / HDMI eARC / AUX Operation .................................................................... 16
9. Bluetooth Operation ...................................................................................................................... 17
9.1 Pair Bluetooth-enabled Devices ................................................................................................................................................... 17
9.2 Listen to Music from Bluetooth Device ......................................................................................................................................17
10. USB Operation ................................................................................................................................ 18
11. Setup Menu ..................................................................................................................................... 19
12. Troubleshooting ............................................................................................................................ 19
13. Specications ................................................................................................................................. 21

3
1. Important Safety Instructions
10 Protect the power cord from being walked on
or pin ed particularly at plugs, convenience ch
rec tacles, and the point where ey exit ep th
from the apparatus.
11
the manufacturer.
12 Use only with the cart, stand, tripod,
bracket or table speci ed by the
manu so wifac turer, or ld th the
unit. When a cart or rack is
used, use tion en mo ng the cart/cau wh vi
un omit c bination to avoid injury from
tip-over.
13 Unplug the unit during lightning storms
or when unused for long periods of time.
14 Refer all ser cing to vi nnel. perso
Servicing is required when the unit has
be agen dam ed in any way, such as power
supply cord or plug is damaged, liquid has
been spilled or objects have fallen into the
unit, the unit has en exposed to rain be
or moisture, does not operate normally, or has
been dropped.
15 This equipment is a Class II or double
insulated electrical app ance. It has been li
designed in such a way that it does not require
a safety connection to electrical earth.
16
on th nit.e u
17 Minimum distance around the unit for
18 The ventila on ld not be impeded by ti shou
covering the ventila on openings th items, ti wi
such as newspapers, table-cloths, curtains, etc.
19 No naked sources, such as lighted
candles, should be placed on the unit.
20 Batteries should be recycled or disposed of as
per state and local guidelines.
21 Th unit ca s moder or tropical e n be u ed in ate
climates.
The lightning ash th arrowhead wi
symbol, within an equilateral triangle, is
intended to alert the user to the presence
of uninsulated “dangerous voltage” within
the product’s osure that may be of encl
su cient magnitude as to cons tute a ti
risk of electric shock to persons.
Safety
1.1
1 – All the safety and Read these structionsin
operating instructions should be read before
this unit is operated.
2 – The safety and Keep these structionsin
operating instructions should be retained for
future reference.
3 – All warnings on the Heed all warnings
appliance and in the operating instruc ons ti
should be adhered to.
4 – All operating and Follow all instructions
usage instructions should be followed.
5Do not use is it near watth un er – The
ap us nepliance should not be ed ar water or
moisture – for example, in a wet basement or
near a swimming pool or similar location.
6Clean only with a dry cloth.
7 . Do not block any ventilation op ingsen
Install in accordance with the manufacturer’s
instructions.
8 Do not install near any heat sources such as
radiators, heaters, stoves, or er paratus oth ap
9 Th unit is supplied e with a stan ard d mains lead
and moulded plug ich for safety re n t wh aso mus
into your ll socket, nsult an ele icwa co ctr ian for
replacement of the ob lete ns ket.so mai soc
CA IONUT
RISK OF ELECTRIC SHOCK
DO NOT OPEN
AVI S
RISQUE DE CHOC
ÉLECTRIQUE NE PAS OUVRIR
Th exclamat n point e io within an
equilateral triangle is tended to alert the in
user to the presence of important operating
and mainte nce (servicing) instructions in na
t literature comp ng the app ance. he ac anyi li
Product specificaties
| Merk: | Hisense |
| Categorie: | Soundbar |
| Model: | AX3100G |
| Kleur van het product: | Zwart |
| Ingebouwd display: | Ja |
| Breedte: | 920 mm |
| Diepte: | 90 mm |
| Hoogte: | 60 mm |
| Gewicht verpakking: | 1016 g |
| Bluetooth: | Ja |
| Bluetooth-versie: | 5.0 |
| Ondersteund audioformaat: | FLAC, MP3, WAV, WMA |
| Connectiviteitstechnologie: | Draadloos |
| Meegeleverde kabels: | AC, HDMI, Optical |
| Snelstartgids: | Ja |
| Aantal USB 2.0-poorten: | 1 |
| Aantal HDMI-poorten: | 1 |
| Gemiddeld vermogen: | 280 W |
| Stroomverbruik (in standby): | 0.5 W |
| Nachtmodus: | Ja |
| Ingebouwde audio decoders: | DTS, DTS-HD Master Audio, DTS:X, Dolby Atmos, Dolby Digital Plus |
| Enhanced Audio Return Channel (eARC): | Ja |
| Game modus: | Ja |
| Audio-uitgangskanalen: | 3.1 kanalen |
| Lijningang: | Ja |
| Ophangsysteem voor aan de muur: | Ja |
| Soundbar speaker RMS vermogen: | - W |
| Meegeleverde subwoofer: | Ja |
| Digitale audio optische in: | 1 |
| Soundbar gewicht: | 2540 g |
| Subwoofer-connectiviteit: | Draadloos |
| Wooferdiameter (subwoofer): | 6.5 " |
| Breedte van de subwoofer: | 214 mm |
| Hoogte van de subwoofer: | 294 mm |
| Diepte van de subwoofer: | 304 mm |
| Gewicht subwoofer: | 5170 g |
| Diameter woofer: | 4 " |
| Stroomverbruik soundbar: | 20 W |
| Stroomverbruik subwoofer: | 15 W |
| Wand montagekit: | Ja |
| Afstandsbediening inbegrepen: | Ja |
| Digitale audio-ingang (coax): | 1 |
| Wifi: | Nee |
| AC-ingangsspanning: | 100 - 240 V |
| AC-ingangsfrequentie: | 50 - 60 Hz |
| Batterijen inbegrepen: | Ja |
| Type beeldscherm: | LED |
| Virtuele surround: | Ja |
Heb je hulp nodig?
Als je hulp nodig hebt met Hisense AX3100G stel dan hieronder een vraag en andere gebruikers zullen je antwoorden
Handleiding Soundbar Hisense
9 September 2025

5 Juli 2025

4 Juli 2025
16 Juni 2025

6 December 2024
6 December 2024

2 November 2024

27 Juli 2023

2 Mei 2023

13 April 2023
Handleiding Soundbar
- Paradigm
- STEALTH Gaming
- MB Quart
- Sunyuey
- GPX
- Lark Sound
- Bticino
- DS18
- Roku
- Energy Sistem
- Krüger And Matz
- SSV Works
- Boss
- Nedis
- Creative
Nieuwste handleidingen voor Soundbar

9 September 2025

2 September 2025

1 September 2025

1 September 2025

1 September 2025

1 September 2025

1 September 2025

14 Augustus 2025

14 Augustus 2025

11 Augustus 2025