HeatStar Nomad HS250TC Handleiding
Bekijk gratis de handleiding van HeatStar Nomad HS250TC (18 pagina’s), behorend tot de categorie Heater. Deze gids werd als nuttig beoordeeld door 58 mensen en kreeg gemiddeld 3.6 sterren uit 29.5 reviews. Heb je een vraag over HeatStar Nomad HS250TC of wil je andere gebruikers van dit product iets vragen? Stel een vraag
Pagina 1/18

60951 REV C
HEAT STAR, Inc., 4560 W. 160TH ST., CLEVELAND, OHIO 44135 • 866-447-2194
WARNING:
— Do not store or use gasoline or other flammable vapors and liquids in the vicinity of this or any
other appliance.
— An LP cylinder not connected for use shall not be stored in the vicinity of this or any other
appliance.
— WHAT TO DO IF YOU SMELL GAS
• Do not try to light appliance.
• Extinguish any open flame.
• Shut off gas to appliance.
— Service must be performed by a qualified service agency.
This is an un-vented gas-fired portable heater. It uses air (oxygen) from the area in which it is used.
Adequate combustion and ventilation must be provided. Refer to pages 4 & 5.
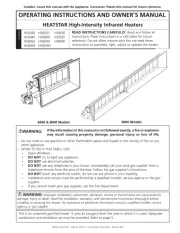
FORCED AIR DUAL-FUEL NOMAD
HEATER
If the information in this manual is not followed exactly, a fire or explosion
may result, causing property damage, personal injury or loss of life.
HS115TC
HS190TC
HS250TC
OPERATING INSTRUCTIONS
AND OWNER’S MANUAL
READ INSTRUCTIONS CAREFULLY: Read and follow all instructions. Place instructions in a safe place
for future reference. Do not allow anyone who has not read these instructions to assemble, light, adjust
or operate the heater.
Model #
LANGUAGES INCLUDED
•ENGLISH
•FRENCH
•SPANISH
NEVER LEAVE THE HEATER UNATTENDED WHILE BURNING!

Operating Instructions and Owner’s Manual
5
Forced-Air Dual-Fuel NOMAD Construction Heater
NEVER LEAVE THE HEATER UNATTENDED WHILE BURNING!
FUEL GAS ODOR
LP gas and natural gas have man-made odorants
added specifically for detection of fuel gas leaks.
If a gas leak occurs you should be able to smell the
fuel gas. Since these fuels are heavier than air you
should smell for the gas odor low to the floor. ANY
GAS ODOR IS YOUR SIGNAL TO GO INTO IMMEDIATE
ACTION!
• Do not take any action that could ignite the fuel gas.
Do not operate any electrical switches. Do not pull
any power supply or extension cords. Do not light
matches or any other source of flame. Do not use your
telephone.
• Get everyone out of the building and away from the
area immediately.
• Close all propane (LP) gas tank or cylinder fuel supply
valves, or the main fuel supply valve located at the
meter if you use natural gas.
• Propane (LP) gas is heavier than air and may settle in
low areas. When you have reason to suspect a propane
leak, keep out of all low areas.
• Use your neighbor’s phone and call your fuel gas
supplier and your fire department. Do not re-enter the
building or area.
• Stay out of the building and away from the area until
declared safe by the firefighters and your fuel gas
supplier.
• FINALLY, let the fuel gas service person and the
firefighters check for escaped gas. Have them air out
the building and area before you return. Properly
trained service people must repair any leaks, check for
further leakages, and then relight the appliance for you.
ODOR FADING - NO ODOR DETECTED
• Some people cannot smell well. Some people cannot
smell the odor of the man-made chemical added to
propane (LP) or natural gas. You must determine if you
can smell the odorant in these fuel gases.
• Learn to recognize the odor of propane (LP) gas
and natural gas. Local propane (LP) gas dealers will
be more than happy to give you a scratch and sniff
pamphlet. Use it to become familiar with the fuel gas
odor.
• Smoking can decrease your ability to smell. Being
around an odor for a period of time can affect your
sensitivity to that particular odor. Odors present in
animal confinement buildings can mask fuel gas odor.
The odorant in propane (LP) gas and natural gas •
is colorless and the intensity of its odor can fade
under some circumstances.
• If there is an underground leak, the movement of gas
through the soil can filter the odorant.
• Propane (LP) gas odor may differ in intensity at
different levels. Since Propane (LP) gas is heavier than
air, there may be more odor at lower levels.
• Always be sensitive to the slightest gas odor. If
you continue to detect any gas odor, no matter how
small, treat it as a serious leak. Immediately go into
action as discussed previously.
ATTENTION- CRITICAL POINTS TO REMEMBER
• Propane (LP) gas has a distinctive odor. Learn to
recognize these odors. (Reference Fuel Gas Odor and
Odor Fading sections above.
• Even If you are not properly trained in the service and
repair of the heater, ALWAYS be consciously aware of
the odors of propane (LP) gas and natural gas.
• If you have not been properly trained in repair and
service of propane (LP) gas then do not attempt to
light heater, perform service or repairs, or make any
adjustments to the heater on the propane (LP) gas fuel
system.
• A periodic sniff test around the heater or at the
heater’s joints; i.e. hose, connections, etc., is a good
safety practice under any conditions. If you smell even
a small amount of gas, CONTACT YOUR FUEL GAS
SUPPLIER IMMEDIATELY. DO NOT WAIT!
UNPACKING (Tools needed: Box cutter)
Remove heater and all components from cardboard
container. Thoroughly inspect all packing material for
pieces that are not garbage. Next check the unit for
possible shipping damage. If any is found immediately
notify the factory.
ODOR FADE WARNING
WARNING- ASPHYXIATION HAZARD
Do not use this heater for heating human living quarters.
• Do not use in unventilated areas.
• The flow of combustion and ventilation air must not be obstructed.
• Proper ventilation air must be provided to support the combustion air requirements of the heater being used.
• Refer to the specification section of the heater’s manual, heater data-plate, or contact the Factory to determine
combustion air ventilation requirements of the heater.
• Lack of proper ventilation air will lead to improper combustion.
• Improper combustion can lead to carbon monoxide poisoning leading to serious injury or death. Symptom of carbon
monoxide poisoning can include headaches dizziness and difficulty in breathing.

Operating Instructions and Owner’s Manual
7
Forced-Air Dual-Fuel NOMAD Construction Heater
NEVER LEAVE THE HEATER UNATTENDED WHILE BURNING!
power switch). The male plug end of the heater will
go inside the female receptacle on the thermostat plug
end. Next plug in your properly grounded three pronged
extension cord into the other side of the thermostat
plug. You can now switch on your heater and return to
where you have your thermostat located and set the
temperature at which you would like your heater to cycle
on and off at. Once the temperature in the space to be
heated drops below the point at which your thermostat
is set, the green indicator light above the switch will
illuminate and the heat sequence will begin. The unit
will continue to run until the setting of the thermostat
is satisfied. If your heater shuts down for any reason
other than the operator turns it off or the thermostat
is satisfied, refer to the troubleshooting portion of this
manual on page 11.
RATE AND FUEL SELECTION
FUEL SELECTION
When setting up your Nomad heater you will need to
know which fuel you will be using and move the Rate/
Fuel selector switch to the correct settings before use. For
LP you will use the Red settings and rate. For NG you will
use the Blue settings and rates Refer to figure 5.
RATE SELECTION
Your Nomad heater is equipped with multi-rate and dual
fuel technology. During setup of your area to be heated
you have the option to use the heater on either the high
or low setting. In order to bring the heat in your space
up to your desired temperature as quickly as possible set
the heater on its high setting (refer to figure 5). Once
you have your space heated to the desired temperature,
you can then turn your setting to the low position to
maintain your desired temperature resulting in dramatic
cost savings from the lower fuel consumption during the
entire heating project.
OPERATION (NO THERMOSTAT)
Plug in your unit using an appropriately sized properly
grounded three pronged extension cord. Attach the small
length of power cord on the heater to your extension
cord. Once power is supplied to the heater you should
see the green indicator light above the switch light up.
Before you turn on your heater you will want to ensure
that you make your fuel and rate selection. Refer to the
"Rate and fuel selection" section for more information.
You can now flip your power switch to the ON position.
After a few seconds your heater will light and you should
feel hot air begin to emit from the outlet of the heater.
With this setup the heater will run continuously until
the operator flips the switch to the off position. If you
would like your heater to cycle on and off based on
the temperature of the space, you will need to use the
supplied remote thermostat.
OPERATION (WITH THERMOSTAT)
To operate your Nomad heater with a thermostat you will
need to place the thermostat in the environment to be
heated and turn the dial to the lowest temperature. Take
the "Piggy-Back" style plug end that was factory installed
on the thermostat and attach it to the small length of
power cord attached to the heater (located near the
FIGURE 5
INCLUDED THERMOSTAT
Cord to heater Extension cored to power
source
Cord to the
Thermostat
THERMOSTAT HOOKUP
PIGGY BACK PLUG
Part # 00618
Product specificaties
| Merk: | HeatStar |
| Categorie: | Heater |
| Model: | Nomad HS250TC |
Heb je hulp nodig?
Als je hulp nodig hebt met HeatStar Nomad HS250TC stel dan hieronder een vraag en andere gebruikers zullen je antwoorden
Handleiding Heater HeatStar

25 Augustus 2025

17 November 2024
17 November 2024

9 Juli 2023

9 Juli 2023

3 Juli 2023

1 Juli 2023

30 Juni 2023

29 Juni 2023

27 Juni 2023
Handleiding Heater
- Olympia
- Infratech
- Team
- Nordic Fire
- Bartscher
- Renkforce
- Pureheat
- Candy
- Arnold Rak
- Vivax
- Concept
- Heidenfeld
- Sogo
- Hubbell
- Exquisit
Nieuwste handleidingen voor Heater

17 September 2025

16 September 2025

16 September 2025
15 September 2025

12 September 2025

12 September 2025

10 September 2025
9 September 2025

9 September 2025

8 September 2025