Logic QL-C1MST112 Handleiding
Logic
Niet gecategoriseerd
QL-C1MST112
Bekijk gratis de handleiding van Logic QL-C1MST112 (2 pagina’s), behorend tot de categorie Niet gecategoriseerd. Deze gids werd als nuttig beoordeeld door 7 mensen en kreeg gemiddeld 4.3 sterren uit 4 reviews. Heb je een vraag over Logic QL-C1MST112 of wil je andere gebruikers van dit product iets vragen? Stel een vraag
Pagina 1/2

QL-C1MST112
Ford Mustang Coupe 2005-up
Thanks for choosing Q-Logic! - Quite possibly the most advanced loudspeaker enclosure available
for Mobile Electronics. Follow the instructions to custom fit your driver to the enclosure.
YOUR INSTALLATION CAN MAKE A HUGE DIFFERENCE IN THE SOUND QUALITY!
INSTALLATION INSTRUCTIONS:
Enclosure Installation
Continued on other side:
Begin the installation process by removing the 4 pin-lock and 2
tree-lock fasteners in the trunk rear valance piece, and remove the
valance. Next, remove the tree locks from the passenger side fender well
carpeting(see picture). Pull the carpet panel back exposing the sheet
metal with several holes punched in it. Install the supplied body clip in
the lower larger square hole in the sheet metal directly behind the wheel
well(see picture). Thread the supplied 1\4-20 x 1" bolt into the clip. The
bracket which held the upper treelock may be bent toward the center of
the car approximately 1/4". This is not required but will aid in the installa-
tion of the upper enclosure bolt later. Replace the carpeting, locate the
bolt head and make a 3-sided box cut around the bolt and fold the cut
panel under the trunk liner(see picture). Remove the bolt for installation.
Tuck the carpet behind the upper bracket and push back into the corner.
When the enclosure is installed the carpet will not extend under the rear
valance. Fold the trunk floor carpeting over, exposing the wire loom and
studs in the floor channel. Remove the wiring harness from the 2 rear-
most studs and move the harness towards the center of the trunk. Slide
the enclosure into the rear corner until the brackets are located on the
two rear studs. Install the supplied 1/4-20 x 1" bolt through the predrilled
hole in the back of the enclosure and into the body clip. Install the
supplied 8mm socket head bolt and washer through the carpeted baffle
and into the upper factory bracket. Install the two supplied nuts on the
studs securing the brackets and tighten all nuts and bolts. Replace the
wiring harness to the original factory location.
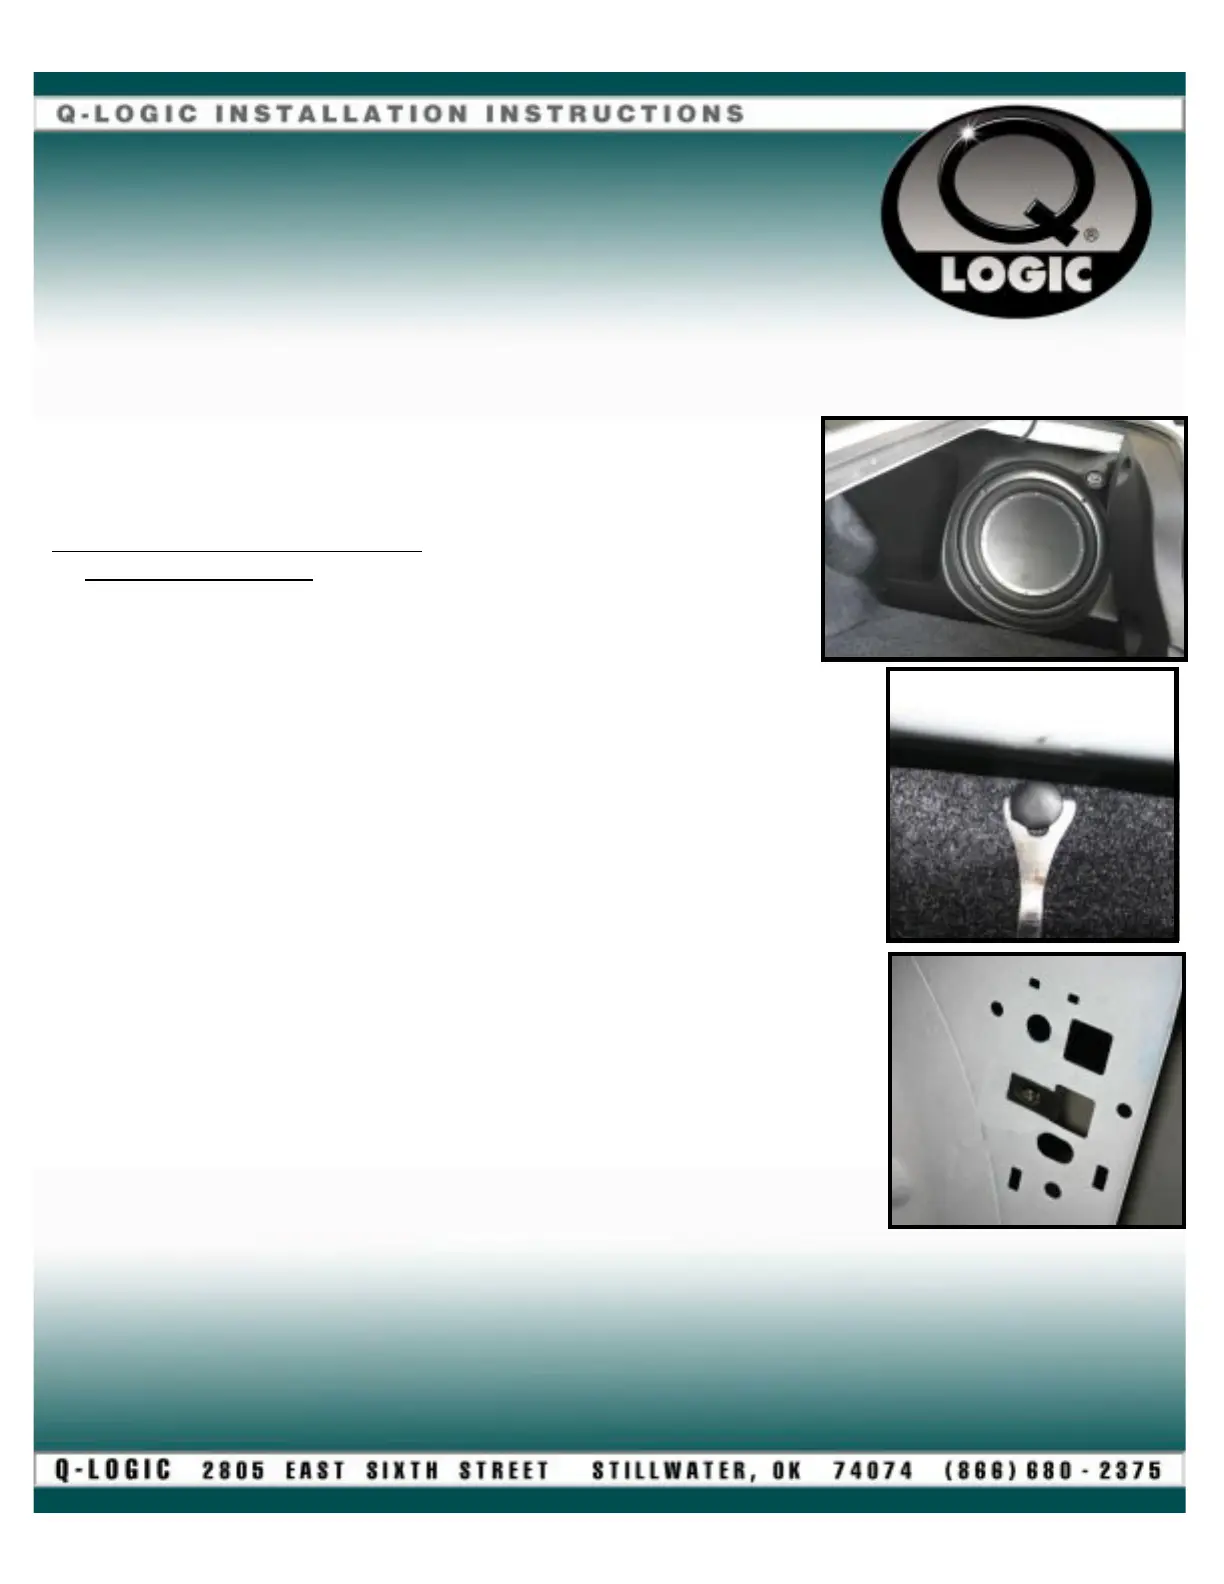
QL-C1MST112 After
Remove Tree Locks
Install Body Clip

ONE YEAR LIMITED WARRANTY
Q-Logic warrants to the original retail purchaser, this product to be free from defective workmanship and material when used under normal conditions in
accordance with the product's printed instructions for a period of one (1) year from date of purchase. Q-Logic agrees to remedy any such defect or to furnish a
new part in exchange for the defective one at no charge for parts or labor.
This warranty is limited to Q-Logic products and specifically excludes consequential damage to other associated equipment which may result for any reason from
use with this product. In no event shall Q-Logic be liable for incidental or consequential damages or have any liability with respect to defects other than the
obligations set forth above. Some states do not allow limitations on how long an implied warranty lasts, and/or the exclusion or limitation of incidental or
consequential damages, so the above limitations or exclusions may not apply to you. This warranty gives you specific rights and you may also have other rights
which vary from state to state.
This warranty does not cover the following:
• Damages caused by water, neglect, abuse, misuse,
• Improper installation or operation.
• Damages caused by acts of God or nature.
• Damages occurring during shipment of the product to Q-Logic for repairs.
• Any product which is modified without consent of Q-Logic.
If you need warranty service, take the following steps:
1.Save your sales receipt for warranty registration and service.
2.Contact the dealer from whom you bought Q-Logic. They will give you instructions for warranty service.
3.If no dealer is available, call Q-Logic for further Instructions: (866) 680 - 2375.
You must receive an RA# before returning any defective parts.
SHIPPING ADDRESS:
Q-Logic
2805 E. 6th Ave.
Stillwater, OK
74074-6513
For other cool Q-Logic products
visit our website!
http://qlogic.ws
Attach the speaker lead from the amplifier to the terminal cup
on the enclosure before installing the faceplate. Before installing the
woofer and faceplate in the vehicle place the Qx Ring and the woofer
into the faceplate and align the dustcap as desired. Predrill the woofer
screw locations with an 1/8" drill bit. Place the supplied polyfill inside
the enclosure. Place the faceplate and Qx Ring in place on the front of
the enclosure. Attach the speaker lead to the woofer as per
manufacturer's instructions. Place the woofer in the enclosure, align
with the previously drilled holes and secure using the supplied #8 x 1"
wood screws. It is recommended to start all screws and then return
and retighten.
Reinstall the rear valance piece using the original hardware. Place the
trunk carpet back in place and fold the remaining flap under itself, and
tuck it against the bottom of the faceplate.
Continued from other side:
Woofer Installation:
Grill Installation:
Place the supplied "U" channel over and around the
edge of the speaker grill. It may help to stretch the "U"
channel before installing it on the grill. Press the grill into
place on the faceplate.
This completes the installation of your new Q-Custom
subwoofer enclosure, Enjoy!
Supplied Hardware:
8 - #8 x 1" Woofer Screws
2 - Pre-Installed Brackets
2 - 6mm Nuts
1 - 1/4-20 Threaded Body Clip
1 - 1/4-20 x 1" Bolt
1 - 8mm Socket Head Bolt
1 - Flat Washer
1 - 12" Qx Ring
1 - Speaker Lead
1 - Polyfill Sheet
Cut Factory Carpet
Install Bolt inside Enclosure
Product specificaties
Merk: | Logic |
Categorie: | Niet gecategoriseerd |
Model: | QL-C1MST112 |
Heb je hulp nodig?
Als je hulp nodig hebt met Logic QL-C1MST112 stel dan hieronder een vraag en andere gebruikers zullen je antwoorden
Handleiding Niet gecategoriseerd Logic
18 September 2025
19 Maart 2025
19 Maart 2025
19 Maart 2025
19 Maart 2025
19 Maart 2025
10 December 2024
Handleiding Niet gecategoriseerd
- BIG
- Elbe
- Elvita
- Hosa
- Kasda
- Basbau
- Fizzics
- Medel
- GR Bass
- Autodesk
- MK
- Progress
- Easy Home
- Weber
- Welcare
Nieuwste handleidingen voor Niet gecategoriseerd
18 September 2025
18 September 2025
18 September 2025
18 September 2025
18 September 2025
18 September 2025
17 September 2025
17 September 2025
17 September 2025
17 September 2025