Heatit Z-Smoke Multisensor Handleiding
Heatit Rookmelder Z-Smoke Multisensor
Bekijk gratis de handleiding van Heatit Z-Smoke Multisensor (2 pagina’s), behorend tot de categorie Rookmelder. Deze gids werd als nuttig beoordeeld door 19 mensen en kreeg gemiddeld 4.6 sterren uit 4 reviews. Heb je een vraag over Heatit Z-Smoke Multisensor of wil je andere gebruikers van dit product iets vragen? Stel een vraag
Pagina 1/2
Heatit Controls AB can not be held liable for typographical errors, other errors or
omittances in our information. Product specifications may change without further notice.
All electrical installations must be carried out by a licensed electrician. The product must
be installed in accordance with national building codes and our installers manual.
Heatit Controls AB l Läkarvägen 4, 454 31 BRASTAD, SWEDEN
Phone: +47 61 18 77 77 l [email protected] – heatit.com
INTRODUCTION
Heatit Z-Smoke Multisensor is a wireless smoke sensor with built-in
PIR motion sensor, temperature sensor and emergency light.
INSTALLATION
Installation must be done by a qualified electrician in accordance
with the National Building Codes. Before installation, disconnect
any power to the smoke detector. During installation of the smoke
detector, power to the smoke detector must be disconnected AT
ALL TIMES!
• Screw the mounting bracket onto the wall/ceiling. If used with
• cable trunkings mount the adapter with the bracket mounted
• on the bottom.
• Unscrew the connection cover.
• Connect the ”L” phase to one of the Wago connectors on the
• back of the smoke detector and connect the ”N” phase to the
• other Wago connector.
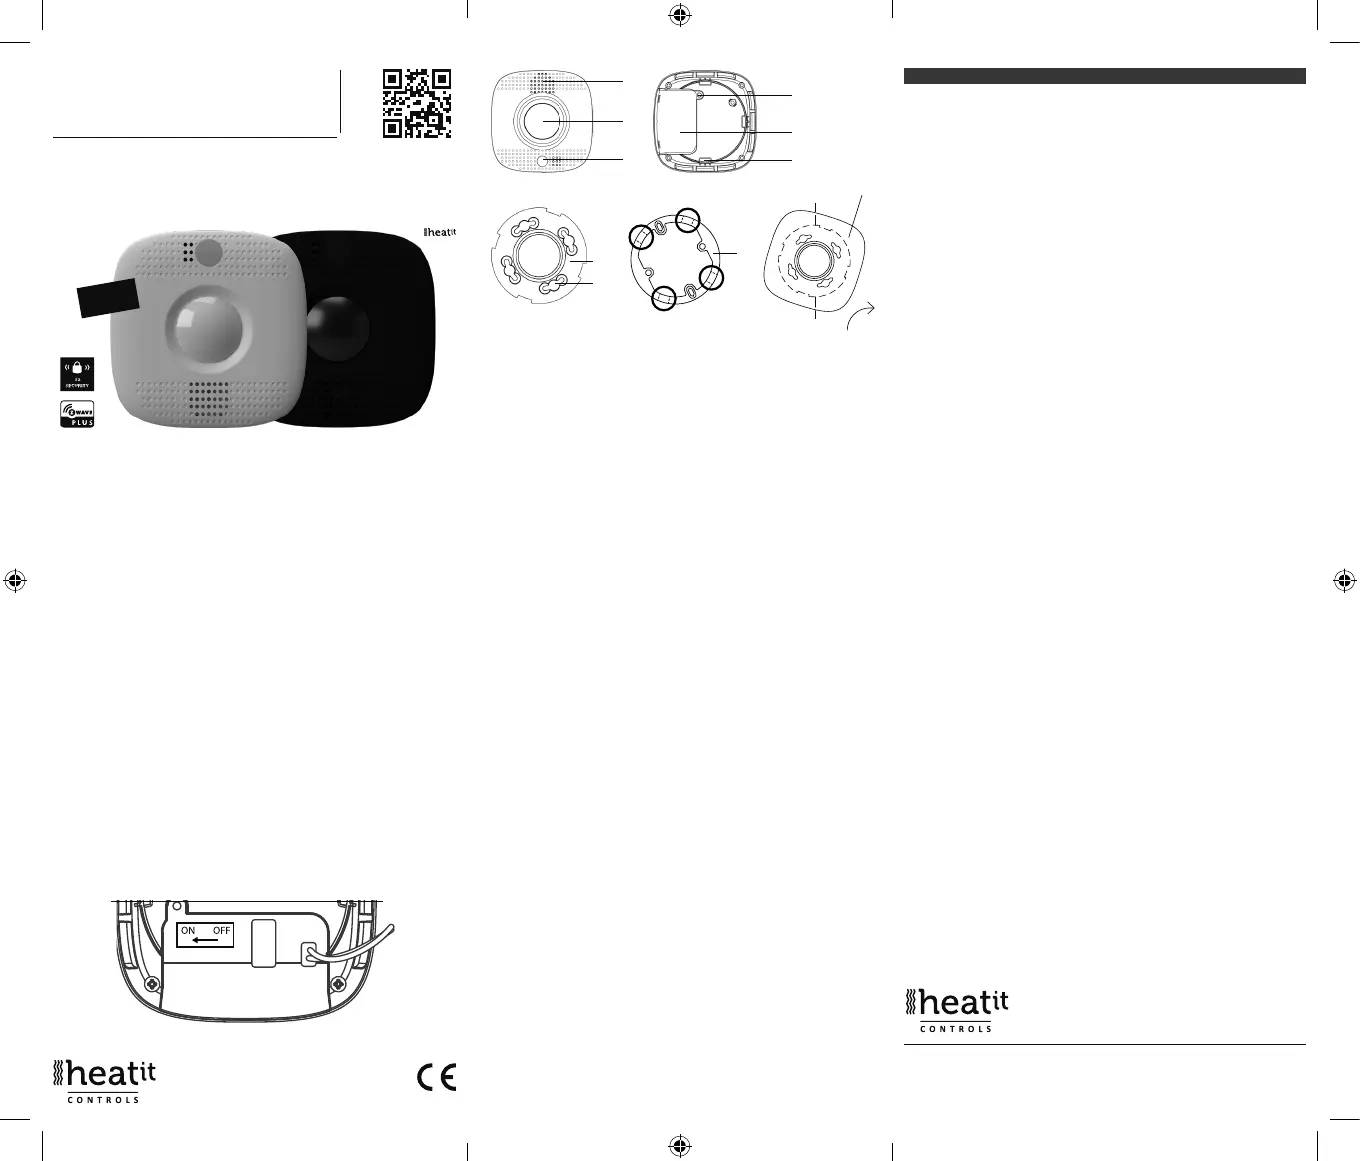
• Switch on the switch. Illustrated below.
• Align the four notches on the smoke detector with the hooks
• on the mounting bracket. Rotate clockwise to lock the hook.
a. LED-indicator/function button/emergency light
b. IR-lens
c. Buzzer
d. Connection compartment fixing screw
e. Connection compartment
f. Hooks
g. Mounting bracket
h. Mounting holes (for the hooks on the mounting bracket)
i. Cable channel adapter
j. Mount by aligning notches and hooks
ADD/REMOVE
After power is appli ed, the smoke detector initiates a 1-minute
warm-up period. During this minute, the device will automatically
enter add/remove mode, and may now be added to the system
via the primary controller/gateway.
Please refer to your primary controller/gateway manual on how to
enter add/remove mode.
SERIAL CONNECTION
1. Add all smoke detectors to the same network.
2. Assign the smoke detectors to the correct zone/room in primary
controller.
3. Access associations from the primary gateway (please refer to
primary controller manual).
4. Assign associations from each device using association group 2
(Sensor Basic Set) to all other smoke detectors.
TECHNICAL DATA
Protocol Z-Wave
Chip Z-Wave 500 chip
Battery 230V AC 50Hz
200mAh, NiMh back-up battery
Temp. sensitivity ±1°C
Alarm 85dB at 3 meters distance
Smoke sensor Photoelectric
Ambient temp. 0°C to 50°C
Humidity Max. 85% RH
Range, PIR Up to 8m at 3m mounting height
IP Code IP 20
Size (LxWxH) 105mm x 105mm x 41mm (ex. adapter)
Approvals Z-Wave Plus
CE, RoHS,
EN 14604:2005, 14604/AC:2008
Read the full manual at:
manuals.heatit.com
HEATIT Z-SMOKE
MULTISENSOR 230V
Quick Guide
Ver 2022-A
230V
d
e
f
g
h
i
Lock
j
a
b
c
Cable slots
dimensions 10x12mm
Quick Guide_Heatit Z-Smoke Multisensor 230V and BATT - Ver2022A.indd 11Quick Guide_Heatit Z-Smoke Multisensor 230V and BATT - Ver2022A.indd 1112.07.2022 11:51:0212.07.2022 11:51:02
Product specificaties
| Merk: | Heatit |
| Categorie: | Rookmelder |
| Model: | Z-Smoke Multisensor |
Heb je hulp nodig?
Als je hulp nodig hebt met Heatit Z-Smoke Multisensor stel dan hieronder een vraag en andere gebruikers zullen je antwoorden
Handleiding Rookmelder Heatit

7 Januari 2026
23 Juli 2024
Handleiding Rookmelder
Nieuwste handleidingen voor Rookmelder
21 Juli 2026
20 Juli 2026
10 Juli 2026
9 Juli 2026
1 Juli 2026
30 Juni 2026
30 Juni 2026
29 Juni 2026
1 Juni 2026
27 Mei 2026