Hasselblad 3043500 Handleiding


Lees hieronder de 📖 handleiding in het Nederlandse voor Hasselblad 3043500 (2 pagina's) in de categorie Lensadapter. Deze handleiding was nuttig voor 45 personen en werd door 2 gebruikers gemiddeld met 4.5 sterren beoordeeld

Pagina 1/2
USER MANUAL
Item no. 3043500
CF Lens Adapter
CF Lens Adapter
The CF Lens Adapter (3043500) allows the use of all C-type lenses
from the V System on H cameras. Integral processors for data con-
version bridge the two systems to access a number of the H-display
and lens-control functions. The adapter allows:
•  light metering at full aperture.
•  electronic focus confirmation on viewfinder display.
•  exploitation of databus connection with CFE lenses.
•  access to shutter speeds (manually set on lens) from
1s–1/500s including B and T mode.
Functions such as autofocus and continuous drive are an integral
part of the H System only so they are therefore not available when
C lenses are used. Likewise, as the light measuring and aperture/
shutter controls are also different between the two systems, then
camera operation differs too. Some other restrictions also apply
regarding specific lenses or combinations of lenses/converters.
Operation of the adapter is not difficult but requires an awareness
of certain points that contrast with regular H operation. You can
use the adapter immediately by going through the procedures
described under the Quick Start heading but a thorough reading
of this manual is advised to ensure optimum performance.
ENG
The figures beside the headings refer to the relevant illustrations
for that section. Rotation directions are described as seen when
facing the camera.
Please note that the adapter requires firmwa re version 9.0.0 or later installed
in the camera! (see camera manual for details).
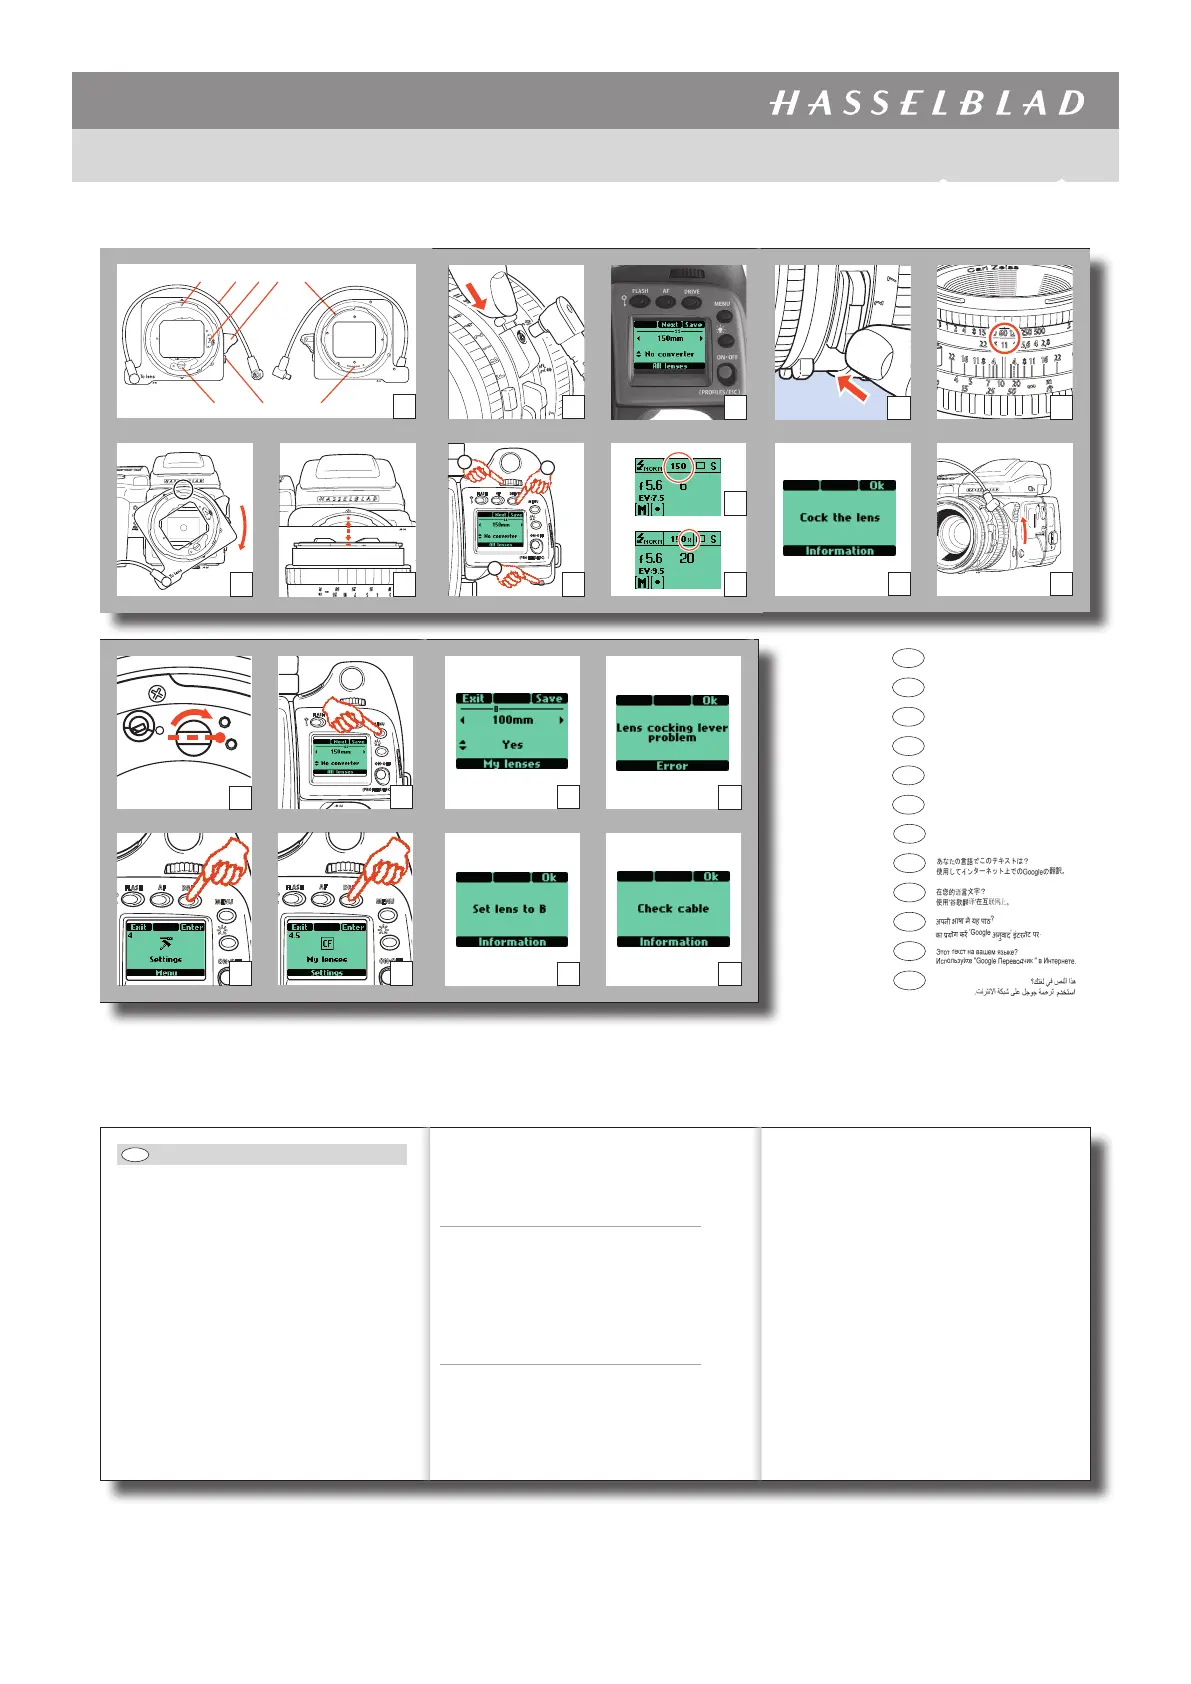
Parts and Components 1
1. Lens locating index
2. Connecting cable
3. Databus connector for CFE lenses
4. Lens cocking lever
5. Adapter locating index
6. Drive shaft
7. Adapter release catch
8. Camera databus connector
Quick start 2, 3, 4, 5, 6, 7, 8, 9, 10, 11, 12
C-type lenses from the V System have changed over the years in
functionality and appearance. The illustrations therefore show some
variations that might not match the lenses you are using. The later
CFE/i models, for example, have a locking device on the PC flash con-
nector whereas earlier models did not. Please see the relevant user
manual for details.
a. Align the red adapter locating index on the rear of the adapter with the red
index on the camera body (illus 2) and rotate the adapter clockwise until it
clicks into place.
b. Align the index on the lens with the red lens locating index on the adapter
(illus 3) and rotate the lens clockwise until it clicks into place.
c. Attach the connecting cable to the PC socket on the lens (illus 4).
d. The grip LCD on the camera will automatically display the lens and converter
choice screen (such as in illus 5).
e. Rotate the front control wheel to choose the lens and the rear control wheel
to choose the converter (or No conver ter). For example, 150 mm lens with
‘No converter’, as in illus 6. Finally, press Save (DRIVE button) to store the
setting and automatically access the standard screen.
f. The focal length of the lens chosen (illus 7) as well as a ’X’ symbol for a con-
verter if chosen (illus 8) now appears on the LCD beneath the AF button.
g. Ensure the depth-of-field button on the lens is in the off position, illus 9.
h. When measuring the light, the camera will display setting information
which has to be transferred to the lens, for example 1/60s at f/11 as in illus
10. See relevant lens user manual if you are not familiar with the settings
on C lenses. This procedure varies according to the type of lens:
C/CF/CFi lenses — Rotate the front control wheel on the grip to scroll
through the list of aperture/shutter combinations visible on the grip LCD
and the viewfinder LCD. Transfer the chosen shutter speed / ape rture combi-
nation settings (or EV visible on grip LCD) to the lens.
The information in this document is furnished for informational use only, is subject to change without notice, and should not be construed as a commitment by Victor Hasselblad AB. The text and images in this document cannot be reprinted or reused wit hout the express permission of Victor Hasselblad AB. Vict or Hasselblad AB assumes no
responsibility or liability f or any errors or inaccuracies that may appear in this document. Victor Hasselblad AB assumes no responsibilit y or liability for loss or damage incurred during or as a result of using Hasselblad products. Copyright © 2013 - Victor Hasselblad AB. All rights reserved.
1/2 Document ID: CF Lens Adapter / 3043500 / User Manual D / V5 / 2013
www.hasselblad.com
2
1
12 3 4 5
6 7 8
3
9 10
11 12
13 14
15 16
45
7
86
1
2
3
18
19
17
20
Ce texte dans votre langue?
Utilisez “Google Translate” sur Internet.
Diesen Text in Ihrer Sprache?
Verwenden Sie “Google Translate” im Internet.
Este texto en su idioma?
El uso de “Google Translate” en Internet.
Questo testo nella tua lingua?
Utilizzare ‘Google Translate’ su Internet.
Este texto na sua língua?
Usar “Google Translate” na Internet.
Denna text på ditt språk?
Använd “Google Translate”på Internet.
Deze tekst in uw taal?
Gebruik ‘Google Translate’ op het internet.
FRA
DEU
ESP
ITA
PRT
SWE
NLD
JPN
CHN
IND
RUS
SAU
USER MANUAL
Item no. 3043500
CF Lens Adapter
The information in this document is furnished for informational use only, is subject to change without notice, and should not be construed as a commitment by Victor Hasselblad AB. The text and images in this document cannot be reprinted or reused without t he express permission of Vi ctor Hasselblad AB. Victor Hasselblad AB assumes no
responsibility or liability f or any errors or inaccuracies that may appear in this document. Vi ctor Hasselblad AB assumes no responsibility or liability for loss or damage incurred during or as a result of using Hasselblad products. Copyright © 2013 - Victor Hasselblad AB. All rights reserved.
2/2 Document ID: CF Lens Adapter / 3043500 / User Manual D / V5 / 2013
www.hasselblad.com
will work correctly (except for the lack of flash synchronisation) if the cable
is not connected but film advance is consequently delayed by 1.5 seconds.
Please note that with some older lens types there may be a delay anyway,
even if the cable is correctly attached.
Removing the adapter
After exposure, you can remove the adapter from the camera
without re-cocking the lens but you cannot remove a lens from
the adapter without re-cocking the lens.
Remove a lens from the adapter by pressing the lens adapter
catch on the adapter and rotating the lens in an anticlockwise
direction.
Remove the adapter from the camera body as you would a lens
by pressing the lens release button on the camera and rotating
the adapter in an anticlockwise direction.
Converters, extension tubes and lenses should be removed in reverse order
to attachme nt, that is, lens first followed by the converter or ex tension
tube. Avoid removing a lens and converter/extension tube as a combined
unit as separation will cause the lens shutter to trip. See note above under
‘Attaching the adapter’ for details.
Lens choice and H display 5, 6, 7, 8,16
Attachment of the adapter or adapter/lens combination auto-
matically causes the camera to display the lens/converter choice
screen on the grip LCD. The grip screen is scrollable or partly
so, depending on lens type (see below). There are two possible
screens (shown by the setting information on the lower row of
the LCD), namely (as in illus 14) and All lenses My lenses.
Toggle between these two screens by pressing the AF button
(signified by the commands in the top row on the screen). Next
The My lenses screen will provide access to a list you have already
created (see below for details) while the will provide acAll lenses -
cess to all lenses available.
When a C/CF/CFi type lens is attached, all ‘C’ lenses are available
(by scrolling) on the list.
To simplify operation however, when a CFE lens is attached,
only CFE lenses that share the same widest aperture appear on
the list. For example, when attaching a CFE4/40 mm lens, the
CFE4/120 mm and the CFE4/180 mm will also appear as they
both have f/4 as their widest aperture. Therefore when attaching
a CFE 2.8/80 mm lens, only that lens appears as it is the only f/2.8
lens in the CFE range. Please note that this feature functions by
way of the databus connections and therefore will not work if
the converter/extension tubes have no databus connectors.
4. Rotate the front control wheel un til the desired lens appears, then rotate the
rear control whee l until ‘ ’ appears, illus 17.Yes
5. When you have matched all lenses of your choice that you want on the list
with a ‘ ’ and each lens you don’t want on the list has been matched with Yes
a ‘ ’, finally press ‘ ’ ( ) button. No Save DRIVE
When accessed, the ‘Lens choice’ screen will now only display
the lenses you have chosen when you rotate the front control
wheel, allowing much faster choice. Please note that the correct
lens still has to be chosen and the any converter must also be
chosen before SAVE is pressed.
Converters cannot be included on a favourite list and always remain as
a choice that has to be set.
Focusing
Although the autofocus function is not available with V System
lenses, the H focus confirmation aid LEDs in the viewfinder func-
tion as normal with exception of lenses slower than f/6.7. This
function remains customizable in Custom Options #14. Operation
is identical as with HC lenses. See the H user manual for full
details.
The focus confirmation function automatically shuts down with lenses
slower than f/6.7 (as it does with HC lenses) on condition that the cor-
rect lens/converter settings have been made. However, this automatic
shutdown does not take place if extension tubes are fitted.
CFE lenses — Pre-set the aperture of your choice on the lens. This setting
will appear on the grip and viewfinder LCD alongside the shutter speed
chosen by the camera. Transfer the shutter speed setting from the grip or
viewfinder LCD (or EV visible on the grip LCD) to the lens.
i. Make the exposure.
j. The message ‘Cock the lens’ now appears on the grip LCD (illus 11) and on
the viewfinder LCD together with a warning triangle. Before another expo-
sure can be made, the lens shutter must be re-cocked by pushing the lens
cocking lever all the way up until it stops (illus 12).
Attaching the adapter 13
The adapter should be attached to the camera body first and then
the lens to the adapter. When using a converter or extension tube
see ‘Converter/ Extension tubes’ section for specific details.
Any resistance experienced when attaching a lens should be assumed to
be a fault in fitting. If the lens does not click into place then check to see
whether the lens shutter has been inadvertently tripped thereby causing
the drive shaft to be out of alignment for attachment.
If this is the case, the lens shutter can be cocked again by insertin g a small
coin or similar in the slot on the drive shaft coupling and rotating it clock wise
(about 4/5 turn) until it locks. See illus 13 for correct alignment.
The connecting cable should be attached whethe r you intend to use flash
or not as it not only conveys information about flash synchronisation but
completion of the shutter action as well. The adapter/lens combination
Whether choice is manual as in C/CF/CFi type lenses or semi-
automatic with CFE lenses, a choice must still be made regarding
a converter at least, and then saved. It is essential that the lens/
converter information is correct as failure to do so can cause er-
rors in light metering while the camera will appear to behave
normally.
If you want to correct your choice afterwards then press the AF
button in the standard screen mode to access the lens choice
screen again.
To set or reset a lens /converter choice proceed as follows:
1. Press the button to access the lens choice screen.AF
2. Toggle the button to access either the ‘ ’ or ‘AF My lenses All lenses’.
3. Rotate the front control wheel to choose the lens attached and the rear con-
trol wheel to choose converter (or No converter). For example, 150 mm lens
with ‘ ’, as in illus 6.No converter
4. Press Save ( but ton) to store the setting and automatically access DRIVE
the standard screen. Note that the focal length of the lens attached now
appears on the LCD beneath the button, illus 7, along with an ‘X’ symbol AF
to signify a chosen converter, illus 8.
Remember to check and save the lens/converter settings when attaching
a lens!
Remember to check the lens/converter settings each time you change lenses
or converters!
The camera cannot recognize CFE or CF lenses when used in conjunction with
converters or extension tubes without databus connectors so consequently
manual settings must be made.
Creating and using a ‘My lenses’ setting 14, 15, 16, 17
If you regularly use the same lenses, you might want to speed up
lens choice when changing lenses by creating a personal My lenses
list that matches your equipment. This method also helps to avoid
errors in choice. Until you create such a list the My lenses screen will
display the Empty! Select lenses in “My lenses” menu message. You can
add to the list at any time by following the same procedure and
you can delete any or all lenses at any time by using the same
procedure simply by choosing No instead of Yes and saving. Note
that CFE lenses will override a favourite list (see previous section)
and automatically implement the correct setting (though the use
of a converter still has to be set). However, if you attach a CFE lens
that is not on the list, the All lenses will display all the CFE My lenses
lenses with the same maximum aperture instead.
1. Press the ‘ ’ button, il lus 14.Menu
2. Rotate the front control wheel until screen 4 ‘ ’ (illus 15) is displayed Settings
on the grip LCD and press the ‘ ’ (Enter DRIVE) button.
3. Rotate the front control wheel until screen 4.5 ‘My lenses’, illus 16, appears
and press the ‘ ’ ( ) button. Enter DRIVE
Light metering 9
For all types of lenses, choice remains between metering meth-
ods in the camera – average, centre weighted and spot – as well
as exposure compensation.
Remember to ensure the depth-of-field check/ stop down button is in
the ‘off’ position when taking a light meter reading (illus 9).
An error message -’Stopped down’ - appears on the grip LCD and a warning
triangle appears in the viewfinder LCD if you have forgotten to open the
aperture again after stopping down for a depth-of-field check, b ut only
with CFE lenses. No warnings are possible with C/CF/CFi lenses as they have
no databus connections.
Exposure 18, 11
When the exposure button is pressed (or the remote release)
the conventional sequence of events takes place. However, after
exposure, the shutter in the lens remains closed and so conse-
quently there is no image in the viewfinder.
If you forget to re-cock the shutter, camera operation is blocked
and the message appears on the grip LCD (illus 11) Cock the lens
and in the viewfinder LCD alongside a red warning triangle. The
standard screen returns again on the grip LCD when the lens has
been cocked.
Avoid pushing up the lens cocking lever or holding it half way up when
making an exposure as this will cause errors. An error message – Lens
cocking lever problem’ (illus 18)– appea rs to warn you of this.
B- and T-release 19, 20
For B exposures, proceed as follows:
1. Ensure the connecting cable is connected between the lens and adapter.
2. Set the shutter on the lens to “B”.
3. Program the USER button (AE-L button on H4D) to “B mode” by first pressing
the the MENU button and then the USER/AE-L button. Rotate the rear control
wheel to set the function to “B mode”.
4. Press the USER/AE-L button to activate “B mode”.
5. Make the exposure (elapsed time shown on the grip LCD) as normal by
maintaining pressure on the exposure button or remote release cord for the
desired amount of time.
For T exposures, proceed as follows:
1. Ensure the connecting cable is connected between the lens and adapter.
2. Set the shutter on the lens to “B”.
3. Program the USER button (AE-L button on H4D) to “T mode” by first pre ssing
the the MENU button and then the USER/AE-L button. Rotate the rear control
wheel to set the function to “T mode”.
4. Press the USER/AE-L button to activate “T mode”.
5. Start the exposure (elapsed time shown on the grip LCD) by pressing the exposure
button or remote release cord. The button can now be released. Stop the expo-
sure by pressing the e xposure button or remote release cord button again.
In both cases, the function can be used as normal.Mirror Up
An error message – ‘ ’ (illus 19) – appears if you made the Set lens to B
wrong shutter setting on the lens (T exposures only).
An error message – ’ (illus 20) – appears if you have omitted Check cable
to attach th e connecting cable (T exposures only).
Converters / Extension tubes
Converters or extension tubes are attached and removed in the
conventional manner. They should be attached to the adapter
first. When removing however, remove the lens first and then the
converter/extension tube. If you remove the lens and converter/
extension tube together as a unit and then separate them, there
is a possibility that the shutter in the lens will be tripped. In this
case see the special note in the Attaching the adaptersection
and illus 13 about how to re-cock the shutter when detached
from the camera.
If you remove a C/CF/CFi lens but leave the converter at tached to the
adapter wh ich in turn is sti ll attached to the camera, then you must
manually make a new lens choice from th e list and save it. This also
applies to CFE lenses if the converter does n ot have databus connector s.
Only V-series converters and extension tubes can be use d with the
adapter.
When a converter or extension tu be is attached, the camera cannot
recognize lens changes when it is not active and therefore the semi-
automatic choice facility normally available with CFE lenses is tem-
porarily lost. The camera can only recall the information from the last
lens change made when the camera was active. This means you should
check set tings carefully in these cases or simply ensure the camera is
active when you make changes.
Points to note
•  The camera must have firmware version 9.0.0 or later installed.
•  Continuous drive is disabled.
•  Interval timer is disabled.
•  Rear flash sync is disabled.
•  Bracketing is disabled.
•  The stop down button on the camera is disabled.
•  Ensure the stop down button on the lens is in the open position for light metering.
•  H System converters and extensions tubes cannot be used.
Technical specifications
Dimensions: approx. 86 x 112 x 20 mm
Weight: 135 g
• C30 30mm
• CF30 30mm
• CFi30 30mm
• C40 C40mm
• CF40 C40mm
• CFE40 40mm
CFE
• CFE40IF 40mmIF
CFE
• C50 50mm
• CF50 50mm
• CF50 50mmFLE
• CFi50 50mmFLE
30
40
50
• C60 60mm
• CB60 60mm
• CF60 60mm
• CFi60 60mm
• C80 80mm
• CF80 80mm
• CFE80 80mm
CFE
• CB80 CB80mm
• C100 100mm
• CF100 100mm
• CFi100 100mm
• C120 C120
• CF120 120mm
• CFi120 120mm
• CB120 120mm
• CFE120 120mm
CFE
60
80
100
12 0
Lens designation on LCD
Objektivbezeic hnung auf LCD
Denominación del objetivo en el LCD
Désignation de l’objectif sur l’écran
Descrizione dell’obiettivo sul display
LCDObjectiefaanduiding op LCD
Designação da objetiva no display LCD
Objektivbeteckning i LCD-displayen
Lens designation
Objektivbezeichnung
Denominación del objetivo
Désignation de l’objectif
Descrizione dell’obiettivo
Objectiefaanduiding
Designação da objetiva
Objektivbeteckning
• C135 135mm
• CF135 135mm
• Variogon 140-280mm
C140-280
• Variogon 140-280mm
CF140-280
• C150 150mm
• CF150 150mm
• CFi150 150mm
• CB160 160mm
• CF180 180mm
• CFi180 180mm
• CFE180 180mm
CFE
• C250 250mm
• CF250 250mm
• CFi250 250mm
• C250Sa 250mmSA
135
140-
280
150
160
180
250
• CF250Sa 250mmSA
• CFi250Sa 250mmSA
• CFE250Sa 250mmSA
CFE
• C350 350mm
• CF350 350mm
• CFE350Sa 350SA
CFE
• C500 C500mm
• CF500 500mm
250
350
500


Product specificaties

Merk: Hasselblad
Categorie: Lensadapter
Model: 3043500

Heb je hulp nodig?

Als je hulp nodig hebt met Hasselblad 3043500 stel dan hieronder een vraag en andere gebruikers zullen je antwoorden