Hager REH312X Handleiding
Hager
Niet gecategoriseerd
REH312X
Bekijk gratis de handleiding van Hager REH312X (3 pagina’s), behorend tot de categorie Niet gecategoriseerd. Deze gids werd als nuttig beoordeeld door 25 mensen en kreeg gemiddeld 4.3 sterren uit 13 reviews. Heb je een vraag over Hager REH312X of wil je andere gebruikers van dit product iets vragen? Stel een vraag
Pagina 1/3

1
6LE001970A Ind. C
e
y
a
i
z
REH312X
Ruftaster Anschlussmodul EB m.
Halterung
Modulo di connessione dei pulsanti
di chiamata
Module de connexion de boutons
d’appel
Aansluitingsmodule voor call
drukknoppen
Call push-bt. connection module
built-in
02/2017 - 6LE001970A Ind. CHager Security-CS70510-38920 CROLLES-France - www.hager.com
Sicherheitshinweise e
Einbau und Montage elektrischer Geräte dürfen
nur durch eine Elektrofachkraft gemäß den
einschlägigen Installationsnormen, Richtlinien,
Vorschriften, Bestimmungen und
Unfallverhütungsvorschriften des Landes
erfolgen.
Bei Installation und Leitungsverlegung die für
SELV-Stromkreise gültigen Vorschriften und
Normen einhalten.
Diese Anleitung ist Bestandteil des Produktes
und muss beim Endkunden verbleiben.
Geräteaufbau (Bild 2)
(1) Klemme G
Klemmen G: Gemeinsamer Kontakt für alle
Ruftaster.
(2) Klemme ( bis ) 0 F
Die Ruftaster werden an die Klemmen ( 0
bis ) angeschlossen.Es können bis zu 16 F
Ruftaster angeschlossen werden.
(3) Busanschlussbuchse
Die Busanschlussbuchse ermöglicht das
Anschließen des Audio- oder Videomoduls
(über ein Busverbindungskabel 335 mm,
mitgeliefert) an das Ruftaster Anschlussmodul.
An der zweiten Busanschlussbuchse
kann, mit einem Busverbindungskabel,
die Busanschlussbuchse des nächsten
Anschlussmoduls angeschlossen werden.
Bis zu 16 Ruftaster Anschlussmodule
können hintereinander kaskadiert werden.
Die Reihenfolge der maximal 16 Ruftaster
Anschlussmodule bestimmt ihre jeweilige
Gruppenadresse (0 ... F). Was eine maximale
Anzahl von 256 Ruftastern ergibt.
Die Bezeichnung der Klemmen entspricht der
Teilnehmeradresse der Innenstation.
Montagehinweise:
REH312X ist horizontal in der Türstation zu
montieren.
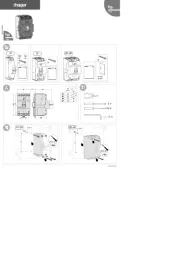
Bild 1: Leiterführung
Um Geräteschäden durch Kondenswasser
zu vermeiden, sind die Leiter vom Ruftaster
Anschlussmodul nach unten wegzuführen.
Klebeäche der Türstation reinigen und
entfetten. Folie vom Klebeband der Halterung
entfernen.
Die Halterung horizontal mit einem
Anpressdruck von 20 kg in der Türstation
ankleben, so das die Anschlussklemmen eines
eingerasteten Ruftaster Anschlussmoduls nach
unten zeigen (Bild 1). Die Endfestigkeit der
Klebeverbindung ist bei Raumtemperatur nach
72 Stunden erreicht. 50% der Endfestigkeit sind
nach 20 Minuten erreicht.
Sobald die Halterung geklebt ist, das
Anschlussmodul befestigen, indem man es
zwischen den 4 Aussparungen platziert und
einclipst.
Technische Daten:
Abmessungen (L x H x B):
• des Anschlussmoduls: 85 x 49 x 21 mm
• der Halterung: 88 x 52 x 4 mm
Consignes de sécurité a
L’installation et le montage d’appareils
électriques doivent être effectués uniquement
par des électriciens qualiés, en conformité
avec les normes d’installation et dans le
respect des directives, dispositions et
consignes de sécurité et de prévention des
accidents en vigueur dans le pays.
Veuillez observer les prescriptions et les
normes en vigueur pour les circuits électriques
TBTS lors de l’installation et de la pose des
câbles.
Cette notice fait partie intégrante du produit et
doit être conservée par l’utilisateur nal.
Composition de l’appareil (image 2)
(1) Borne G
Les bornes G : contact commun à tous les
boutons d’appel.
(2) Borne (de à ) 0 F
Les boutons d’appel se connectent aux
bornes (de à ). 0 F
Il est possible de connecter jusqu’à 16
boutons d’appel.
(3) Prise de raccordement bus
La prise de raccordement bus permet (à l’aide
d’un câble de connexion de bus 335 mm,
fourni) de connecter le module audio ou vidéo
au module de connexion de boutons d‘appel.
La seconde prise de raccordement bus
permet de connecter en série un second
module d’extension de boutons d’appel
(à l’aide d’un câble de connexion de bus).
Il est possible de connecter jusqu’à 16
modules d’extension de boutons soit 256
boutons d’appel maximum.
La désignation des bornes correspond à
l’adresse interphone du poste intérieur.
Instructions de montage :
Le REH312X doit être installé horizontalement
dans la boîte d’encastrement ou sur la platine
de rue.
Image 1 : guidage des conducteurs
Les entrées de câble doivent être orientées
vers le bas du module de connexion de boutons
d‘appel pour éviter la dégradation des câbles
par l’humidité.
Istruzioni di sicurezza y
L’installazione e il montaggio degli apparecchi
elettrici vanno effettuati unicamente da
elettricisti qualicati, conformemente alle
norme d’installazione e nel rispetto di direttive,
disposti, raccomandazioni di sicurezza e
prevenzione degli incidenti in vigore nel paese
interessato.
Si prega di osservare le prescrizioni e le norme
vigenti per i circuiti elettrici TBTS durante
l’installazione e la posa dei cavi.
Questo manuale è parte integrante del prodotto
e va conservato dall’utente nale.
Composizione dell’apparecchio
(immagine 2)
(1) Morsetto G
I morsetti G: contatto comune a tutti i pulsanti
di chiamata.
(2) Morsetto(da a ) 0 F
I pulsanti di chiamata si collegano ai morsetti
(da a ). 0 F
È possibile collegare un numero massimo di
16 pulsanti di chiamata.
(3) Bus ingresso/uscita
Il bus ingresso/uscita permette (mediante
un cavo di connessione di bus 335 mm, in
dotazione) di collegare il modulo audio o
video al modulo di connessione dei pulsanti di
chiamata.
Il secondo bus ingresso/uscita permette
di collegare in serie un secondo modulo
d’estensione di pulsanti di chiamata (mediante
un cavo di connessione di bus).
È possibile collegare un numero massimo di
16 moduli d’estensione di pulsanti ossia un
numero massimo di 256 pulsanti di chiamata.
La denominazione dei morsetti corrisponde
all’indirizzo citofono della stazione interna.
Istruzioni di montaggio:
L’REH312X va installato orizzontalmente nella
scatola a incastro o sulla piastrina “lato via”.
Immagine 1: guida dei conduttori
Gli ingressi del cavo vanno orientati verso la
parte inferiore del modulo di connessione dei
pulsanti di chiamata per evitare il degrado dei
cavi a causa dell’umidità.
Rimuovere il lm di protezione dello zoccolo
per farlo aderire ad una supercie pulita e non
grassa.
Quando la base sarà incollata (dopo 20 minuti
sarà incollata al 50%) ssate il modulo di
connessione posizionandolo fra le 4 tacche e
agganciandolo.
Caratteristiche tecniche:
Dimensioni (L x H x P):
• modulo: 85 x 49 x 21 mm
• supporto: 88 x 52 x 4 mm
Fig. 2: Geräteaufbau / descrizione dell’apparecchio / description de l’appareil
(1) (2)
G G 0 1 2 3 4 5 6 7 8 9 A B C D E F
(3)
(3)(1) (2)
335 mm

2 Hager Security-CS70510-38920 CROLLES-France - www.hager.com
Safety instructions z
Electrical devices must be mounted and
installed by qualied electricians only and in
compliance with the installation standards and
directives, provisions and safety and accident
prevention instructions in force in the country.
Please follow the recommendations and
standards applicable to safety extra low
voltage electrical circuits when installing and
laying cables.
These instructions are part of the product and
must be kept by the end user.
Design and layout of the device (g. 2)
(1) Terminal G
Terminals G: contact common to all call
buttons.
(2) Terminal (from to ) 0 F
The call buttons are connected to the
terminals (from to ). 0 F
Up to 16 call buttons can be connected.
(3) Input/output bus
The input/output bus can be used to connect
the audio or video module to the call button
connection module (using a bus connection
cable 335 mm, supplied).
The second input/output bus can be used
to connect a second call button extension
module (using a bus connection cable). Up
to 16 call buttons can be connected in series.
The sequence of call button connection
modules is determined by their respective
group address (0 … F). This can result in a
maximum of 256 call buttons.
The terminal identication corresponds to the
indoor device intercom address.
Mounting instructions:
The REH312X must be installed horizontally in
the ush-mounting box or on the outdoor caller
unit.
Figure 1: conductor routing
To prevent damage to the device as a result of
condensation, route the conductors downwards
away from the call button connection module.
Remove the protective lm from the base so
that it can be stuck to a clean, grease-free
surface.
Once the base has been glued (50% will
beglued after 20 minutes), position the
connection module between the 4 slots and clip
it into place.
Technical data:
Dimensions (W x H x D):
• module: 85 x 49 x 21 mm
• mounting plate: 88 x 52 x 4 mm
Montage-instructies:
De REH312X moet horizontaal geïnstalleerd
worden in de inbouwbox of op het deurstation.
Beeld 1: geleiding van de stroomdraden
De kabelingangen van de aansluitingsmodule
voor call drukknoppen moeten naar beneden
gericht zijn om beschadiging van de kabels door
vocht te voorkomen.
Het kleefvlak reinigen en ontvetten en de
beschermingsfolie van de sokkel verwijderen.
Eens de sokkel vastgehecht is (kleeft voor
50% na 20 minuten), de aansluitingsmodule
vastzetten door hem tussen de 4 inkepingen te
plaatsen en te clipsen.
Technische kenmerken:
Afmetingen (L x H x P) :
• module: 85 x 49 x 21 mm
• sokkel: 88 x 52 x 4 mm
Enlever le lm de protection du socle an de
le faire adhérer sur une surface propre et non
grasse.
Lorsque le socle est collé (après 20 minutes, il
sera collé à 50 %), xer le module de connexion
en le positionnant entre les 4 encoches et le
clipser.
Caractéristiques techniques :
Dimensions (L x H x P) :
• du module : 85 x 49 x 21 mm
• du support : 88 x 52 x 4 mm
Veiligheidsvoorschriften i
De installatie en de montage van elektrische
apparaten dienen uitsluitend door
gekwaliceerde elektriciens uitgevoerd te
worden, conform de installatienormen en met
inachtneming van de in het land geldende
richtlijnen, bepalingen en voorschriften qua
veiligheid en ongevallenpreventie.
Gelieve de geldende voorschriften en normen
voor de elektrische stroombanen ZLVS te
respecteren bij de installatie en het aanleggen
van de kabels.
Deze handleiding maakt integraal deel uit van
het product en moet door de eindgebruiker
bijgehouden worden.
Bestanddelen van het apparaat
(beeld 2)
(1) Aansluitklem G
De aansluitklemmen G: contact
gemeenschappelijk voor alle call
drukknoppen.
(2) Aansluitklem (van tot ) 0 F
De call drukknoppen worden aangesloten op
de aansluitklemmen (van tot ). 0 F
Maximum 16 call drukknoppen kunnen
aangesloten worden.
(3) Bus ingang/uitgang
Met de bus ingang/uitgang kan de audio of
video module aangesloten worden op de
aansluitingsmodule voor call drukknoppen
(aan de hand van een busaansluitingskabel
335 mm, bijgeleverd).
Met de tweede bus ingang/uitgang kan een
tweede extensiemodule voor call drukknopen
in serie aangesloten worden (aan de hand
van een busaansluitingskabel)
Het is mogelijk maximum 16 extensiemodules
voor call drukknoppen aan te sluiten, hetzij
maximum 256 call drukknoppen.
De aansluitklemmen worden gedetermineerd in
overeenstemming met het intercomadres van
het interne station.
02/2017 - 6LE001970A Ind. C
Fig. 2: beschrijving van het apparaat / desciption of the equipment
(1) (2)
G G 0 1 2 3 4 5 6 7 8 9 A B C D E F
(3)
(3)(1) (2)
335 mm
Product specificaties
| Merk: | Hager |
| Categorie: | Niet gecategoriseerd |
| Model: | REH312X |
Heb je hulp nodig?
Als je hulp nodig hebt met Hager REH312X stel dan hieronder een vraag en andere gebruikers zullen je antwoorden
Handleiding Niet gecategoriseerd Hager
12 Mei 2025
12 Mei 2025

12 Mei 2025
12 Mei 2025
12 Mei 2025
12 Mei 2025
12 Mei 2025
12 Mei 2025
12 Mei 2025
12 Mei 2025
Handleiding Niet gecategoriseerd
- Crane Song
- Delimano
- Lucide
- Delta
- Paingone
- Anova
- PCTV Systems
- Qanba
- Meinl
- Tefal
- Suunto
- AFX
- ID-Tech
- Kaiser Fototechnik
- Lewitt
Nieuwste handleidingen voor Niet gecategoriseerd
18 September 2025
18 September 2025
18 September 2025
18 September 2025
18 September 2025
18 September 2025

18 September 2025
17 September 2025
17 September 2025

17 September 2025