GVM WY-2V Handleiding
GVM Niet gecategoriseerd WY-2V
Bekijk gratis de handleiding van GVM WY-2V (1 pagina’s), behorend tot de categorie Niet gecategoriseerd. Deze gids werd als nuttig beoordeeld door 74 mensen en kreeg gemiddeld 4.4 sterren uit 9 reviews. Heb je een vraag over GVM WY-2V of wil je andere gebruikers van dit product iets vragen? Stel een vraag
Pagina 1/1
Shutter release
extension cable
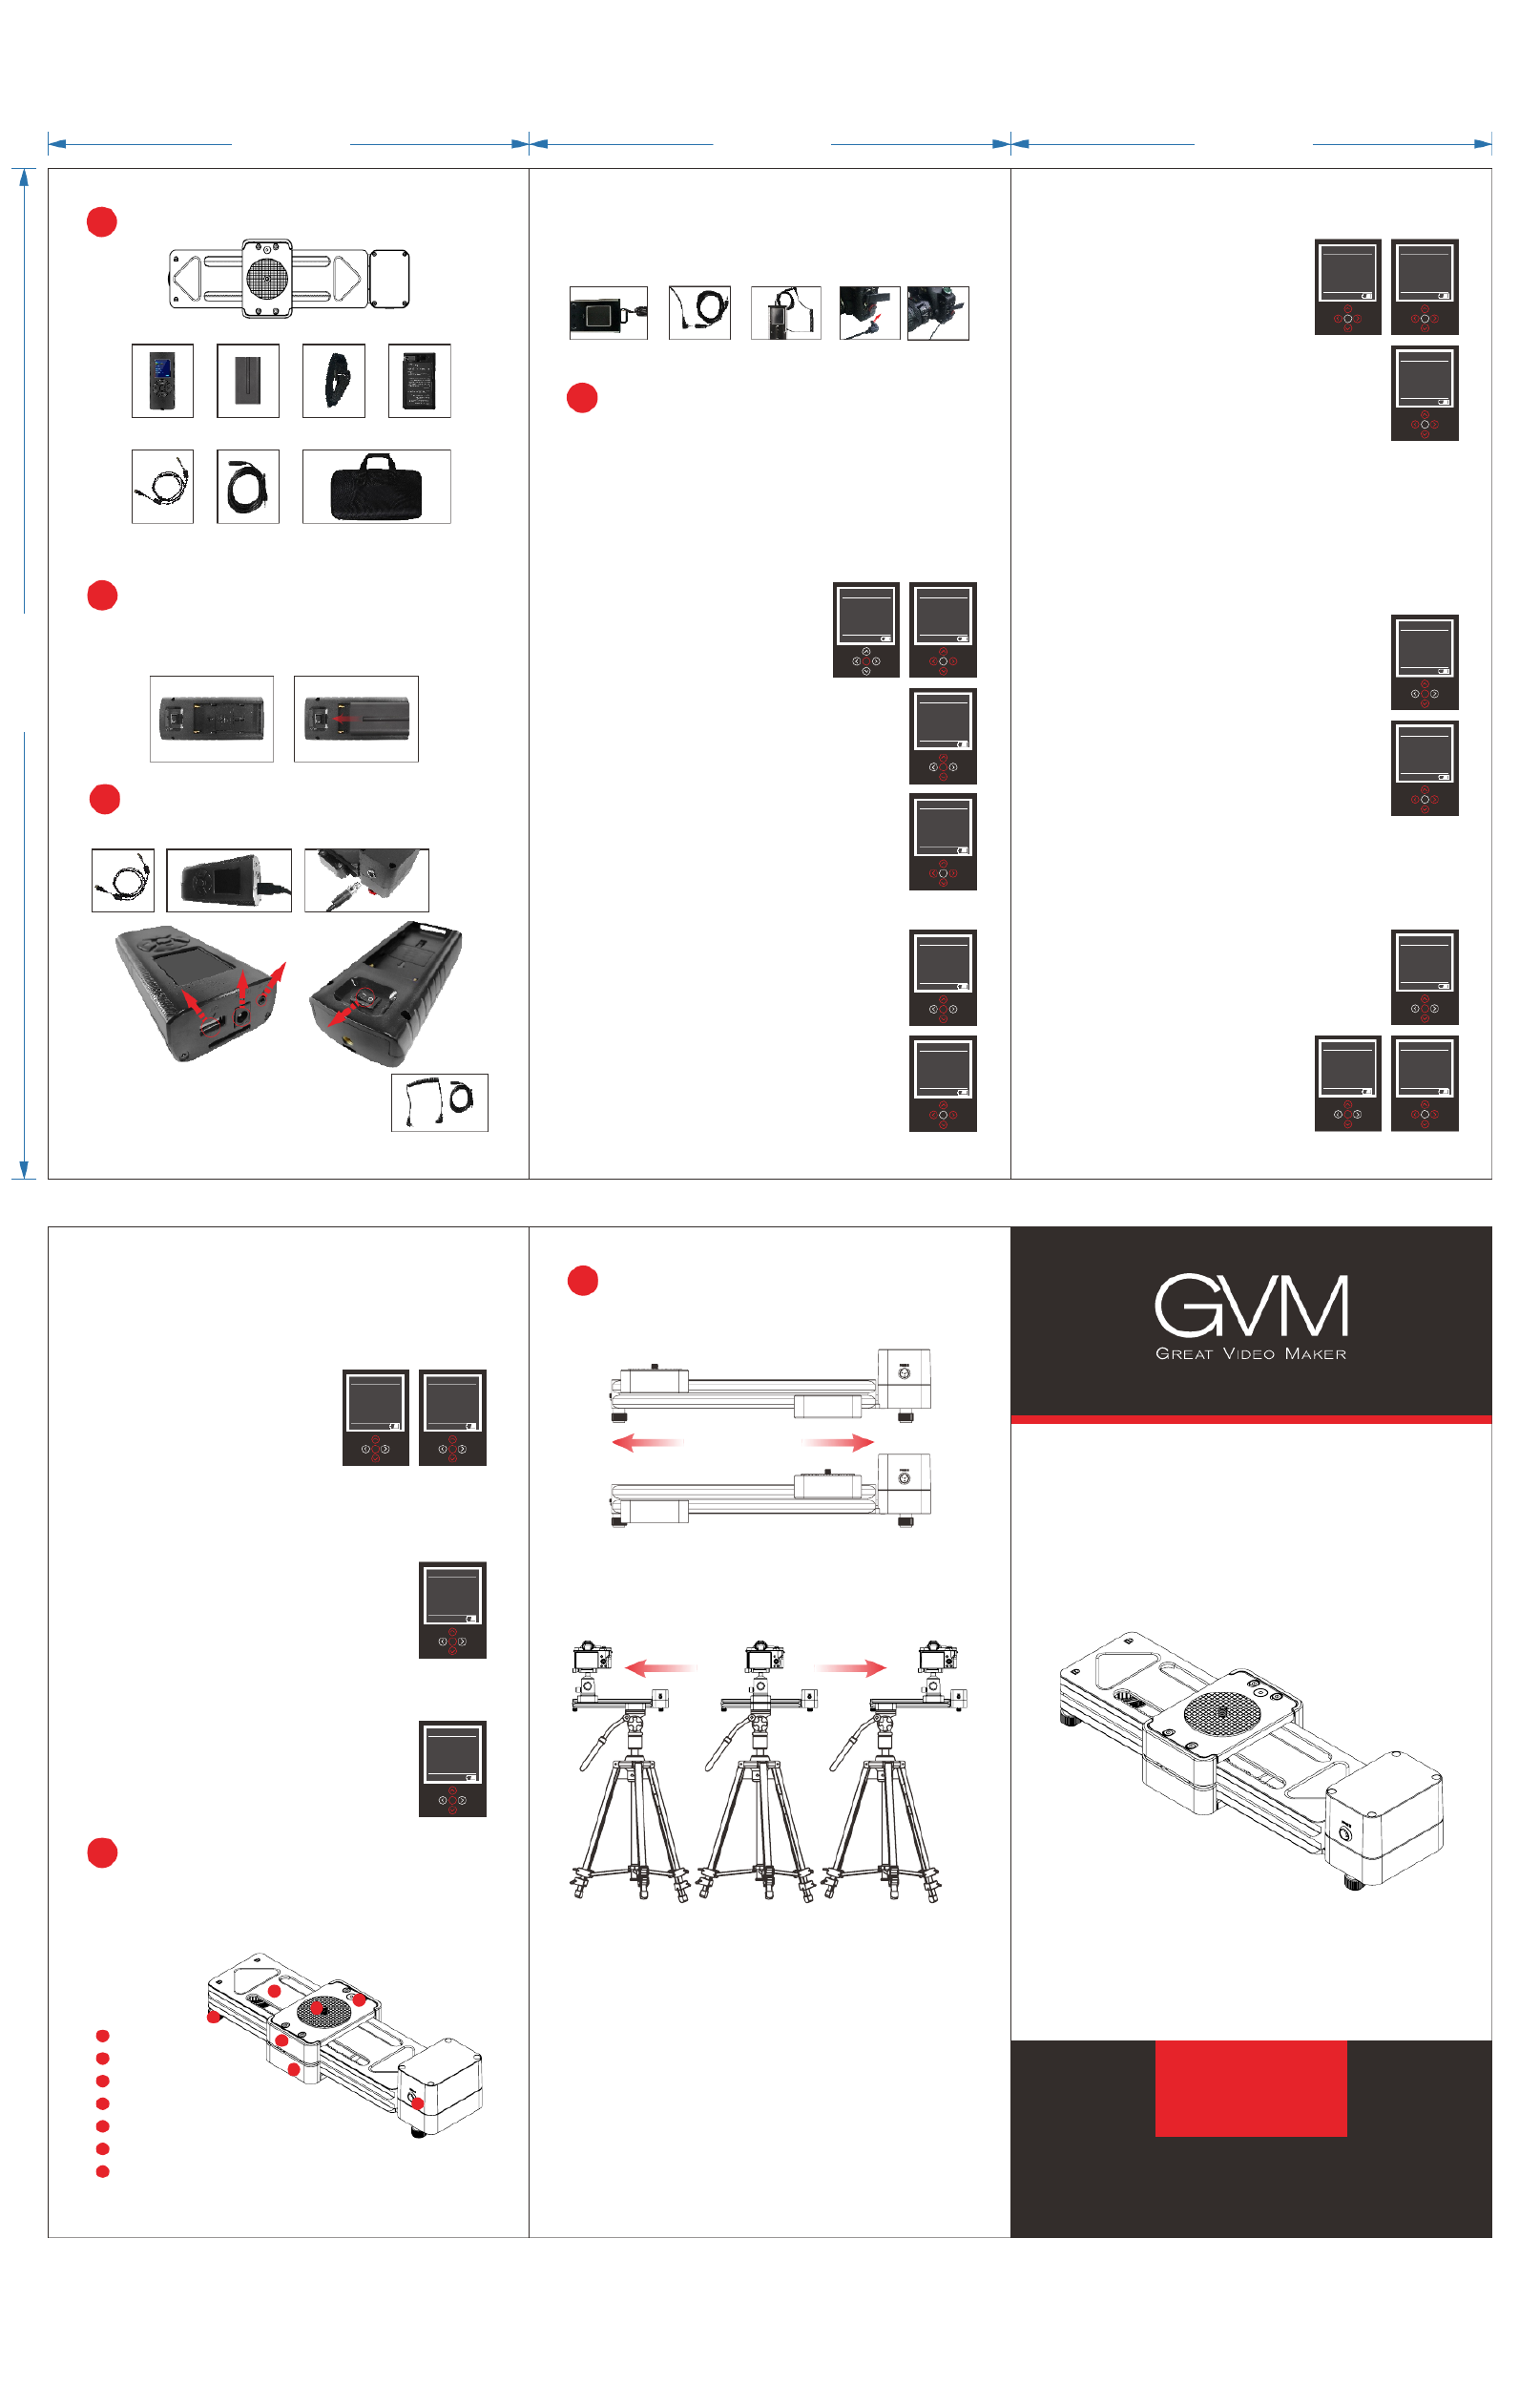
1 Package Contents
1Locate the battery clip on the back of the remote. .
2Insert the battery. .
2
2
2
22Installing the Battery
Plug the remote cable into the remote and motor.
3
3
3
33 Connecting he emotendotort r a m
2. Plug the shutter release cable into the remote
control and the camera’s remote control terminal.
Use the extension cable if more length is required.
+
+
+
++ =
=
=
==
Portable bag
Battery Hook&LoopRemote
4
4
4
44 Settings Menu:
Remote cable
1. Turn off power to reset the remote control.
2. Settings Menu
1/ Set the Language:
1. Press the up or down arrow and highlight the Settings
menu option (P1).
2. Press the up or down arrow and highlight the Language
menu option (P2).
3. Press the right or left arrow button
to change language between English
and Chinese. Long press the middle
button to save your settings.
Set the start point:2/
1. Press the up or down arrow and highlight the
Settings menu option (P1).
2. Press the middle button.
3. Highlight the Set Start option and press the
middle button (P3).
4. Press the right or left arrow button to move
the slider. Press the middle button to stop the
motion.
5. Press the middle button a second time to
select the start point (P4)
6. Long press the middle button to save the start point.
Set the end point:3/
1. Highlight the Set End option and press the
middle button (P5)
2. Press the right or left arrow button to move
the slider. Press the middle button to stop the
motion.
3. Press the middle button a second time to
select the end point (P6)
4. Long press the middle button to save the
end point.
Motorized Slider
1. Locate the shutter release and extension
cable.
Using the time-lapse function
Camera shutter
release input
P3
P1
P4
Set Start
Set End
Language:English
Reset:No
Versi on: 1.0
Setting
Video Shot
Time Lapse
Shutter s etup
Setting
Set Start
Set End
Language:English
Reset:No
Versi on: 1.0
Setting
Speed:50%
Step:0
Set Sart:-33554432
Set Start
Set Start
Set End
Language:English
Reset:No
Versi on: 1.0
Setting
Battery Charger
5
5
5
55Introduction
Auto Loop
Auto Stop
Auto Mode
Auto Loop
Auto Stop
Auto Mode
P15
5. Auto Mode
Auto Mode has two options: Auto Loop and Auto Stop. To
use either one, you first must set the start and end points
as described in the Settings section.
1. Press the up or down arrow
and highlight the Video Shot
menu option. Then press the
middle button(P13).
2. Press the up or down arrow
buttons and highlight the Auto
Mode menu option (P14).
Auto Loopwill provide motion between the start and 1/
end points indefinitely.
1. Highlight the Auto Loop button and then
press the middle button (P15).
2. Press the right or left arrow to
start motion.
3. Press the middle button to
pause the motion.
Auto Stopwill provide motion between the start and 2/
end points one time.
1. Highlight the Auto Stop button and then
press the middle button (P16).
2. Press the right or left arrow to start motion.
3. Press the middle button to pause the motion.
P7
P6P4
P8
Speed:50%
Step:0
Set End:-335544 32
Set End
Video Shot
Time Lapse
Shutter s etup
Setting
Int e rv al: .1 0
Time-lapse: 1.0
Stop Time: .1 2
Photo:10 0 0
Auto LoopNo:
Setting
Speed:50%
Step:0
Set Sart:-33554432
Set Start
P10
Video Shot
Time Lapse
Shutter s etup
Setting
Manual Mode
Auto Mode
Setting
Set Start
Set End
Language:English
Reset:No
Versi on: 1.0
Setting
Speed 50: %
Direct ionPause:
Manual Mode
Video Shot
Manual Mode
Auto Mode
Setting
P14P13
P16
4/ Set the speed:
1. At any time while setting the start
or end points, you can adjust the
speed from [1-100%] by pressing the
Up or Down arrows (P4), (P6).
Reset:5/
1.Highlight the Reset option(P7).
2.Press the right r left arrow button to choose
"Yes"or"No".Press the middle button to reset the
remote control or go back setting menu.
3.Long press the middle button to save the
setting.
3. Time lapse menu
1/ Set the start point:
1. Press the up or down arrow and highlight the Time Lapse
menu option (P8).
2. Press the middle button.
3. Highlight the parameter you want to change
and adjust its value by pressing the right or left
arrow button (P9).
4. Press the middle button when complete.
5. Press the right or left arrow button to begin
time lapse shooting.
6. Press the middle button to pause any motion.
7. The minimum Interval time is 0.1 second, the
minimum Stop time is 1 second, and the Stop
time needs longer than Time-lapse time at least
0.2 seconds。
4. Video shot menu
1/ Manual Mode:
1. Press the up or down arrow and highlight
the Video Shot menu option (P10) and then
press the middle button.
2. Highlight Manual Mode and then press the
middle button(P11).
3. Press the left or right arrow button
to begin motion (P12).
4. You can adjust the speed at any
time by pressing the Up or Down
arrow buttons.
P11
P9
P2
P5
P6
Speed:50%
Step:0
Set End:-335544 32
Set End
TROUBLE SHOOTING
1. Use a standard Sony NP-F550/F570/F770/F9XX
series battery.
2. Monitor the battery power level shown on the bottom
of the remote controller.
3. Make sure all cables are firmly inserted into all
devices.
4. If the slider is not horizontal, make sure to lock the
center brake before turning off the power or
disconnecting the cable. Under normal operations, the
motor acts as a brake and any loss of power will permit
the camera base to quickly fall to its lowest point
potentially damaging your camera or slider.
1 Using the slider
Video Shot
Time Lapse
Shutter s etup
Setting
P12
O
O
O
ON
N
N
NO
O
O
OF
F
F
FF
F
F
F
/
/
/
/ON OFF/
DC
DC
DC
DC
adapt
adapt
adapt
adapter
er
er
erDCadapter
S
S
S
Sh
h
h
hu
u
u
ut
t
t
tt
t
t
te
e
e
er
r
r
r
Re
Re
Re
Rel
l
l
le
e
e
ea
a
a
as
s
s
se
e
e
e
Shutter
Release
M
M
M
Mo
o
o
ot
t
t
to
o
o
or
r
r
r
c
c
c
co
o
o
on
n
n
nn
n
n
ne
e
e
ec
c
c
ct
t
t
ti
i
i
io
o
o
on
n
n
n
Motor
connection
The WY-2V is a portable solution for achieving smooth, linear
camera motion in your video productions. You can capture
tracking shots and push-ins that will increase production value
and add a cinematic quality to your firm.
5
6
7
1
2
3
4
Camera mount base
5
1/4" mount
6
Bubble level
7
Tripod mount base
Adjustable feet
1
2
3
Slider rail
4
DC Power interface
When used it on the floor or table, the WY-2V provides 6.5-inch
sliding distance.
You can use a heavy-duty tripod or light stand to support the
slider for height and tracking length. After installation, the
WY-2V offer 13-inch sliding length. The mounting base of the
slider is equipped with a 1/4"-20 screw sockets.
尺寸:* 折页300 210mm23
Add: 338 N Canal St, #20, South San Francisco,CA94080, USA
Web: www.gvmled.com
Email: support@gvmled.com
MOTORIZED SLIDER
123
4 5
WY-2V
100.00 mm100.00 mm
210.00 mm
100.00 mm
Product specificaties
| Merk: | GVM |
| Categorie: | Niet gecategoriseerd |
| Model: | WY-2V |
Heb je hulp nodig?
Als je hulp nodig hebt met GVM WY-2V stel dan hieronder een vraag en andere gebruikers zullen je antwoorden
Handleiding Niet gecategoriseerd GVM

24 Juni 2026
10 November 2025
9 November 2025
15 November 2024
28 Mei 2024
8 Juni 2023
11 Mei 2023
7 Mei 2023
5 Mei 2023
29 April 2023
Handleiding Niet gecategoriseerd
Nieuwste handleidingen voor Niet gecategoriseerd
23 Juli 2026
23 Juli 2026
23 Juli 2026
22 Juli 2026
22 Juli 2026
22 Juli 2026
22 Juli 2026
22 Juli 2026
22 Juli 2026
21 Juli 2026