Foscam FI9961EP Handleiding
Foscam Bewakingscamera FI9961EP
Bekijk gratis de handleiding van Foscam FI9961EP (31 pagina’s), behorend tot de categorie Bewakingscamera. Deze gids werd als nuttig beoordeeld door 105 mensen en kreeg gemiddeld 4.8 sterren uit 7 reviews. Heb je een vraag over Foscam FI9961EP of wil je andere gebruikers van dit product iets vragen? Stel een vraag
Pagina 1/31
2Physical Description
V1.0.9
305503000462
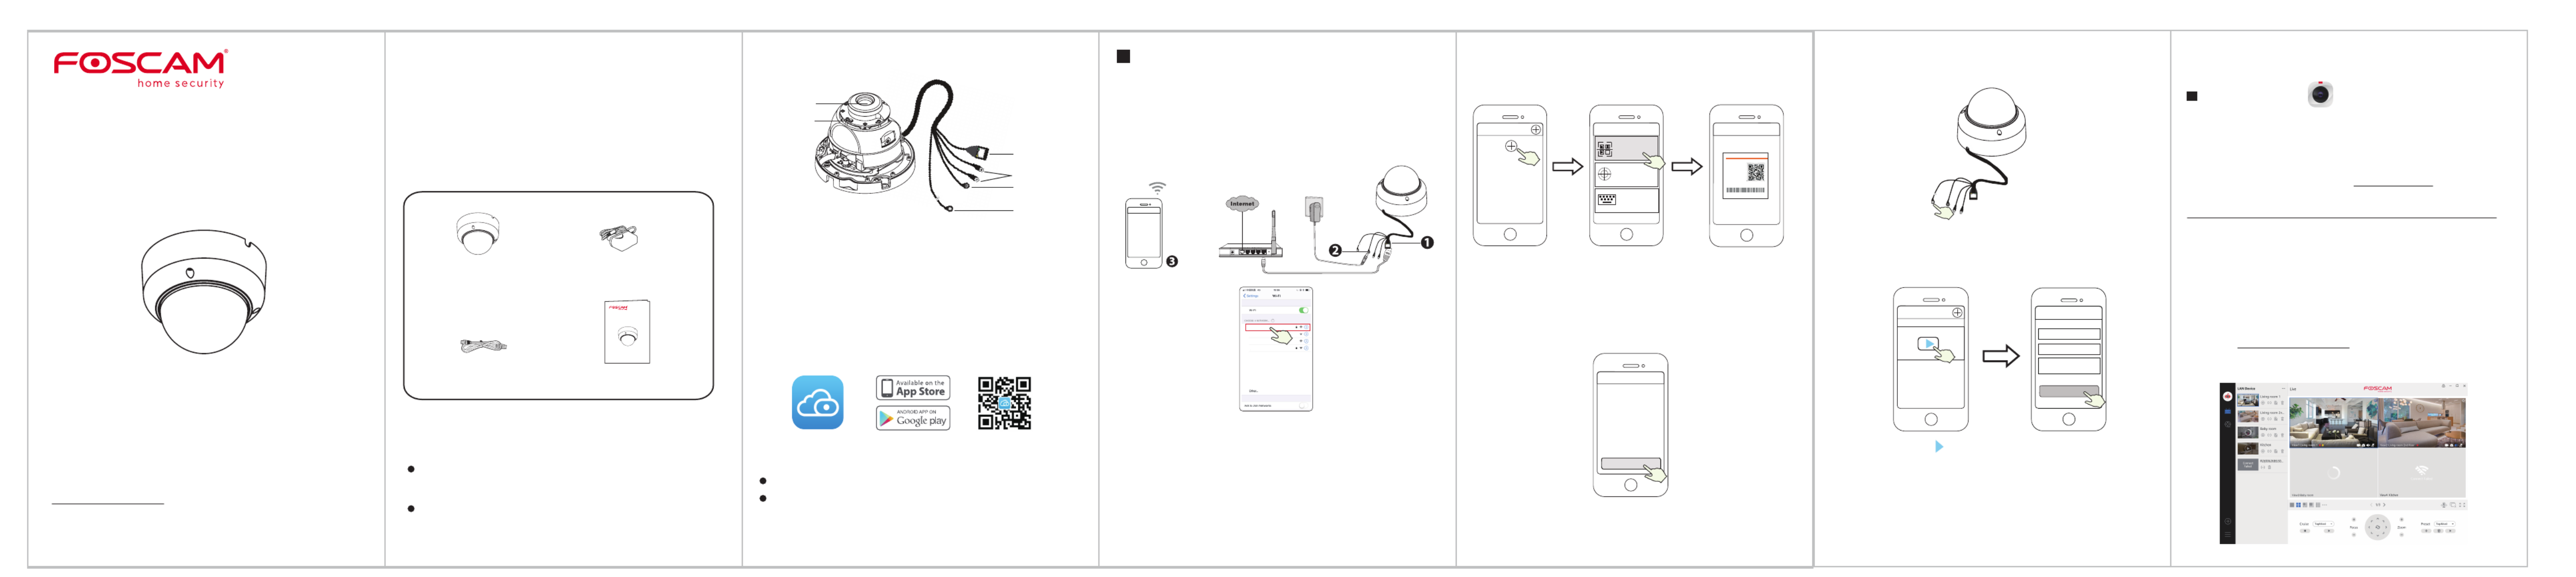
Quick GuideSetup
FHD Security Camera
Security Tips
Package Contents
3
Setting Up Your Camera:
Wired Connection via Foscam App
Setting Up Your Foscam
Security Camera
1
Getting Started
LAN
Audio In/Out
Power
Reset Button
Array LED
LENS
Power Adapter IP Camera
Quick Setup Guide
Quick Setup Guide
FH D Secu rity Cam e ra
Ethernet Cable
To view this guide in other languages (e.g. Nederlands, Deutsch,
Français, Español), and for detailed manuals, tools, etc., please visit
foscam.com/downloads.
Please change the camera's password regularly, using a combina-
tion of numbers, letters and special characters.
We recommend that you regularly update your camera with the
latest available software and rmware to ensure the best experience
with your camera.
To ensure a smoother video experience on your smart phone, it is
recommended that your smart phone meet the following specications:
iOS: version 8.1 or higher.
Android: 4.1 or higher, using a device with a Graphics Processing
Unit (GPU).
Before You Get Started
Scan the QR code below to download and install the Foscam APP.
Wired Connection
1. Connect the camera to your router with an Ethernet cable.
2. Plug the power adapter into the camera, and then wait for about 1
minute.
3. Make sure your smart phone is connected to the same WiFi network as
the camera.
WPS
Router / Switch
WiFi connection
Foscam_1
Foscam_2
xxxxx_2.4G
xxxxx_5G
Tips:You need to connect to the 2.4GHz network if your WiFi router is
dual-band—most newer routers have both 2.4GHz and 5GHz
channels. For example, choose SSID: XXXXX_2.4G.
5. After logging into Foscam APP, select “Tap to add a camera” or "" +
icon on the upper right corner, then select "" and Scan the QR code
scan the QR code that labeled at the bottom of your camera.
4. Open the foscam APP and please register a Foscam account, or sign in if
you have one already.
Scan the QR code which
is located at the bottom
of your camera.
Tap + iconSelect ”Scan
the code”
Tap to add a camera
Add Device
<
Scan the QR code
Search in LAN
Manually add
Scan QR Code
<
Mo del : XXX
MAC ID:000000000000
Usern a m e(defa ul t):adm i n
Password(defau lt ):(blan k )
DDNS:XXXXXX.
m yfoscam.org
FCC ID: XXXXX
IC:12558A-XX
S/N:FIAI1403000001
UI D:XXXXXXXXXXX
FHD Wir el es s IP C am er a
6. Wait for a few seconds and then you can set the camera name and tap
“” in "Set name" interface.Save
Camera added successfully
and name has been set
Set name
Save
Camera added successfully
Please set the camera name:
My Camera
Note: If the adding process fails, please reset your camera and try
adding again according to the above method.
Reset Button
7. Tapping on the play button in the video box will jump to the “Camera
Login” setting interface. For your security, please set a new username
and password for your camera before viewing live video.
Set a new username
and password
Tap “ ”
Camera Login
New camera username
Re-enter new camera
password
New camera password
Foscam_camera
On
Submit
8. After completing the above steps, you can begin using your camera.
.
4
Other Ways to Access Your Camera
Foscam VMS
Foscam VMS is a new tool for PCs. It does not require plug-ins and is
compatible with Windows & Mac, supporting all Foscam HD cameras and
up to 36 cameras at the same time. If you would like to manage multiple
cameras, we suggest you install Foscam VMS. You can download the
“Foscam VMS ” Windows version from foscam.com/vms, and can
download the "Foscam VMS" Mac version from the APP store:
https://apps.apple.com/cn/app/foscamvms/id1521202507?mt=12
Add the IP Camera
1. Run Foscam VMS, then create a local administrator account and login.
2. Tap the "+" icon on the Foscam VMS and follow the setup wizard to
add your camera.
Please visit to view the user manual and for foscam.com/downloads
additional detailed steps.
Note: For the best experience, please update Foscam VMS to the
latest version!
Note: For the best experience, please update the APP to the latest version!
Product specificaties
| Merk: | Foscam |
| Categorie: | Bewakingscamera |
| Model: | FI9961EP |
| Kleur van het product: | Wit |
| Soort: | IP-beveiligingscamera |
| Vormfactor: | Dome |
| Ondersteuning voor plaatsing: | Binnen & buiten |
| Connectiviteitstechnologie: | Bedraad |
| Ethernet LAN: | Ja |
| Montagewijze: | Plafond/muur |
| Maximum resolutie: | 1920 x 1080 Pixels |
| Totaal aantal megapixels: | 2 MP |
| Type stroombron: | Power over Ethernet (PoE) |
| Minimale belichting: | 0 Lux |
| Aantal cameras: | 1 |
| Geïntegreerde geheugenkaartlezer: | Ja |
| Compatibele geheugenkaarten: | MicroSD (TransFlash) |
| Ingebouwde HDD: | Ja |
| Nachtvisie: | Ja |
| Video bewegings-detectie: | Ja |
| Certificering: | CE, RoHS, FCC, IC, IP66 |
| Volledige HD: | Ja |
| Type beeldsensor: | CMOS |
| Duurzaamheidscertificaten: | RoHS |
| Veiligheidsfunties: | Vandaalbestendig |
| IP-adresfilter: | Ja |
| Power over Ethernet (PoE): | Ja |
| Blootstelling type: | Auto |
| Maximale afstand: | 20 m |
| Bewegingssensor: | Ja |
| Weerbestendig: | Ja |
| Wide Dynamic Range (WDR): | Ja |
| Wifi: | Ja |
| Type waarschuwingsnotificatie: | E-mail, Snapshot alert message, Text alert message |
| Actieve ombevoegde demontage alarm: | Ja |
Heb je hulp nodig?
Als je hulp nodig hebt met Foscam FI9961EP stel dan hieronder een vraag en andere gebruikers zullen je antwoorden
Handleiding Bewakingscamera Foscam

10 December 2024
9 December 2024
4 December 2024
10 Juni 2024
12 Maart 2024
10 Januari 2024
18 Augustus 2023
4 Juli 2023
28 Juni 2023
15 Juni 2023
Handleiding Bewakingscamera
Nieuwste handleidingen voor Bewakingscamera
22 Juli 2026
17 Juli 2026
15 Juli 2026
14 Juli 2026
14 Juli 2026
14 Juli 2026
14 Juli 2026
13 Juli 2026
13 Juli 2026
13 Juli 2026