Extron XTP II FT 402 8K Handleiding
Extron Niet gecategoriseerd XTP II FT 402 8K
Bekijk gratis de handleiding van Extron XTP II FT 402 8K (2 pagina’s), behorend tot de categorie Niet gecategoriseerd. Deze gids werd als nuttig beoordeeld door 5 mensen en kreeg gemiddeld 5.0 sterren uit 3 reviews. Heb je een vraag over Extron XTP II FT 402 8K of wil je andere gebruikers van dit product iets vragen? Stel een vraag
Pagina 1/2
1
XTP II FT 402 8K • Setup Guide
IMPORTANT NOTE:
Go to www.extron.com for the complete user guide, installation instructions, and specications before
connecting the product to the power source.
The Extron XTP II FT 402 8K is an XTP
®
transmitter for video, audio, bidirectional control, and Ethernet transmission over two ber
optic cable. This guide provides instructions for an experienced installer to install and connect the XTP II FT 402 8K.
WARNING:The XTP II FT 402 8K outputs continuous invisible light (Class 1 rated), which may be harmful to the eyes;
use with caution. Plug the attached dust caps into the optical transceivers when the ber cable is unplugged.
CLASS 1 LASER PRODUCT, see the XTP II FT 402 8K User Guide, at www.extron.com.
AVERTISSEMENT :Le XTP II FT 402 8K émet une lumière invisible en continu (conforme à la classe 1) qui peut être
dangereux pour les yeux, à utiliser avec précaution. Branchez les protections contre la poussière dans l’ensemble
émetteur/récepteur lorsque le câble bre optique est débranché.
Produit laser de classe 1, voir le XTP II FT 402 8K User Guide sur www.extron.com (en anglais).
OVERXTPXTP OUT
RS-232
TxRxG
RS-232
TxRxG
REMOTE
LAN
R
POWER
--A MAX
12V
INPUTS
1
HDMI
HDMI OUT
OUTIN
2
DISPLAYPORT
AUDIO
XTP II FT 402 8K
A
BCDEFGHI
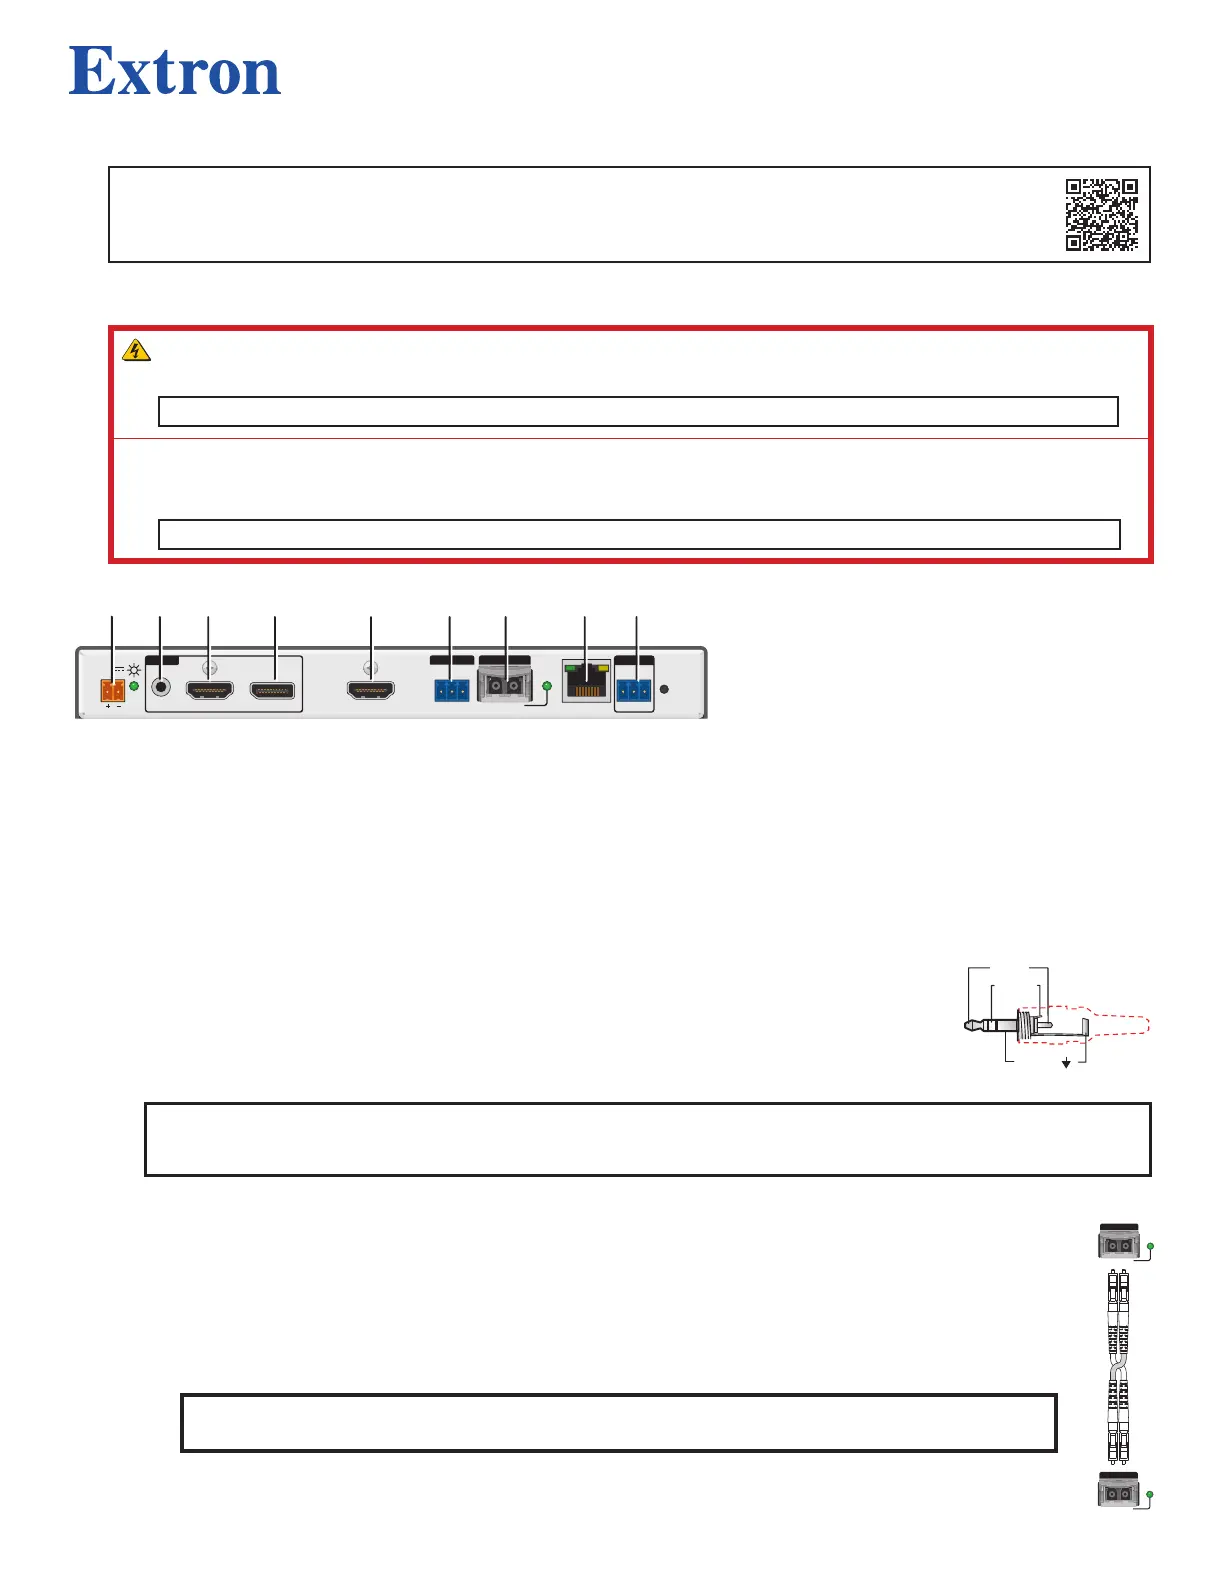
Figure 1. Rear Panel Connectors
Installation
Step 1 — Mount the Device
Turn o or disconnect all equipment power sources and mount the transmitter on a tabletop or in a rack.
Step 2 — Connect Input and Output Devices
1. Connect an unbalanced analog audio source to the 3.5 mm, TRS connector (see gure 1,
B
). Wire
the connector as shown to the right. Audio from this input can be transmitted with any of the two
video inputs. By default, HDMI embedded audio is given priority.
2. Connect a digital video source to the female HDMI connector (
C
). It can accept HDMI, DVI (with an
appropriate adapter), or dual mode DisplayPort video signals.
NOTES:
• Use an Extron LockIt
®
Plus lacing bracket to secure HDMI cables to the rear panel connectors.
• Video input from a DisplayPort source must be a dual mode DisplayPort source.
3. Connect a DisplayPort video source to the female DisplayPort connector (
D
).
4. Connect a digital video display to the HDMI output connector (
E
).
Step 3 — Connect Throughput Devices
1. Connect a ber optic cable between the XTP connector on the transmitter (
G
) and the receiving device as
follows (see the image on the right for ber cable connections):
a. Connect the fiber cable between the transmitter Out port and the receiver In port (
1
).
NOTE:Ensure that the transmitter and connected receiver are in the same transmission mode,
singlemode (SM) or multimode (MM) and use the correct SM or MM ber cable to connect the devices.
b. To return serial data from the receiver to the transmitter, connect a cable between the receiver Out port
and the transmitter In port (
2
). The IN LED indicator lights green when light is present on the conductor.
A
DC power connector
B
Analog audio input
connector
C
HDMI input connector
D
DisplayPort input
connector
E
HDMI output connector
F
Over XTP (RS-232)
connector
G
XTP output connector
H
LAN connector
I
Remote RS-232
connector
Sleeve ( )
Ring(R)
Tip(L)
3.5 mm Stereo Plug Connector
(balanced)
Receiver
Transmitter
11
22
22
11
XTP OUT
OUTIN
XTP IN
OUTIN
Product specificaties
| Merk: | Extron |
| Categorie: | Niet gecategoriseerd |
| Model: | XTP II FT 402 8K |
Heb je hulp nodig?
Als je hulp nodig hebt met Extron XTP II FT 402 8K stel dan hieronder een vraag en andere gebruikers zullen je antwoorden
Handleiding Niet gecategoriseerd Extron

26 Maart 2026
4 Maart 2026
11 December 2025
9 December 2025
9 December 2025
9 December 2025
29 November 2025
29 November 2025
23 November 2025
7 November 2025
Handleiding Niet gecategoriseerd
Nieuwste handleidingen voor Niet gecategoriseerd
23 Juli 2026
23 Juli 2026
23 Juli 2026
23 Juli 2026
23 Juli 2026
23 Juli 2026
23 Juli 2026
23 Juli 2026
23 Juli 2026
22 Juli 2026