Extron TLP Pro 535M Handleiding
Bekijk gratis de handleiding van Extron TLP Pro 535M (2 pagina’s), behorend tot de categorie Monitor. Deze gids werd als nuttig beoordeeld door 5 mensen en kreeg gemiddeld 4.6 sterren uit 8 reviews. Heb je een vraag over Extron TLP Pro 535M of wil je andere gebruikers van dit product iets vragen? Stel een vraag
Pagina 1/2
1
RM 7, 8, 9 - Rack Mount TLP Accessories • Setup Guide
IMPORTANT NOTE:
Go to www.extron.com for the complete RM 7, RM 8, or RM 9 specications, and related TLP Pro series
(535M, 835M, 1035M, or 1535M) installation instructions and specications.
Rack Mount Overview
This guide provides instructions for experienced installers to utilize
the following rack mount TLP accessory options:
•RM 7 — to mount and install the Extron TLP Pro 535M (see
gure 3 on page 2) or 835M (see gure 1) touchpanel in a
standard 19-inch equipment rack with 3U of vertical space.
•RM 8 — to mount and install the Extron TLPPro 535M (portrait-
style, see gure 4 on page 2) or 1035M (see gure 2) in a
standard 19-inch equipment rack with 4U of vertical space.
•RM 9 — to mount and install the Extron TLPPro 1535M
touchpanel (see gure 5on page 2) in a standard 19-inch
equipment rack, with 6U of vertical space.
Preparing and Installing
Secure the RM 7, RM 8, or RM 9 to the rack using the provided
#10-32 screws (see gures on the right and page 2,
1
). Ensure the
correct orientation (the top and bottom of the RM has a lip that faces
backwards).
For the location of the screws on any of the TLP mounting plate
options, see their respective mounting diagram.
Each RM includes ease-of-access openings for the status LEDs, reset
button, and menu button of their respective TLP Pro touchpanels.
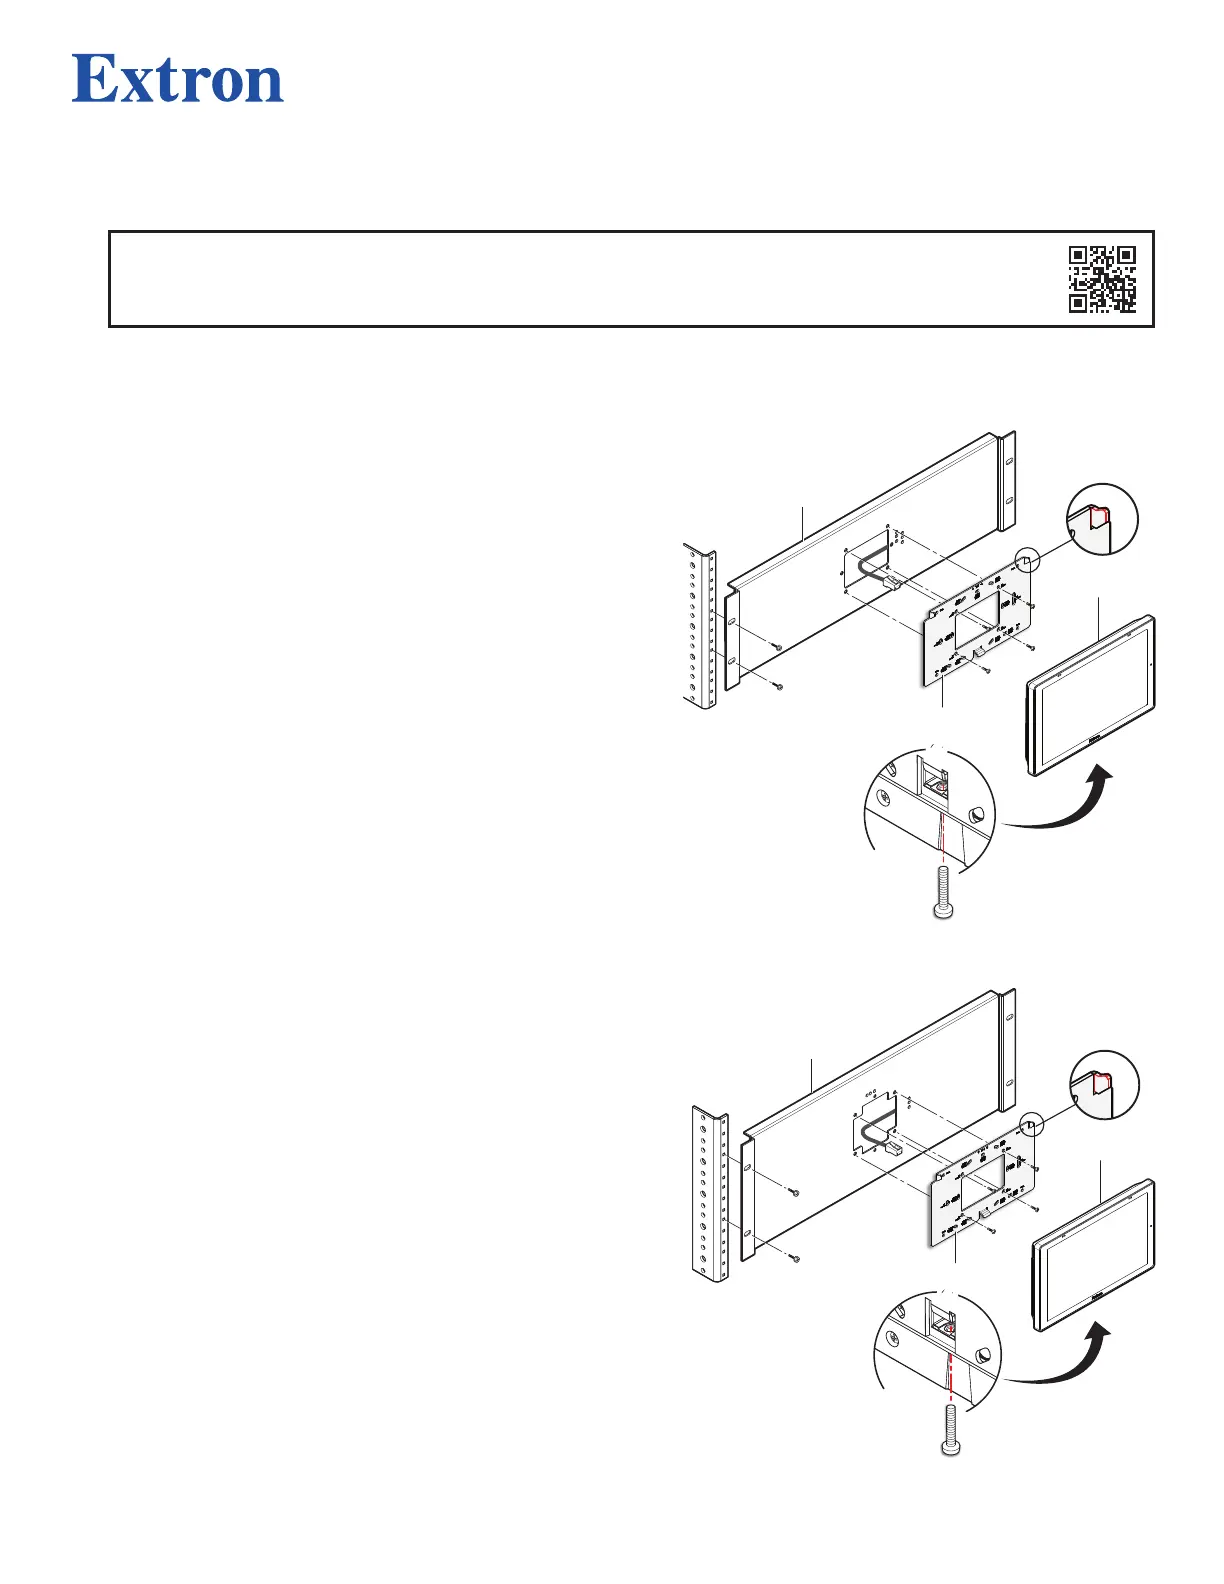
Mounting the Touchpanel
Use the following steps to mount the TLP Pro touchpanel with their
respective TLP Pro mounting plate:
1.Attach the TLP mounting plate to the RM, using the four
provided M3 screws (
2
). Ensure the mounting plate is in the
correct orientation with the hooks on the mounting plate pointing
upwards (
3
) and facing outwards from the RM.
2.Run an Ethernet cable to the rack. Pass it through the RM and
mounting plate.
3.Connect the cable to the LAN/PoE input behind the touchpanel
(see the TLP Pro Series User Guide at www.extron.com).
4.Align the TLP Pro so that the four hooks on the mounting plate
fit into the four slots behind the touchpanel. The TLP Mounting
Plate has only two hooks to fit into the touchpanel (see the TLP
Pro Series User Guide).
5.Press the touchpanel onto the hooks and slide it downwards so
that the hooks sit securely in the slots.
6.The tongue at the bottom of the mounting plate (
4
) sits in the
groove in the bottom of the touchpanel (see inset,
5
). Fasten
the two together by tightening the lock screw (
6
).
RM 7
TLP Mounting Plate
TLP Pro 835M
Back View
5
44
1
2
4
3
5
6
Figure 1. RM 7 and TLP Pro 835M Installation
RM 8
TLP Mounting Plate
TLP Pro 1035M
Back View
44
1
2
4
3
5
6
Figure 2. RM 8 and TLP Pro 1035M Installation
Product specificaties
| Merk: | Extron |
| Categorie: | Monitor |
| Model: | TLP Pro 535M |
Heb je hulp nodig?
Als je hulp nodig hebt met Extron TLP Pro 535M stel dan hieronder een vraag en andere gebruikers zullen je antwoorden
Handleiding Monitor Extron

9 Maart 2026
3 Maart 2026
2 Maart 2026
2 Maart 2026
7 November 2025
2 April 2025
18 September 2024
5 September 2024
5 September 2024
5 September 2024
Handleiding Monitor
Nieuwste handleidingen voor Monitor
8 Juni 2026
4 Juni 2026
4 Juni 2026
4 Juni 2026
3 Juni 2026
3 Juni 2026
3 Juni 2026
2 Juni 2026
2 Juni 2026
2 Juni 2026