Extron ACP VC1 EU Handleiding
Extron
Niet gecategoriseerd
ACP VC1 EU
Bekijk gratis de handleiding van Extron ACP VC1 EU (8 pagina’s), behorend tot de categorie Niet gecategoriseerd. Deze gids werd als nuttig beoordeeld door 5 mensen en kreeg gemiddeld 4.4 sterren uit 3 reviews. Heb je een vraag over Extron ACP VC1 EU of wil je andere gebruikers van dit product iets vragen? Stel een vraag
Pagina 1/8

1
IMPORTANT:
Go to www.extron.com for the
complete user guide, installation
instructions, and specifications.
ACP VC1 EU/MK • Setup Guide
The Extron ACP VC1 EU/MK Audio Control Panel is a fully congurable control interface for use with any Extron ACP-enabled
device.
Each ACP VC1 EU/MK includes two ACP ports, which support power and communication between the host device and the
ACP VC1 EU/MK. Up to eight ACP panels can be used per host device for more demanding control needs.
NOTE: The ACP VC1 EU front and rear panels are identical to those of the ACP VC1 MK. The only difference is the shape of
the plastic faceplate attached to the front of the device. The panels function identically.
Planning System Installation
When planning an ACP system installation, consider how many ACP panels to use, maximum cable distance, and mounting (see
the ACP VC1 EU and ACP VC1 MK product pages at www.extron.com for more information regarding the ACP VC1 EU/MK).
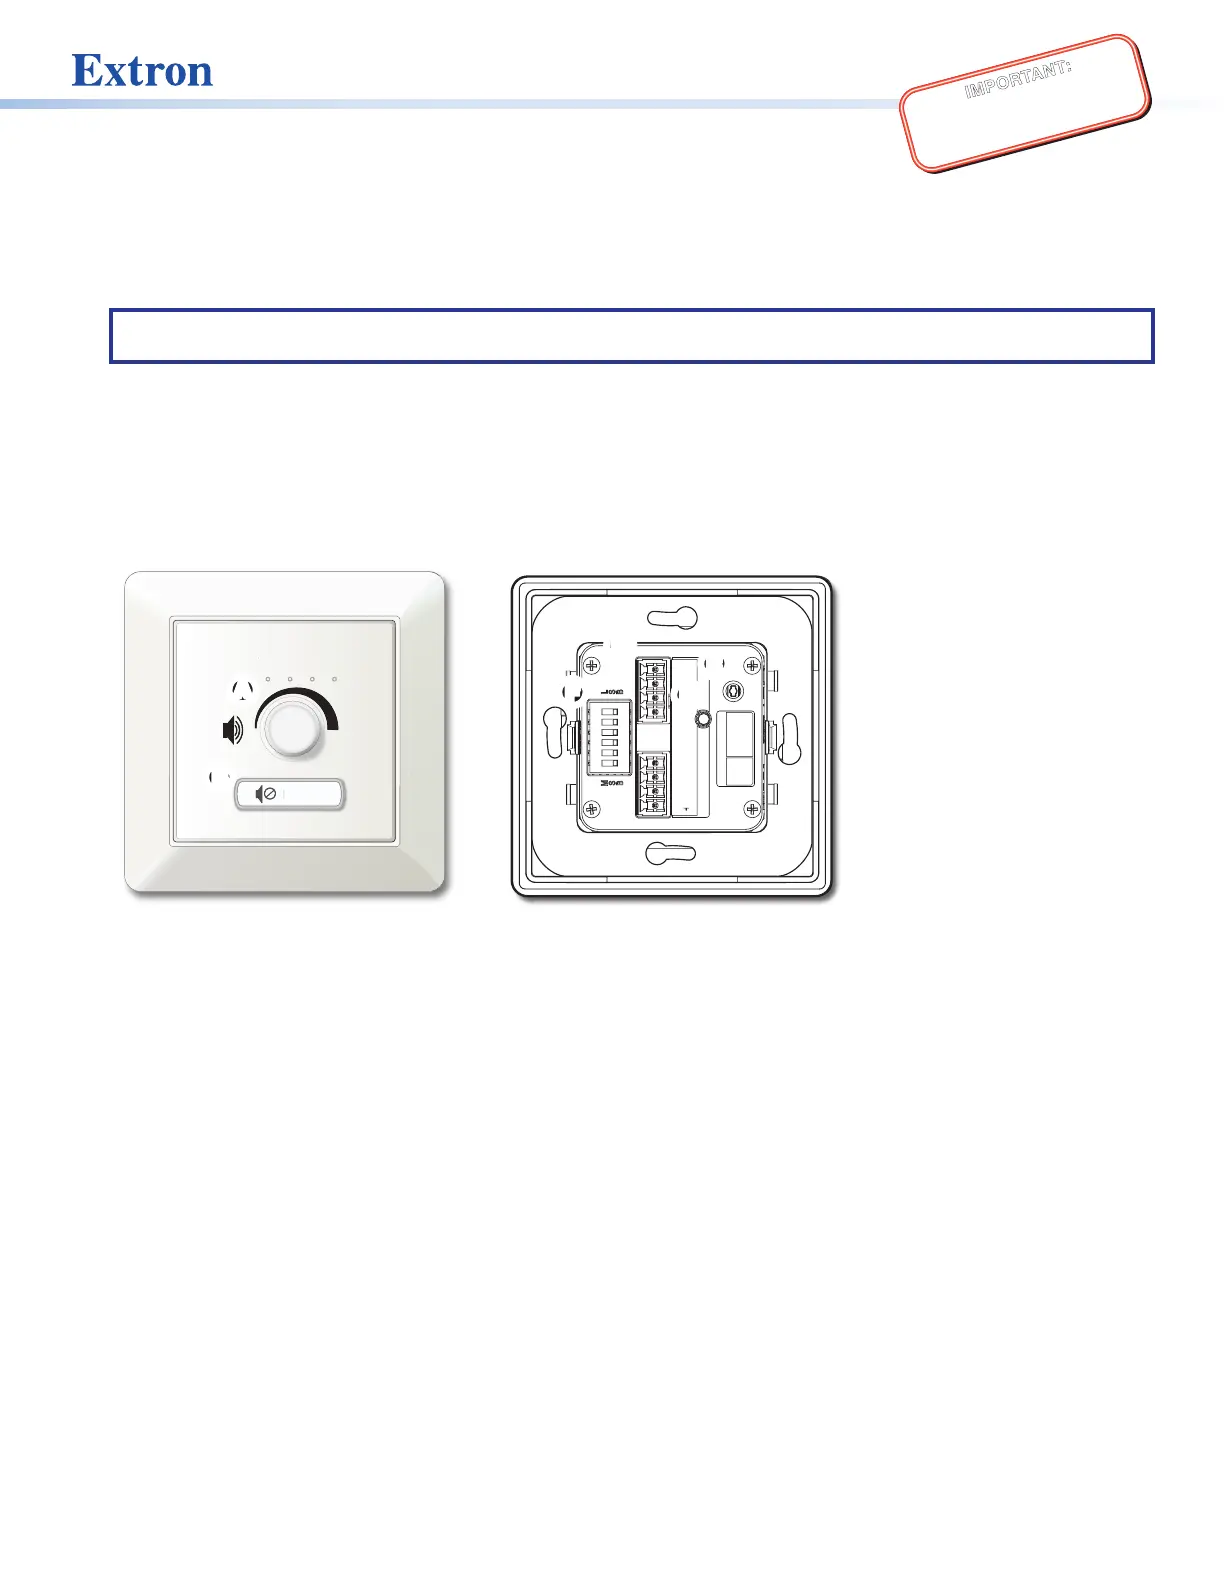
Front and Rear Panel Features
MUTE
VOLUME
M
U
T
E
V
O
L
U
ME
+V
ACP
PWR LOAD
= 1.5W
+S -S G
+V+S -S G
R
STATUS
GREEN
AMBER
RED
LINK
COM ERROR
ID ERROR
AA
B
B
C
C
DD
EE
F
F
Figure 1. ACP VC1 EU/MK
A
Front Panel Rotary Volume Knob
D
Connection Status LED
B
Front Panel Button
E
Reset Button
C
ACP Ports (2)
F
Bus ID DIP Switches
Installation
Step 1: Get Ready
Use the following checklist to prepare for installation:
Download and install the latest software, rmware, and device drivers needed to congure the host device and the
connected ACP devices (see the host device user guide, available at www.extron.com, for details regarding software and
drivers).
Obtain cables, mounting hardware, and any other supplies required for the installation.

2
ACP VC1 EU/MK • Setup Guide (Continued)
Step 2: Prepare the Installation Site
ATTENTION:
• Installation and service must be performed by authorized personnel only.
• L’installation et l’entretien doivent être effectués par le personnel autorisé uniquement.
• Extron recommends installing the ACP VC1 EU/MK into a grounded, UL Listed electrical junction box.
• Extron recommande d’installer le ACP VC1 EU/MK dans un boîtier d’encastrement électrique mis à la terre, listé UL.
• If the ACP VC1 EU/MK will be installed into ne furniture, it is best to hire a licensed, bonded craftsperson to cut the
access hole and perform the physical installation so the surface will not be damaged.
• S’il est prévu d’installer le ACP VC1 EU/MK dans du beau mobilier, il est préférable de faire appel à un artisan autorisé
et qualié pour couper le trou d’accès et réaliser l’installation de telle façon que la surface ne soit pas endommagée.
• Follow all national and local building and electrical codes that apply to the installation site.
• Respectez tous les codes électriques et du bâtiment, nationaux et locaux, qui s’appliquent au site de l’installation.
NOTE: For the installation to meet UL requirements and comply with National Electrical Code (NEC), the ACP VC1 EU/MK
must be installed in a UL Listed junction box. The end user or installer must furnish the junction box. It is not included with
the ACP VC1 EU/MK.
Americans with Disabilities ACT (ADA) Compliance
When planning where to install these devices, consider factors affecting accessibility of the button panel such as height from
the oor, distance from obstructions, and how far a user must reach to press the buttons. For guidelines, see sections 307
(“Protruding Objects”) and 308 (“Reach Ranges”) of the 2010 ADA Standards for Accessible Design available at
http://www.ada.gov/regs2010/2010ADAStandards/2010ADAStandards.pdf.
Site Preparation
Extron offers an assortment of mud rings, optional ULListed in-wall junction boxes, external wall boxes (EWBs), and surface or
tabletop mounting boxes for use with the ACP button panels. The ACP VC1 EU and ACP VC1 MK are 1-gang EU and MK size
devices.
Step 3: Removing the Plastic Faceplate, Removing the Button Panel, and Changing the Button
The plastic faceplate and button can be replaced. Additional buttons ship with the device and others can be ordered from
www.extron.com.
To change the button:
1. Insert the Extron removal tool (pry tool) between one side of the plastic faceplate and
the button plate. Release the catch holding the wallplate to the metal mounting plate
(see
1
in the figure to the right). If necessary, use the pry tool to release the second
catch on the opposite side.
2. Insert a small flat-bladed screw driver into a slot on the button plate to separate the
button plate from the control plate (
2
).
3. Press the blade of the screw driver in until there is an audible click.
4. Repeat steps 2 and 3 to release all four tabs holding the button plate in place.
5. Tilt the top of the button plate forward as it is removed to prevent the button from
falling out (
3
).
6. To remove the button, press the button backward through its
MUTE
MUTE
Extron
Extron
Insert
to line.
11
MUTE
VOLUME
VOLUME
PC
VIDEO
OFF
ON
LAPTOP
22
3
3
Product specificaties
Merk: | Extron |
Categorie: | Niet gecategoriseerd |
Model: | ACP VC1 EU |
Kleur van het product: | Black, White |
Gewicht: | 100 g |
Gewicht verpakking: | 200 g |
Breedte verpakking: | 102 mm |
Diepte verpakking: | 178 mm |
Hoogte verpakking: | 76 mm |
Soort: | Digitale volumeregelaar |
Materiaal behuizing: | Kunststof |
Montagewijze: | Wandmontage |
Stroomverbruik (typisch): | 1 W |
Ingang operation voltage (max): | 12 V |
Power handling: | - W |
Dempknop: | Ja |
Afmetingen opening voorpaneel (BxH): | 81 x 81 mm |
Heb je hulp nodig?
Als je hulp nodig hebt met Extron ACP VC1 EU stel dan hieronder een vraag en andere gebruikers zullen je antwoorden
Handleiding Niet gecategoriseerd Extron
31 Juli 2025
31 Juli 2025
31 Juli 2025
31 Juli 2025
22 Juli 2025
21 Juli 2025
21 Juli 2025
10 Juni 2025
16 April 2025
16 April 2025
Handleiding Niet gecategoriseerd
- Phoenix Contact
- Parrot
- Trigano
- Icarus Blue
- Evoc
- Piet Boon
- UClear
- Aquael
- Profilo
- Furman
- Bazooka
- Valeo
- AVer
- Statron
- HQ
Nieuwste handleidingen voor Niet gecategoriseerd
14 September 2025
14 September 2025
13 September 2025
13 September 2025
13 September 2025
13 September 2025
13 September 2025
13 September 2025
13 September 2025
13 September 2025