Epson STYLUS CX5200 INKJET ALL Handleiding
Bekijk gratis de handleiding van Epson STYLUS CX5200 INKJET ALL (1 pagina’s), behorend tot de categorie Printer. Deze gids werd als nuttig beoordeeld door 64 mensen en kreeg gemiddeld 4.1 sterren uit 5 reviews. Heb je een vraag over Epson STYLUS CX5200 INKJET ALL of wil je andere gebruikers van dit product iets vragen? Stel een vraag
Pagina 1/1
Unpacking
Setting Up the Stylus CX
1. Unlocking
2.Attaching the Parts
3.Plugging in the Power Cord
4.Installing the Ink Cartridges
1.Press the P On button to turn on this product.
2.Shake the package of ink cartridges four or five
times, then open the package and remove the
ink cartridges.
cCaution:
❏Be careful not to break the hook on the side of the cartridge when you
remove it from the package.
❏Do not shake the ink cartridge after removing from the package; this
can cause leakage.
❏Do not remove or tear the label on the cartridge; this can cause leakage.
3.Insert the ink cartridges as illustrated below.
Note:
Install all ink cartridges. This product does not work unless all cartridges are
installed properly.
4.Close the scanner unit.
Ink charging starts. It takes about two minutes. While charging, this product
produces a variety of mechanical sounds. This is normal. When the On light stops
flashing, ink charging is complete.
cCaution:
❏Do not turn the power off during the ink charging process.
❏Do not load paper until ink charging is complete.
Note:
The ink cartridges packaged with this product are partly used during the initial
setup. To produce high quality printouts, the print head in this product must be
fully charged with ink. This one-time process consumes a considerable amount
of ink, but subsequent cartridge sets will last for their full rated life.
5.Selecting Language
You can select your preferred language for use on the LCD panel. For details, see
Chapter 1 in the Copy Guide.
This product is now ready to make copies. See “Using the Copy Feature”. If you want to
print data or scan images, set up your computer as described below.
Setting Up the Computer
1. Connecting
1.Turn off your Stylus CX.
Note:
Do not turn on this product until a message prompts you to do so.
2.Connect the USB cable.
Note:
If the “Add New Hardware Wizard” dialog box appears, click Cancel and
disconnect the USB cable from this product. Then return to step 1. Connecting.
2.Installing the Software
cCaution for Macintosh users:
Turn off all virus protection programs before you install the software.
For Mac OS X users, see "Installing the Software for Mac OS X".
1.Make sure that this product is off.
2.Insert the software CD into the CD-ROM drive.
For users of Mac OS 8.6 to 9.x:
Double-click the EPSON icon in the EPSON folder.
3.The EPSON Installation Program dialog box appears.
Select Install Software, and then click .
4.Follow the on-screen instructions.
5.For users of Mac OS 8.6 to 9.x
After installing the software, choose Chooser from the
Apple menu, and then select the icon for this product
and the port that this product is connected to.
Note for Windows users:
You may need to restart your computer while installing the software. If a message
instructing you to restart appears, remove the software CD, then click Restart. After
restarting make sure this product is off, then reinstall the software.
This product is now ready to print and scan. The Reference Guide includes detailed
information about printing and scanning. To view the Reference Guide, see "Viewing the
Reference Guide".
The contents may vary in certain locations. Remove all tapes and protective materials following the Notice Sheet.
power cord
USB cable
Power cord may come
attached in some countries.
feeder guardink cartridges
paper supportCD-ROM
Be sure to use the USB cable
that comes with this product.
On
Error
Scan
Reset
Reset all(3sec)
Menu
Recall
Save(3sec)
Press the POn button.
Do not touch this part.
①✍
①✍③
On
Scan
Recall
Save(3sec)
On
Error
Scan
Recall Reset
Reset all(3sec)
Save(3sec)
Flashing On
On
Error
Scan
Reset Copies
Value
B&W
Stop
Return to Top
Color
Enter
Reset all(3sec)
Menu
Copy
Recall
Save(3sec)
LCD panel
On
Error
Scan
Reset Copies
Value
B&W
Stop
Return to Top
Color
Enter
Reset all(3sec)
Menu
Copy
Recall
Save(3sec)
Press to turn off.For users of Mac OS 8.6 to 9.x
EPSON Installation Program
dialog box
Using the Copy Feature
1. Preparation
2.Making a Copy
Select Various Copy Modes and Other Options
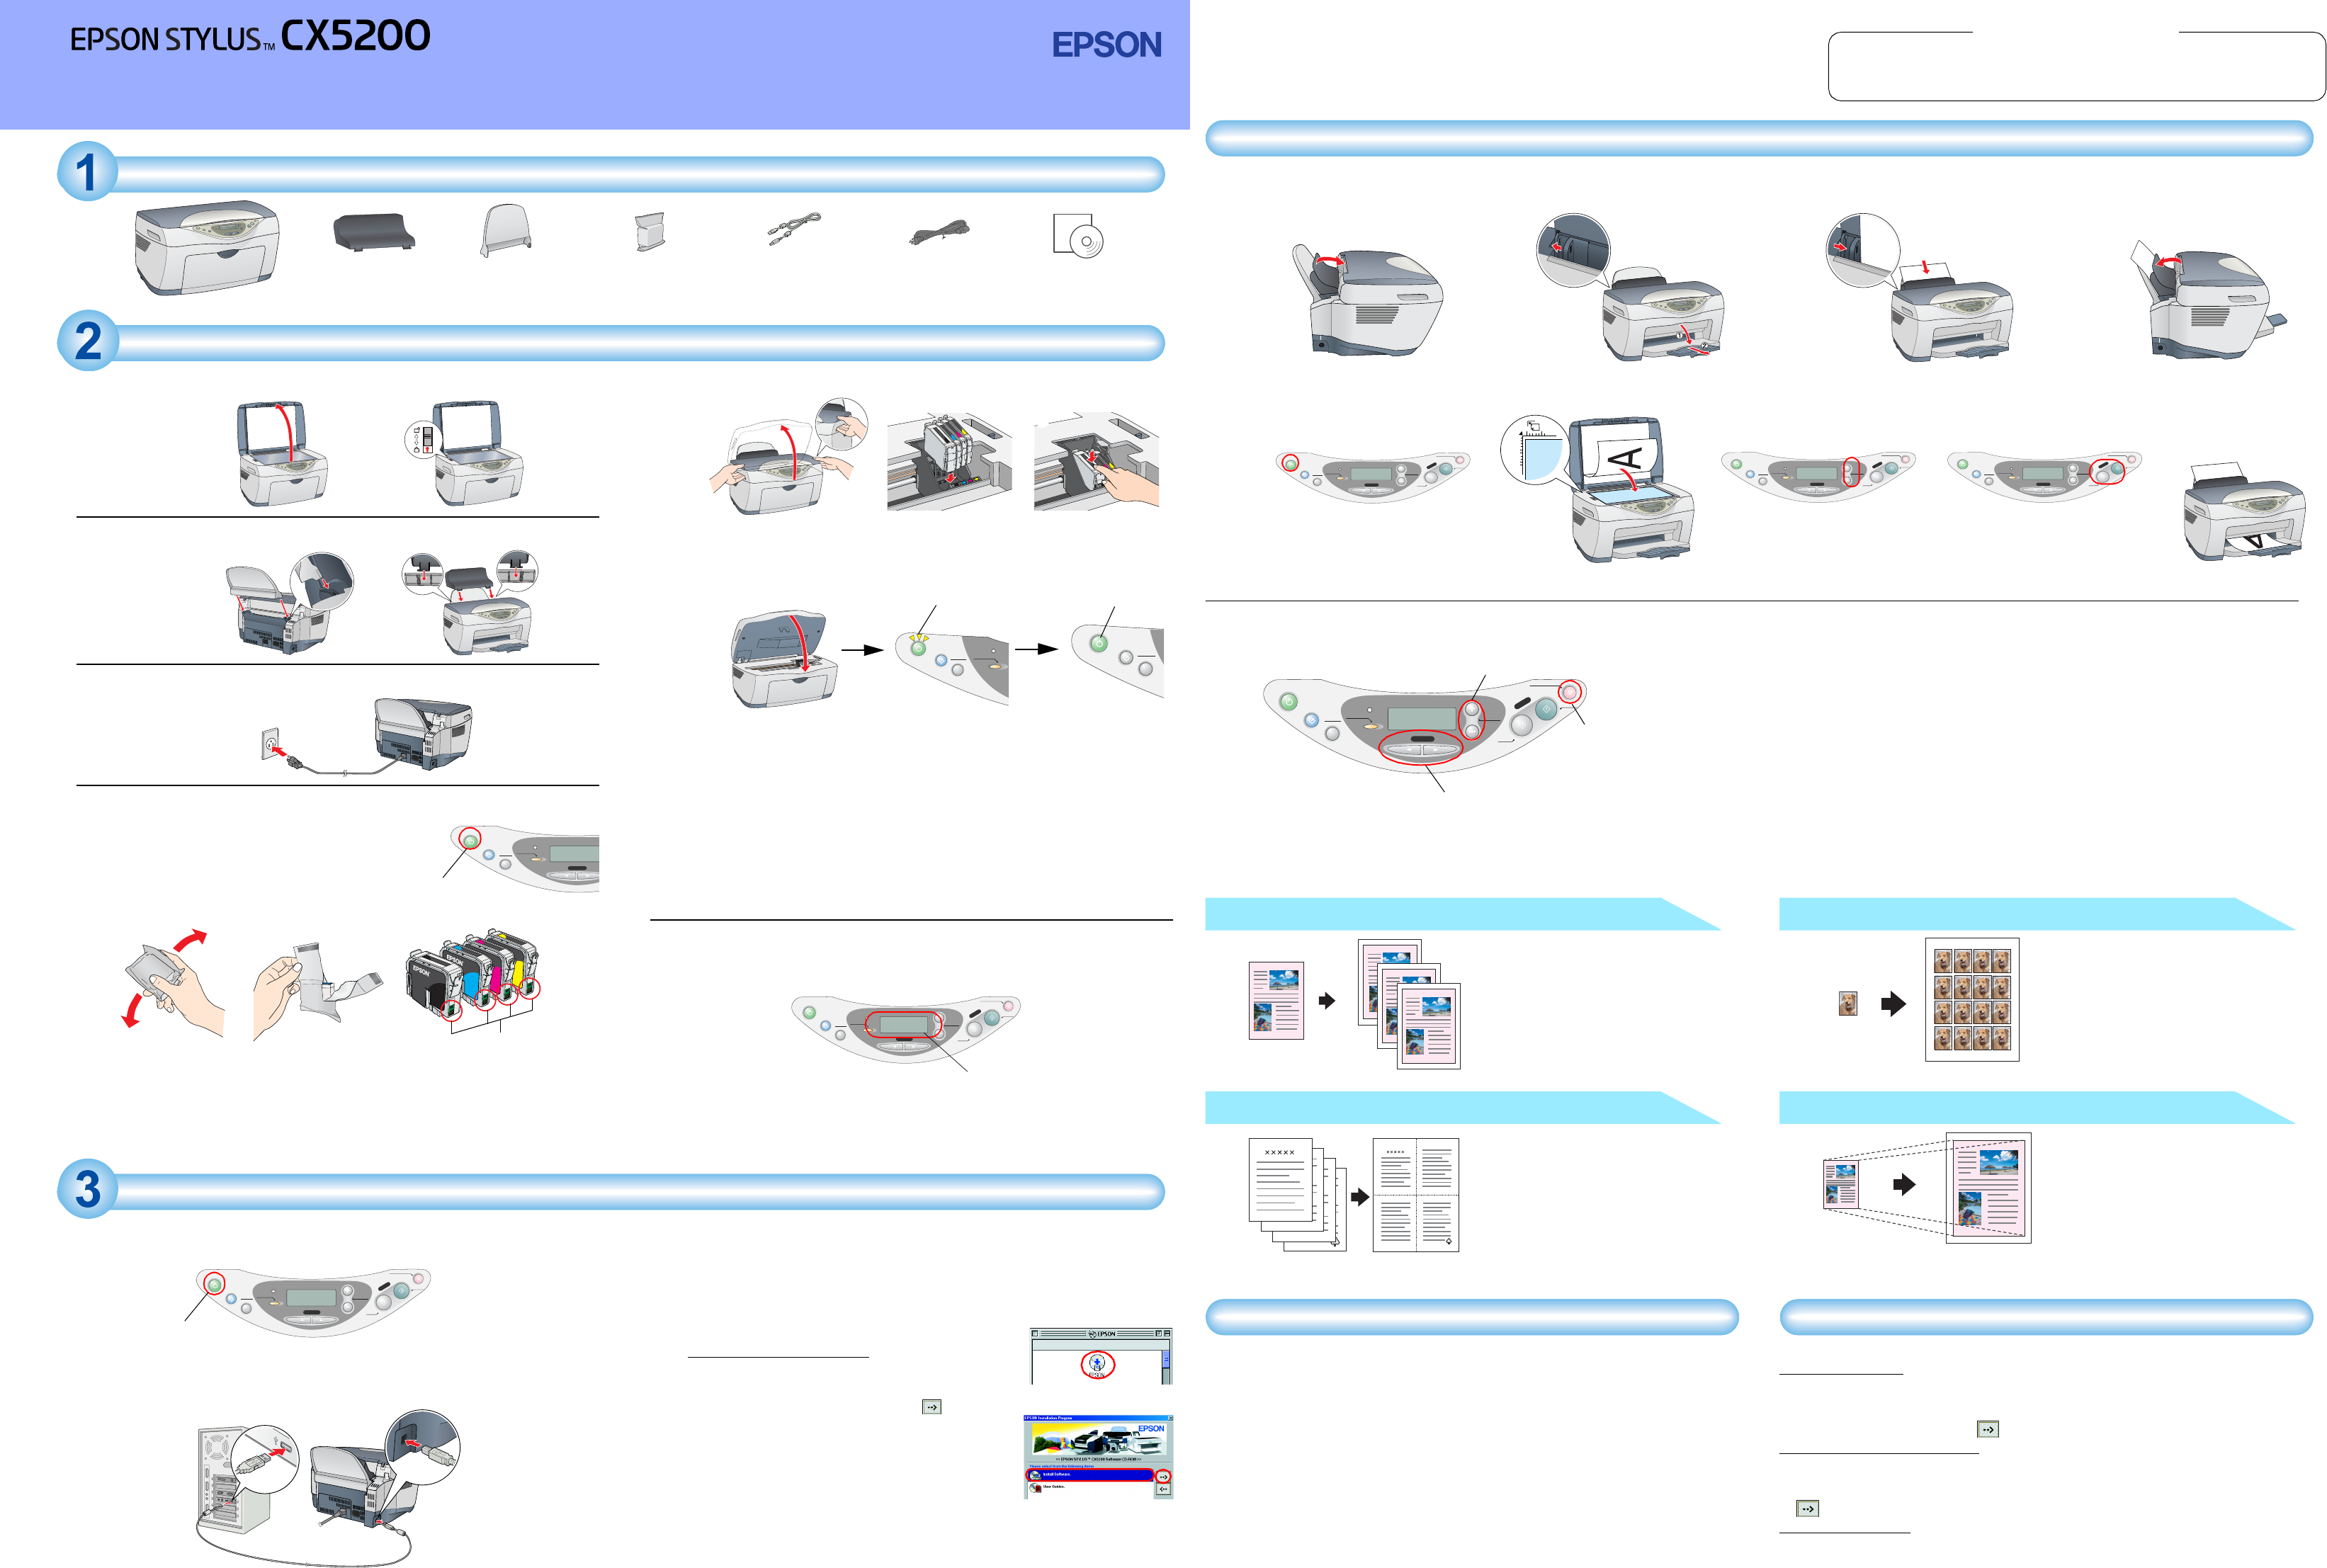
Standard Copy
You can copy the original image to various
sizes or types of single sheet paper.
Use the Copies/Value buttons to select
Standard from the Copy Mode menu.
Note:
In the Reduced Margin Copy mode, you can
make a copy with a 3-mm bottom margin on
paper.
2-up Copy/4-up Copy
You can put two or four pages of the original
images on a sheet of paper.
Use the Copies/Value buttons to select 2-up
or4-up from the Copy Mode menu.
Repeat Copy
You can create multiple copies of an image
on a sheet of paper.
Use the Copies/Value buttons to select Repeat
from the Copy Mode menu.
Note:
You can make lots of copies of a small original
image, such as a card or a picture of the face
in just one printing.
Auto Fit Page
You can make a copy with enlarging or
reducing each page of your document
automatically to fit the size of paper set in the
sheet feeder.
Use the Copies/Value buttons to select Auto
Fit Page from the Reduce/Enlarge menu.
Installing the Software for Mac OS X
1.Make sure that this product is off and insert the software CD into the CD-ROM drive.
2.Double-click the Mac OS X Driver folder. → Double-click the EPSON TWAIN folder. →
Double-click your preferred language folder. → Double-click the EPSON TWAIN folder.
→ Double-click the EPSON TWAIN 5 Installer icon. Follow the on-screen instructions to
install EPSON TWAIN.
If the Authorization window opens, click the key icon, enter the administrator's name
and password, click OK, and then click Continue.
3.After installing EPSON TWAIN, double-click the EPSON Scan to Filefolder in your
preferred language folder, and then double-click the EPSON Scan to File Installer icon
to install EPSON Scan to File.
4.After installing EPSON Scan to File, double-click the Printer Driver folder in the Mac OS
X Driver folder, and then double-click CX5200.pkg to install the printer software.
5.After installing the software, follow the instruction below to select this product:
Double-click Macintosh HD. → Double-click the Applications folder. → Double-click the
Utilities folder. → Double-click the Print Center icon. → Click Add Printer. → Select EPSON
USB. → Select this product. → Click Add.
Viewing the Reference Guide
To learn more about this product, see the Online Reference Guide.
For Windows users
1.Insert the software CD into the CD-ROM drive. The Installer dialog box appears.
If the dialog box does not appear, double-click SETUP.EXE in the CD-ROM.
2.Select User Guides and click .
For users of Mac OS 8.6 to 9.x
1.Insert the software CD into the CD-ROM drive.
2.Double-click the EPSON icon inside the EPSON folder, then select User Guides and click
.
For Mac OS X users
1.Insert the software CD into the CD-ROM drive.
2.Double-click the Manual folder inside the EPSON folder, then double-click the REF_G
folder in your preferred language folder. Then double-click theINDEX.HTM.
①✍ ③④
On
Error
Scan
Reset Copies
Value
B&W
Stop
Return to Top
Color
Enter
Reset all(3sec)
Menu
Copy
Recall
Save(3sec)
Press the P On button.
①✍③④⑤
On
Error
Scan
Reset Copies
Value
B&W
Stop
Return to Top
Color
Enter
Reset all(3sec)
Menu
Copy
Recall
Save(3sec)
On
Error
Scan
Reset Copies
Value
B&W
Stop
Return to Top
Color
Enter
Reset all(3sec)
Menu
Copy
Recall
Save(3sec)
Press the Copies/Value buttons
to set the number of copies.Press the B&W Copy button (to copy in
grayscale), or the Color Copy button
(to copy in color).
On
Error
Scan
Reset Copies
Value
B&W
Stop
Return to Top
Color
Enter
Reset all(3sec)
Menu
Copy
Recall
Save(3sec)
Copies/Value buttons
Menu buttons
Stop button
This product provides you with a variety of copying options. You can choose from various
formats and use many different types of paper.
1.Press one of the Menu buttons until CopyMode appears on the LCD panel
2.Press one of the Copies/Valuebuttons until the desired copy mode appears.
Note:
Be sure to select the copy mode first, because other copy settings return to default
values when the copy mode changes.
3.Use the Menu and Copies/Value buttons to make other copy settings.
4.Press the Stop button. The settings you made appear on the LCD panel.
See the Copy Guide for the available menu items in each copy mode.
Setup English
4033397-00
xxx cCautions must be observed
to avoid damage to your
equipment.
Notes contain important
information and useful tips on the
operation of this product.
Cautions and Notes
Product specificaties
| Merk: | Epson |
| Categorie: | Printer |
| Model: | STYLUS CX5200 INKJET ALL |
Heb je hulp nodig?
Als je hulp nodig hebt met Epson STYLUS CX5200 INKJET ALL stel dan hieronder een vraag en andere gebruikers zullen je antwoorden
Handleiding Printer Epson

31 Mei 2026
27 Mei 2026
27 Mei 2026
11 April 2026
11 April 2026
28 November 2025
26 November 2025
7 Oktober 2025
7 Oktober 2025
7 Oktober 2025
Handleiding Printer
Nieuwste handleidingen voor Printer
20 Mei 2026
13 Mei 2026
12 Mei 2026
12 Mei 2026
7 Mei 2026
6 Mei 2026
5 Mei 2026
2 Mei 2026
2 Mei 2026