Elcom REN233X Handleiding
Elcom Niet gecategoriseerd REN233X
Bekijk gratis de handleiding van Elcom REN233X (2 pagina’s), behorend tot de categorie Niet gecategoriseerd. Deze gids werd als nuttig beoordeeld door 22 mensen en kreeg gemiddeld 4.7 sterren uit 6 reviews. Heb je een vraag over Elcom REN233X of wil je andere gebruikers van dit product iets vragen? Stel een vraag
Pagina 1/2
1
6LE007246A
REN233X, REU233X
Fingerprint reader module with
control device built-in/RMD
z
09/2019 - 6LE007246AHager Security-CS70510-38920 CROLLES-France www.hager.com
Safety instructions
Electrical equipment may only be installed and
assembled by qualied electricians.
Failure to comply with these instructions may re-
sult in damage to the device, re or other hazards.
When installing and routing cables, always
comply with the applicable regulations and
standards for SELV electrical circuits.
These instructions are an integral component
of the product and must be retained by the end
user.
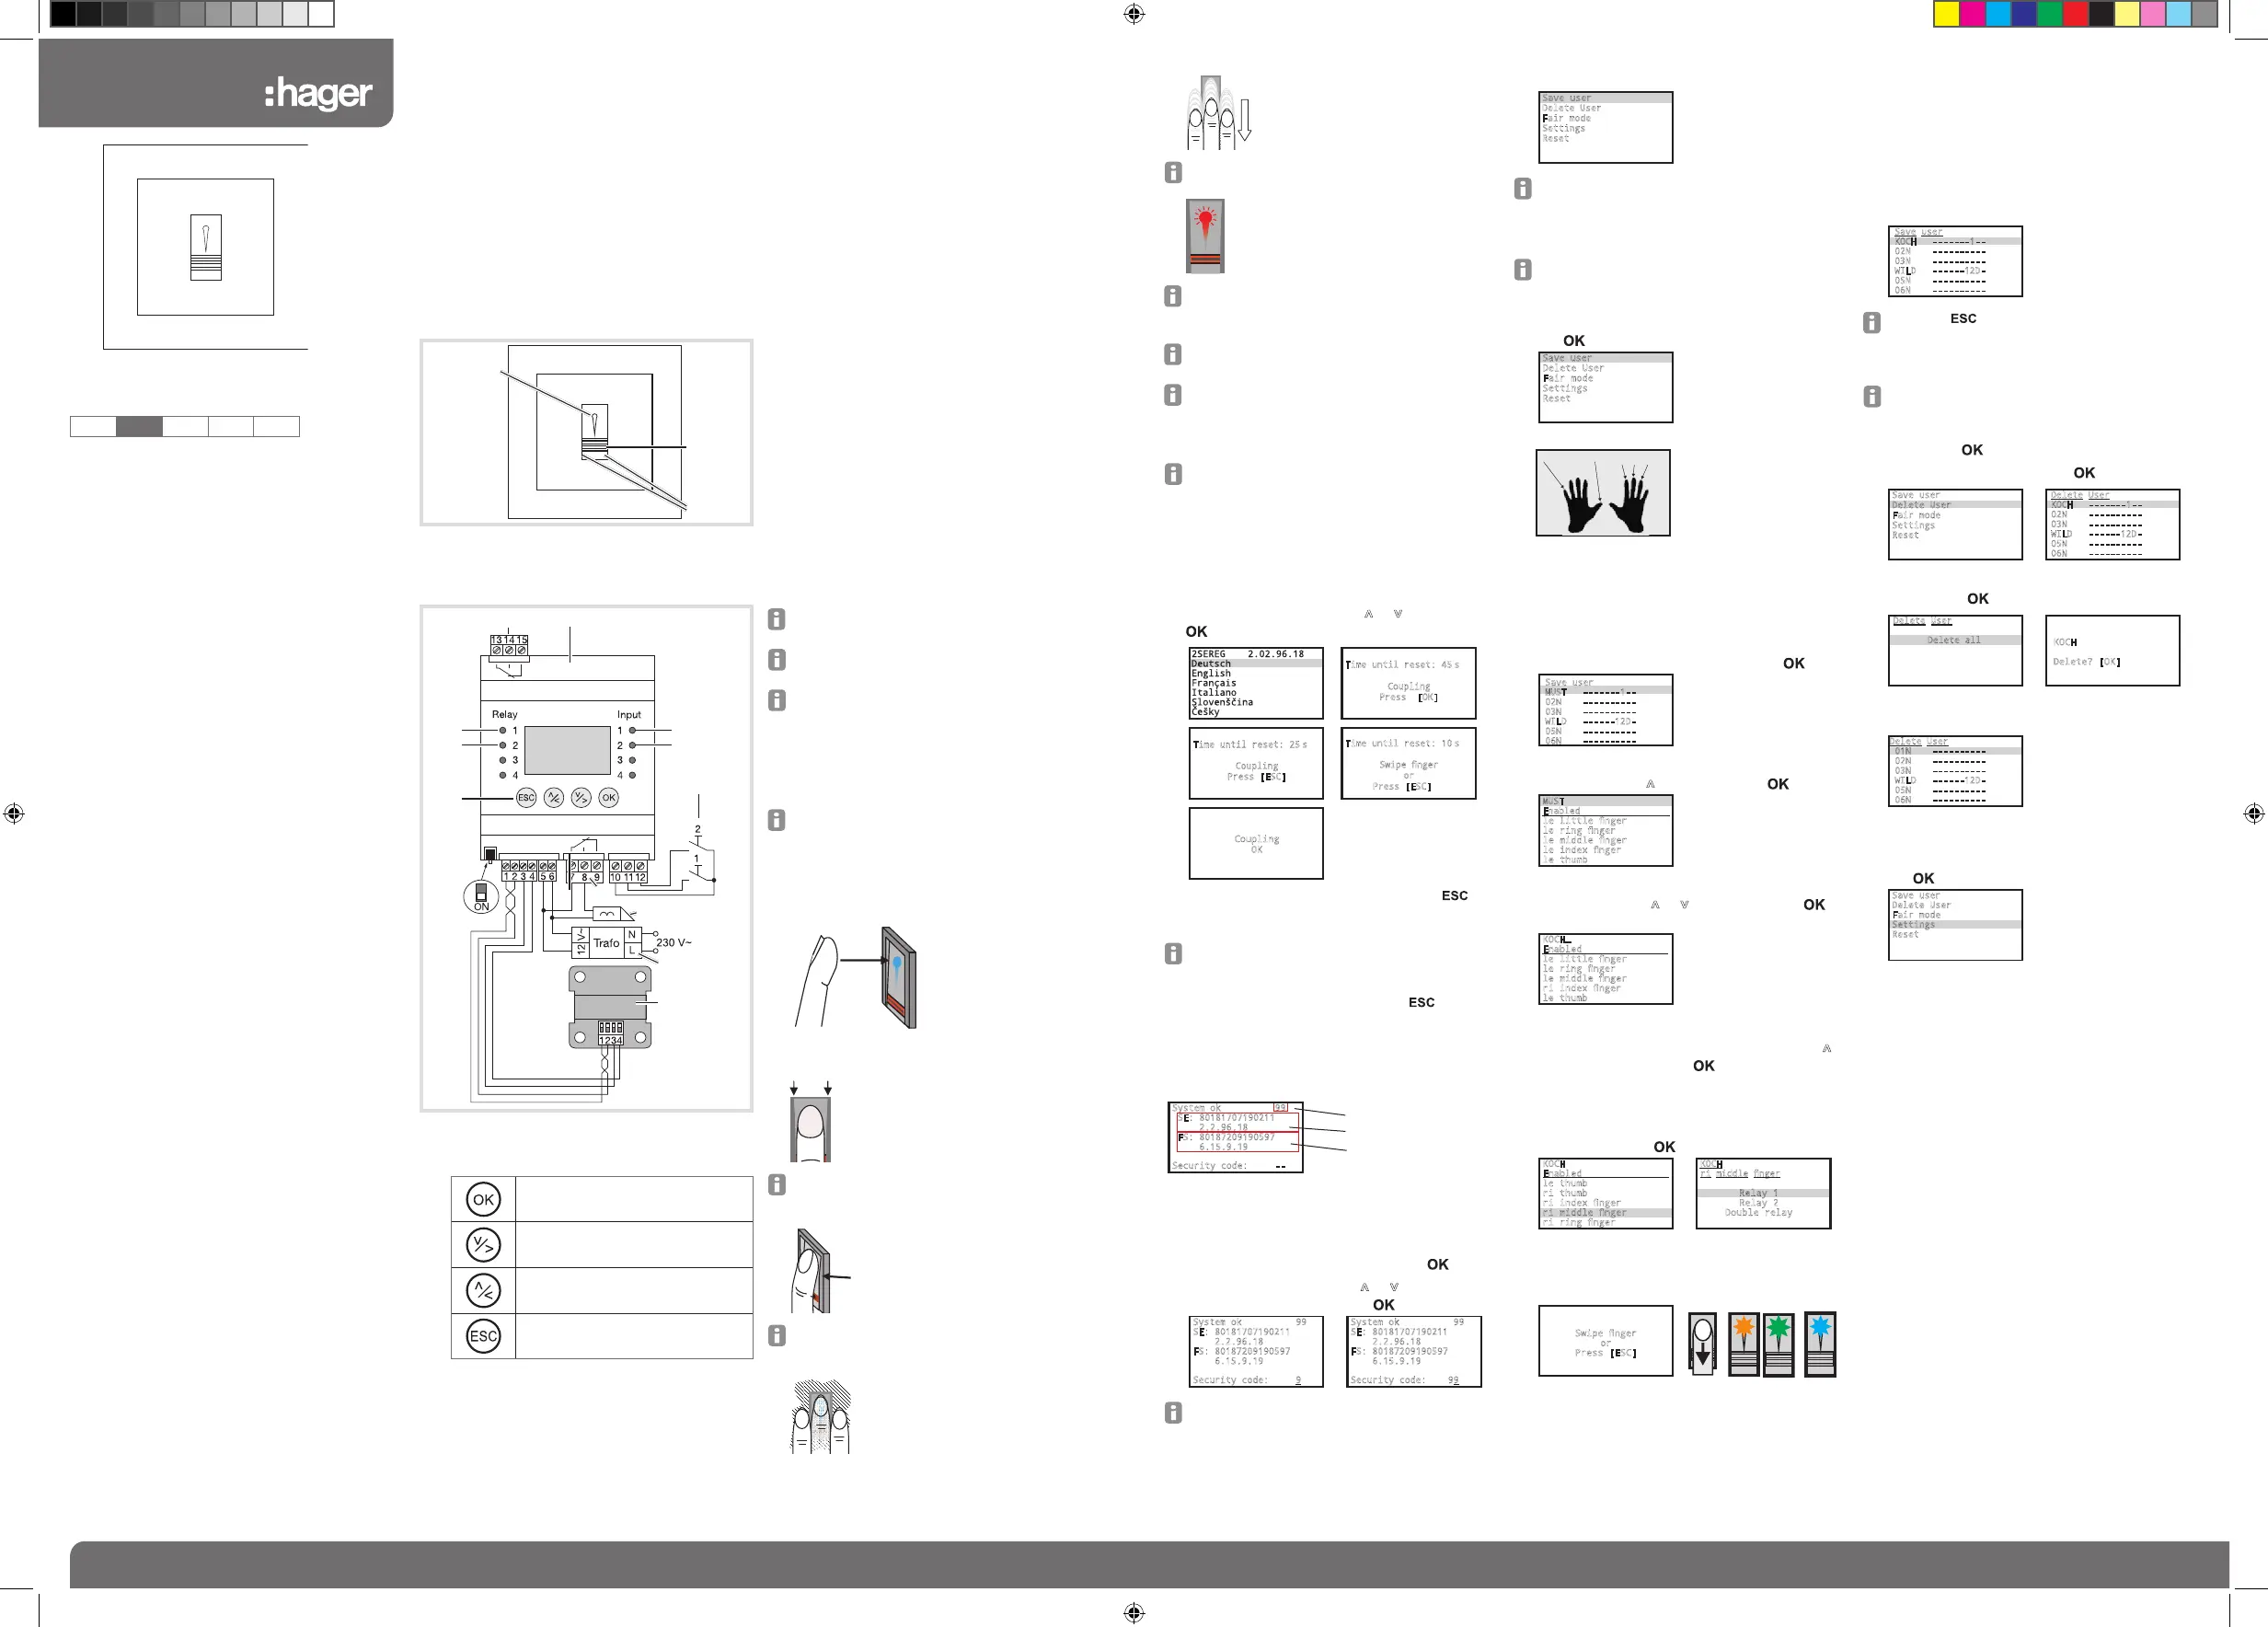
Design and layout of the device
(2)
(1)
(3)
Figure 1: Design and layout of the device
(1) Scanning point status LED, multicoloured
(2) Fingerprint sensor
(3) Function LEDs
(8)(9)
(12)
Bottom
(13)
(6)
(7)
(11)
(10)
(4)
(14)
(15)
(16)
(5)
Figure 2: Connection diagram
(4) Switch on cable termination! (Factory setting)
(5) Operation buttons
Transfer a value, jump to the next
menu level.
Navigation in the menu down/
right, setting values
Navigation in the menu up/left,
setting values
Abandon a menu entry, cancel
entries.
(6) Status LED green relay 2
lights up when relay is closed
(7) Status LED green relay 1
lights up when relay is closed
(8) Connecting terminals relay 2
(9) Control device
(10) Status LED input 1 red
lights up upon signal to input
(11) Status LED input 2 red
lights up upon signal to input
(12) Optional Exit button of the inputs
(13) Connecting terminals relay 1
(14) Door release
(15) E.g. safety transformer 12 V~
(16) Fingerprint reader
The ngerprint reader module is comprised of one n-
gerprint reader (Figure 1) and the rail-mounted control
unit (Figure 2). The device records the minutiae (nger
lines) of the third phalanx and evaluates them. An as-
signed function is executed via the integrated switching
contact (relay 1/2) if the ngerprint matches a saved
reference ngerprint.
The device can be congured via the control unit, using
the menu. Up to 99 ngers/users can be saved. The
switching duration of the relay can be set.
Connection/mounting
The wiring between the ngerprint reader (16) and
control unit (9) is routed via terminals 1–4.
-For the data connection (terminals 1 + 2), a
wrapped wire pair (twisted pair) must be used
-The length of the power supply cable (terminals
3 + 4) is max. 50 m with a wire diameter of
0.8 mm. For larger distances or smaller wire
diameters, the power supply wires 3+4 can be
doubled.
Only one ngerprint reader can be operated for
each control unit.
Data connection terminals 1+2 cannot be dou-
bled.
To protect against manipulation, the control unit
must be installed in a secure indoor area.
Power supply
For power supply, connect 8–24 V AC/DC to termi-
nals 5+6 of the control unit.
We recommend our 12 V AC safety transformer
for power supply ST320.
Finger guide
Place the middle of the third phalanx on the
scanning point of the nger guide.
Do not twist/tilt your nger; apply it straight and
in the centre of the edges of the nger guide.
Apply it as “at” as possible. There should only
be a small slot between the sensor and the
nger.
When applying your nger, the remaining
ngers should be stretched out. This makes
operation easier and smoother.
Move your nger smoothly over the sensor over
a period of 1 ... 1.5 seconds in a downwards
direction.
If you lift your nger too quickly, the scanning
point status LED will light up “red”:
Index, middle and ring ngers work best. The
thumb and little nger provide nger images
that are more difcult to evaluate.
For ngers that are often damp, save these in a
damp condition.
Children's ngers only work from approx. 5
years.
Device settings
The control unit (9) is optimised in terms of con-
sumption. The LCD display switches off after
approx. 2 minutes without actuation. Actuating
the screen turns the display on again.
The Language language can be set once during
commissioning (exception Reset).
Set Language
Select the Language using
˄or ˅
, conrm with
and follow the instructions.
>
Time until reset: 45s
Coupling
Press [OK]
>
Time until reset: 25s
Coupling
Press [ESC]
>
Time until reset: 10s
Swipe nger
or
Press [ESC]
1)
>
Coupling
OK
Appears for 5 seconds
1)
For the initial commissioning only the ESC but
ton can be pressed, since no ngers have been
saved yet.
When exchanging the control unit (e.g. after a
defect), all the ngers saved on the ngerprint
reader are retained if a recognised nger is
moved over the sensor. Press the Press
the ESC button to delete all ngers saved.
Enter device status/Security code
Two-digit Security code
(Factory setting 99)
(17)
(18)
(19)
System ok 99
SE: 80181707190211
2.2.96.18
FS: 80187209190597
6.15.9.19
Security code: --
(17) Number of free memory slots
(18) Serial number/software version control unit
(19) Serial number/software version ngerprint
reader
To enter the Security code, press the button.
Select the two digits using
˄
or
˅
respectively
and conrm this by pressing .
System ok 99
SE: 80181707190211
2.2.96.18
FS: 80187209190597
6.15.9.19
Security code:
9
>
System ok 99
SE: 80181707190211
2.2.96.18
FS: 80187209190597
6.15.9.19
Security code: 9
9
>
If the Security code is entered incorrectly 3
times, the system is disabled for 30 minutes!
The main menu is displayed
Save user
Delete User
Fair mode
Settings
Reset
If no buttons are pressed within 3 minutes, the
control unit automatically returns to normal
operation.
Save user (max. 99 ngers)
For each user, we recommend saving a nger
on both the left and right hand, ideally the index
or middle nger.
Select Save user from the main menu and conrm
with
Save user
Delete User
Fair mode
Settings
Reset
------12D-
Fingers that the user has already saved, as well
as their relay assignments, are displayed.
1 = Relay 1 (in the example right index nger)
2 = Relay 2 (in the example right middle nger)
D =
Double relay/both relays (in the example right
ring nger)
Select entry/user name and conrm with .
Save user
MUST -------1--
02N ----------
03N ----------
WILD ------12D-
05N ----------
06N ----------
>
If you need to change the user name, select the
user name using˄ and conrm with .
MUST
Enabled
le little nger
le ring nger
le middle nger
le index nger
le thumb
>
To change the user name, select the letter
individually using
˄or ˅
and conrm with .
All four characters must be conrmed.
KOCH
_
Enabled
le little nger
le ring nger
le middle nger
ri index nger
le thumb
or/subsequently
If you need to change the user status, select ˄to
go to
user status. Using , set the user status
to Enabled or Disabled.
or/subsequently
First select the nger and then the relay and the
conrm each with .
KOCH
Enabled
le thumb
ri thumb
ri index nger
ri middle nger
ri ring nger
>
KOCH
ri middle nger
Relay 1
Relay 2
Double relay
The ngerprint reader is ready to save the
nger.
Move nger over the sensor
Swipe nger
or
Press [ESC]
>>
()
Finger was not detected, the status LED ashes
red briey and then lights up orange again.
Move your nger over the sensor again.
or
Finger was detected. The status LED blinks
orange, then lights up green briey and then
orange again during rst and second nger
detection
After third nger detection, the status
LED lights up blue after the short green illumina-
tion and the nger is saved.
The relay assignment is displayed. Additional
ngers can now be recorded.
Save user
KOCH -------1--
02N ----------
03N ----------
WILD ------12D-
05N ----------
06N ----------
Press the button to return to the main
menu.
Delete User
You can only delete users, not individual n-
gers.
Select Delete User from the main menu and
conrm with
Select user and conrm with .
Save user
Delete User
Fair mode
Settings
Reset
>
Delete User
KOCH -------1--
02N ----------
03N ----------
WILD ------12D-
05N ----------
06N ----------
>
Press Delete all and then Delete? [OK] again,
conrm with .
Delete User
Delete all
>
KOCH
Delete? [OK]
>
All ngers belonging to the user were deleted
and the user name was reset.
Delete User
01N ----------
02N ----------
03N ----------
WILD ------12D-
05N ----------
06N ----------
Submenu Settings
Select
Settings
from the main menu and conrm
with
Save user
Delete User
Fair mode
Settings
Reset
6LE007246A_REN233X-REU233X_Fingerabdruck-Leser-EB_print_gb.indd 118.09.2019 08:27:15
Product specificaties
| Merk: | Elcom |
| Categorie: | Niet gecategoriseerd |
| Model: | REN233X |
Heb je hulp nodig?
Als je hulp nodig hebt met Elcom REN233X stel dan hieronder een vraag en andere gebruikers zullen je antwoorden
Handleiding Niet gecategoriseerd Elcom

17 November 2024
17 November 2024
17 November 2024
8 Februari 2024
7 Februari 2024
7 Februari 2024
7 Februari 2024
7 Februari 2024
7 Februari 2024
7 Februari 2024
Handleiding Niet gecategoriseerd
Nieuwste handleidingen voor Niet gecategoriseerd
23 Juli 2026
23 Juli 2026
23 Juli 2026
23 Juli 2026
23 Juli 2026
22 Juli 2026
22 Juli 2026
22 Juli 2026
22 Juli 2026
22 Juli 2026