Easypix Clip Tube Handleiding

Easypix Fotocamera Clip Tube

Lees hieronder de 📖 handleiding in het Nederlandse voor Easypix Clip Tube (4 pagina's) in de categorie Fotocamera. Deze handleiding was nuttig voor 49 personen en werd door 2 gebruikers gemiddeld met 4.5 sterren beoordeeld

Pagina 1/4
Manual
1. Get to know your DV (camera)
1.1 Features
5.0Mega pixels resolution sensor
Digital video camcorder
Digital still camera
TV output
2.0" LTPS real color display
Internal 64 MB flash memory and SD card support
Driver free for Windows XP/Vista and MAC 9.x and X.x
Macro mode
2. Functional parts:
1 Strap hook Hook for attaching the wrist strap to the camera.
2 SD card slot SD card slot.
3 AV port For television connection.
4 Macro switch
Macro mode: Select this mode to take close-up photographs (distance
11cm - 18cm).
Normal mode: Select this mode to take photographs from 0.5m -
infinity.
5 LCD screen Display photographs, video clips, camera setting and menu.
6 Microphone For voice input.
7 Lens
Records the image to be taken.
Note: Keep the lens clean. Dirt and fingerprints will affect the quality of the
picture.
8 USB interface Via this connection, you can download photographs and video clips to a
computer.
9 USB switch Slide it to pop-up the USB interface.
10 Battery door 2xAA alkaline batteries.
11 Delete Press it to delete the photo or video clip in playback mode.
12 Mode Press it to select different mode/Press and hold it to enter setting menu
13 Left For menu LEFT selection
14 UP UP & Digital zoom in.
15 Right For menu right selection
16 Power on/off button Press this button to turn on, press again to turn off.
17 Speaker Speaker
18 REC Press this button to take photographs or start/stop recording a video
clip. and press it to confirm changes.
19 Down Down & Digital zoom out.
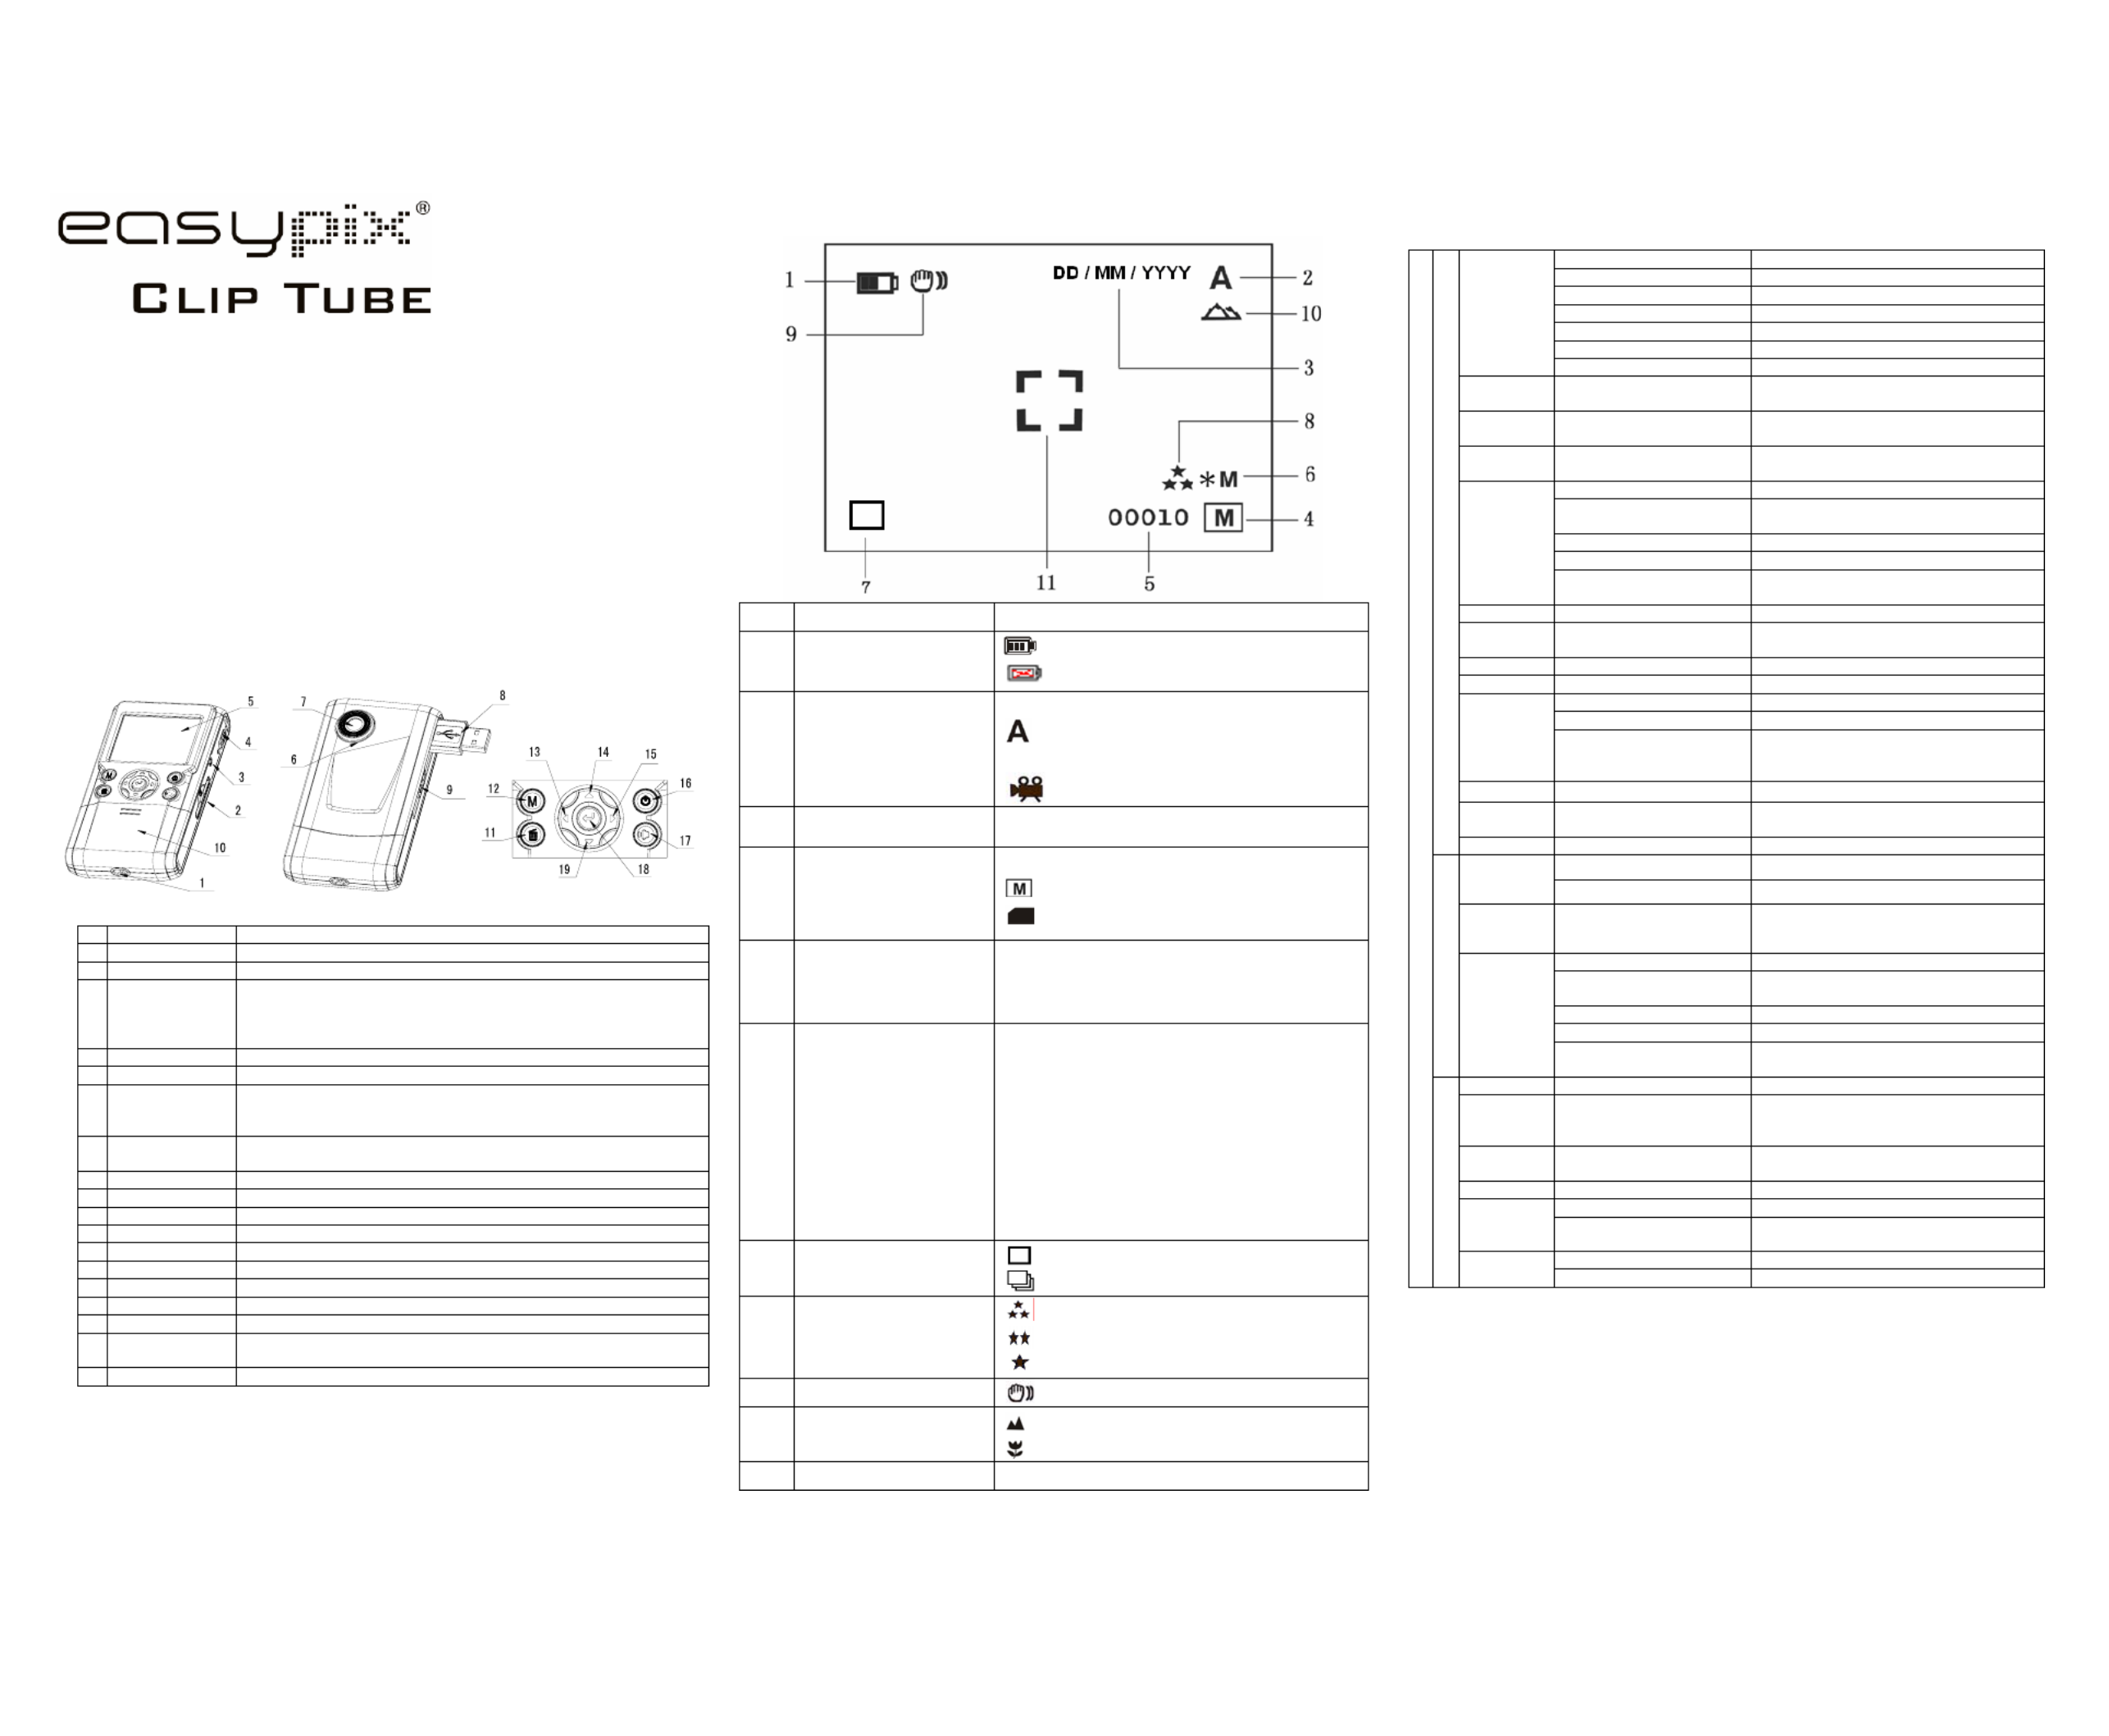
3. Explanation of the status icons
Item Function Description
1 Battery indicator
The batteries are full.
The batteries are empty
2 Recording mode
Setting for photographs taking
Setting for videos capture
3 Date stamp Displays the date day/month/year
4 Memory or SD card
indicator
Indicates memory or SD card
: Pictures stored in built-in memory
:Pictures stored in SD card
5 Photo / Video counter
Photo mode :No. of balance picture can be taken;
Video mode: Balance of recording time in second;
Playback mode: The No. of pictures or video file.
6 Selected Resolution
12M= 4032x3024
8M= 3264x2448
5M= 2560x1920;
3.1M = 2048x1536;
2M= 1600x1200
1.3M= 1280x960;
VGA= 640x480;
QVGA= 320x240
7 Photo Recording Mode
Single shot
Continue shot
8 Picture quality
The quality is fine (Default).
The quality is standard.
The quality is economy.
9 Brightness Alert Alert user to hold the camera steadily.
10 Normal / Macro
mode indicator
Normal mode (0.5m – infinity)
Macro mode (11cm –18cm)
11 View center
4. Details for DV (camera) setting
12M pixel resolution 4032 x 3024
8.0M pixel resolution 3264 x 2448
5.0M pixel resolution 2560 x 1920
3.1M pixel resolution 2048 x 1536
2.0M pixel resolution 1600 x 1200
1.3M pixel resolution 1280 x 960
Size
VGA resolution 640 x 480
Quality Fine(Default)/Standard/
Economy Picture quality set
Scene mode Auto(Default)/Sport/Landsc
ape/ Scene set
Exposure
value
+/-2, +/-5/3, +/-4/3,
+/-2/3,+/-1/3 +/-1, 0(Default) Level of exposure
Auto (Default) Automatic white balance
Daylight White balance selected for daylight
surrounding
Cloudy White balance selected for cloudy surrounding
Tungsten White balance selected for tungsten lighting
White
balance
Fluorescent White balance selected for fluorescent
surrounding
ISO Auto(Default)/100/200 Sensitivity select
Color Standard (Default) / Vivid /
Sepia / Monochrome Color setting
Saturation Normal(Default) / High / Low Saturation setting
Sharpness Normal(Default) / Hard /Soft Sharpness setting
2s Set the delay time at 2s to take a picture
10s Set the delay time at 10s to take a picture
Self timer
10+2s
Set the delay time at 10s to take a picture,
and then every 2s to take pictures
automatically.
Date Input Off(Default)/Set DD,MM,YYYY
Time Stamp Off(Default)/Date Only/
Date & Time Show the date and / or time on the pictures
DC (Camera) Capture
Burst Off(Default)/On Press REC key to take three photos.
VGA 640 x 480
Size QVGA 320 x 240
Exposure
value
+/-2, +/-5/3, +/-4/3,
+/-2/3,+/-1/3 +/-1, 0(Default) Level of exposure
Auto (Default) Automatic white balance
Daylight White balance selected for daylight
surrounding
Cloudy White balance selected for cloudy surrounding
Tungsten White balance selected for tungsten lighting
DV (Video output)
White
balance
Fluorescent White balance selected for fluorescent
surrounding
Format Execute/cancel Format the memory card.
Language
English/T-Chinese/S-Chines
e/French/German/Italian/Sp
anish/Portuguese/Japanese
Select display language
Auto off 1/3/5 min and Off Auto power off in1min, 3min(default) or
5 min if no operation
Sys. Reset Execute/cancel Restore default setting
50Hz Main European electricity frequency Light-
Frequency
(Flicker) 60Hz Main American electricity frequency
NTSC American and Japanese video format
SET
Setup
TV Out PAL European video format.
Note: The camera will remain the last setting when it is turned off.
5. Using the DV(camera)
5.1 Installing the batteries
1. Open the battery door.
2. Insert2x AA alkaline batteries into the camera.
3. Press the POWER button to turn on the DV (camera)
5.2 Inserting a memory card (not included)
This DV (camera) has built-in internal memory. This memory can be extended with a SD memory
card (not included).
Follow the instructions given below to insert the optional SD memory card into the camera.
1. Turn off the camera first.
2. Insert the SD card into the camera.
Note: There is only one right direction to insert the SD memory card into the slot. Do not force the
card into the slot, or else it may damage both the camera and the SD memory card.
Note: The SD memory card must be formatted before taking photographs. See the following
sections for more information.
5.3 Formatting the memory or SD card
1. Press and hold Mode button to enter setting menu;
2. Select Setup setting by Right key and select Format mode by up or down key;
3. Press REC to confirm and select by up or down key.
4. Press REC to format the card or memory.
5.4 Setting the resolution
The DV (camera) can be set to different resolutions.
1. Press and hold Mode button to set proper resolution.
Resolution: VGA640 x 480 1280 x 960),1.3M( ),2.0M1600 x 1200),
3.1M (2048 x 1536), 5M (2560 x 1920), 8M (3264 x 2448), 12M (4032 x 3024)
2. Different resolutions will be displayed. Select the desired resolution by using the or
buttons and then press the REC button to confirm the selection.
5.5 Taking Video or photographs
1. Turn on the DV( )camera .
2. Press Mode to set the DV to photo mode ( ) or video mode ( ).
3. Depending on the distance to the object being photographed, use Macro switch to adjust
the distance. Select the flower symbol ( ) if you wish to take a close-up photograph
(11cm –18cm).
If you wish to take video or photograph of surroundings or people (0.5m - infinity),set the
Macro switch to Normal mode ( ).
4. Use the LCD screen to aim the object you wish to take video or photograph.
5. Press REC button.
Caution: 1) Taking picture for fast-moving object is not recommended.
2) Image may be distorted when taking picture in a moving vehicle.
5.6 Zoom in and out
The DV can zoom in up to 8 times.
Zoom in or out by pressing the or button, a number will appear on the display. 8.00 is the
maximum zoom.
5.7 Taking photographs using self-timer function
You can use the self-timer function when you wish to take a photograph for yourself or when you
wish to photograph for an object where the camera must be as still as possible.
1. Set the camera to photo mode.
2. Press and hold Mode button. The quick menu will appear.
3. Press or ▼ ▼ to self-timer mode, press REC and or to set the delay time: 2seconds /
10 seconds / 10+2seconds or off.
4. Press the REC button to confirm. The self-timer function is now ready for use.
5. Aim at the object you wish to photograph.
6. Press the REC button to take a photograph.
7. The photograph will be taken after the timer reaches the delay time that you pre-set, and
the camera will beep once.
5.8 Playback photographs
1. Press Mode button to set playback mode, and or to select the video clip or photo.
2. Pressor to zoom the image.
3. Press and hold Mode button to select SLIDE SHOW. Press REC to confirm andor to
select time. The pictures saved in your camera or your SD card will be displayed in
sequence automatically.
5.9 Playback video clips
1. When video clips are displayed, press REC to play, and press DOWN key to stop.
2. Press REC to pause the playback
3. Press Mode to exit.
5.10 Delete photographs and video clips
Follow the instructions given below to delete photograph or video.
1. Press MODE to select Playback mode.
2. Press and hold MODE button and select Single/All/Select , press REC to confirm.
3. If you select Protect picture, your current file or images can not be deleted.
4. Press MENU to exit.
Note: you can also press Delete button to delete photograph or video clips in playback mode.
6. Connecting to a PC
By connecting the camera to a PC, your system be expanded to fill a wide range of uses. Using
the ‘ ARCSOFT MEDIAIMPRESSION” performs images saving, browsing, file management,
printing photos, email photos and upload videos to YOUTUBE.
Also the unit can be connected to the computer as Mass Storage Device,
Autorun function (Option)
When you connect the Digital Camera to the PC,a simple Arcsoft Media Impression software
which inside the memory will run automatically.
As different from user setting on the computer, the software may not be launched automatically.
Please double click the icon inside COMPUTER.
Note: Autorun function is only compatible with Windows XP / Vista.
Note: Under the environment with electrostatic discharge, the sample may malfunction and
memory lost. It requires user re-install the battery to reset the sample.
7. Specifications
Sensor 5.0 Me
g
a
p
ixel CMOS senso
r
VGA (640x480)
DV QVGA (320x240)
12.0 Mega pixels: (4032x3024) (Hardware Interpolation)
8.0 Mega pixels: (3264x2448) (Hardware Interpolation)
5.0 Mega pixels: (2560x1920)
3.1 Me
g
a
p
ixels:
(
2048x1536
)
2.0 Mega pixels (1600x1200)
1.3 Mega pixels: (1280x960)
Image resolution
DC
VGA: (640x480)
Lens F/2.8 f=8.5mm
Focus ran
g
e 0.5m. ~ Infinit
y
Macro mode 11cm
18cm
Di
g
ital zoom 8x
LCD displa
y
2.0" real color LTPS TFT
White balance Auto/Da
y
li
g
ht/cloud
y
/Tun
g
sten/Fluorescen
t
DV mode Up to 30fps
@
VGA
(
Use SD card
)
Built-in memory 64 MB Flash memory
VGA 75 S
DV QVGA 150 S
VGA: (640x480) –325 Pictures
1.3M: (1280x960) – 155 Pictures
2.0 M (1600x1200) – 112 Pictures
3.1M: (2048x1536) -- 78 Pictures
5.0M: (2560x1920) -- 65 Pictures
8.0M: (3264x2448) -- 47 Pictures
Picture Capacity in
64M memory (The
quantity of pictures
varies and depends
on the complexity
of the scene)
DC
12M: (4032x3024) --30 Pictures
External memory card SD card supports up to 8GB
File format Picture: JPEG, Video: AVI,
Self timer 2/10/10+2 seconds
PC interface USB 1.1
TV-out NTSC/PAL
Power source 2xAA alkaline batteries.
7.1 System requirement
Windows XP/Vista or above
Operating System Mac 9.x or X.x
CPU Pentium II or above
RAM At least 64MB
Interface USB
ort
CD 4x s
p
eed CD ROM or above
8. Trouble shooting
Problem Cause Solution
Cannot turn on the camera by
pressing the “power” button.
Low battery power.
Battery placed at wrong
polarities.
Replace or install the
battery correctly.
Photos can not be saved
when taking pictures.
The memory card or built-in
memory hasn’t been
formatted properly.
Format the memory in
SETUP mode of the
camera. Please refer to
section 5.3.
Cannot find removable disk
after connecting the camera
to the computer.
Connection failure.
Make sure all cable
connections are secured
and restart the computer if
necessary.
The batteries used up very
fast.
Use wrong type of battery. Replace with new
ALKALINE battery.
The video photos are blurry
1. The DV (camera) is not
held steadily
2. The lens of DV (camera)
is dirty.
3. The DV (camera) is Set to
wrong macro mode.
1. Hold the DV (camera)
steadily until it beeps
when taking video
photo.
2. Clean the lens with soft
dry cloth.
3. Set the macro mode
according to the
distances of subject.
For EU only
AM-DV541K-AGB-CLV-R


Product specificaties

Merk: Easypix
Categorie: Fotocamera
Model: Clip Tube

Heb je hulp nodig?

Als je hulp nodig hebt met Easypix Clip Tube stel dan hieronder een vraag en andere gebruikers zullen je antwoorden


Handleiding Fotocamera Easypix

Handleiding Fotocamera

Nieuwste handleidingen voor Fotocamera