Easypix AquaPix W1400 Handleiding
Easypix Fotocamera AquaPix W1400
Bekijk gratis de handleiding van Easypix AquaPix W1400 (98 pagina’s), behorend tot de categorie Fotocamera. Deze gids werd als nuttig beoordeeld door 12 mensen en kreeg gemiddeld 5.0 sterren uit 6 reviews. Heb je een vraag over Easypix AquaPix W1400 of wil je andere gebruikers van dit product iets vragen? Stel een vraag
Pagina 1/98
IMPOR TANT
- Don’t open the battery door under water.
- Close the battery door properly for best water sealing.
- Rinse the camera with clean water after used and keep it dry for
storage.
1. ameraGetnow ourting to ky c
14.0 Mega pixels resolution sensor
D igital still camera
Digital video camcorder
Built- f inlash light
4 x digital zoom
2.olor display7 +1.8" TFT c
MicroSD card support
2 x AAA alkaline batteries
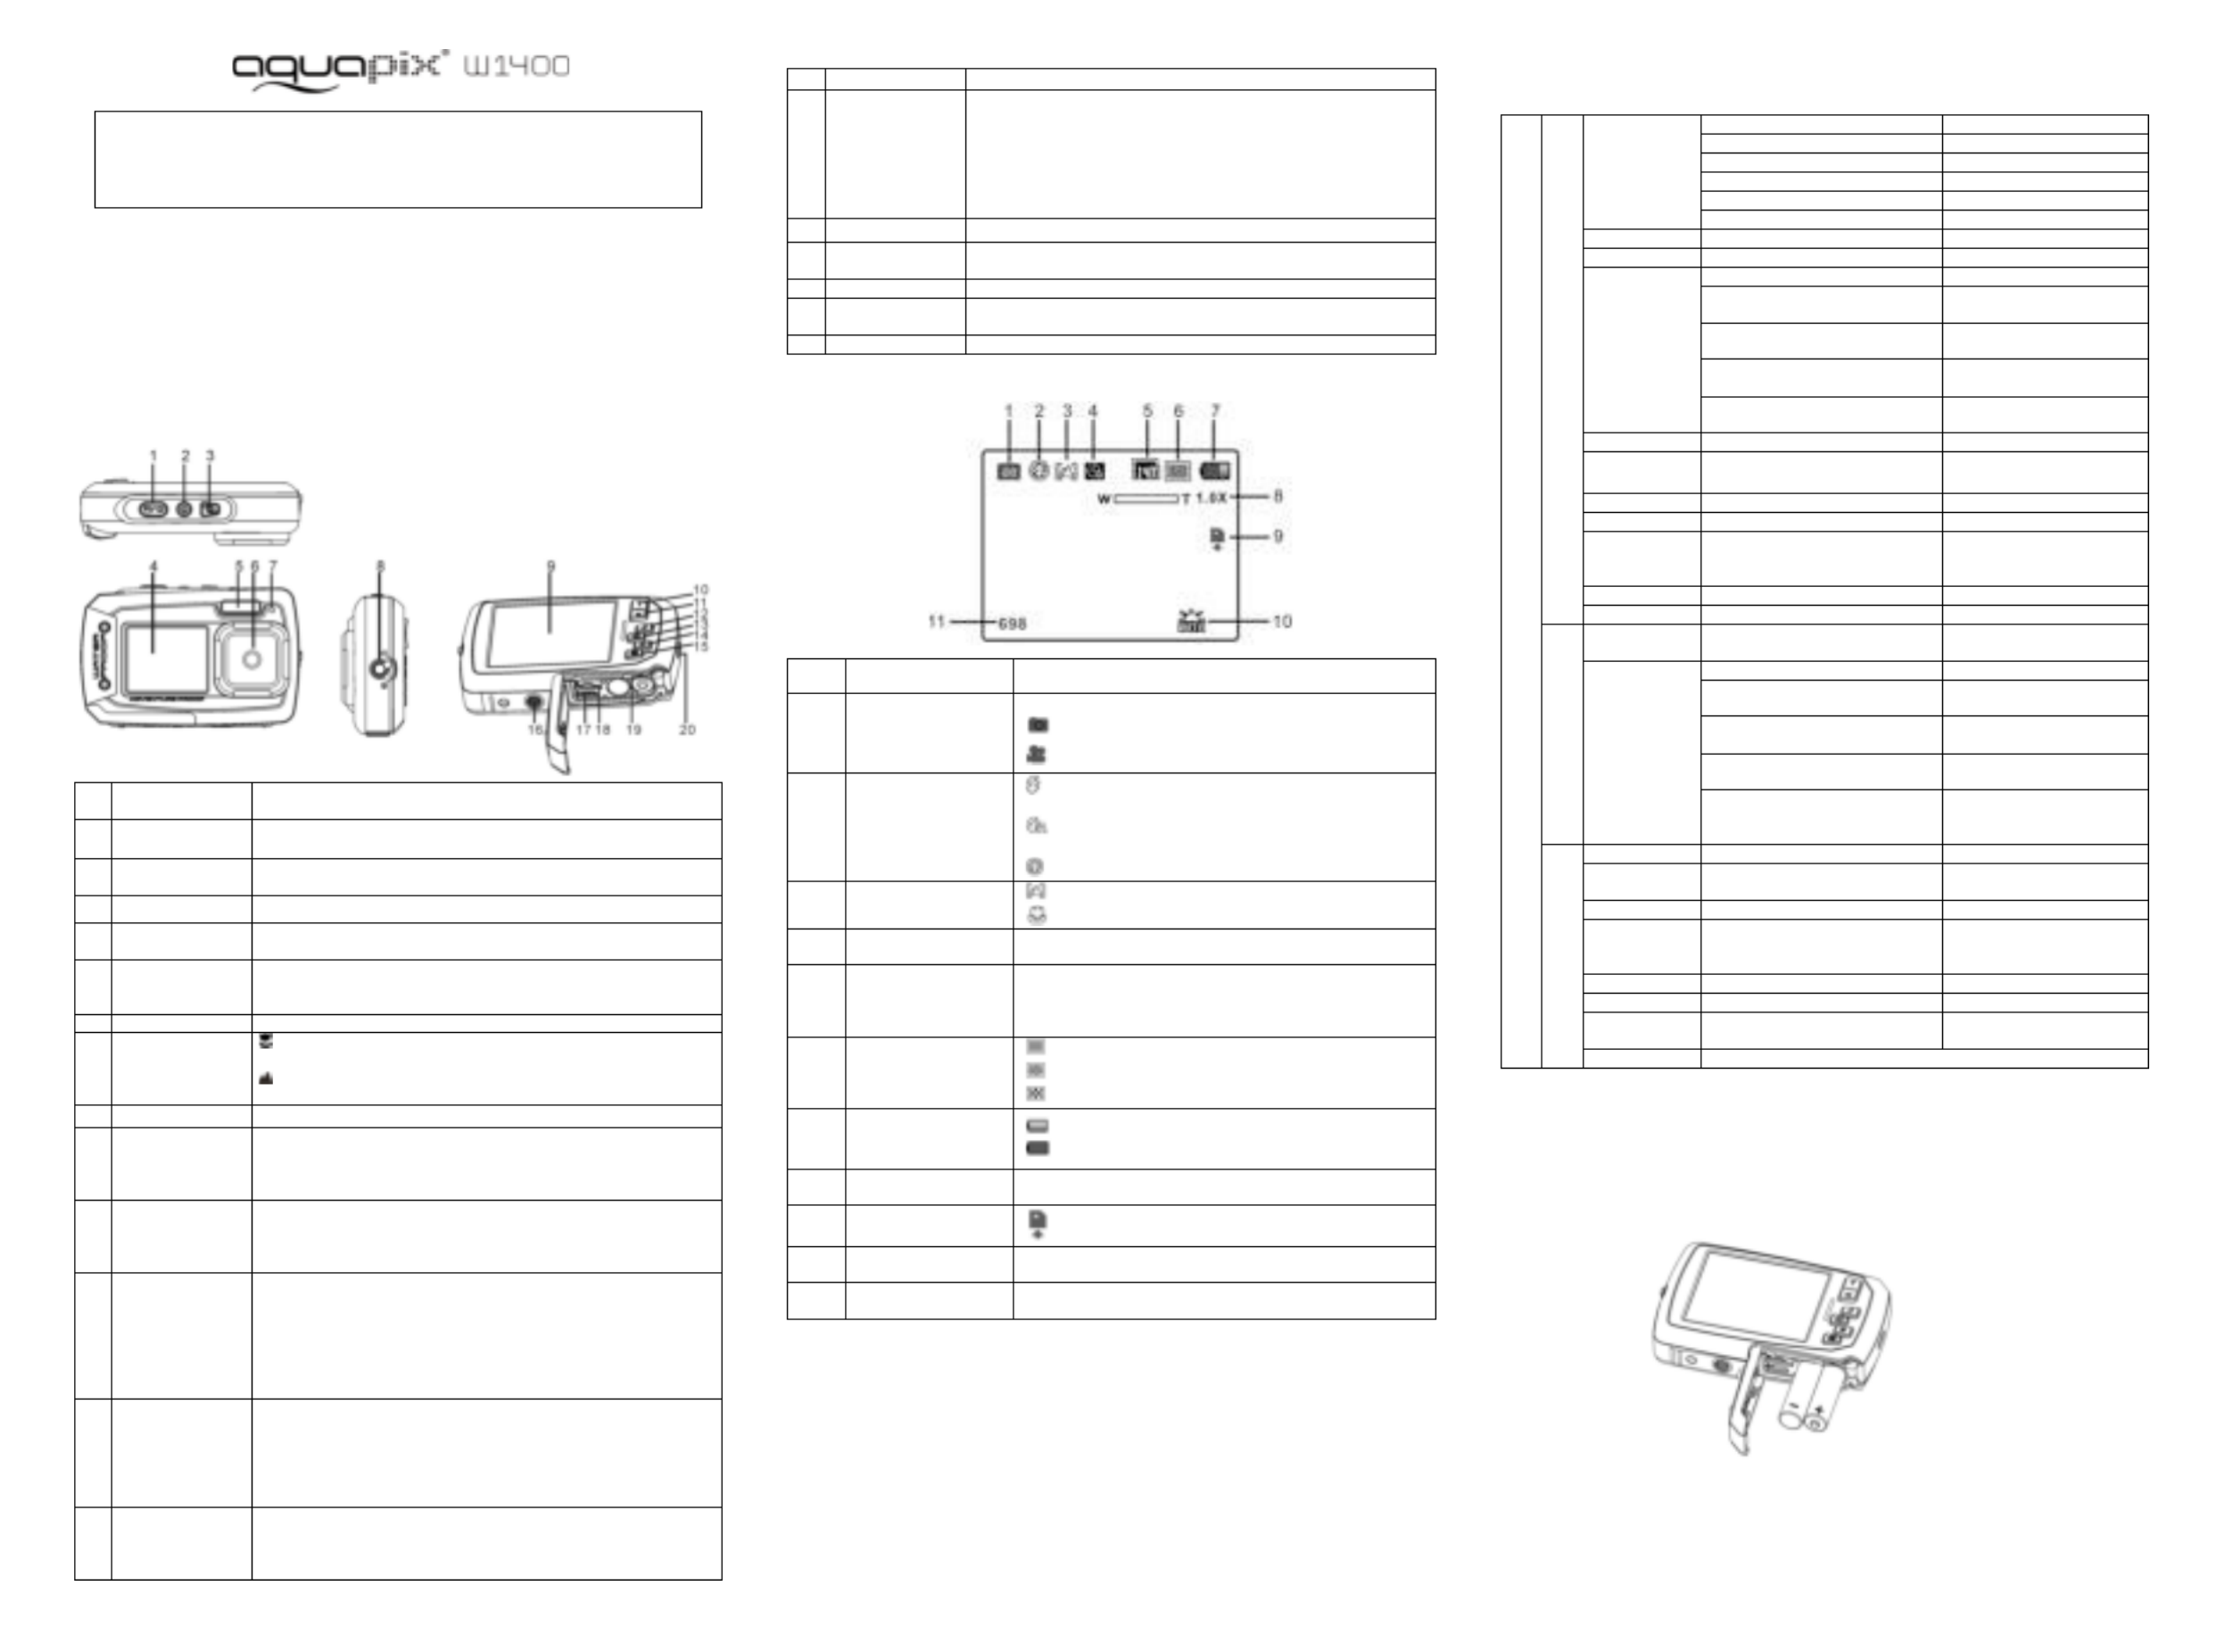
2. Functional parts
1
Shutter
Press this button to take photographs or to start /stop recording
a video clip, or to confirm changes in menu mode
2
Power on/off
button
Press this button for at least 2 seconds to switch on or off the
camera,or press it to display or hide the status icon on LCD.
3
Monitor switching
button
Press this button to switch between the front monitor and the back
monitor.
4
Front monitor
U- se the front monitor when taking selfportrait shots
5
Flash light
Use the built- in flash to give the subject extra lighting when
shooting in the dark (the best shooting distance is within 1.5m).
6
Lens
Capture the image.
Note: Keep the lens clean. Dirt and fingerprints will affect the
quality of the picture.
7
Busy indicator
When the indicator is blinking, the camera is busy.
8
Macro/normal
switch
Macro mode: S-elect this mode to take closeup photographs
(distance 11cm - 18cm).
Normal mode: Select this mode to take photographs from
0.5m - infinity.
9
Main screen
Display photographs, video clips, camera setting and menu.
10
Up/Tele
In Preview mode: press this button for zooming in.
In Menu mode: press this button to move up the selection bar.
In Image for enlarging the photo.Playback mode: press this button
In Video Playback mode: press it to start/pause the video.
11
Down/Wide
In Shooting mode: press this button for zoom ingout.
In Menu mode: press this button to move down the selection bar.
InImage Playback mode: press this button for reducing the photo size.
In Video Playback mode: press this button to enter the thumbnail mode
12
Left F / lash light
In Menu mode: presfor the s this button left selection;
In Playback mode: press this button to go back to the previous one;
In Photo to I nfinite Preview mode:press this button to switchFlash
mode;
When zooming in under Image Playback mode: press it to move to the
left poof the photo.rtion
In for fast Video Playback mode: press it rewind.
13
Right / Playback
Press this button to enter Playback mode;
In Playback mode: press this button to move to the next one;
In Menu mode: press this button for the right selection;
When zooming in under Image Playback mode: press it to move to the
right portion of the photo.
In forVideo Playback mode: press it fast forward.
14
Mode s witch
Press this button to switch between movie and still capture mode;
In Playback mode: press this button to exit.
When zooming in under Image Playback mode: press it to move to
the upper portionof the photo. In ayback mode: press it to Video Pl
stop the video.
15
Menu / Delete
In Preview mode: press it to enter the settings Menu.
In Playback mode:
Press it for a short time to enter“Delete single/ all files”mode;
Press it for a long time to enter file compiling and system setting
menu.
In Photo (zoom in) Playback mode: press it to move to the down
area of the photo.
16
Tripod connector
For fixing the camera on the tripod.
17
USB interface
Y ou can download photographs and video clips to a computer
when connecting with a USB cable. (not included)
18
MicroSD card slot
MicroSD card s . torage location
19
Battery
compartment
Compartment for 2 xatteries AAA alkaline b
20
Strap hook
Hook for attaching the wrist strap to the camera.
3. consExplanation of the status i
Item
Function
Description
1
M ode
Shows the current operating mode:
P hoto mode.
V ideo mode.
2
Flash
Force flash: The flash will be on under any
environment.
Auto flash: The camera determines ifthe flash
should be used or not.
No flash: The flash is turned off.
3
Normal/Macro
mode
M– . ode (0.5m infinity)
Macro mode (11cm – . 18cm)
4
S- elftimer
Indicates the Seltimer is setf-
5
R esolution
Shows the selected picture resolution:
20 M5184X3888 142040 = ;M = 43x32;
x = 8M = 32642448; 5M259244x19;
= 3M = 2048x1536; VGA640x480
6
Picture quality
Super fine.
Fine.
Normal
7
Battery indicator
The batteries are full.
The batteries are empty.
8
Zoom indicator
S hows the zoom ratio during preview mode
9
MicroSD card
Indicates the MicroSD card is inserted and will be
usedas storage for PHOTO and VIDEO
10
White balance
Shows the teselected Whi- balance mode.
11
Photo/Video counter
Photo mode: . No. of pictures that can betaken
Video mode:. Available recording time
4. amera Details for csettings
S ettings
Photo
Resolution
20 MP resolution
51843888x
14 M P resolution
43203240x
8 M P resolution
3 264448x2
5 MP resolution
259244x19
3 M P resolution
20481536x
VGA resolution
640480x
Quality
Super Fine/Fine/Normal
Picture quality setting
Metering
Center/Multi/Spot
Metering setting
White B alance
Auto
Automatic w hite balance
Daylight
White balance for shooting
under fine weather condition
Cloudy
White balance for shooting
under cloudy condition
Tungsten
White balance for shooting
under tungsten lighting
Fluorescent
White balance for shooting
under fluorescent lighting
ISO Speed
Auto/100/200/400/800
Sensitivity selection
E xposure
±±±±±2.0, 5/3, 4/3, 1.0,
2/3,1/3, ± 0
Exposure setting
Self Timer
On/Off
Self timer setting
S harpness
H ard/ Normal/ Soft
S harpness setting
E ffect
Normal/ B&W/ Sepia/ Negative/
Lomo/ Pencil Sketch/ Red/
Green/ Blue/ Vivid
E ffect setting
Date Stamp
On/ Off
D ate stamp setting
Qu ick View
On/ Off
Q uick view setting
Video
Movie Size
VGA 640 x 480
Q x VGA 320240
Video resolution setting
White Ba lance
Auto
Automatic white balance
Daylight
White balance for shooting
under fine weather condition
Cloudy
White balance for shooting
under cloudy condition
Tungsten
White balance for shooting
under tungsten lighting
Fluorescent
White balance selected for
shooting under fluorescent
lighting
Setup
S ounds
Off/On
S ounds setting
Frequency
50Hz60Hz /
Select power frequency in
your location
Power Save
O ff / 1Minute / 3 Minutes
Auto power off selection
Language
English/ French/
Deutsch/Italian/Spanish/
Portuguese/Japanese
D isplay language selection
Date/Time
YY/MM/DD/HH/MM/SS
Date or time setting
Format
Yes/No
Format the MicroSD Card
Reset All
Yes/No
Reset all settings to factory
default positions
Version
S hows the firmware version
Note: Turning off . the camera will not erase the last settings
5. ameraUsing the c
5.1 atteriesInstalling the b
1. Open the battery door.
2. Insert 2 x . AAA alkaline batteries into the camera compartment
3. doorClose the battery .
Note:
Make sure that the batteries are inserted in the right directions (as marked in the diagram above).
Product specificaties
| Merk: | Easypix |
| Categorie: | Fotocamera |
| Model: | AquaPix W1400 |
Heb je hulp nodig?
Als je hulp nodig hebt met Easypix AquaPix W1400 stel dan hieronder een vraag en andere gebruikers zullen je antwoorden
Handleiding Fotocamera Easypix

15 September 2025
28 September 2023
10 Juni 2023
6 Juni 2023
27 Mei 2023
18 Mei 2023
6 Mei 2023
5 Mei 2023
3 Mei 2023
22 April 2023
Handleiding Fotocamera
Nieuwste handleidingen voor Fotocamera
22 Juli 2026
17 Juli 2026
14 Juli 2026
14 Juli 2026
14 Juli 2026
13 Juli 2026
13 Juli 2026
13 Juli 2026
12 Juli 2026
7 Juli 2026