Dometic DCU Handleiding
Bekijk gratis de handleiding van Dometic DCU (13 pagina’s), behorend tot de categorie Airco. Deze gids werd als nuttig beoordeeld door 125 mensen en kreeg gemiddeld 4.5 sterren uit 63 reviews. Heb je een vraag over Dometic DCU of wil je andere gebruikers van dit product iets vragen? Stel een vraag
Pagina 1/13

L-4111 ENGLISH 1
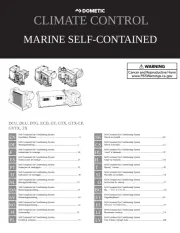
Self-contained Air Conditioning Systems
Installation Manual For These Product Families:
Dometic
Rev. 20170
L-4111 English
P/N 339708
COPYRIGHT © 2011-2016 Dometic Corporation. All Rights Reserved.
No part of this publication may be reproduced, translated, stored in a retrieval system, or transmitted in any form or by any means electronic, mechanical,
photocopying, recording or otherwise without prior written consent by Dometic Corporation. Every precaution has been taken in the preparation of this
manual to insure its accuracy. However, Dometic Corporation assumes no responsibility for errors and omission. Neither is any liability assumed for
damages resulting from the use of this product and information contained.
INTRODUCTION
Improper installation procedures can result in unsatisfactory performance and/or premature failure of these air conditioning (A/C)
units. In the interest of product improvement, Dometic’s specifications and design are subject to change without prior notice.
This installation can typically be done by one person with brief help from an additional person.
INSTALLATION
S
AFETY
C
ONSIDERATIONS
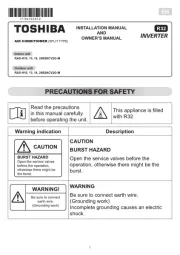
Indicates a hazardous situation which, if not avoided, will result in death or serious injury.
Indicates a hazardous situation which, if not avoided, could result in death or serious injury.
Indicates a hazardous situation which, if not avoided, could result in minor or moderate injury.
Indicates a situation which can cause damage to the engine, personal property and/or the environment, or
cause the equipment to operate improperly.
Turbo
(DTU/DTM)
Vector Compact
(DCU)
EnviroCool
(ECD)
Low Profile
(DLU)

2 L-4111 ENGLISH
CARBON MONOXIDE HAZARD. Never install your air conditioner in the bilge or engine room areas. Ensure
that the selected location is sealed from direct access to bilge and/or engine room vapors. Do not terminate condensate drain
line within 3' (0.91 m) of any outlet of engine or generator exhaust systems, nor in a compartment housing an engine or
generator, nor in a bilge, unless the drain is connected properly to a sealed condensate or shower sump pump. If drain line is
not properly installed, then dangerous fumes may travel up drain line and contaminate living quarters. Failure to follow this
precaution could result in death or serious injury.
CARBON MONOXIDE HAZARD. Never install the A/C unit in a location where it can circulate carbon
monoxide, fuel vapors or other noxious fumes into the boat's living spaces. Do not install or operate a self-contained unit in the
engine room or near an internal combustion engine. Failure to follow this precaution could result in death or serious injury.
EXPLOSION HAZARD. Never install the A/C unit in a location containing gasoline engines, tanks, LPG/
CPG cylinders, regulators, valves or fuel line fittings. Unless labeled otherwise, self-contained units do not meet federal
requirements for ignition protection. Failure to follow this precaution could result in death or serious injury.
ELECTRICAL SHOCK HAZARD. Be sure to effectively ground the A/C unit. The A/C unit must be effectively
grounded to minimize electrical shock hazard. Refer to the installation guidelines for further information. Failure to follow this
precaution could result in death or serious injury.
Contains fluorinated greenhouse gases in hermetically sealed equipment. Refer to the condensing unit's
product data plate label for quantity of refrigerant shown in weight and GWP. Refrigerant added should be noted on unit label.
P
RIOR
T
O
I
NSTALLATION
Read these instructions completely and then plan all connections which must be made to the A/C unit including ducting,
condensate drain line, seawater inlet and outlet hoses, electrical power connection, location of control, and seawater pump
placement, to assure easy access for routing and future servicing.
I
NSTALLATION
O
VERVIEW
See Figure 1 for an overview of a typical self-contained A/C system installation.
Figure 1: Installation Overview

Self-contained Air Conditioning Systems Installation Manual
L-4111 ENGLISH 3
B
LOWER
R
OTATION
(
IF
APPLICABLE
)
Rotate the blower to the direction which allows the most direct airflow discharge through the ducting.
•For Turbo blowers – Loosen the adjustment screw on blower mount ring, rotate blower to desired position, and then
tighten adjustment screw. See Figure 2.
•For EnviroCool/MCS/ECD blowers – Remove screws on plate, rotate blower to vertical or horizontal position, and
fasten plate using self-tapping screws. See Figure 2.
•For Vector Compact blowers – Remove mounting-ring screws and screws that attach the blower to the drain pan.
Rotate the blower to the desired position, and then install self-tapping mounting screws. Plug any unused screw holes
in the blower to prevent air loss. See Figure 2.
P
LACEMENT
OF
A/C U
NIT
IMPORTANT INSTALLATION NOTE: The turbo self-contained condensate base pan is equipped with vibration isolators
installed in the bottom of the pan. These isolators are designed to dampen the vibration caused by the operating A/C unit from
transferring into the mounted surface. Care must be taken when moving the A/C unit across mounting surfaces as isolators can
be damaged.
Isolators will not normally pull out of pan, but can turn sideways if dragged and may break if excessive
dragging occurs. Unit must be picked up after moving to allow isolator to reset into well or vibration isolation will be ineffective.
The A/C unit must be mounted to a low flat level surface, in bottom of locker, under a bunk or dinette seat, or in a similar
location. See Figure 1 before mounting unit.
CARBON MONOXIDE HAZARD. Never install the A/C unit in the bilge or engine room areas. Read the
safety considerations on page 2 and see Figure 1 before mounting unit.
Figure 2: Blower Rotation Procedures for Each System Type
Standard
blower position
as shipped
Remove 7 screws to
rotate blower
EnviroCool/MCS/ECD Systems
1. Remove screws on plate.
2. Rotate blower to horizontal or vertical position.
3. Fasten blower in place using self-tapping screws.
Product specificaties
| Merk: | Dometic |
| Categorie: | Airco |
| Model: | DCU |
Heb je hulp nodig?
Als je hulp nodig hebt met Dometic DCU stel dan hieronder een vraag en andere gebruikers zullen je antwoorden
Handleiding Airco Dometic
11 November 2024

4 Mei 2024

30 Maart 2024

9 Januari 2024

9 Januari 2024

9 Januari 2024

8 Augustus 2023

8 Augustus 2023

2 Mei 2023

16 April 2023
Handleiding Airco
- Calor
- Profile
- Corberó
- Create
- Bosch
- Edy
- Black And Decker
- White Knight
- AEG
- Unold
- Dimplex
- Holland Electro
- ActronAir
- Conrad
- Windmill
Nieuwste handleidingen voor Airco
26 Augustus 2025
26 Augustus 2025
26 Augustus 2025

26 Augustus 2025

26 Augustus 2025

26 Augustus 2025
26 Augustus 2025

26 Augustus 2025
26 Augustus 2025

26 Augustus 2025