Digital Watchdog DWC-B1365T Handleiding
Digital Watchdog Bewakingscamera DWC-B1365T
Bekijk gratis de handleiding van Digital Watchdog DWC-B1365T (3 pagina’s), behorend tot de categorie Bewakingscamera. Deze gids werd als nuttig beoordeeld door 38 mensen en kreeg gemiddeld 4.9 sterren uit 7 reviews. Heb je een vraag over Digital Watchdog DWC-B1365T of wil je andere gebruikers van dit product iets vragen? Stel een vraag
Pagina 1/3
B1365T
About manual
INSTRUCTION MANUAL
■Do not open or modify
Do not open the case except during maintenance and
installation, as itmay be dangerous and cause damages.
■Do not put objects inside the unit
Make sure that no metal objects or flammable substances
get inside the camera. It could cause fire, short-circuits or
damages.
■Be carefulwhen handling the unit
Toprevent damage, do not drop the camera or subject itto
strong shock or vibration.
■Install away fromelectric or magnetic fields
■Protect fromhumidity and dust
■Protect fromhigh temperature
Be carefulwhen installingcloseto the ceiling, ina kitchen
or boiler room, as the temperature may rise to high levels.
■Cleaning
Dirt can be removed fromthe case only by wiping it with
a soft cloth moistened with a soft detergent solution.
■Mounting Surface
The mounting surface materialmust be strong enough to
support the camera.
Before installing and using the camera, please read this
manual carefully.
Be sure to keep it handyfor future reference.
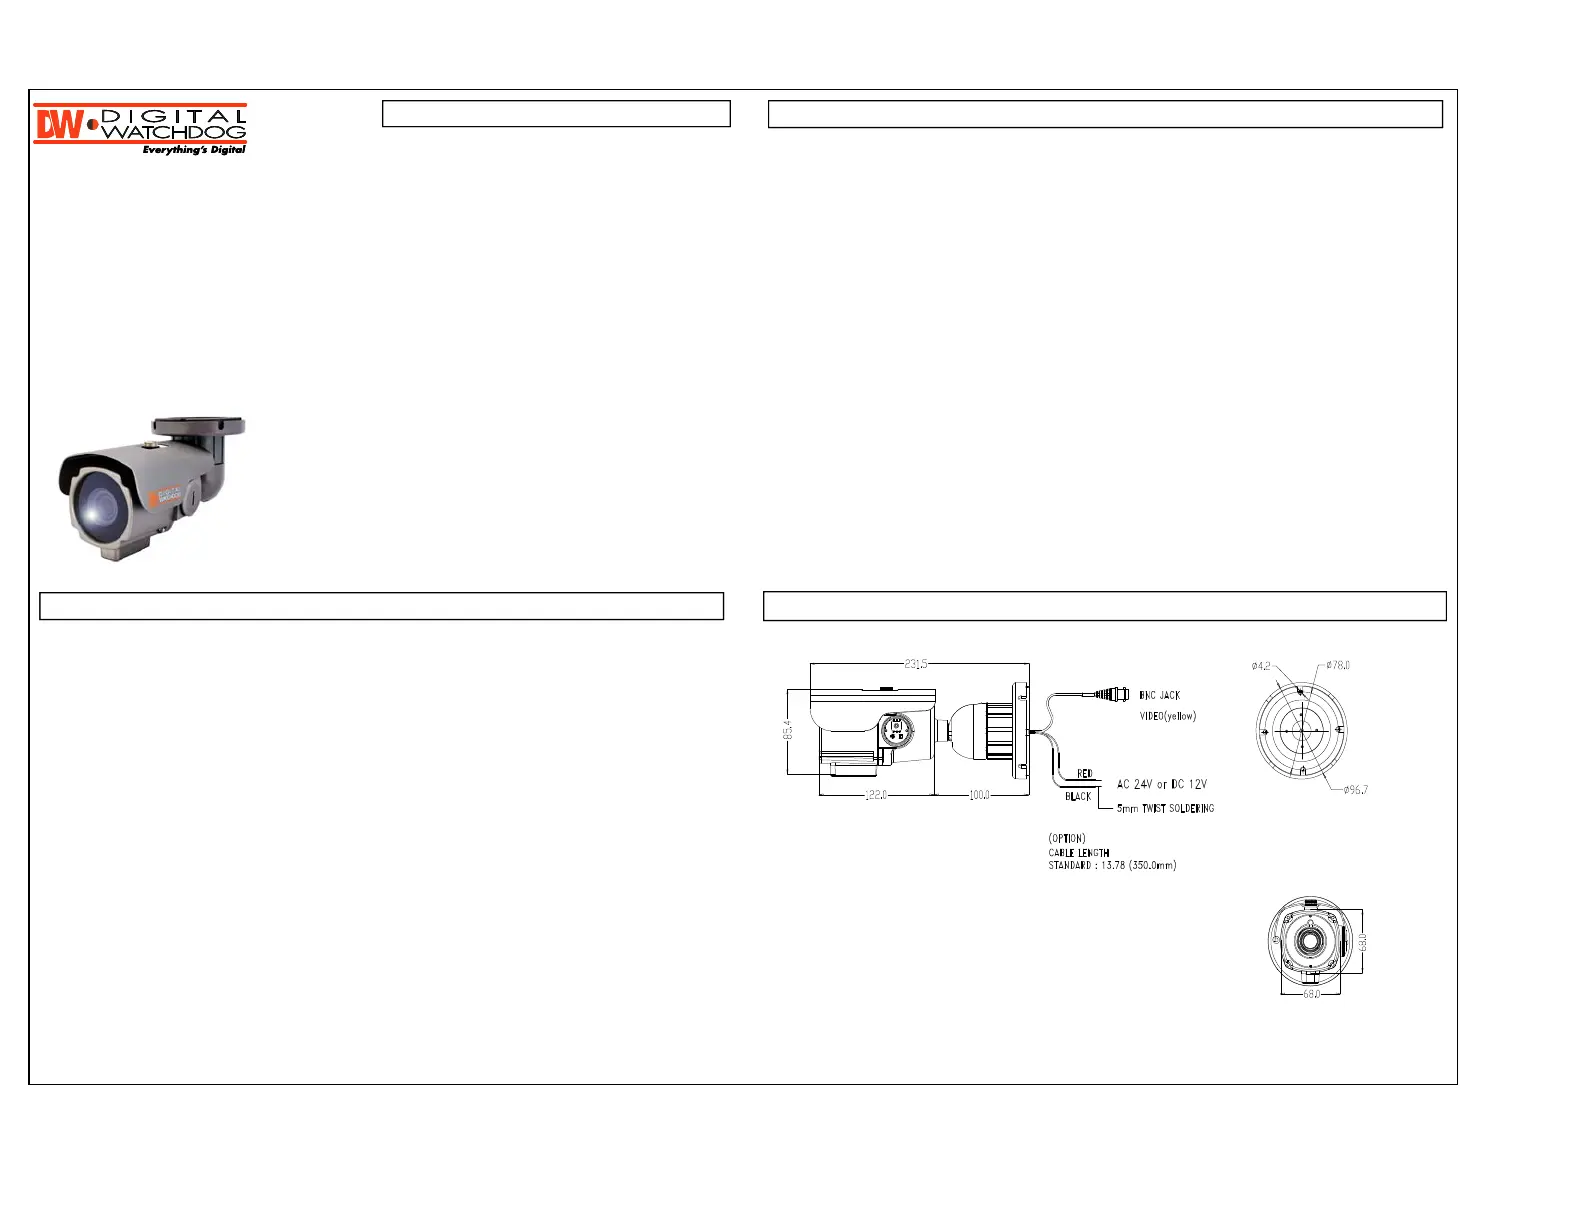
DIMENSION (mm)WARRANTY INFORMATION
PRECAUTIONS
Digital Watchdog(referred to as “the Warrantor”) warrants
the Camera Series against defects in materials or
workmanship as follows:
LIMITS AND EXCLUSIONS
There are no express warranties except as listed above.
The Warrantorwill not beliablefor incidental or
consequentialdamages(includingwithoutlimitation
Before sending the camera out for repair, check the
items below. If the problem persists after checking
these items, contact your service center.
■If noimage appears.
Is the coaxialcable attached securely?
Are the power and voltage normal?
Has the irisof the lens inside the camera been
adjustedcorrectly (withthe level volume)?
Is thereadequate illumination?
■If the image is unclear
Is the lens infocus?
Is the lens dirty?
Dirt of fingerprints on the lens can adversely
affect the images.
Gentlywipe any dirt or fingerprints off the lens
with a soft cloth or lens cleaning paper and cleaning
fluid (commerciallyavailable).
Is the monitor adjusted correctly?
TROUBLESHOOTING
5436 WCrenshawStreet
Tampa, FL 33634
www.digital-watchdog.com
■Do not open or modify
Do not open the case except during maintenance and
installation, as it may be dangerous and cause damages.
■Do not put objects inside the unit
Make sure that no metal objects or flammable substances
get inside the camera. It could cause fire, short-circuits or
damages.
■Be careful when handling the unit
To prevent damage, do not drop the camera or subject it to
strong shock or vibration.
■Install away from electric or magnetic fields
■Protect from humidity and dust
■Protect from high temperature
Be careful when installing close to the ceiling , in a kitchen
or boiler room, as the temperature may rise to high levels.
■Cleaning
Dirt can be removed from the case only by wiping it with
a soft cloth moistened with a soft detergent solution.
■Mounting Surface
The mounting surface material must be strong enough to
support the camera.
Before installing and using the camera, please read this
manual carefully.
Be sure to keep it handy for future reference.
DIMENSION (mm)WARRANTY INFORMATION
PRECAUTIONS
Digital Watchdog(referred to as “the Warrantor”) warrants
the Camera Series against defects in materials or
workmanship as follows:
LABOR: For the initial five (5) years from the date of original
purchase, if the camera is determined to be defective, the
Warrantor will repair or replace the unit, with
new or refurbished product at its option, at no charge.
PARTS: In addition, the Warrantor will supply replacement
parts for the initial five (5) years. To obtain warranty or out
of warranty service, please contact a Technical Support
Representative at 1-866-446-3595Monday through Friday
from 9:00 AM to 5:00 PM Eastern.
A purchase receipt or other proof of the date of the original
purchase is required before warranty service is rendered.
This warranty only covers failures due to defects in
materials and workmanship which arise during normal use.
This warranty does not cover damage which occurs in
shipment or failures which are caused by products not
supplied by the Warrantor or failures which result from
accident, misuse, abuse, neglect, mishandling,
misapplication, alteration, modification, faulty installation,
set-up adjustments, improper antenna, inadequate signal
pickup, maladjustment of consumer controls, improper
operation, power line surge, improper voltage supply,
lightning damage, rental use of the product or service by
anyone other than an authorized repair facility or damage
that is attributable to acts of God.
LIMITS AND EXCLUSIONS
There are no express warranties except as listed above.
The Warrantor will not be liable for incidental or
consequential damages (including, without limitation,
damage to recording media) resulting from the use of
these products, or arising out of any breach of the
warranty. All express and implied warranties, including
the warranties of merchantability and fitness for
particular purpose, are limited to the applicable warranty
period set forth above.
Some states do not allow the exclusion or limitation of
incidental or consequential damages, or limitations on
how long an implied warranty lasts, so the above
exclusions or limitations may not apply to you.
This warranty gives you specific legal rights and you may
also have other rights that vary from state to state.
If the problem is not handled to your satisfaction, then
write to the Address above.
Service calls which do not involve defective materials or
workmanship as determined by the Warrantor, in its sole
discretion, are not covered. Costs of such service calls
are the responsibility of the purchaser.
Before sending the camera out for repair, check the
items below. If the problem persists after checking
these items, contact your service center.
■If no image appears.
Is the coaxial cable attached securely?
Are the power and voltage normal?
Has the iris of the lens inside the camera been
adjusted correctly (with the level volume) ?
Is there adequate illumination?
■If the image is unclear
Is the lens in focus?
Is the lens dirty?
Dirt of fingerprints on the lens can adversely
affect the images.
Gently wipe any dirt or fingerprints off the lens
with a soft cloth or lens cleaning paper and cleaning
fluid (commercially available).
Is the monitor adjusted correctly?
WARNING:
TO PREVENT THE RISK OF FIRE OR ELECTRIC
SHOCK, DO NOT EXPOSE THIS APPLIANCE TO
RAIN OR MOISTURE.
TROUBLESHOOTING
5436 W Crenshaw Street
Tampa, FL 33634
www.digital-watchdog.com
Product specificaties
| Merk: | Digital Watchdog |
| Categorie: | Bewakingscamera |
| Model: | DWC-B1365T |
Heb je hulp nodig?
Als je hulp nodig hebt met Digital Watchdog DWC-B1365T stel dan hieronder een vraag en andere gebruikers zullen je antwoorden
Handleiding Bewakingscamera Digital Watchdog

19 December 2025
19 December 2025
18 December 2025
18 December 2025
18 December 2025
17 December 2025
17 December 2025
17 December 2025
17 December 2025
17 December 2025
Handleiding Bewakingscamera
Nieuwste handleidingen voor Bewakingscamera
22 April 2026
21 April 2026
7 April 2026
7 April 2026
6 April 2026
6 April 2026
6 April 2026
6 April 2026
3 April 2026
1 April 2026