Denon SC-N10 Handleiding
Denon Hifi systeem SC-N10
Bekijk gratis de handleiding van Denon SC-N10 (17 pagina’s), behorend tot de categorie Hifi systeem. Deze gids werd als nuttig beoordeeld door 31 mensen en kreeg gemiddeld 4.4 sterren uit 8 reviews. Heb je een vraag over Denon SC-N10 of wil je andere gebruikers van dit product iets vragen? Stel een vraag
Pagina 1/17
ENGLISH
お買い上げいただき、ありがとうございます。
ご使用の前にこの取扱説明書をよくお読みのうえ、正しくご使用
ください。
お読みになった後は、いつでも見られるところに「保証書」と
共に大切に保管してください。
この製品は持ち込み修理対象製品です。
出張修理をご希望される場合は、別途出張料をご請求させていた
だくことになりますので、あらかじめご了承願います。
詳しくは、「保証と修理について」をご覧ください。
付属品について
ご使用になる前に
使用上のご注意
n設置について
スピーカーの音質は、部屋の大きさ・形態(洋室、和室)・設置
のしかたなどの影響を受けやすいため、設置については次のこと
にご注意ください。
•本機を直接床に設置すると低音が不自然に強調される場合があ
ります。そのときは、コンクリートブロックなど固い台の上に
設置してください。
•本機をレコードプレーヤーと同じ台や棚の上に設置すると、
ハウリングを起こすことがありますので、ご注意ください。
•本機の近くに磁石もしくは磁石を備えた家具や器具などが
置かれている場合、本機との相互作用により、テレビに色むら
を発生させる場合がありますのでご注意ください。
警告
•スピーカーケーブルを足や手に引っ掛けて本機を落下させることのな
いように、ケーブルは必ず壁などに固定してください。
•取り付け後は、必ず安全性を確認してください。また、その後定期的
に落下の可能性がないか安全点検を実施してください。取り付け場
所、取り付け方法の不備によるいかなる損害、事故について当社はい
っさいその責を負いません。
nお手入れのしかた
•キャビネットや操作パネル部分の汚れを拭き取るときは、
柔らかい布を使用して軽く拭き取ってください。
※化学ぞうきんをご使用の際は、その注意書に従ってください。
•ベンジン、シンナーなどの有機溶剤および殺虫剤などが本機に
付着すると、変質したり変色することがありますので使用しな
いでください。
nその他のご注意
•アンプの音量を極端に大きくして歪んだ音のまま再生すること
は、アンプやスピーカーにダメージを与える場合があります。
適正な音量でお楽しみください。
•本機を移動させる場合、サランネット越しにスピーカー部表面
に強い力を加えると、スピーカーを破損させてしまうことがあ
りますので、ご注意ください。
•スピーカー前面のサランネットは、取り外しができません。
設置のしかた
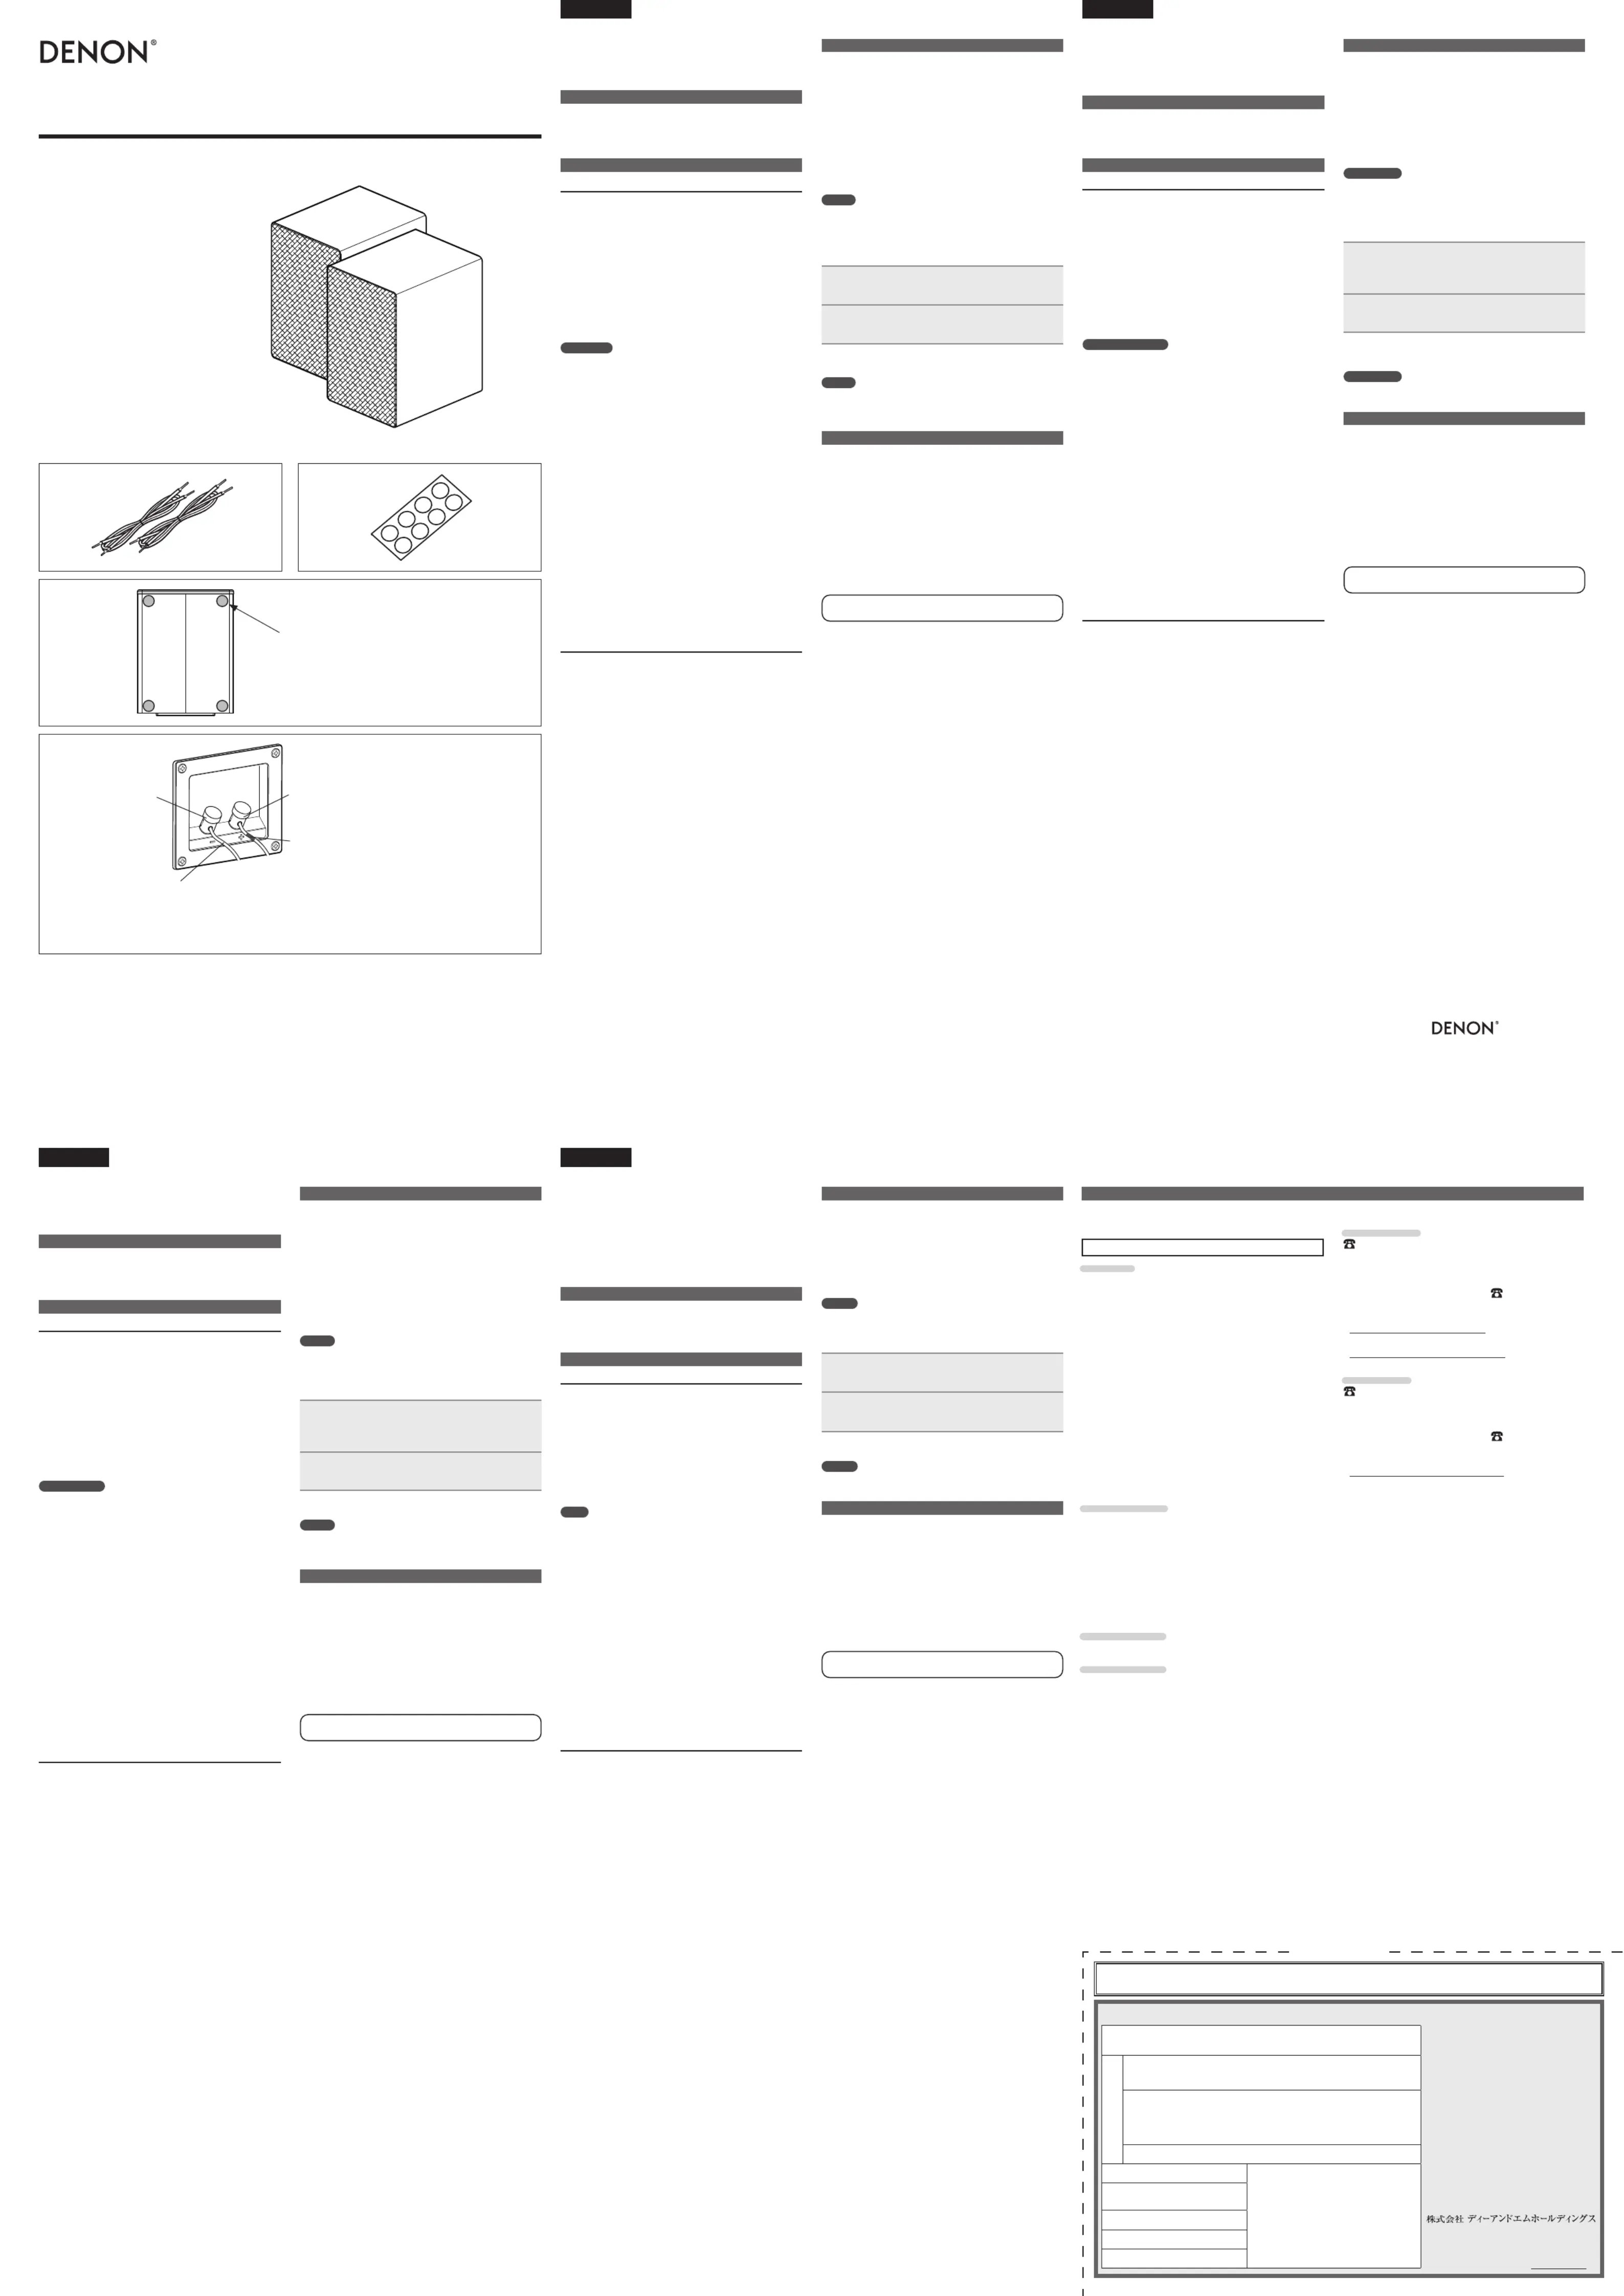
付属のすべり止め(4枚)を底面に貼ってください。(v
A)
日本語
SC-N10
SPEAKER
Owner’s Manual
Manuel de l’Utilisateur
Manuale delle istruzioni
取扱説明書
Bedienungsanleitung
Manual del usuario
Gebruiksaanwijzing
Bruksanvisning
Руководство пользователя
Instrukcja obsługi
操作说明书
③④
Thank you for purchasing this Denon product. To ensure proper
operation, please read this owner’s manual carefully before using
the product.
After reading them, be sure to keep them for future reference.
Accessories
q Owner’s Manual1 ........................................................................
w Safety Instructions1 .....................................................................
e Speaker cable2 .............................................................................
r Anti-slip pads (8 pcs. / 1sheet)1 ...................................................
Before using
Note on use
nCautions on installation
The quality of the sound produced from the speaker is affected
by the size and type of the room, as well as by the method of
installation. Consider the points listed below before installing the
speaker.
•If the bass sound is overemphasized when the speakers are
installed directly on the floor, set them on concrete blocks or
other hard stands.
•Note that placing the speaker on the same stand or shelf as a
record player may result in howling.
•Also note that if there is a magnet or any device generating
magnetic force nearby, interaction between this device and the
speakers can cause the colors on the TV to become blotchy.
WARNING
•Be sure to fasten the speaker cables to a wall, etc., to prevent
people from tripping over them or otherwise pulling on them
accidentally, causing the speakers to fall.
•Be sure to check for safety after installing the speakers.
Afterwards, perform safety inspections at regular intervals to be
sure there is no danger that the speakers will fall. Denon will not
be liable for damages or accidents caused by inappropriate choice
of the place of installation or improper installation procedures.
n
Cleaning
•Use a dry wiping cloth and wipe lightly to remove dirt from the
cabinet and operation panel.
•When using chemically treated cloths, follow the precautions
provided for them.
•Do not use benzene, thinners, or other organic solvents or
insecticides on the speakers since they may cause a change in
quality or color.
nOther cautions
•Raising the amplifier’s volume excessively and playing with
distorted sound could damage the amplifier and speakers. Enjoy
the sound at a reasonable volume level.
•When moving the unit, note that applying strong force to the
surface of the speaker through the saran net could damage the
speaker.
•The Saran net on the front of the speakers cannot be removed.
How to Install
Attach four of the included anti-slip pads to the bottom of the unit.
()vA
Connections
When connecting the speakers to an amplifier, be sure to read the
amplifier’s owner’s manual carefully and connect properly.
•Connect the input terminals on the rear panel of the speaker with
the speaker output terminals on the amplifier, using the included
speaker cables.
•Connect the speaker for the left channel to the “L” terminal on
the amplifier, the speaker for the right channel to the “R” terminal
on the amplifier, making sure to check the polarities (“+” and
“–”). ()vB
•Amplifiers have various speaker output terminals.
Check the owner’s manual of the amplifier you are using for
details.
NOTE
•Be sure to turn the amplifier’s power off before connecting the
speakers to the amplifier.
•If the polarities are inverted, the phase may be off and the sound
may have no bass component, making it seem unnatural. Be sure
to connect the polarities properly.
1
Push the speaker terminal and insert the
speaker cable into the cable insertion slot.
2
Release your nger from the speaker terminal
to x the speaker cable.
Once connections are completed, pull gently on the speaker cables
to check that they are securely connected.
NOTE
•Do not let the core wires of two speaker cables touch each other.
Doing so will short-circuit the amplifier circuitry and damage the
amplifier.
Specifications
Type: 2-way · 2-speakers
Reflex box
Frequency range: 50 Hz ~ 20 kHz
Input impedance: 6 Ω/ohms
Max. input: 60 W (IEC), 120 W (PEAK)
Sensitivity: 85 dB (1 W · 1 m)
Crossover frequency: 3.5 kHz
Speakers: 12 cm (4-23/32”) cone bass-mid x 1
3 cm (1-3/16”) balance dome high range x 1
Maximum external
dimensions: 153 (W) x 233 (H) x 200 (D) mm
(6-1/32” x 9-11/64” x 7-7/8”)
Weight: 2.4 kg (5 lbs 5 oz)
For improvement purposes, specifications and design are
subject to change without notice.
B
A
接続のしかた
接続の際は、アンプの取扱説明書をよくお読みの上、正しくご使
用ください。
•スピーカー背面の入力端子とアンプのスピーカー出力端子を付
属のスピーカーケーブルで接続します。
•左チャンネルのスピーカーはアンプのL端子へ、右チャンネル
のスピーカーはアンプのR端子へ、極性(+、−)を確認して
接続してください。(v
B)
•アンプにはいろいろなスピーカー出力端子があります。
お使いになるアンプの取扱説明書を確認してください。
ご注意
•スピーカーをアンプに接続する場合は、必ずアンプの電源を切ってか
らおこなってください。
•極性を間違えると、位相が変わったり低音域のない不自然な再生音に
なってしまいます。正しく接続してください。
1
スピーカー端子を押し、ケーブル差し込み口に
スピーカーケーブルを差し込む。
2
スピーカー端子から指を離し、スピーカー
ケーブルを固定する。
接続が終わったら、スピーカーケーブルを軽く引っ張り、確実に
接続されているか確認をしてください。
ご注意
•スピーカーケーブルの芯線どうしを接触させないでください。アンプ
の回路がショートし、故障の原因となります。
主な仕様
形式:2ウェイ・2スピーカー
バスレフ型
再生周波数域:50Hz〜20kHz
入力インピーダンス
:6Ω
最大許容入力:60W(JEITA)、120W(PEAK)
平均出力音圧レベル
:85dB(1W・1m)
クロスオーバー周波数
:3.5kHz
スピーカーユニット
:ウーハ−(12cmコーン形×1)
ツィ−タ−(3cmバランスドーム形×1)
最大外形寸法:
153(幅)×233(高さ)×200(奥行き)mm
質量:2.4kg
※JEITA:(社)電子情報技術産業協会が制定した規格です。
仕様および外観は改良のため、予告なく変更することがあり
ます。
Nous vous remercions d’avoir acquis cet appareil Denon. Afin
d’assurer son bon fonctionnement, veuillez lire attentivement ce
manuel de l’utilisateur avant d’utiliser l’appareil.
Après l’avoir lu, conservez-le afin de pouvoir vous y reporter
ultérieurement.
Accessoires
qManuel de l’Utilisateur
wInstructions de sécurité1 .............................................................
eCâble d’enceinte2
rRondelles antidérapantes (8 pavés / 1feuille).1
Avant l’utilisation
Observations relatives a l’utilisation
nPrecautions d’installation
La qualité du son produit par le enceintes est affectée par la taille et
la forme de la pièce, ainsi que par la méthode d’installation. Soyez
attentifs aux remarques inscrites ci-dessous avant l’installation du
enceintes.
•Si le son des basses est excessif lorsque les enceintes sont
installées directement sur le sol, placez-les sur des blocs de
béton ou sur un autre support dur.
•Veuillez noter que quand le enceintes est disposé sur le même
support ou la même étagère qu’une platine disque, un bruit
gênant peut se produire.
•Notez également que si un aimant ou un autre appareil générant
une force magnétique se trouve à proximité, une interaction
entre cet appareil et les enceintes peut brouiller les couleurs de
la télévision.
AVERTISSEMENTS
•Fixez les câbles d’enceinte au mur, etc., afin d’éviter de vous y
prendre les mains ou les pieds et de faire tomber les enceintes.
•Veillez à effectuer un contrôle de sécurité après l’installation
des enceintes. Par la suite, effectuez des contrôles de sécurité
régulièrement pour vous assurer que les enceintes ne risquent
pas de tomber. Denon n’acceptera aucune responsabilité pour
des dégâts ou accidents causés par un choix inapproprié du lieu
d’installation ou par des procédures d’installation incorrectes.
nNettoyage
•Utilisez un chiffon et essuyez légèrement afin d’ôter la poussière
desboîtiers et du panneau de commande.
•Lorsque vous utilisez des chiffons traités chimiquement, respectez
les mesures de précaution jointes à ces produits.
•Ne pas utiliser de benzène, de dissolvant ou d’autres solvants
organiques, ou d’insecticides pour nettoyer l’unité principale, car
ils risquent d’en altérer la qualité ou la couleur.
nAutres Précautions
•Vous risquez d’endommager l’amplificateur et les enceintes si
vous augmentez trop le volume de l’amplificateur et produisez un
son distordu. Appréciez le son à un niveau de volume raisonnable.
•Lorsque vous déplacez les enceintes, veuillez remarquer que
vous risquez de les endommager si vous exercez une forte
pression au niveau du filet de protection.
•Le filet de protection qui se trouve sur l'avant des enceintes n'est
pas amovible.
Installation
Fixez quatre des patins antidérapants en dessous de l'unité. ()vA
Connexions
Afin d’effectuer les connexions correctement, lisez attentivement
le mode d’emploi de l’amplificateur.
•Connectez les bornes d’entrée situées sur le panneau arrière des
enceintes aux bornes de sortie de l’amplificateur, à l’aide des
câbles d’enceinte (Fourni).
•Connectez l’enceinte de la voie gauche à la borne “L” de
l’amplificateur, l’enceinte de la voie droite à la borne “R” de
l’amplificateur, en vérifiant les polarités (“+” et “–”). (v
B)
•Les amplificateurs sont dotés de différents types de bornes de
sortie d’enceintes.
Vérifiez le mode d’emploi de votre amplificateur.
REMARQUE
•L’amplificateur doit être mis hors tension avant d’y connecter les
enceintes.
•Si les polarités sont inversées, les enceintes risquent d’être
horsphase et les basses ne seront alors pas reproduites
correctement. Assurezvous de connecter les polarités
correctement.
1
Enfoncez la borne d’enceintes et insérez le
câble d’enceinte dans la fente d’insertion du
câble.
2
Retirez votre doigt de la borne d’enceintes
pour xer le câble d’enceinte.
Lorsque les connexions sont terminées, tirez doucement sur
les câbles d’enceinte pour vous assurer qu’ils sont fermement
connectés.
REMARQUE
•Ne pas laisser les fils de deux câbles d’enceinte entrer en contact.
Ceci causerait un court-circuit et endommagerait l’amplificateur.
Spécifications
Type: 2-enceintes à · 2-voies
Caisson de résonance
Gamme de fréquence: 50 Hz ~ 20 kHz
Impédance d’entrée: 6 Ω/ohms
Puissance max: 60 W (IEC), 120 W (PEAK)
Sensibilité: 85 dB (1 W · 1 m)
Fréquence de croisement: 3,5 kHz
Enceintes:
1 x cônes bass-mid de 12 cm (4-23/32”)
1 x dome balance haut de gamme 3 cm (1-3/16”)
Dimensions externes
maximales: 153 (L) x 233 (H) x 200 (P) mm
(6-1/32” x 9-11/64” x 7-7/8”)
Poids: 2,4 kg (5 lbs 5 oz)
Par souci d’amélioration, les caractéristiques et le design sont
susceptibles de modifications sans préavis.
Grazie per avere acquistato questo prodotto Denon. Per un
funzionamento corretto, assicurarsi di leggere attentamente il
presente manuale delle istruzioni prima di utilizzare il prodotto.
Una volta letto, custodirlo per consultazioni future.
Accessori
qManuale delle istruzioni
wIstruzioni per la sicurezza1 ..........................................................
eCavo dell’altoparlante2
rCuscinetti antiscivolo (8 pezzi / 1 foglio)1
Prima dell’uso
Note sull’uso
nPrecauzioni sull’installazione
La qualità del suono emesso dal altoparlanti dipende dalla grandezza
e dal tipo dell’ambiente nonché dal metodo di installazione. Prima di
installare il altoparlanti, osservate i seguenti punti.
•Se il suono dei bassi è troppo enfatizzato quando gli impianti
di altoparlanti sono collocati direttamente a contatto con il
pavimento, posizionarli su blocchi di cemento o altri supporti
rigidi.
•Il posizionamento del altoparlanti sullo stesso supporto o
sulla stessa mensola di un videoregistratore può provocare
interferenze.
•Notare inoltre che se vicino all’unità è presente un magnete o
un dispositivo che genera forza magnetica, l’interazione tra tale
dispositivo e gli impianti di altoparlanti può comportare una
visualizzazione a macchie dei colori sul televisore.
AVVERTENZA
•Fissare i cavi dell’altoparlante alla parete ecc., in modo da non
rimanere impigliati e far cadere l’unità.
•Dopo l’installazione dei altoparlanti, verificate che siano sicuri.
Dopodiché, eseguire il controllo di sicurezza a intervalli regolari
per assicurarsi che non vi sia pericolo che gli impianti d altoparlanti
cadano. Denon declina ogni responsabilità per danni o incidenti
dovuti alla scelta di un luogo di installazione inappropriato oppure
a procedure di installazione errate.
nPulizia
•Utilizzare un panno per pulire delicatamente l’unità e rimuovere la
sporcizia dall’involucro e dal pannello di controllo.
•Quando si utilizzano panni trattati chimicamente, adottare tutte le
precauzioni necessarie.
•Non utilizzare benzene, diluenti, altri solventi chimici o insetticidi
sull’unità principale, poiché possono deteriorarne la qualità o
modificare il colore.
nAltre precauzioni
•Un volume eccessivo dell’amplificatore e la riproduzione di suoni
distorti possono arrecare danni agli altoparlanti e all’amplificatore.
Ascoltare la musica mantenendo il volume a livelli non eccessivi.
•Nello spostare l’unità fare attenzione a non applicare un’eccessiva
pressione sulla superficie dell’altoparlante attraverso la rete
saran, poiché ciò potrebbe arrecare danni all’altoparlante.
•La rete Saran sulla parte anteriore degli altoparlanti non può
essere rimossa.
Modalità di installazione
Fissare quattro dei piedini antiscivolo in dotazione sul fondo
dell'unità. ()vA
Collegamenti
Prima di effettuare i collegamenti, leggere attentamente il manuale
delle istruzioni dell’amplificatore in modo da collegarlo in maniera
adeguata.
•Collegare i terminali di ingresso collocati nel pannello posteriore
del altoparlanti con i terminali d’uscita dell’altoparlante
sull’amplificatore utilizzando i cavi dell’altoparlante (In dotazione).
•Collegare il altoparlanti per il canale sinistro al terminale “L”
dell’amplificatore e il altoparlanti per il canale destro al terminale
“R” dell’amplificatore, controllando inoltre le polarità (“+” e “–”).
(v
B)
•Ci sono diversi tipi di terminali d’uscita dell’altoparlante sugli
amplificatori.
Controllare il manuale delle istruzioni dell’amplificatore.
NOTA
•Spegnere l’amplificatore prima di collegare il altoparlanti allo
stesso.
•Se le polarità sono invertite, la fase potrebbe essere spenta
e l’audio potrebbe non avere i toni bassi, risultando quindi
innaturale. Collegare le polarità in maniera corretta.
1
Spingere il terminale del cavo e inserire il cavo
dell’altoparlante nella fessura di inserimento
del cavo.
2
Levare il dito dal terminale dell’altoparlante
per ssare il cavo dell’altoparlante.
Dopo aver completato i collegamenti, tirare leggermente i cavi
dell’altoparlante per assicurarsi che siano collegati saldamente.
NOTA
•Evitare che le anime dei due cavi di collegamento entrino in
contatto. In caso contrario, la circuiteria dell’amplificatore andrà in
corto circuito, arrecando danni all’amplificatore.
Speciche
Tipo: 2-vie · 2-altoparlanti
Involucro Reflex
Gamma di frequenza: 50 Hz ~ 20 kHz
Impedenza di ingresso: 6 Ω/ohm
Ingresso max: 60 W (IEC), 120 W (PEAK)
Sensibilità: 85 dB (1 W · 1 m)
Frequenza di crossover: 3,5 kHz
Altoparlanti: 12 cm cono bassi-medi x 1
3 cm high range a cupola bilanciato x 1
Dimensioni esterne
massime: 153 (L) x 233 (A) x 200 (P) mm
Massa: 2,4 kg
Per motivi di miglioramento, dati tecnici e design sono soggetti
a modifiche senza preavviso.
ITALIANO
FRANCAIS
保証と修理について
n保証書
この取扱説明書内の保証書を、切り取り線に沿って切り離してお使いください。
保証書は、必ず「販売店名・購入日」などの記入を確かめてください。
保証期間はご購入日から1年間です。
保証について
1.保証期間内でも、次のような場合には有料修理となります。
(1)使用上の誤り、または改造や不当な修理による故障または損傷。
(2)
お買い上げ後の取付場所の移動、落下、引っ越しの際の輸送等による
故障または損傷。
(3)火災、地震、水害、落雷、その他の天災地変、公害、異常電圧、
指定以外の電源電圧による故障または損傷。
(4)車両、船舶に搭載して使用された場合に生じた故障または損傷。
(5)業務用に使用されて生じた故障または損傷。
(6)保証書のご提示がない場合。
(7)
保証書にお買い上げ年月日、お客様名、販売店名の記入のない場合、
あるいは字句を書き換えられた場合。
(8)故障の原因が本機以外にある場合で改善を要するとき。
2.
次の場合、掛かる費用をお客様に負担していただくことになります。
(1)
この製品について出張修理をご希望の場合には、出張に要する実費を
申し受けます
。
(2)
この製品を直接メーカーへ郵送、または宅配便等で送付した場合の
送料はお客様の負担となります。
3.
ご転居の場合や贈答品等で修理をご依頼されたい場合は、保証書に記載の修
理お問い合わせ窓口へご相談ください。
4.
お客様にご記入いただいた保証書の内容は、保証期間内のサービス活動
およびその後の安全点検活動のために記載内容を利用させて頂く場合が
ございますので、あらかじめご了承ください。
5.
本書は再発行いたしませんので紛失しないよう大切に保存してください。
保証期間経過後の修理
修理によって機能が維持できる場合は、お客様のご要望により、有料修理
致します。
型名
SC-N10
※
お
客
様
お名前
様
ご住所 〒
電話番号
()
※お買い上げ日※取扱販売店名・住所・電話番号
年月日
保証期間(お買い上げ日より)
本体:
1 年
年
保証書
お買い上げいただきありがとうござい
ます。保証期間内に取扱説明書、添付
シート等の注意書きにしたがって、正
常な使用状態での使用中に故障した場
合には本書記載内容にもとづきサービ
スセンターにて無料修理をさせていた
だきます。お買い上げの日から左記の
保証期間内に故障した場合は、本書を
ご準備の上、下記の修理お問い合わせ
窓口にご依頼ください。本書は日本国
内においてのみ有効です。
EectiveonlyinJapan.
移動や輸送が困難な大型製品につきま
しては、出張修理のお見積りをさせて
いただきますので、修理お問い合わせ
窓口までご相談ください。
※印欄に記入のない場合は無効となりますので必ずご確認ください。
〒210-8569
神奈川県川崎市川崎区日進町2番地1D&Mビル
修理お問い合わせ窓口 TEL:0570-666-811
DENONホームページ URL:http://denon.jp
(切り取り線)
www.denon.com
Printed in China 5411 11694 20AD
Copyright © 2018 D&M Holdings Inc. All Rights Reserved.
Anti-slip pads /
Rondelles antidérapantes /
Cuscinetti antiscivolo /
すべり止め
“–” side terminal: Black /
Borne “–”: Noir /
Terminale lato “–”:Nero /
“–” 側端子:黒
“+” side terminal: Red /
Borne “+”: Rouge /
Terminale lato “+”:Rosso /
“+” 側端子:赤
Connect to amplifier's “+” side:
The cable with a line printed on it and with a red tube /
Connectez au côté “+” de l’amplificateur :
Le câble avec une ligne imprimée et un tube rouge /
Collegare al lato “+” dell’amplificatore:
Il cavo su cui è stampata una linea e con un tubo rosso /
“+” 側端子用ケーブル:
線にライン印刷あり、および赤チューブ付き
Connect to amplifier's “–” side: Plain core /
Connectez au côté “–” de l’amplificateur : Ame lisse /
Collegare al lato “–” dell’amplificatore: Anima liscia /
“–” 側端子用ケーブル:線にライン印刷なし
n修理を依頼されるとき
修理を依頼される前に
正しい操作をしていただけずに修理を依頼される場合がありますので、
この取扱説明書をお読みいただき、お調べください。
修理を依頼されるとき
•出張修理をご希望される場合は、別途出張料をご請求させていただくこと
になりますので、あらかじめご了承ください。
•修理を依頼されるときのために、梱包材は保存しておくことをおすすめします。
n依頼の際に連絡していただきたい内容
•お名前、ご住所、お電話番号
•製品名·······取扱説明書の表紙に表示しています。
•製造番号···製品背面に表示しています。
•できるだけ詳しい故障または異常の内容
n補修部品の保有期間
本機の補修用性能部品の保有期間は、製造打ち切り後8年です。
nお客様の個人情報の保護について
•お客様にご記入いただいた保証書の控えは、保証期間内のサービス活動およびその
後の安全点検活動のために記載内容を利用させていただく場合がございますので、
あらかじめご了承ください。
•この商品の保証書によって、保証書を発行している者(保証責任者)およびそれ
以外の事業者に対するお客様の法律上の権利を制限するものではありません。
n修理料金のしくみ
•技術料·······
故障した製品を正常に修復するための料金です。
技術者の人件費・技術教育費・測定機器などの設備費・一般管理費
などが含まれます。
•部品代·······
修理に使用した部品代金です。
その他修理に付帯する部材などを含む場合もあります。
•出張料·······
製品のある場所へ技術者を派遣する場合の費用です。
別途駐車料金をいただく場合があります
。
修理相談窓口
0570(666)811
•
•
0466(86)9520
•
http://denon.jp/jp/html/service.html
n代表修理窓口
•
n当社製品のご相談と修理についてのお問い合わせは、お買い上げ店
または下記窓口にご連絡ください。
お客様相談センター
0570(666)112
FAX:044(330)1367
•
•
050(3388)6801
•
http://denon.jp/jp/html/faq.html
•
http://denon.jp/jp/html/contact.html
z
z
Product specificaties
| Merk: | Denon |
| Categorie: | Hifi systeem |
| Model: | SC-N10 |
Heb je hulp nodig?
Als je hulp nodig hebt met Denon SC-N10 stel dan hieronder een vraag en andere gebruikers zullen je antwoorden
Handleiding Hifi systeem Denon

16 November 2024
28 September 2024
4 September 2023
6 Juli 2023
5 Juli 2023
3 Juni 2023
1 Juni 2023
31 Mei 2023
21 Mei 2023
19 Mei 2023
Handleiding Hifi systeem
Nieuwste handleidingen voor Hifi systeem
28 Mei 2026
21 Mei 2026
20 Mei 2026
20 Mei 2026
19 Mei 2026
19 Mei 2026
13 Mei 2026
12 Mei 2026
11 Mei 2026
11 Mei 2026