DayStar Filters QUARK Handleiding


Lees hieronder de đź“– handleiding in het Nederlandse voor DayStar Filters QUARK (16 pagina's) in de categorie Niet gecategoriseerd. Deze handleiding was nuttig voor 168 personen en werd door 2 gebruikers gemiddeld met 4.5 sterren beoordeeld

Pagina 1/16
DAYSTAR FILTERS QUARK
Congratulations on your purcha se of a Quark Hydrog en Alpha
“Eyepiece” solar filter. Please read this manual before using the product.
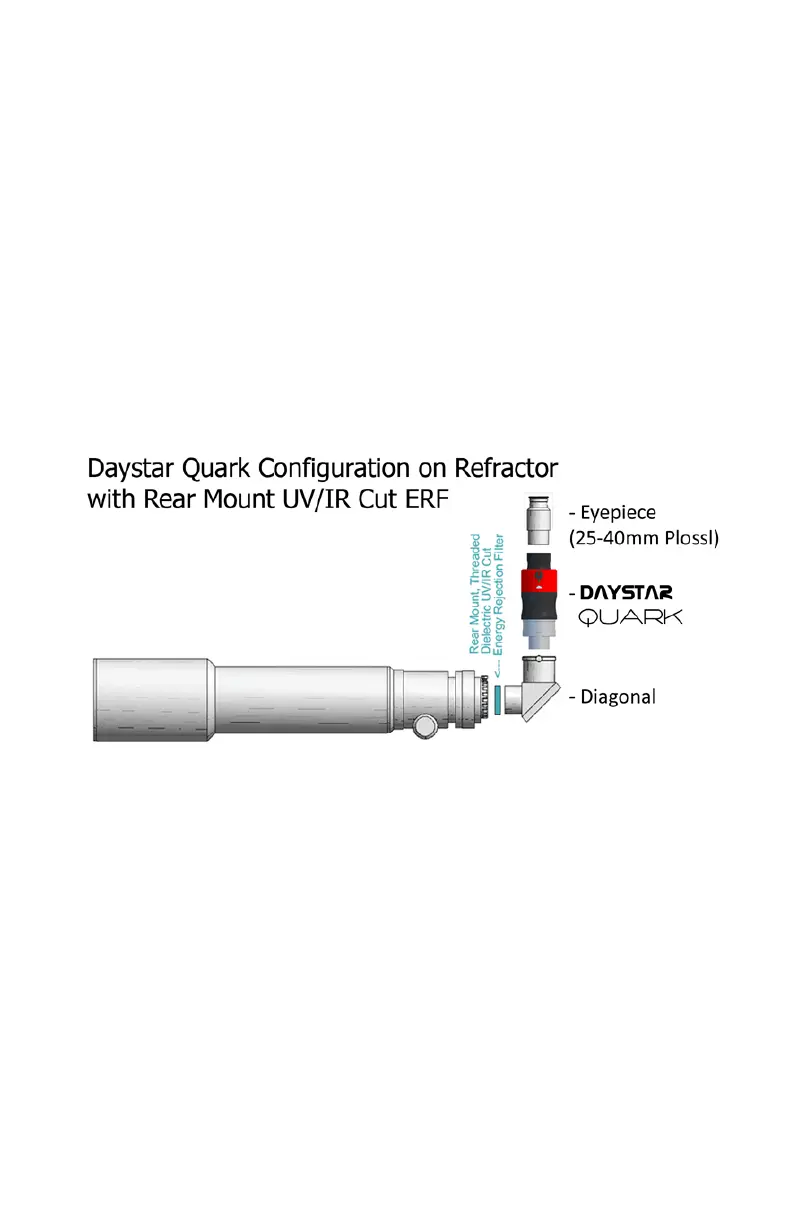
To use the filter, plug in the included power supply, then place the
Quark after your telescope’s diagonal and insert an eyepiece or
camera in the rear of the lter. Turn the knob to point straight away
from the light. When the light turns green in about 5-10 minutes
your viewing experience can begin.
To prevent damage, we recommend using an Energy Rejection Filter on
telescopes of 80mm aperture or more, or when tra cking the Sun for long
periods. This can be a UV/IR cut filter mounted before the diagonal, or a
full aperture red or yellow glass ERF mounted in front of the telescope.
Warnings:
Do not disassemble the filter, the bl ocking element is separated from the
etalon and the complete ssembly must be used together for safe viewing.
Do n ot po wer the filter from a computer or cell phone charger as the
Quark requires a high current power supply (> 1.5A) for operation.
For assistance:
Call: 1 (866) 680-6563
Email: servi ce@daystarfilters.com
Visit: http://www.da ystarfilters.com
Cautions & Warnings:
There are n o use r se rviceable pa rts inside the Quark. Do not
diassemble t he unit. Certain components are under p ressure a nd
disassembly can ca use permanent damage. All el ements are required
for proper operation and removal of any internal component will cause a
malfunction that could result in unfiltered light which can cause blindness
or damage to equipment.
Solar Observing with a telescope is sensitive to certain risks.
ď‚· Caution and care of the telescop e and filter is advised in
assembly, use and dismantling at all times.
ď‚· Telescope owners must use caution when affixing the filter to the
telescope ne ver to poi nt any telesco pe at the sun without th e
solar filter safely installed first.
ď‚· While ob serving, owners must take care and ca ution that all
parts of the filter and telescope a ssembly are pro perly affixed
and th at no pie ces h ave be en opened, tam pered with or
removed.
ď‚· Owners must also use caution when the telescope is being
assembled and dismantled to assure the telescope is never
pointing at the sun without the solar filter properly installed.
ď‚· Responsible owners will be prud ent to inform guest or novice
observers of the special nature of the telescope configuration so
not to imply that telescopi c observing of the sun is safe without
proper filtration.
A few very important points that owners and operators must
understand:
• DayStar filters are rear-mounted and can be applied to a
choice of telescopes if applie d p roperly. If app lication i s
incorrect, the filter will not perform as specified.
• DayStar Filters a re interferen ce filters. If light reaches a
DayStar Filter at an angle, it will cause wavelength
wingshift. For our appli cation on a telescope, DayStar owners
need F/1 5 to F/30 light, so we need to alter you r telescope’s
F/ratio in order to reach F/15 to F/30 where your DayStar will
operate correctly. Best performance is at F/27-F/32.
• DayStar filters are temperature sensitive. Changi ng the
temperature will change t he wavelength (CWL) that the filter will
transmit. Users need to be aware of temperature tuning issues.
USAGE:
The Quark is de signed for use o n F/4 to F/9 refractors. Combined with
an integrated 4.3x telecen tric barlow, this results in a F/17 to F/38 final
image respectively, to provide the best performance from your filter.
Because of the incl uded barlo w, ima ges will a ppear 4x larg er than
without the Quark, and ample additional backfocus is available.
The filter mu st be plu gged in usi ng th e su pplied power supply. The
etalon cavity is precision heated to regulate the wavelength of the filter
output.
Any other USB power source you wi sh to use must be rated for at least
1.5 amps at 5 volts. Co mputer USB ports and cell phone chargers d o
not normally support this much power.
After letting the filter come up to temperature and settle, the light will turn
green and viewing can begin.
Knob tuning:
If the imag e la cks contrast, you may nee d t o adj ust th e ce nter
wavelength of the filter.
A knob is provided to adjust the center wavelength of the filter. Turn th e
knob counter clockwise to lower the wavelength towards the blue by u p
to 0.5Ă…. Turn clockwise to raise the wavelength towards the red by up to
0.5Ă…. Each click of the knob is 0.1Ă….
Tuning i s required on tele scopes with “droop” of th e focu ser, because
even very sli ght tilts will effectivel y lower th e ce nter wavelengt h of the
filter. Turn the kno b clockwise 2-3 clicks and wait 5-10 minutes to see if
the view is improved.
Additional tu ning can be performed, j ust ke ep in mi nd that after every
adjustment of the knob the filter must settle in tempera ture for
approximately 5-10 minutes before your change becomes effective.
Tuning can also b e use d to observe Doppler shifted feature s moving
towards or away from you. A feature moving towards you will be brighter
in blue (counterclockwise) wing shift, away from you will be reddened
(clockwise knob tuning).


Product specificaties

Merk: DayStar Filters
Categorie: Niet gecategoriseerd
Model: QUARK

Heb je hulp nodig?

Als je hulp nodig hebt met DayStar Filters QUARK stel dan hieronder een vraag en andere gebruikers zullen je antwoorden


Handleiding Niet gecategoriseerd DayStar Filters

Handleiding Niet gecategoriseerd

Nieuwste handleidingen voor Niet gecategoriseerd