Datalogic QuickScan QS6000 Plus Handleiding
Datalogic
Barcode lezer
QuickScan QS6000 Plus
Bekijk gratis de handleiding van Datalogic QuickScan QS6000 Plus (16 pagina’s), behorend tot de categorie Barcode lezer . Deze gids werd als nuttig beoordeeld door 142 mensen en kreeg gemiddeld 5.0 sterren uit 71.5 reviews. Heb je een vraag over Datalogic QuickScan QS6000 Plus of wil je andere gebruikers van dit product iets vragen? Stel een vraag
Pagina 1/16

1
Electronic Article Surveillance (EAS)
Installation Instruction Manual
Introduction
The EAS option enables nners toQuickScan QS6000 Plus model sca
provide Electronic Article Surveillance (EAS) deactivation.
This document provides information and procedures to install a new
EAS Antenna Upgrade Kit, or to replace a malfunctioning loop antenna
already installed in the canner. s
The EAS upgrade or replacement of the loop antenna in the scanner
involves:
• Replacing the Scan Window with a new thinner Scan Window
and the EAS Loop Antenna;
• Replacing the Handle Printed Circuit Board (PCB) with one that
contains a connector for the EAS Antenna leads, and
• Replacing the Interface Cable with a special EAS Interface Cable.
The loop antenna connects to the store’s EAS System through this special
Interface Cable
Before installing the upgrade or replacing the EAS antenna, verify that
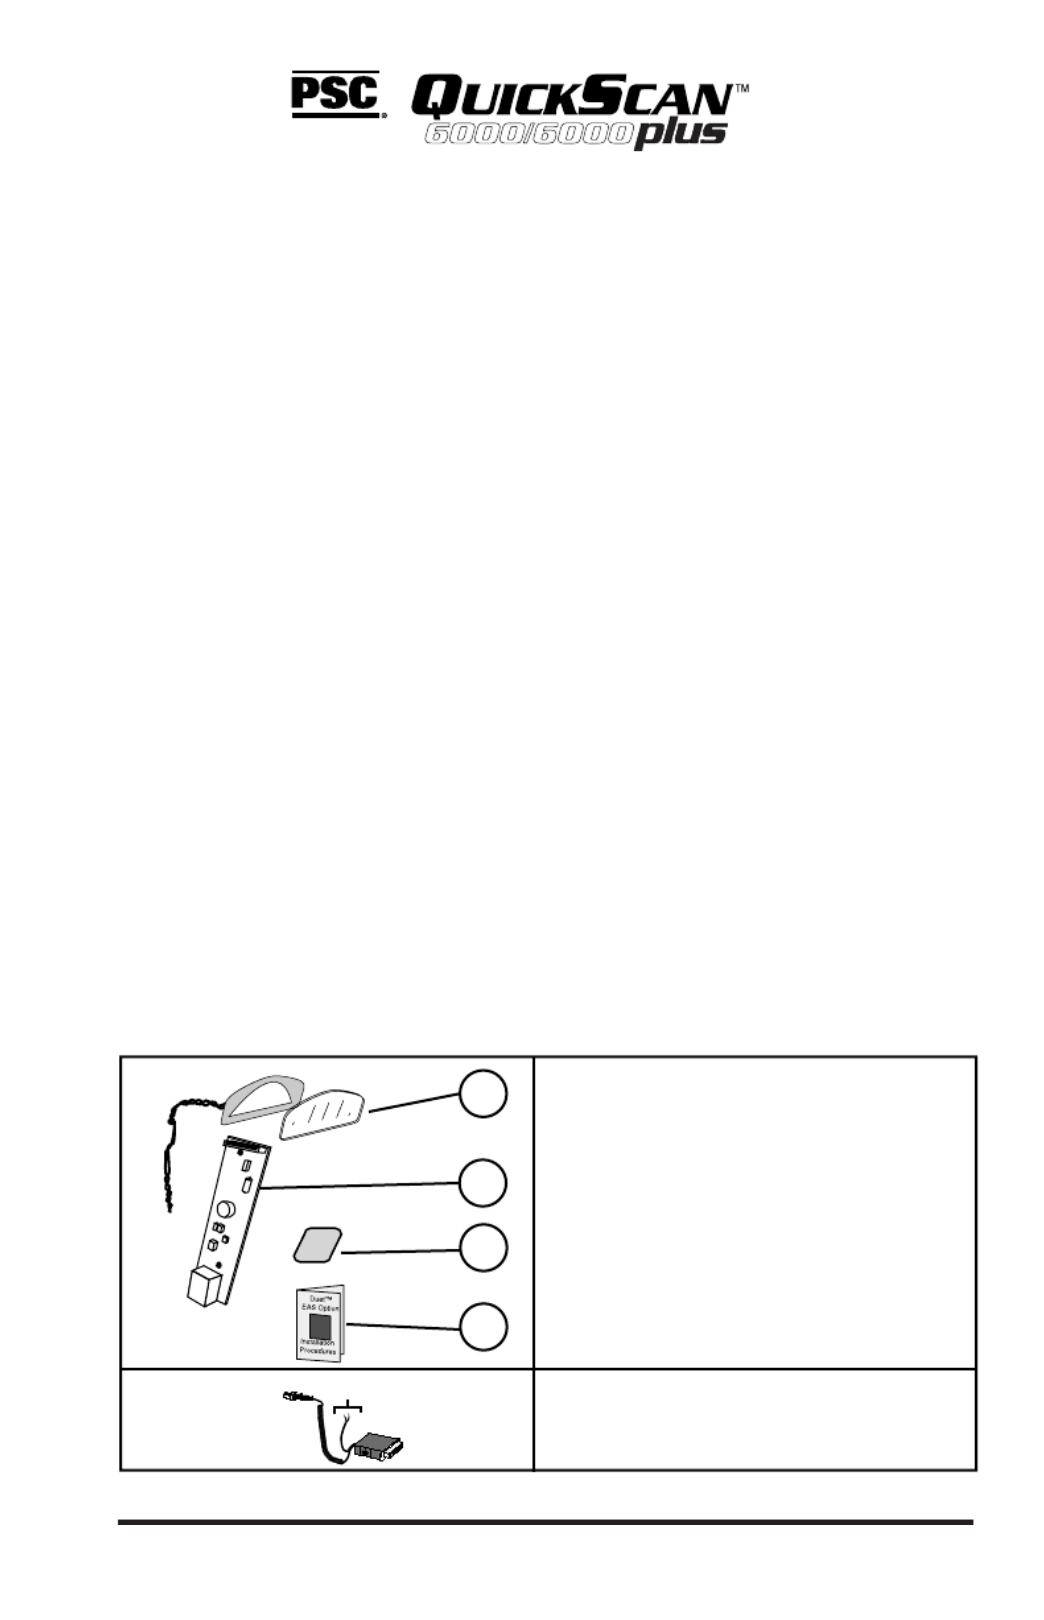
your EAS Upgrade Kit contains the following items shown in Figure 1.
2
1
4
3
Scan Window
Loop Antenna
To EAS System
EAS/Interface
Cable
Figure 1. EAS Kit
1. Scan Window/
EAS Antenna.
2. Handle PCB.
3. Insulation Tape Strip
4 . This Instruction Sheet
You should also have the correct
EAS/Interface cable that matches
your POS Terminal connection.
QuickScan® QS6000 Plus

2
Tools Required
You need the following tools to upgrade or replace the EAS
Antenna:
• Torque Limiting Driver.
• T8 Torx® bit.
• Multimeter (or equivalent) to test for continuity.
• ESD (ElectroStatic Discharge) protection as described below.
• .050 hex driver
ElectroStatic Discharge Protection
To protect static sensitive circuitry, follow these ElectroStatic Discharge
(ESD) procedures when upgrading, or servicing an existing EAS antenna.
Figure 2 shows the ESD materials.
1
2
3
4
Figure 2. ESD Setup
ESD Procedures:
1. Connect the above ESD components together with a common
ground strap to eliminate any electrical potential.
2. Use the anti-static floor and table mats to neutralize the working
area (floors, carpeting, tables, etc.).
3. Use the anti-static wrist strap to eliminate buildup static charge
picked up from the environment (shoes on carpets, etc.).
4. Attach the anti-static ground clip to a known ground point.
PSC and the PSC logo are registered Trademarks of PSC INC.
QS6000/6000 PLUS
is
a trademark owned by PSC, Inc. Torx® is a registered trademark of Camcar Textron.
ESD Materials:
1. Anti-static tablemat
2. Anti-static wriststrap
3. Anti-static floormat
4. Earth Ground
Alerts you to use
ESD protection.
Torx® is a registered trademark of Camcar Textron.

3
Installation/Replacement Procedures
Before you begin
1. Disconnect the Power to the Scanner.
2. Disconnect the scanner from the Point of Sale (POS) Terminal.
3. Place the scanner on its side on the ESD tablemat.
To Replace the EAS antenna or to install a new EAS antenna, use the
procedures described below to:
• Disconnect and replace the Interface Cable (I/F) with a new cable.
• Separate the Left and Right enclosures.
• Remove and Replace the Handle PC Board with a new PC Board.
• Remove and replace the Decoder PC Board.
• Remove the original Scan Window and replace with a new
window and the EAS loop antenna.
Reference the QuickScan lusQS6000 P Service Manual for more
information.
Disconnecting the I/F Cable
The I/F Cable connects the scanner to the POS system and power supply.
1. Insert a .050” hex driver or bent paper clip into the CABLE RELEASE
hole, and press down to unlock the cable connector. Refer to Figure 3.
Interface
Connector
Paper Clip
Ca ble R elea se
Adapter Plug for
QS6000 Plus
I/F Cables
Figure 3. Disconnecting the Interface Cable.
2. Gently pull the cable connector from the scanner.
3. Disconnect the cable from the POS system (connections will vary
depending upon interface type.
This completes I/F Cable disconnection.
Product specificaties
Merk: | Datalogic |
Categorie: | Barcode lezer |
Model: | QuickScan QS6000 Plus |
Heb je hulp nodig?
Als je hulp nodig hebt met Datalogic QuickScan QS6000 Plus stel dan hieronder een vraag en andere gebruikers zullen je antwoorden
Handleiding Barcode lezer Datalogic
5 Februari 2025
26 Juni 2024
26 Juni 2024
5 Juni 2023
13 Mei 2023
11 Mei 2023
5 Mei 2023
30 April 2023
29 April 2023
Handleiding Barcode lezer
- EC Line
- Garmin
- IC Intracom
- Brady
- Renkforce
- POSline
- Cognex
- Datamax-O'neil
- Motorola
- Code Corporation
- Manhattan
- Honeywell
- ID-Tech
- Tecno
- Zebra
Nieuwste handleidingen voor Barcode lezer
15 Juni 2025
11 Juni 2025
11 Mei 2025
31 Maart 2025
31 Maart 2025
26 Februari 2025
26 Februari 2025
26 Februari 2025
25 Februari 2025
20 Februari 2025