Crestron CEN-IO-RY-204 Handleiding
Crestron
Niet gecategoriseerd
CEN-IO-RY-204
Bekijk gratis de handleiding van Crestron CEN-IO-RY-204 (7 pagina’s), behorend tot de categorie Niet gecategoriseerd. Deze gids werd als nuttig beoordeeld door 12 mensen en kreeg gemiddeld 4.7 sterren uit 6.5 reviews. Heb je een vraag over Crestron CEN-IO-RY-204 of wil je andere gebruikers van dit product iets vragen? Stel een vraag
Pagina 1/7

The Crestron® CEN-IO-COM-202,CEN-IO-DIGIN-204 CEN-IO-IR-204, ,
and CEN-IO-RY-204 are wireless I/O extenders designed to expand the
available control ports within a commercial or residential system. The
extenders communicate to the local network over Wi-Fi® wireless
communications for remote control and monitoring.
N
N
N
NNO
O
O
OOTE:
TE:
TE:
TE:TE:The CEN-IO-COM-202, CEN-IO-DIGIN-204, CEN-IO-IR-204,
and CEN-IO-RY-204 are functionally similar. For simplicity within this
guide, the term "extender"is used to refer to all models except where
otherwise noted.
In
In
In
InIn t
t
t
tthe
he
he
hehe Box
Box
Box
BoxBox
1 CEN-IO-COM-202, CEN-IO-DIGIN-204, CEN-IO-IR-204, or
CEN-IO-RY-204, Wi-Fi Network Extender
A
A
A
AAd
d
d
ddd
d
d
ddit
it
it
ititiona
iona
iona
ionaional
l
l
ll I
I
I
IItem
tem
tem
temtems
s
s
ss
1 Bracket, Mounting, Integrated DINRail Clip (4510935)
1 Connector, 2-Pin (2003574)
1 Power Pack, PW-0512WUL (2045867)
2 Screw, 6-32, 3/8 in., Phillips(2007225)
CEN
CEN
CEN
CENCEN-I
-I
-I
-I-IO-COM
O-COM
O-COM
O-COMO-COM-2
-2
-2
-2-202
02
02
0202 On
On
On
OnOnly
ly
ly
lyly
2 Connector, 5-Pin (2003577)
CEN
CEN
CEN
CENCEN-I
-I
-I
-I-IO-D
O-D
O-D
O-DO-DI
I
I
IIG
G
G
GGI
I
I
IIN-20
N-20
N-20
N-20N-204
4
4
44 Only
Only
Only
OnlyOnly
1 Connector, 5-Pin (2003577)
CEN
CEN
CEN
CENCEN-I
-I
-I
-I-IO-IR-
O-IR-
O-IR-
O-IR-O-IR-2
2
2
2204
04
04
0404 a
a
a
aand
nd
nd
ndnd CE
CE
CE
CECEN
N
N
NN-IO-R
-IO-R
-IO-R
-IO-R-IO-RY-2
Y-2
Y-2
Y-2Y-20
0
0
004
4
4
44 Only
Only
Only
OnlyOnly
1 Connector, 8-Pin (2003850)
Mou
Mou
Mou
MouMount
nt
nt
ntnt t
t
t
tthe
he
he
hehe Devi
Devi
Devi
DeviDevic
c
c
cce
e
e
ee
The extender can be mounted onto a flat surface or a standard DIN rail
using the included mounting bracket.
CA
CA
CA
CACAUTION
UTION
UTION
UTIONUTION:
:
:
::
To prevent overheating, do not operate the extender in an
area that exceeds the environmental temperature range (41 to 104°F
or 5 to 40°C) for this device.
Optional rack mount and pole mount kits (not included)are also available
for use with the extender. For more information, refer to the RMK-IFE-1U
Installation Guide (Doc. 7627) and the PLMK-IFE-101 Installation Guide
(Doc. 7615) at www.crestron.com/manuals.
De
De
De
DeDet
t
t
ttermi
ermi
ermi
ermiermine
ne
ne
nene a
a
a
aa Mo
Mo
Mo
MoMount
unt
unt
untunti
i
i
iing
ng
ng
ngng Lo
Lo
Lo
LoLoc
c
c
cca
a
a
aat
t
t
ttion
ion
ion
ionion
Mount the extender in a location that will provide optimum performance.
For more information, refer to the Best Practices for Installation and
Setup of Crestron RF Products Reference Guide (Doc. 6689) at
www.crestron.com/manuals.
1
1
1
11
C
C
C
CCEN-IO
EN-IO
EN-IO
EN-IOEN-IOSeri
Seri
Seri
SeriSeries
es
es
eses
QuickStart
W
W
W
WWi-
i-
i-
i-i-F
F
F
FFi
i
i
ii®
®
®
®® Net
Net
Net
NetNetwork
work
work
workwork I/
I/
I/
I/I/O
O
O
OO E
E
E
EEx
x
x
xxt
t
t
tte
e
e
eenders
nders
nders
ndersnders

S
S
S
SSurfa
urfa
urfa
urfaurfac
c
c
cce
e
e
eeM
M
M
MMou
ou
ou
ouount
nt
nt
ntnting
ing
ing
inging
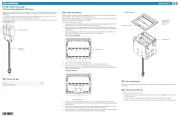
1. Attach the mounting bracket to the surface using four appropriate
mounting screws (not included) through the four mounting holes on
the bottom of the bracket.
2. Align the slots on the bottom of the extender with the tabs on the
mounting bracket.
3. Press the extender into the bracket until it snaps into place.
4. (Optional) Secure the extender to the bracket using the two included
6-32 3/8 in. screws as shown in the following illustration.
DINR
DINR
DINR
DINRDINRa
a
a
aai
i
i
iil
l
l
ll M
M
M
MMount
ount
ount
ountounti
i
i
iing
ng
ng
ngng
1. Pull the DIN rail release tab downward using a flat-head screwdriver.
2. Position the DIN rail mounting tabs (located on the rear of the
bracket) over the top edge of the DIN rail.
3. Push the DIN rail release tab upward to lock the mounting bracket
onto the rail.
4. Align the slots on the bottom of the extender with the tabs on the
mounting bracket.
5. Press the extender into the bracket until it snaps into place.
N
N
N
NNOTE:
OTE:
OTE:
OTE:OTE:
Do not use the included screws to secure the bracket to the
bottom of the extender when mounting into a DINrail, as it will then
not be possible to remove the extender from the DIN rail.
2
2
2
22
C
C
C
CCEN-IO
EN-IO
EN-IO
EN-IOEN-IOSerie
Serie
Serie
SerieSeries
s
s
ss
QuickStart
W
W
W
WWi
i
i
ii-Fi
-Fi
-Fi
-Fi-Fi®
®
®
®® N
N
N
NNe
e
e
eetwo
two
two
twotwork
rk
rk
rkrk I/
I/
I/
I/I/O
O
O
OO E
E
E
EEx
x
x
xxt
t
t
ttende
ende
ende
endeenders
rs
rs
rsrs

Connec
Connec
Connec
ConnecConnect
t
t
tt t
t
t
tthe
he
he
hehe Devi
Devi
Devi
DeviDevice
ce
ce
cece
Make all device connections as shown in the following illustrations.
CEN
CEN
CEN
CENCEN-I
-I
-I
-I-IO-CO
O-CO
O-CO
O-COO-COM-20
M-20
M-20
M-20M-202
2
2
22 Rear
Rear
Rear
RearRear Pa
Pa
Pa
PaPanel
nel
nel
nelnel C
C
C
CConn
onn
onn
onnonne
e
e
eect
ct
ct
ctction
ion
ion
ionions
s
s
ss
CEN
CEN
CEN
CENCEN-I
-I
-I
-I-IO-DIGIN
O-DIGIN
O-DIGIN
O-DIGINO-DIGIN-20
-20
-20
-20-204
4
4
44 Rear
Rear
Rear
RearRear Pa
Pa
Pa
PaPanel
nel
nel
nelnel C
C
C
CConn
onn
onn
onnonne
e
e
eect
ct
ct
ctction
ion
ion
ionions
s
s
ss
CEN
CEN
CEN
CENCEN-I
-I
-I
-I-IO-I
O-I
O-I
O-IO-IR-2
R-2
R-2
R-2R-20
0
0
004
4
4
44 R
R
R
RRe
e
e
eea
a
a
aar
r
r
rr Pa
Pa
Pa
PaPanel
nel
nel
nelnel Conn
Conn
Conn
ConnConne
e
e
eect
ct
ct
ctction
ion
ion
ionions
s
s
ss
3
3
3
33
C
C
C
CCEN-I
EN-I
EN-I
EN-IEN-IO
O
O
OOSeri
Seri
Seri
SeriSeries
es
es
eses
QuickStart
W
W
W
WWi
i
i
ii-Fi
-Fi
-Fi
-Fi-Fi®
®
®
®® N
N
N
NNe
e
e
eet
t
t
ttwor
wor
wor
worwork
k
k
kk I
I
I
II/O
/O
/O
/O/O Ex
Ex
Ex
ExExte
te
te
teten
n
n
nnd
d
d
dders
ers
ers
ersers
Product specificaties
| Merk: | Crestron |
| Categorie: | Niet gecategoriseerd |
| Model: | CEN-IO-RY-204 |
Heb je hulp nodig?
Als je hulp nodig hebt met Crestron CEN-IO-RY-204 stel dan hieronder een vraag en andere gebruikers zullen je antwoorden
Handleiding Niet gecategoriseerd Crestron

9 September 2025
9 September 2025
9 September 2025
9 September 2025
9 September 2025
9 September 2025
9 September 2025
8 September 2025
8 September 2025
8 September 2025
Handleiding Niet gecategoriseerd
- Amaran
- Benning
- Wehkamp
- Celestion
- REL Acoustics
- Mikavi
- RockShox
- Vasagle
- Maxview
- New Pol
- Bruynzeel
- Lifetime
- Digitus
- Cottons
- Sanli
Nieuwste handleidingen voor Niet gecategoriseerd
16 September 2025

16 September 2025
16 September 2025

16 September 2025
16 September 2025

16 September 2025
16 September 2025
16 September 2025

16 September 2025
16 September 2025